Mullvad VPN Guide
How to get up and running with Mullvad VPN paid for in Bitcoin
A VPN (“Virtual Private Network”) is a service that establishes a secure and encrypted connection between your phone or computer and a remote server managed by a VPN provider.
Technically, when connecting to a VPN, your internet traffic is redirected through an encrypted tunnel to the VPN server. This process makes it difficult for third parties, such as Internet Service Providers (ISPs) or malicious actors, to intercept or read your data. The VPN server then acts as an intermediary that connects to the service you wish to use on your behalf. It assigns a new IP address to your connection, which helps to hide your real IP address from the sites you visit. However, contrary to what some online advertisements may suggest, using a VPN does not allow you to browse the internet anonymously, as it requires a level of trust in the VPN provider who can see all your traffic.
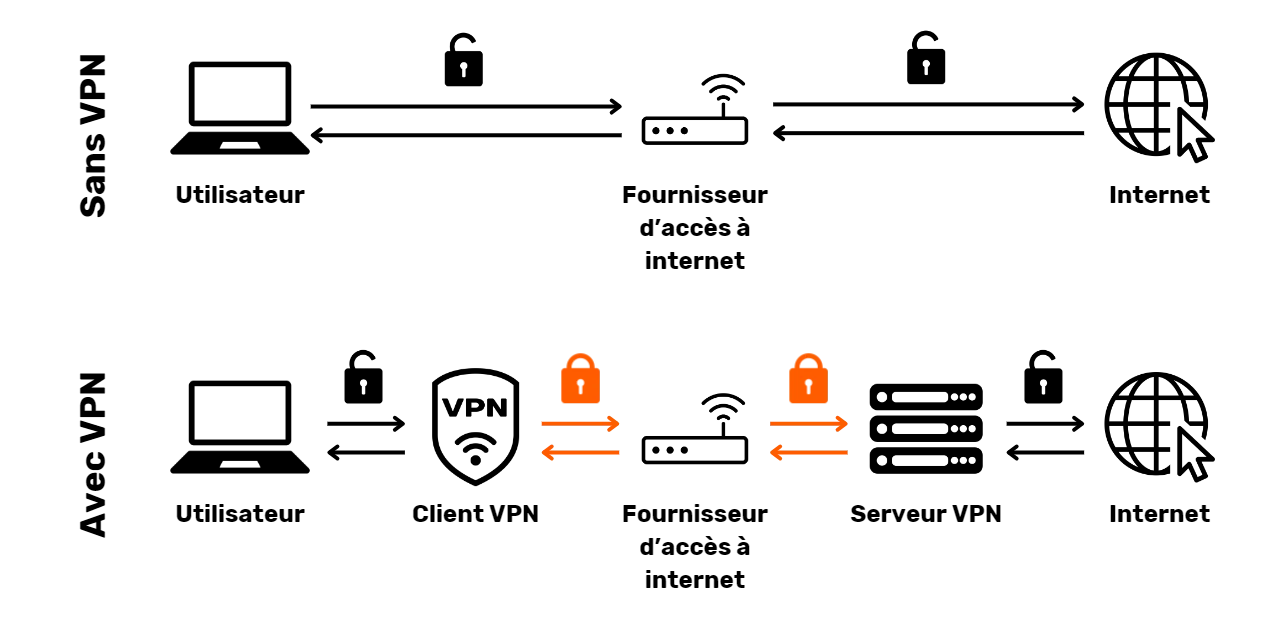
The benefits of using a VPN are numerous. Firstly, it preserves the privacy of your online activity from ISPs or governments, provided that the VPN provider does not share your information. Secondly, it secures your data, especially when you are connected to public Wi-Fi networks, which are vulnerable to MITM (“man-in-the-middle”) attacks. Thirdly, by hiding your IP address, a VPN allows you to bypass geographical restrictions and censorship, to access content that would otherwise be unavailable or blocked in your region.
As you can see, the VPN shifts the risk of traffic observation to the VPN provider. Therefore, when choosing your VPN provider, it is important to consider the personal data required for registration. If the provider asks for information such as your phone number, email address, bank card details, or worse, your postal address, the risk of associating your identity with your traffic increases. In the event of a compromise of the provider or a legal seizure, it would be easy to associate your traffic with your personal data. Therefore, it is recommended to choose a provider that does not require any personal information and accepts anonymous payments, such as with bitcoins.
In this tutorial, I will present a simple, efficient, reasonably priced VPN solution that requires no personal information for its use.
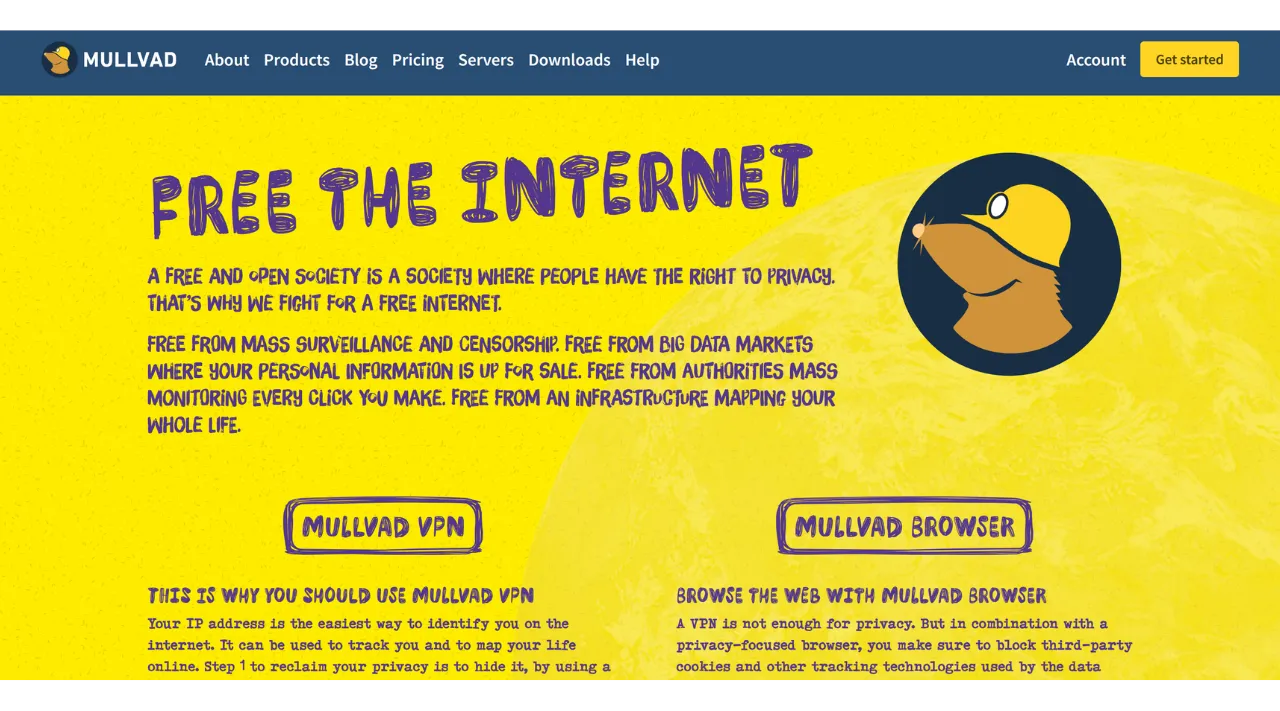
Introduction to Mullvad VPN
Mullvad VPN is a Swedish service that stands out for its commitment to user privacy. Unlike mainstream VPN providers, Mullvad requires no personal data at sign-up. There’s no need to provide an email address, phone number, or name; instead, Mullvad assigns you an anonymous account number used for payment and accessing the service. Additionally, Mullvad claims to keep no activity logs that pass through their servers.
For payment, it’s not necessarily required to provide credit card information, as Mullvad accepts bitcoin payments (onchain and lightning). They also accept cash payments through the mail.
Mullvad VPN also distinguishes itself through its transparency and security. Their software is open-source, and they regularly undergo independent security audits to assess their applications and infrastructure, the results of which are published on their website. The company behind Mullvad is based in Sweden, a country known for its strict privacy laws. They exclusively use self-hosted servers, thereby eliminating the risks associated with using third-party cloud services, such as hyperscalers AWS, Google Cloud, or Microsoft Azure.
In terms of features, Mullvad offers everything one expects from a good VPN client, including a kill switch that protects your traffic if the VPN disconnects, an option to disable the VPN for specific applications, and the ability to route your traffic through multiple VPN servers.
Naturally, this quality of service comes at a cost, but a fair price is often an indicator of quality and honesty. It can signal that the company has a business model without needing to sell your personal data to third parties. Mullvad VPN offers a flat rate of 5 euros per month, usable on up to 5 different devices.
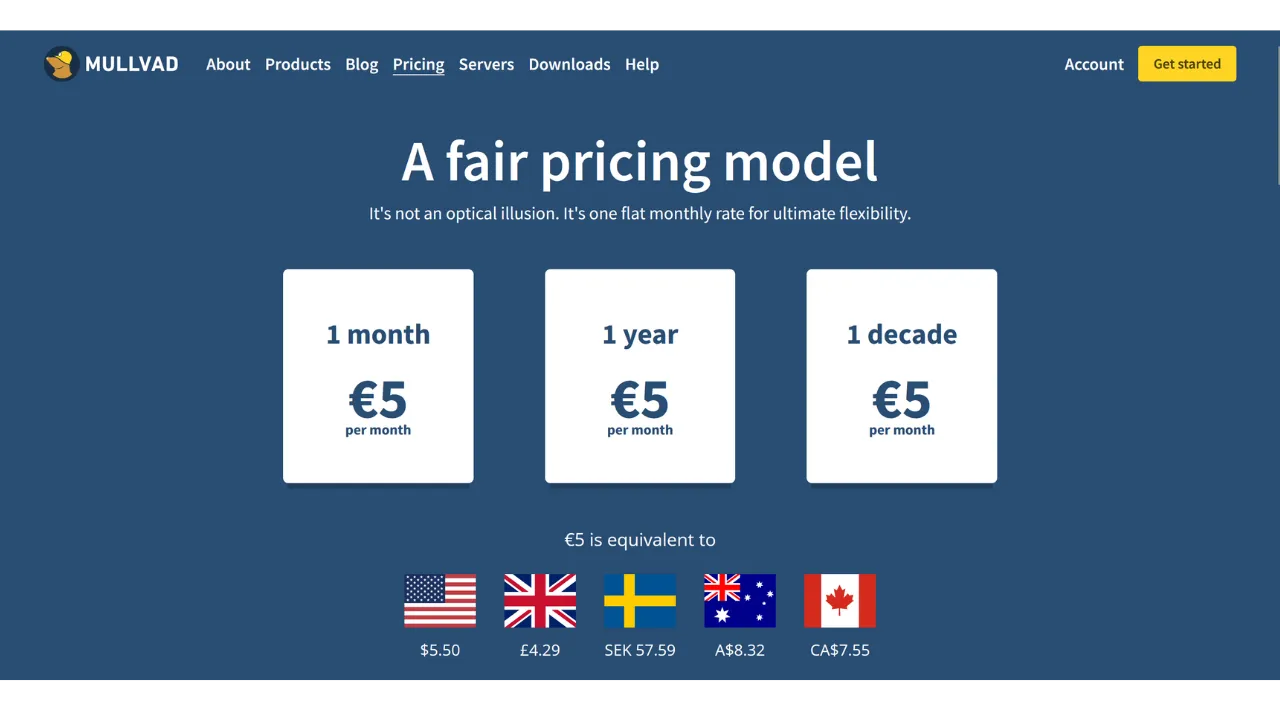
Unlike mainstream VPN providers, Mullvad has a model of purchasing access time to the service rather than a recurring, automatic subscription. You simply make a one-time payment in bitcoins for the chosen duration. For example, if you buy one year of access, you can use the service for that period, after which you must return to Mullvad’s website to renew your access time.
Compared to IVPN, another high-quality VPN provider, Mullvad is slightly more economical. For instance, even when opting for a three-year purchase with IVPN, the monthly cost amounts to about €5.40. However, IVPN does offer some additional services and also has a cheaper plan than Mullvad’s (the Standard plan), but this is limited to only 2 devices and excludes the “multi-hop” protocol.
I also conducted some informal speed tests to compare IVPN and Mullvad. Although IVPN showed a slight superiority in terms of performance, the speeds at Mullvad were still very satisfactory. Compared to mainstream VPN providers, IVPN and Mullvad proved to be at least as efficient, if not superior in some cases.
How to install Mullvad VPN on a computer?
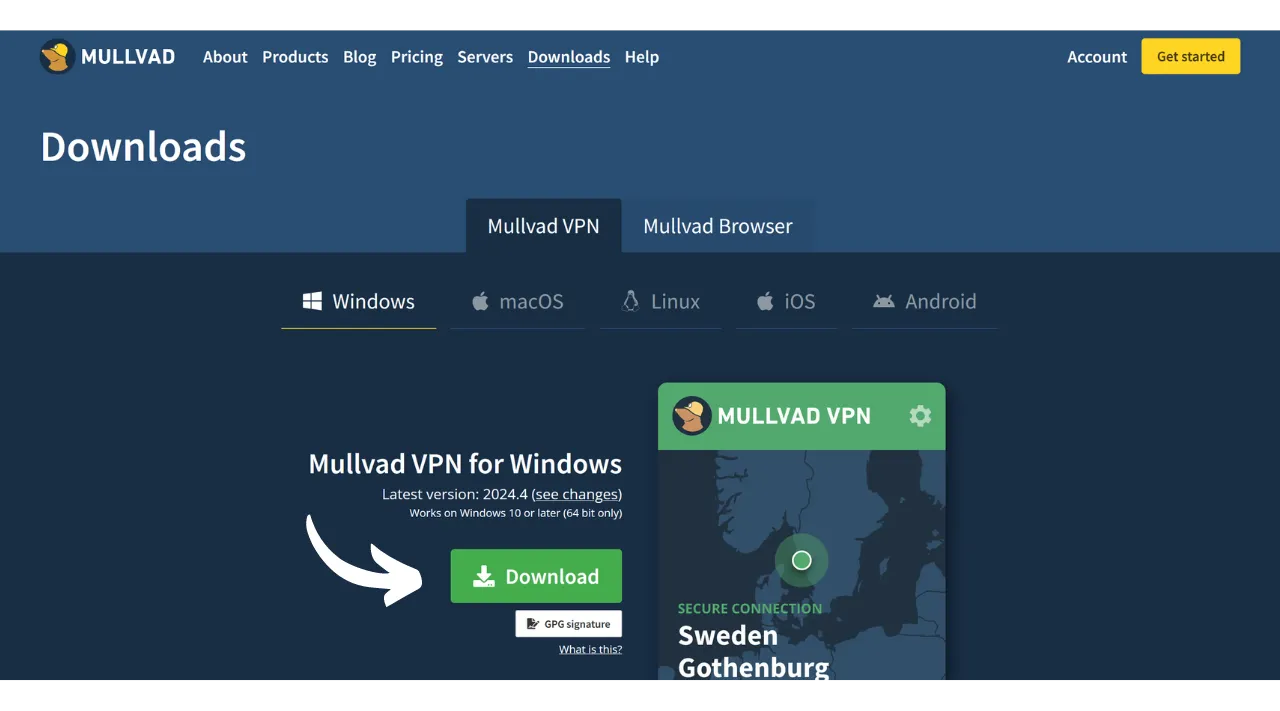
Visit the official Mullvad website and click on the “Downloads” menu.
For Windows or macOS users, download the software directly from the site and follow the instructions provided by the setup wizard to complete the installation.
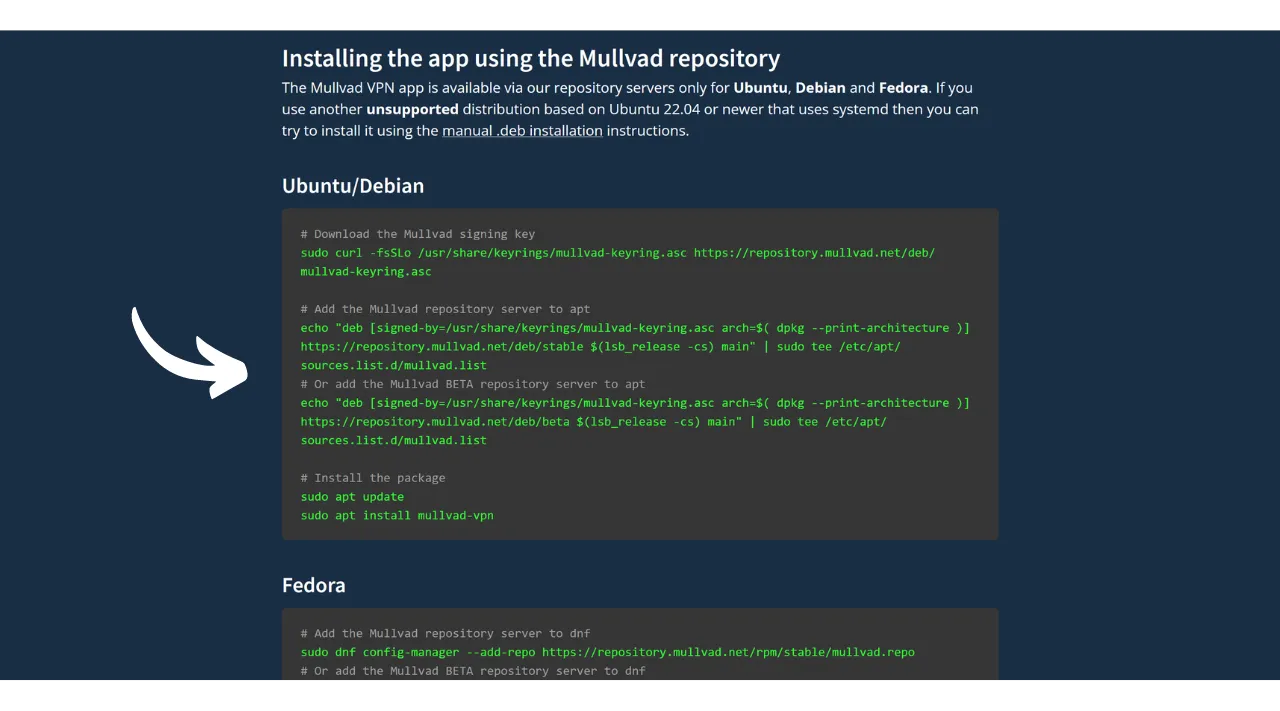
For Linux users, you can find the instructions specific to your distribution in the “Linux” section.
Once the installation is complete, you will need to enter your account ID. We will see how to obtain this in the following sections of this tutorial.
How to install Mullvad VPN on a smartphone?
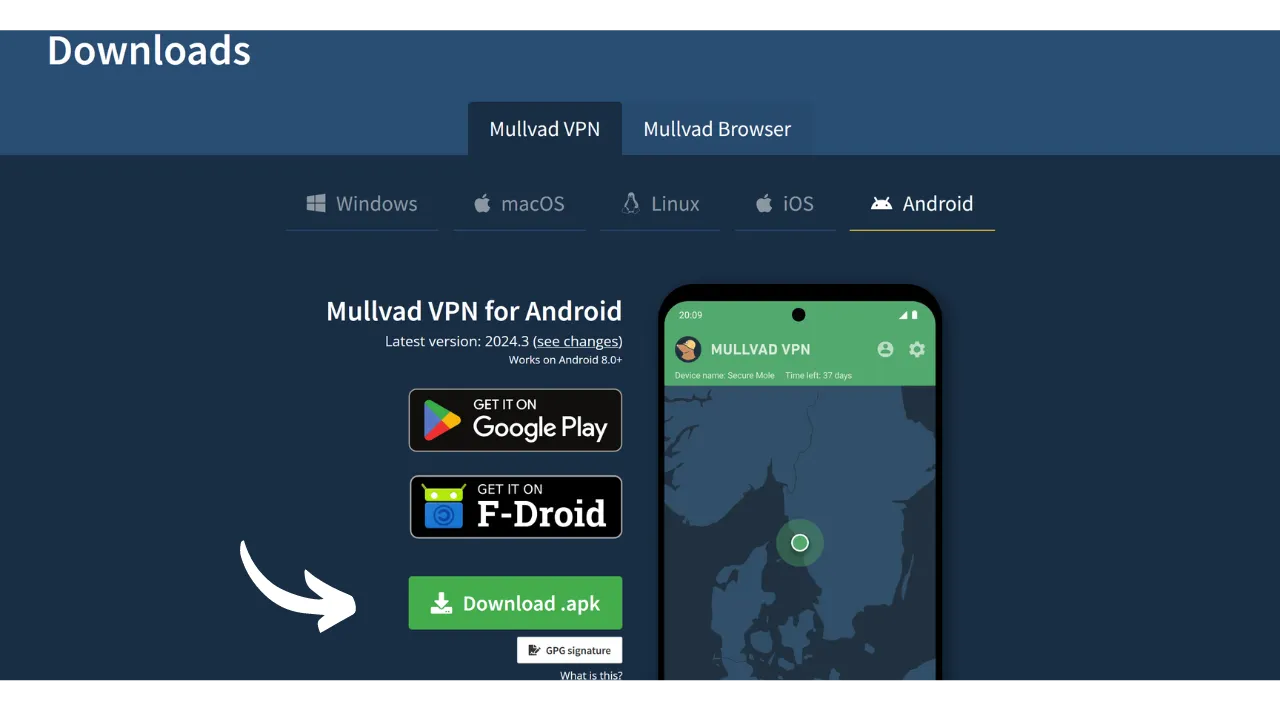
Download Mullvad VPN from your app store, whether it’s the AppStore for iOS users, the Google Play Store for Android, or F-Droid. If you are using Android, you also have the option to download the .apk file directly from the Mullvad site.
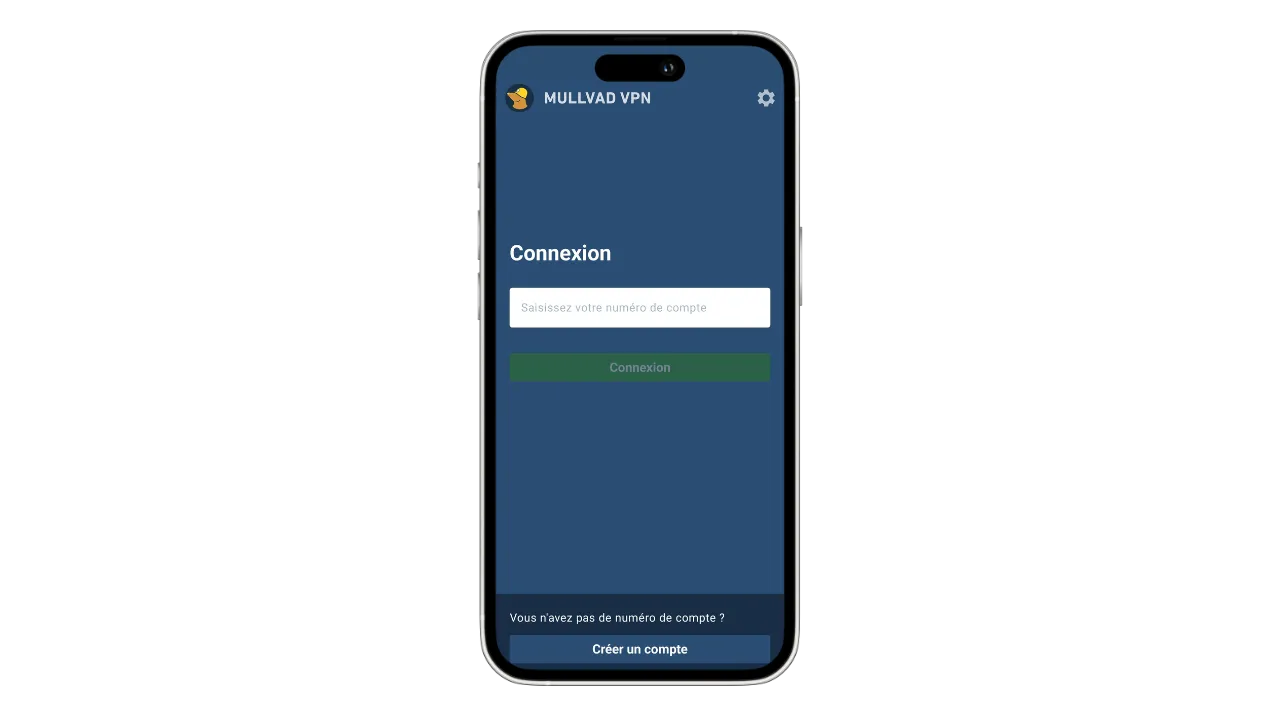
Upon first use of the app, you will be logged out. You will need to enter your account ID to activate the service.
Now, let’s move on to activating Mullvad on your devices.
How to pay for and activate Mullvad VPN?
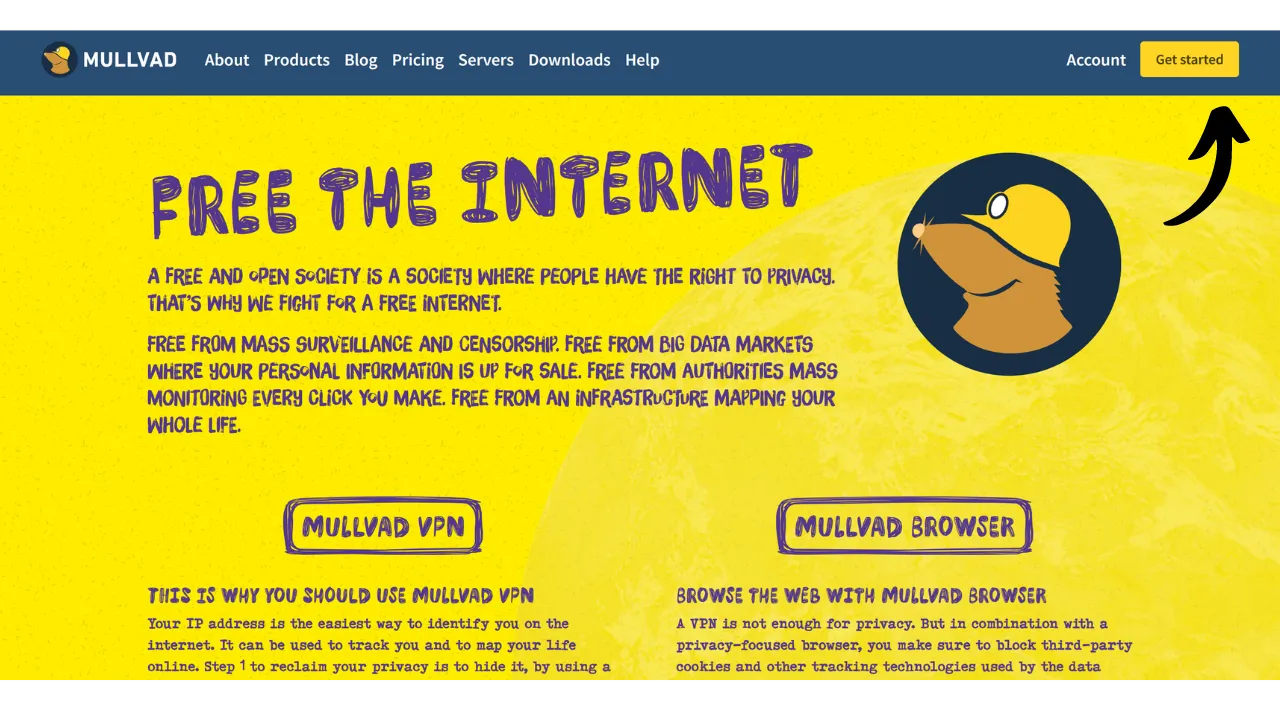
Go to the official Mullvad website and click on the “Get Started” button.
Click on the “Generate account number” button.

Mullvad will then create your account. You do not need to provide any personal information. It is only your account number that will allow you to log in. It acts somewhat like an access key. Save it in a safe place like your password manager, for example. You can also make a paper copy.
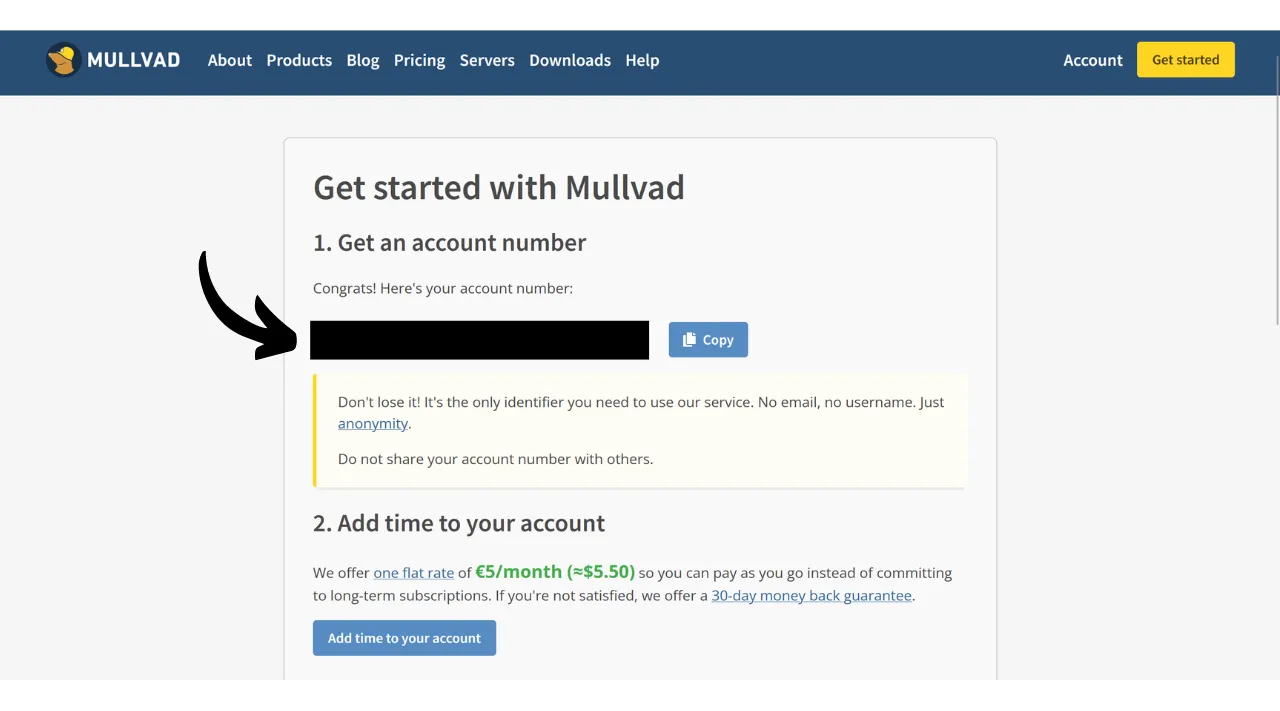
Then click on the “Add time to your account” button.
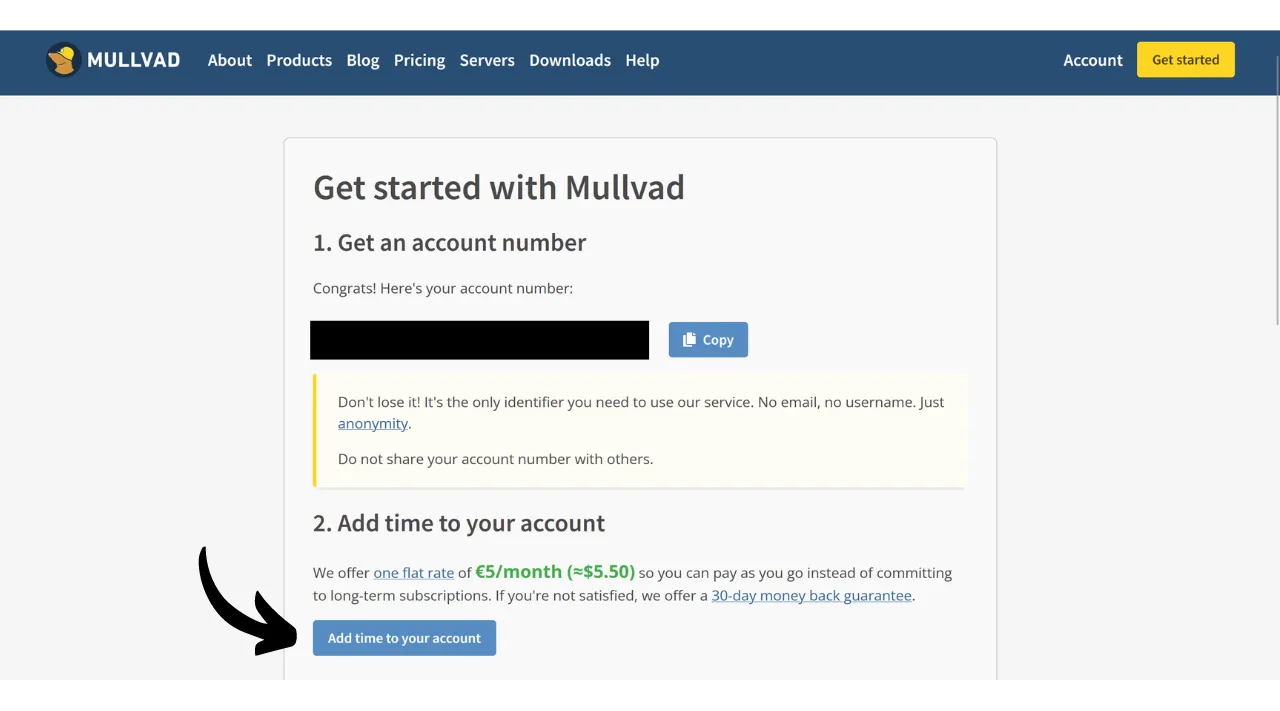
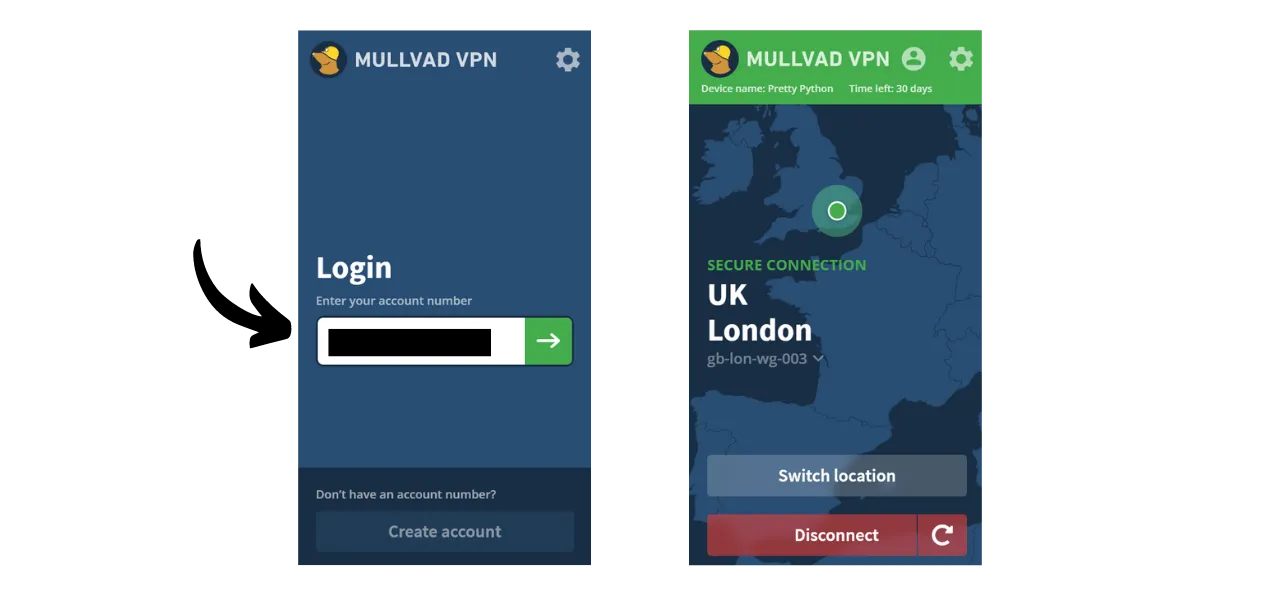
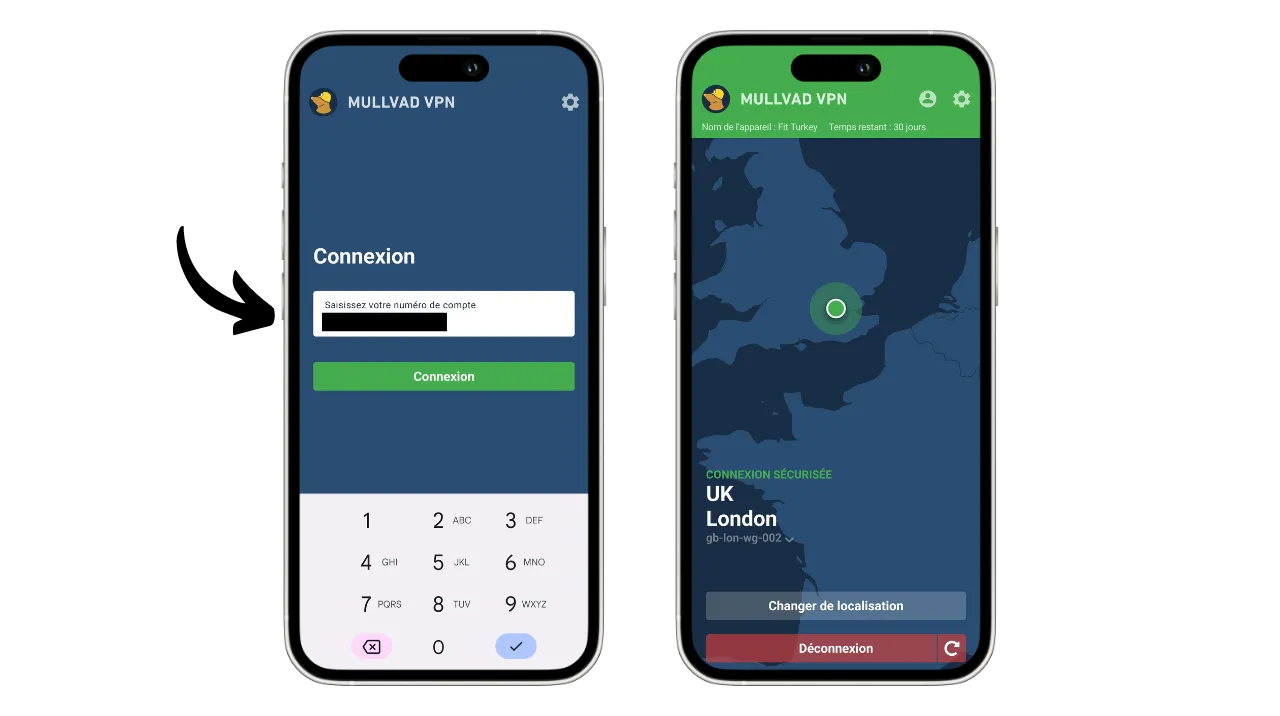
You will then arrive at the login page for your account. Enter your account number and then click on the “Log in” button.

Choose your payment method. I recommend paying in bitcoins, as you will benefit from a 10% discount, which brings the cost down to €4.50 per month.
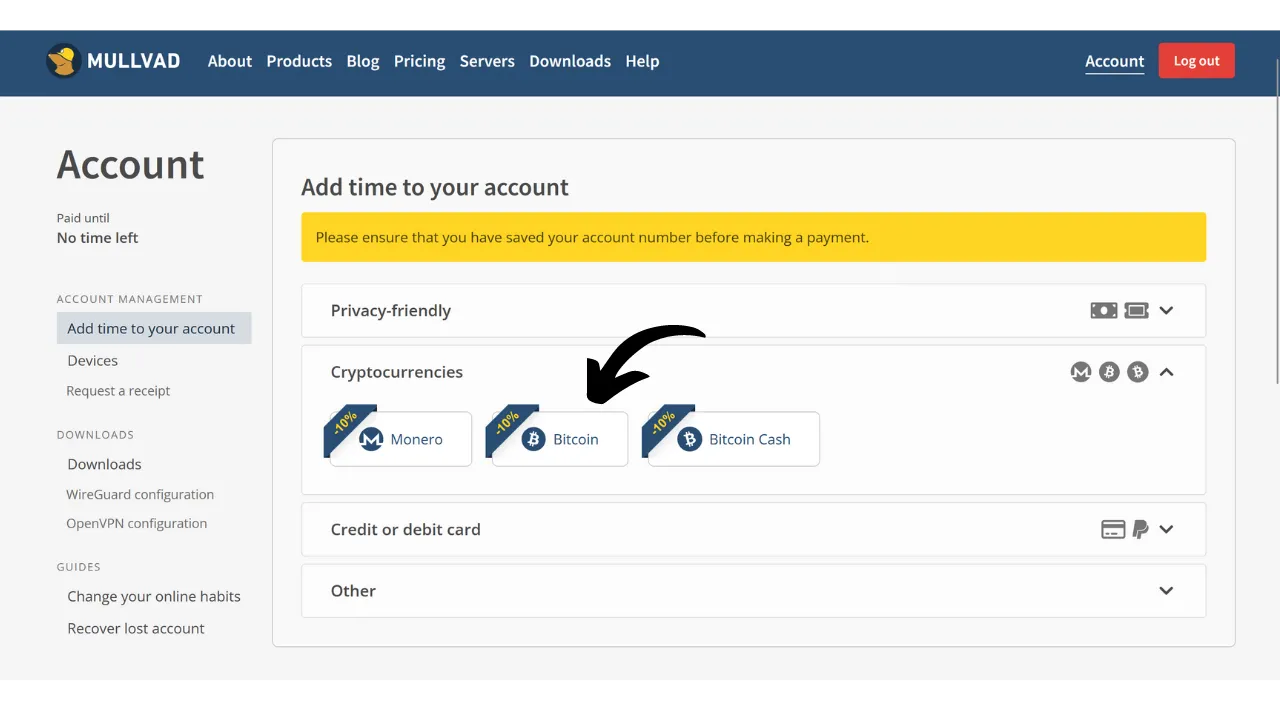
Click on the “Create a one-time payment address” button.
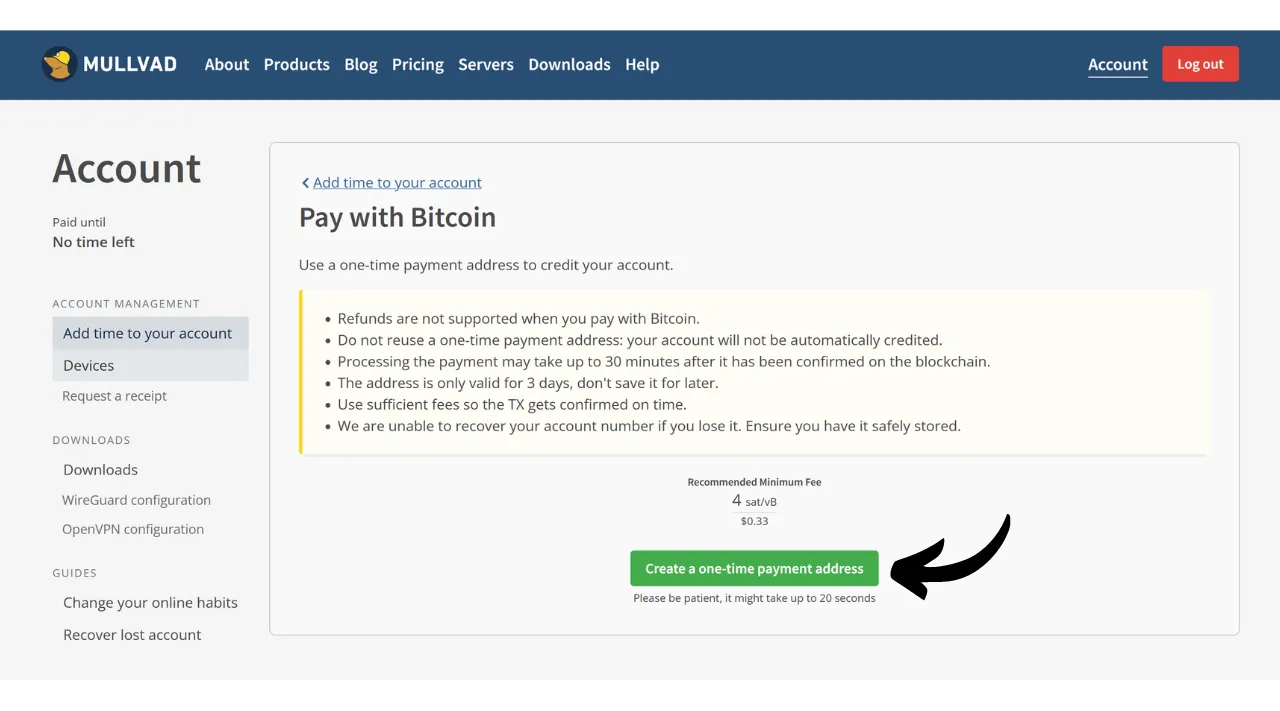
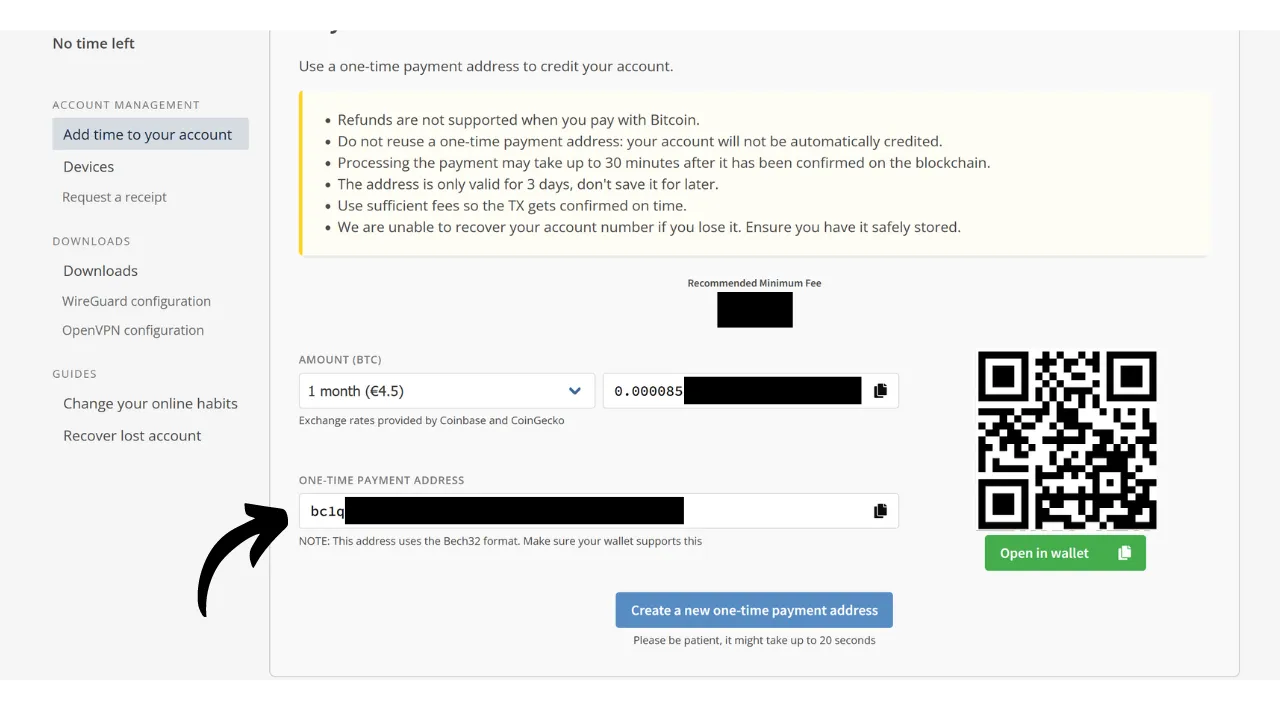
Then pay with your Bitcoin wallet the amount indicated to the receiving address given to you.
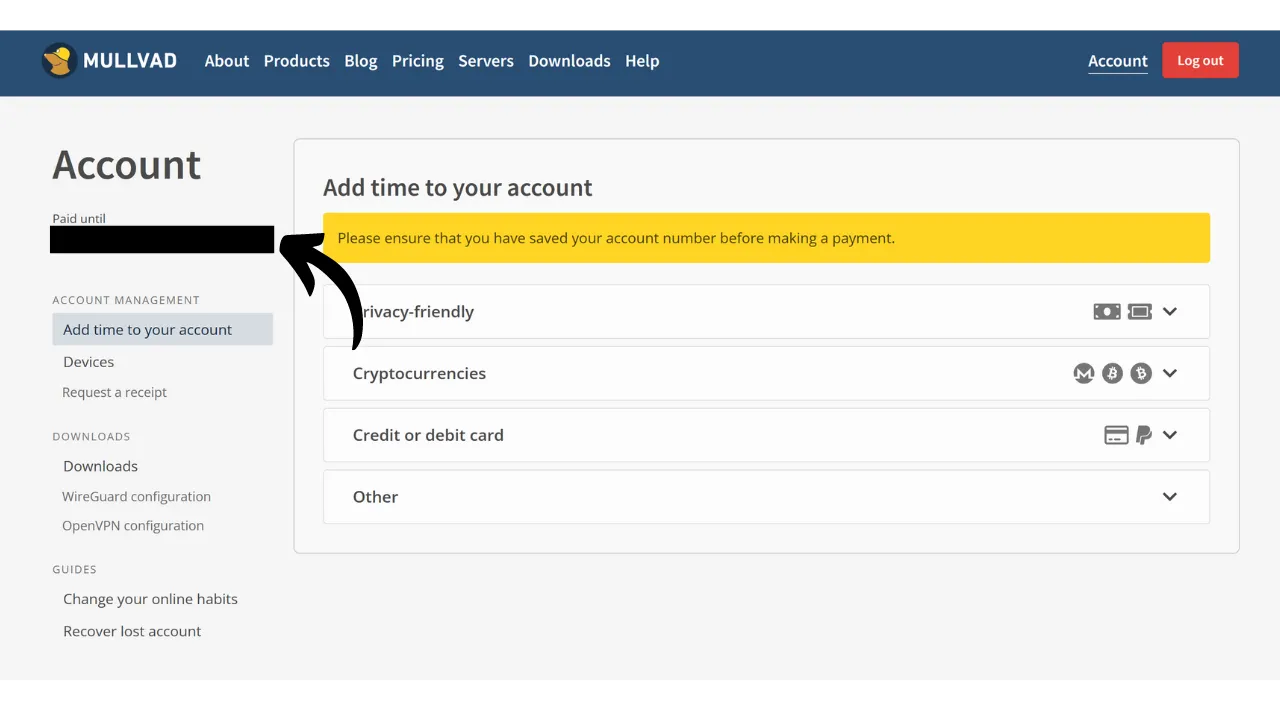
It may take a few minutes before the site detects your payment, once the transaction is confirmed. Once the payment is detected by Mullvad, the duration of your subscription will appear at the top left of the page, instead of the mention “No time left”.
You can then enter your account number on the software to activate the VPN.
To activate the VPN on your mobile application, the process is exactly the same. You just need to enter your account number.
How to use and configure Mullvad VPN?
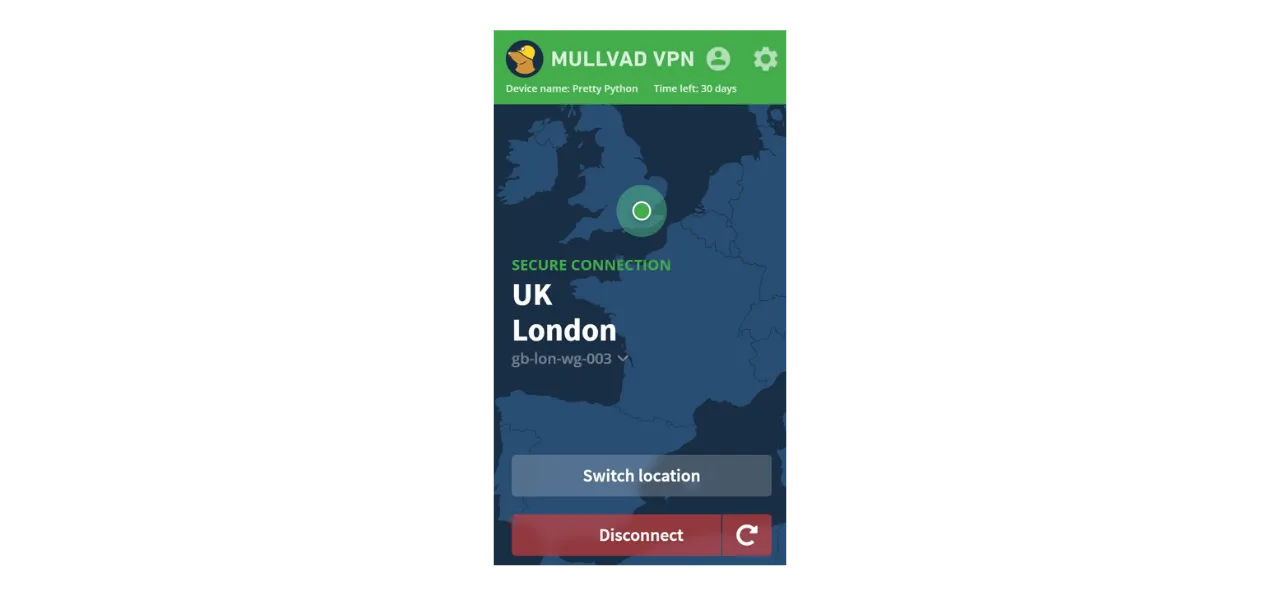
Now that you have an active account and have entered your account number in the Mullvad software or app, you can fully enjoy the services of your VPN.
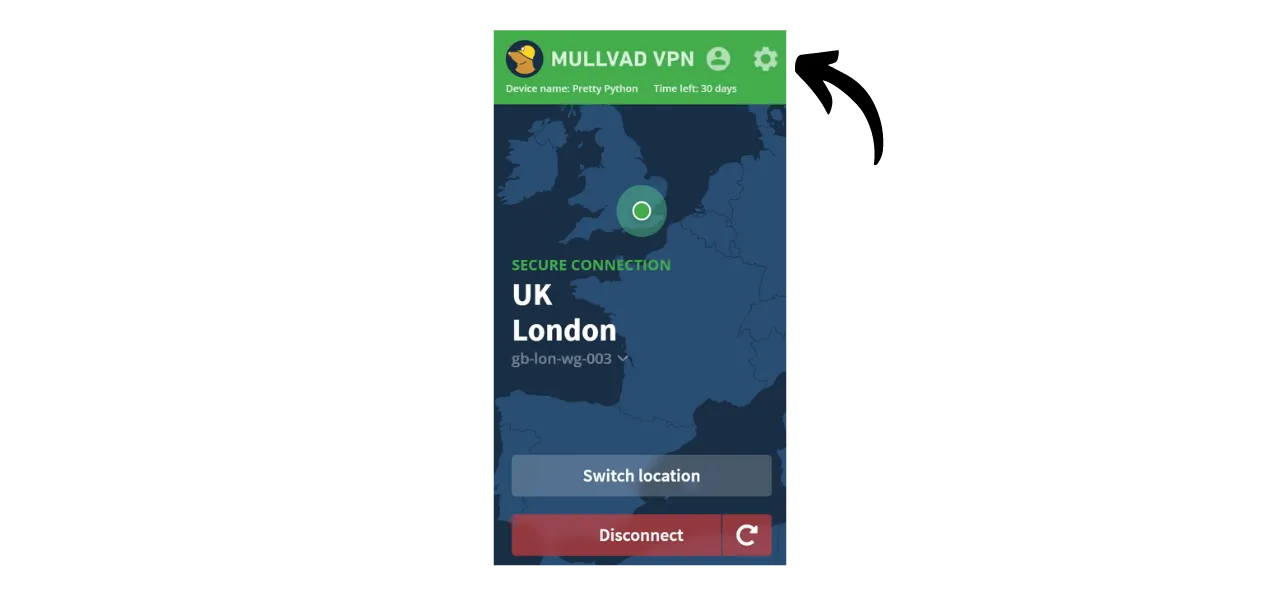
To disconnect from the VPN, simply click on the “Disconnect” button.
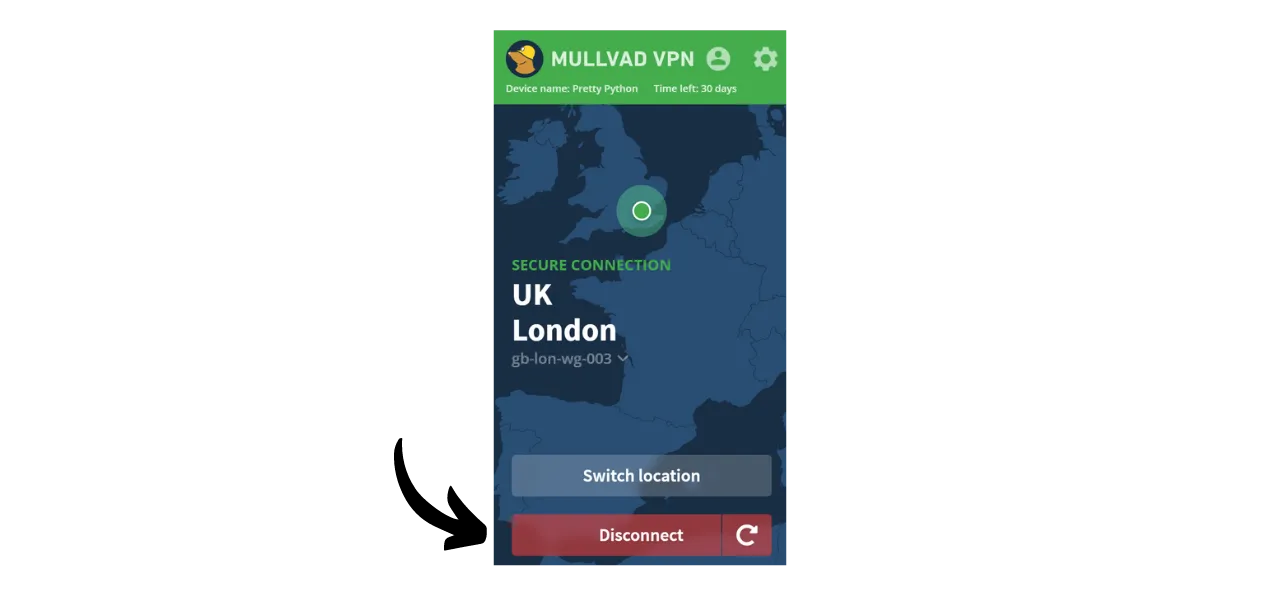
The small red arrow next to the “Disconnect” button allows you to change servers without changing the current location.
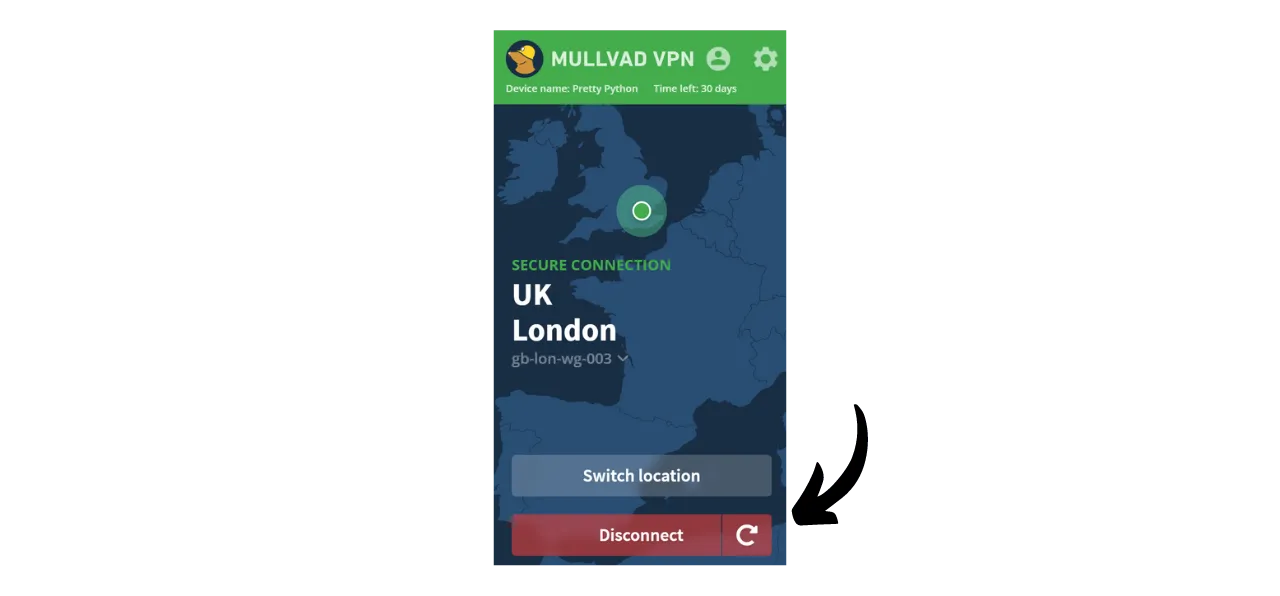
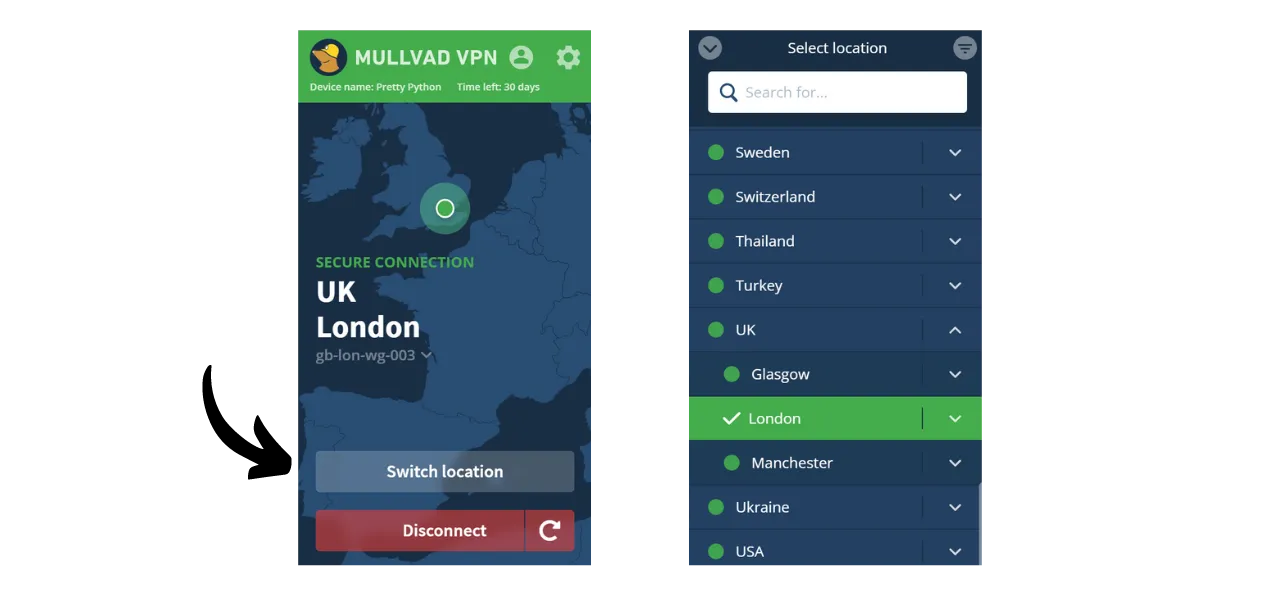
If you want to change cities for your VPN server, click on “Switch location” to choose a new location.
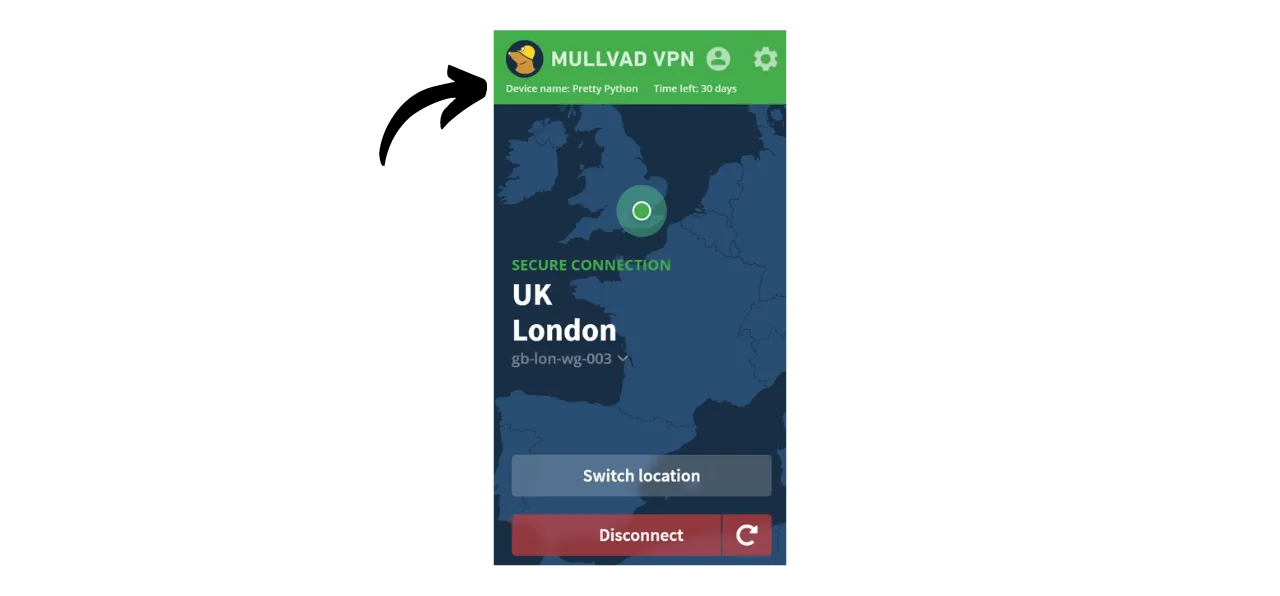
At the top of the screen, you will see your device’s nickname as well as the remaining duration of your package.
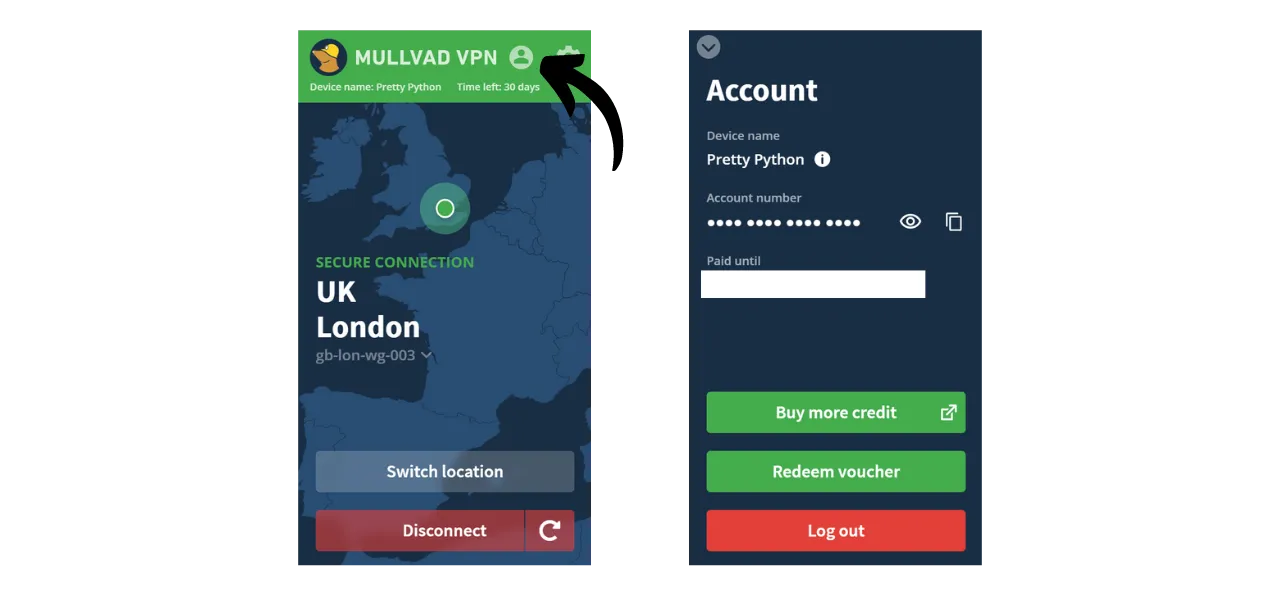
By clicking on the icon of the little man, you will access detailed information about your account.
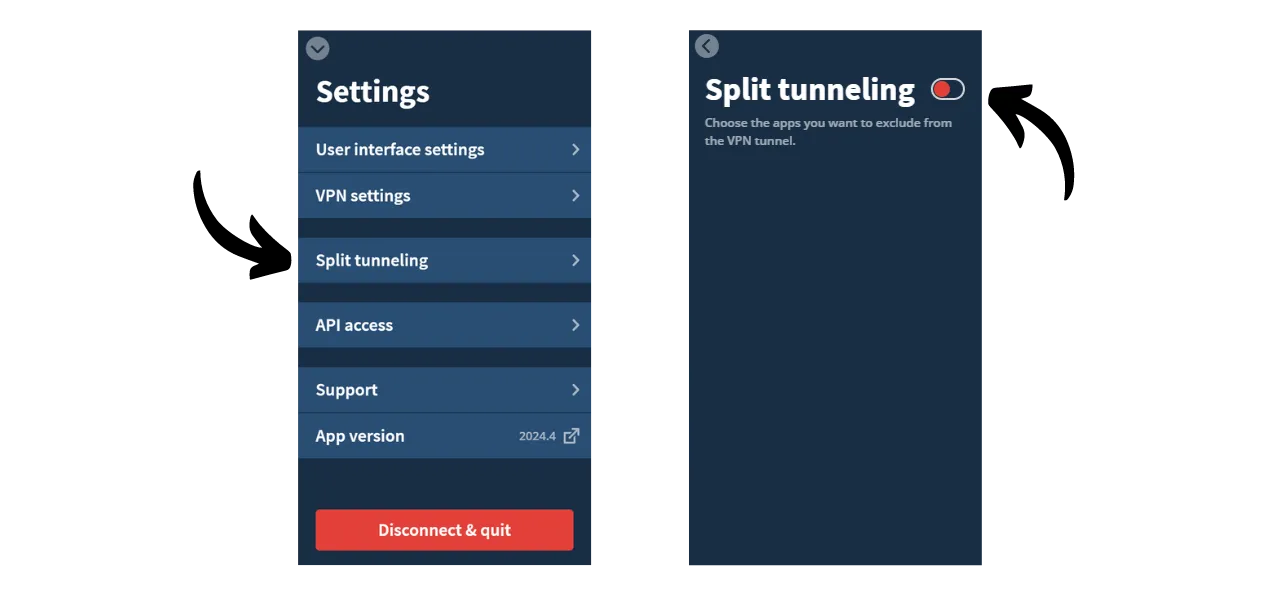
To access settings, click on the gear wheel.
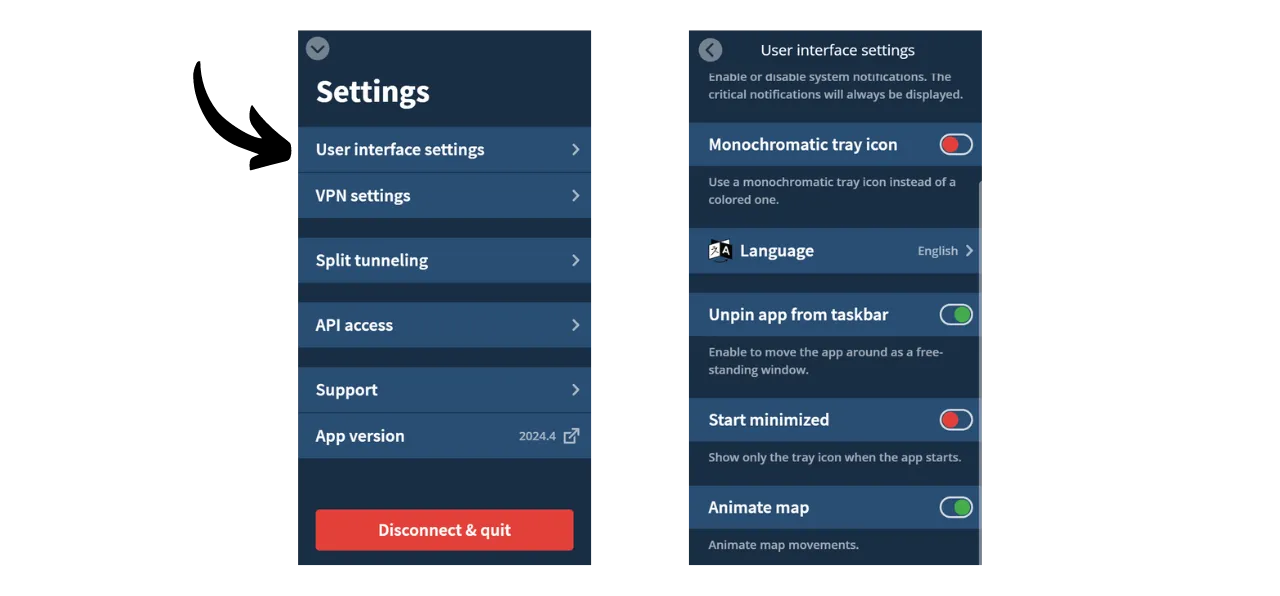
In the “User interface settings” menu, you can customize the settings of your software, including the interface language and its behavior on your system.
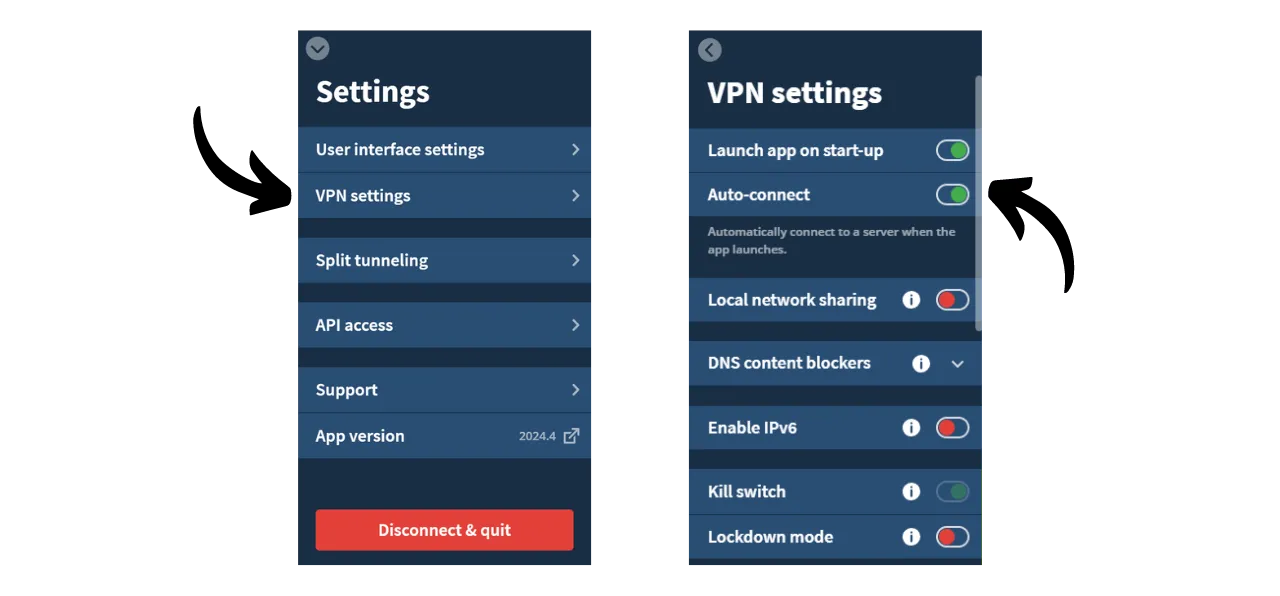
In the “VPN settings” menu, you will find options related to your VPN. I recommend enabling the “Launch app on start-up” and “Auto-connect” options so that your VPN connection automatically launches when your machine starts.
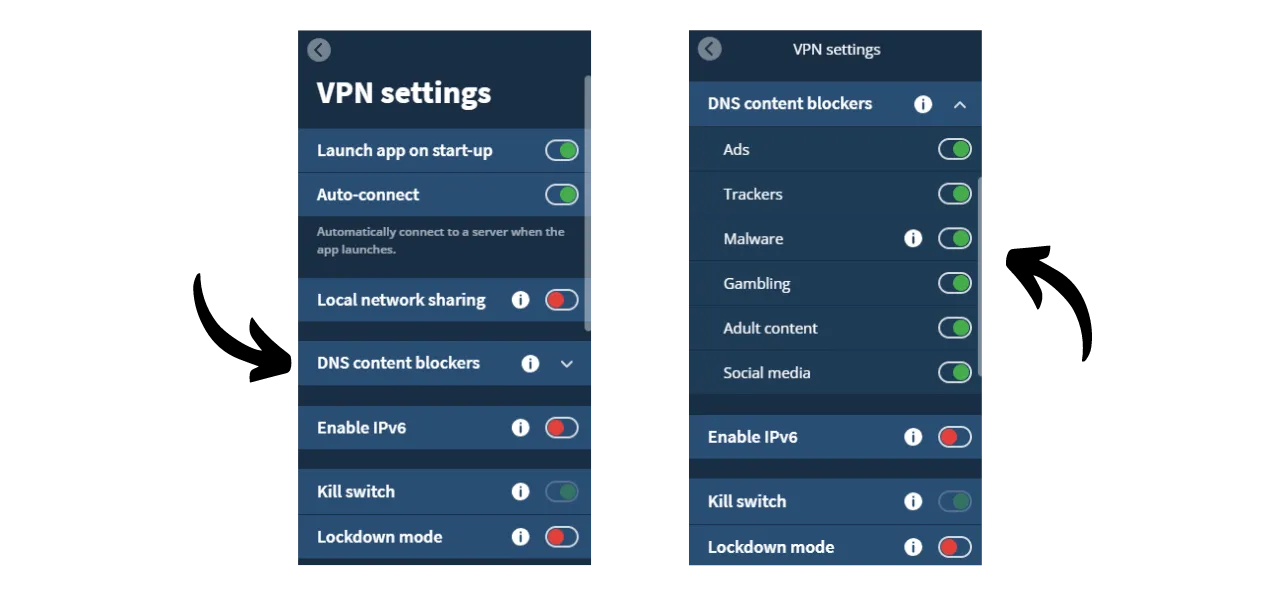
In the “DNS content blockers” submenu, you have the option to filter and block DNS requests to malicious, advertising, or unwanted websites.
Finally, the “Split tunneling” menu allows you to select specific applications on your machine for which internet traffic will not be routed through the VPN.
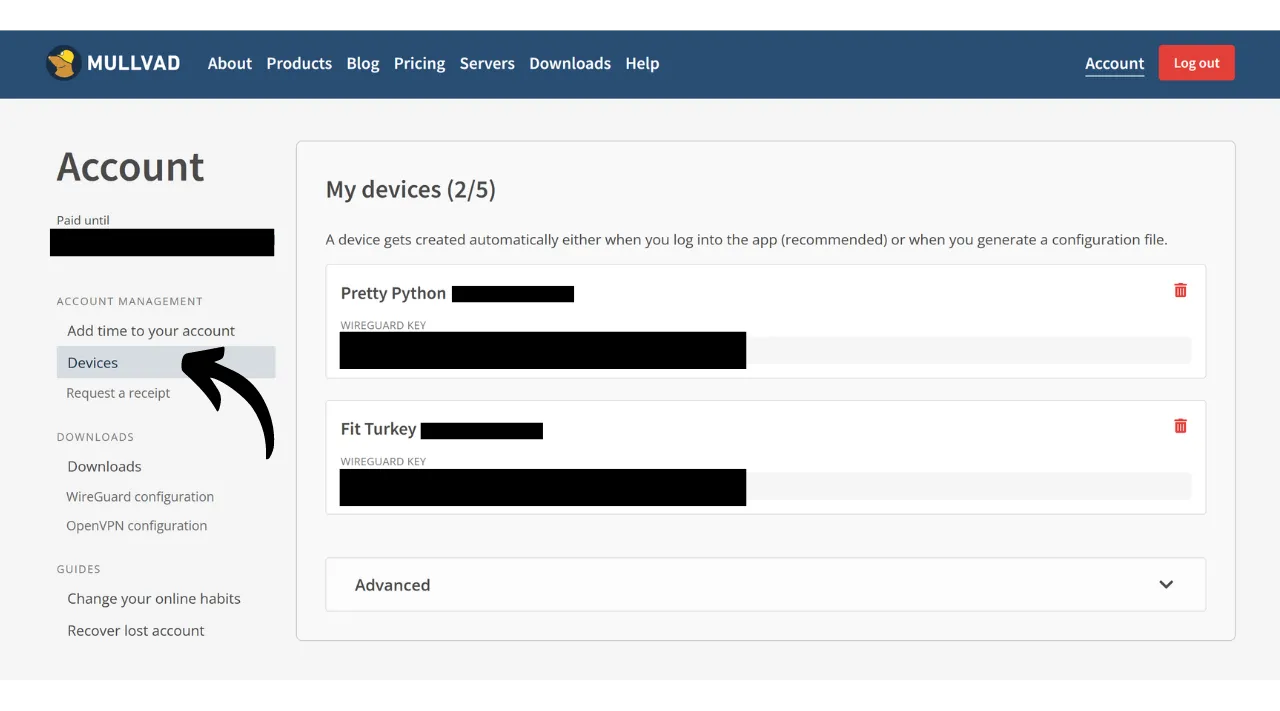
To get an overview of your Mullvad account and manage the various connected devices, you can click on the “Devices” menu on the website.
And there you have it, you are now equipped to fully enjoy Mullvad VPN.