Sparrow Wallet Guide
How to install, configure and use Sparrow Wallet

Sparrow Wallet is a self-custody Bitcoin wallet management software developed by Craig Raw. This open-source software is appreciated by bitcoiners for its many features and intuitive Interface.
There are two ways to use Sparrow:
- Like a hot wallet, where your private keys are stored on your PC.
- As a cold wallet manager, where private keys are held on a Hardware Wallet. In this mode, Sparrow only manipulates public wallet information, tracks funds, generates addresses, and builds transactions, but the Hardware Wallet signature is required to make these transactions valid. It can therefore replace applications such as Ledger Live or Trezor Suite.
Sparrow supports single-signature and multi-signature wallets, and enables fluid management of multiple wallets. For example, you can simultaneously control one wallet connected to a Ledger, another to a Trezor, and also have a hot wallet.
The software also offers advanced coin control features, allowing you to choose precisely which UTXOs to use in your transactions to optimize your confidentiality.
In terms of connection, Sparrow lets you connect to your own Bitcoin node, either remotely via an Electrum Server, or with Bitcoin Core. It’s also possible to use a public node if you don’t yet have your own. Remote connections are made via Tor.
Install Sparrow Wallet
Go to the official Sparrow Wallet download page and choose the software version that corresponds to your operating system.
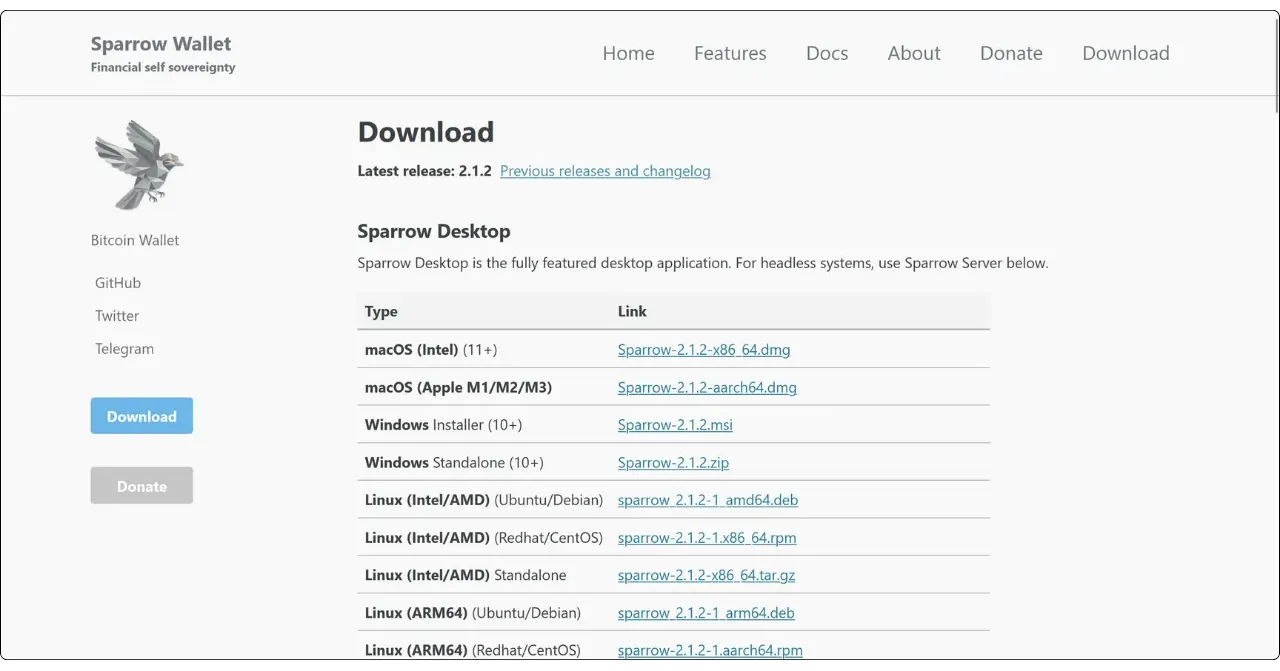
Download only from official release pages and verify signature and hash before installing to reduce supply‑chain and tampering risks.
Once Sparrow has been installed, you can skip the initial explanatory screens and go straight to the connection management screen.
Connecting to the Bitcoin network
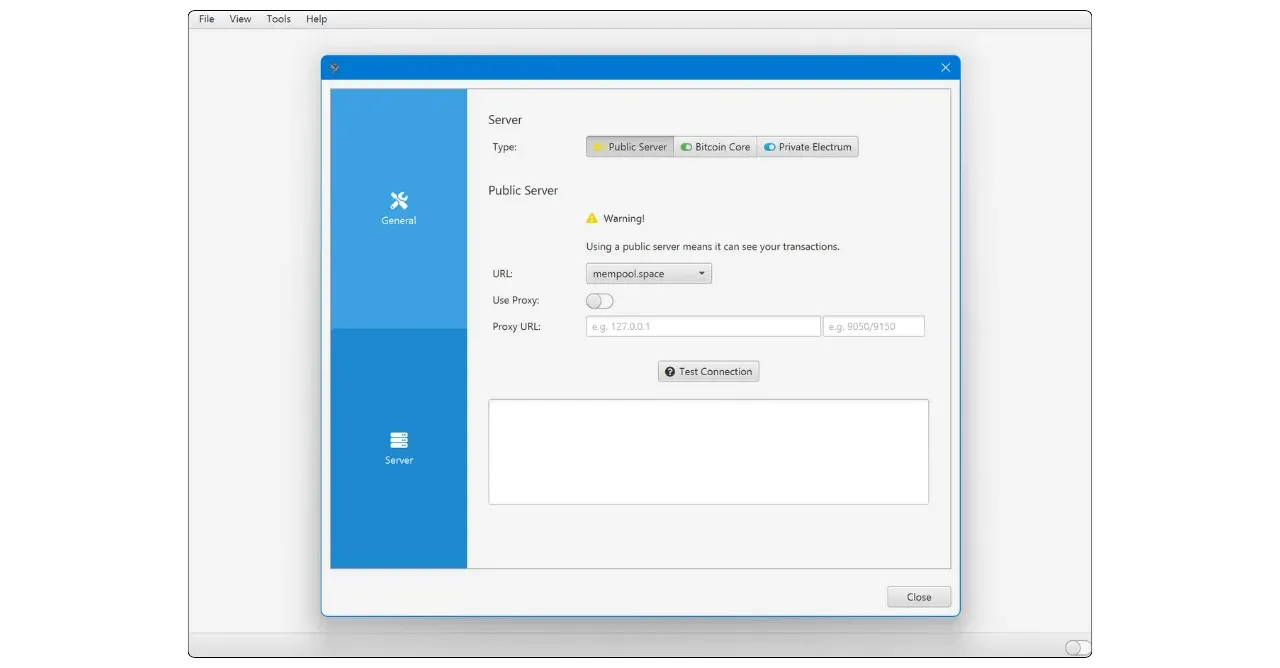
To interact with the Bitcoin network and broadcast your transactions, Sparrow must be connected to a Bitcoin node. There are three main ways to establish this connection:
- 🟡 Using a public node, i.e. connecting to a third-party node that allows such connections. If you don’t have your own Bitcoin node, this option lets you get started with Sparrow quickly. However, the node you connect to will see all your transactions, which could compromise your confidentiality. Having control over your keys is essential, but having your own node is even better. So use this option only if you’re just starting out, while being aware of the risks to your privacy.
- 🟢 Connecting to a Bitcoin Core node. If you have your own Bitcoin Core node, you can connect it to Sparrow Wallet, either locally if Bitcoin Core is installed on the same machine, or remotely.
- 🔵 Connection via an Electrum server. If your Bitcoin node is equipped with Electrs, as is the case with node-in-a-box solutions such as Umbrel or Start9, you can connect to it remotely from Sparrow.
It is preferable to use a connection via Electrs or Bitcoin Core on your own node to reduce the need to trust a third party and optimize your confidentiality
Public nodes learn your wallet activity and reduce privacy. Prefer your own Bitcoin Core or Electrum server, ideally over Tor.
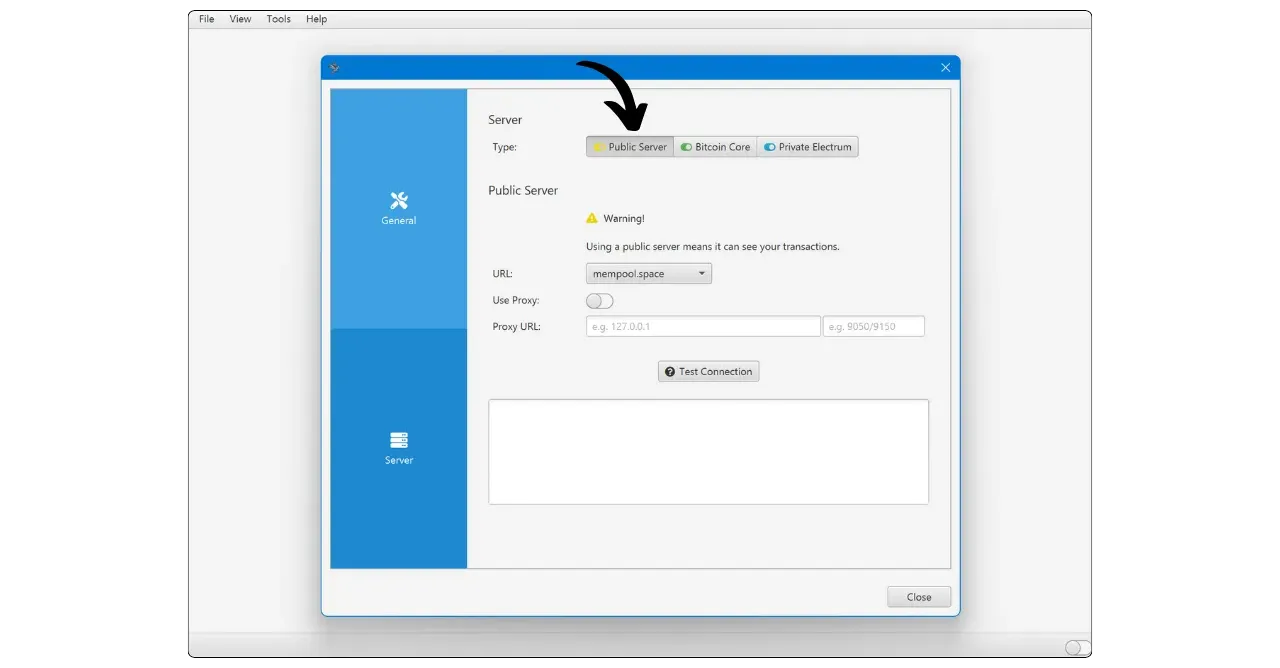
Connect to a public node 🟡
Connecting to a public node is very simple. Click on the “Public Server” tab.
Select a node from the drop-down list.
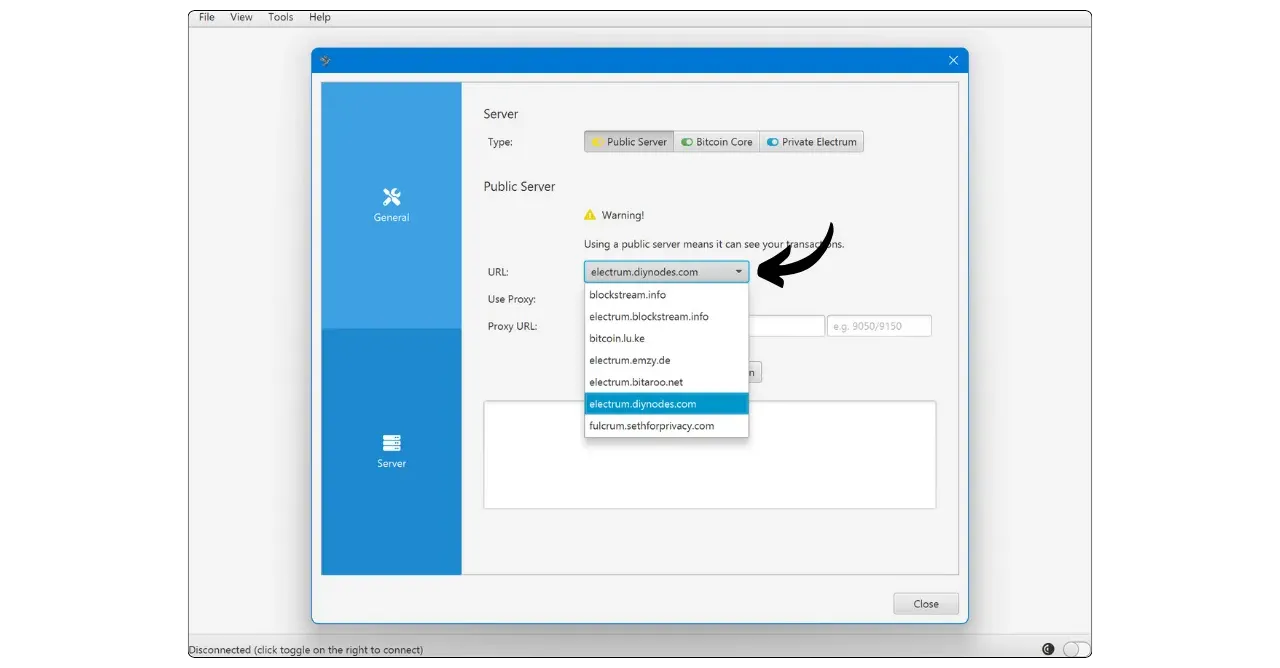
Then click on “Test Connection”.
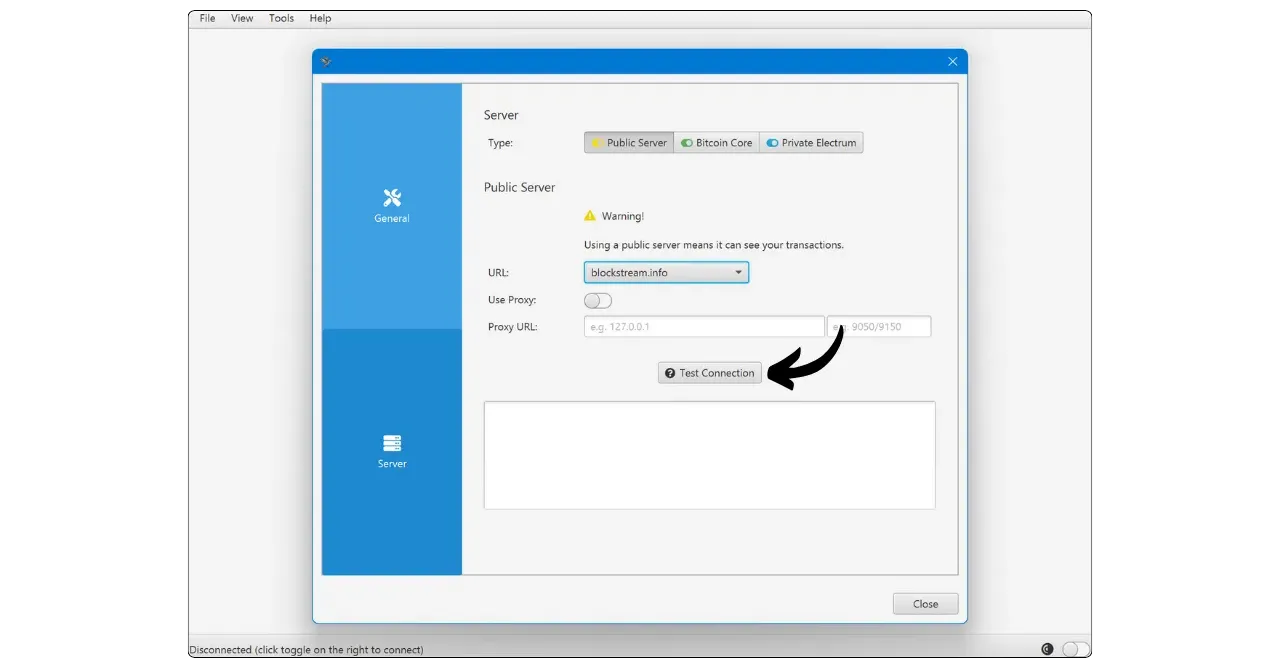
Once connected, Sparrow Wallet will display a yellow tick in the bottom right-hand corner of Interface to indicate that you are connected to a public node.

Connecting to a Bitcoin Core 🟢
The second method of connecting to a Bitcoin node is to link Sparrow to a Bitcoin Core. If Bitcoin Core is installed on the same machine, authentication will be via the cookie file. If Bitcoin Core is on a remote machine, you’ll need to use the password defined in the Bitcoin.conf file.
Please note that if you use a pruned Bitcoin Core node, you won’t be able to restore a wallet containing transactions predating the locally stored blocks. However, for a new wallet created on Sparrow, this won’t be a problem: your new transactions will be visible, even with a pruned node.
Pruned nodes cannot rescan beyond pruned blocks. Restoring old wallets may fail; use an unpruned node for full history.
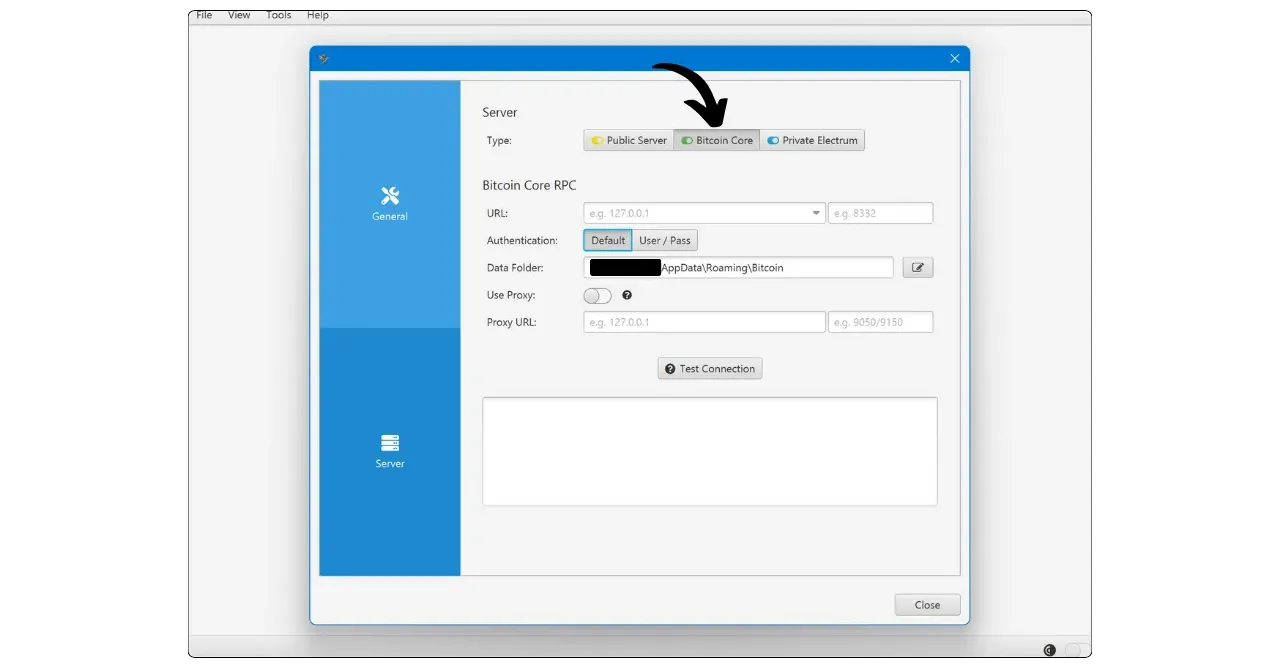
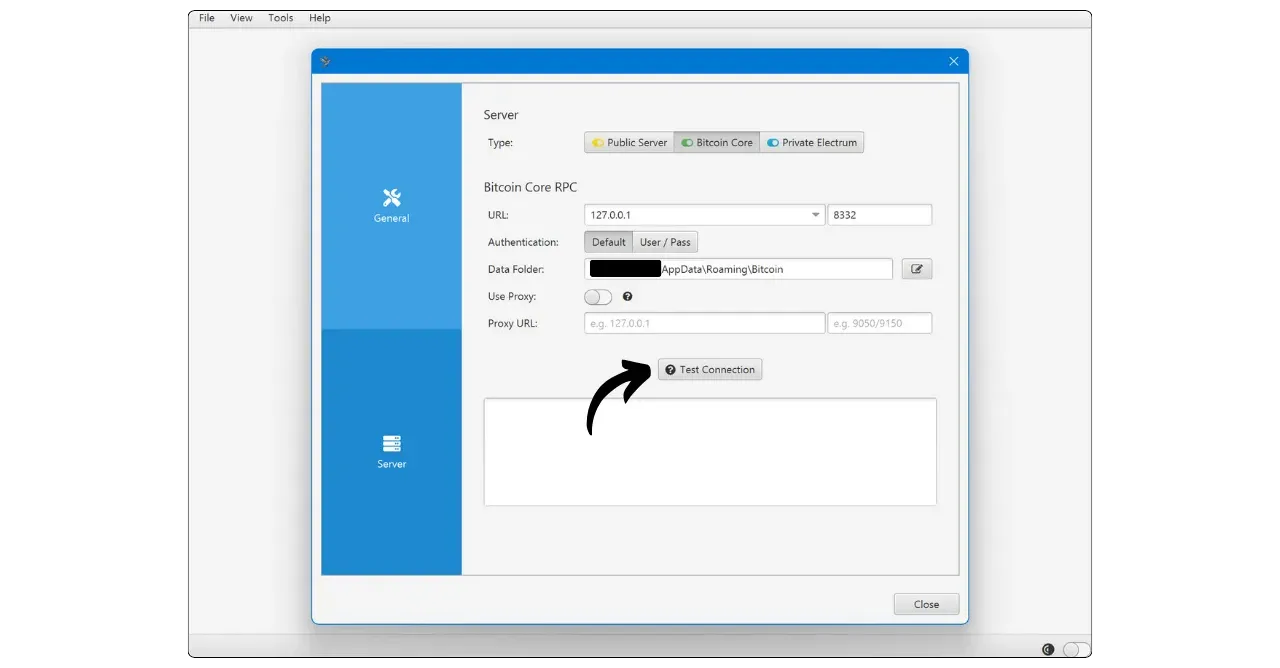
On Sparrow, go to the “Bitcoin Core” tab.
With Bitcoin Core local:
If Bitcoin Core is installed on your computer, locate the Bitcoin.conf file among the software files. If this file does not exist, you can create it. Open it with a text editor and insert the following line:
1
server=1
Then save your changes.
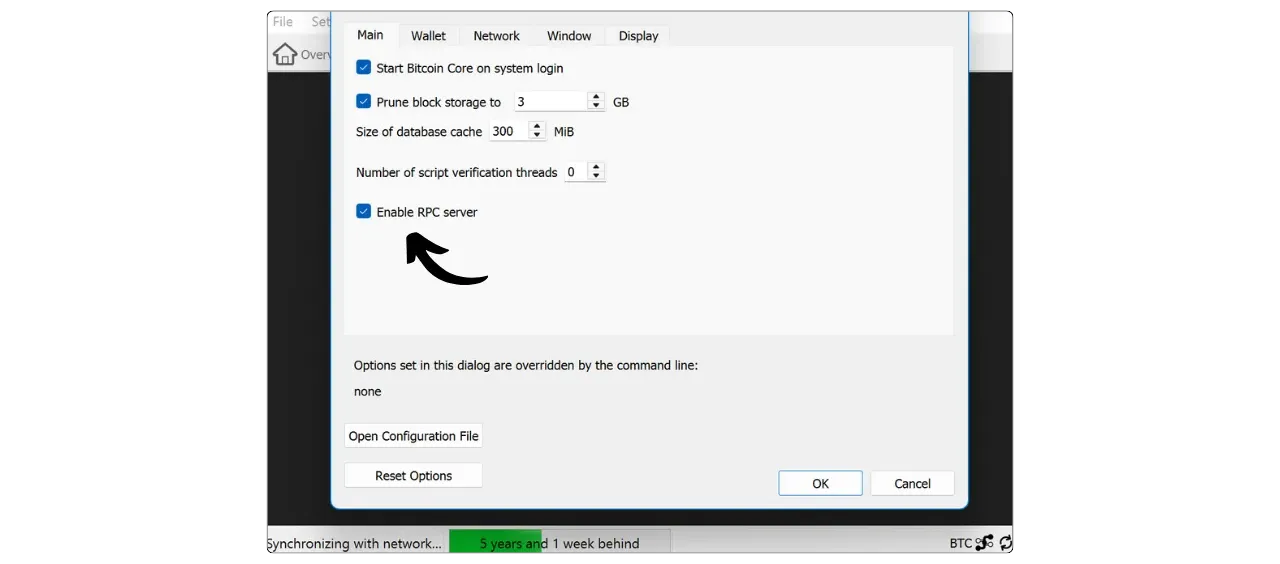
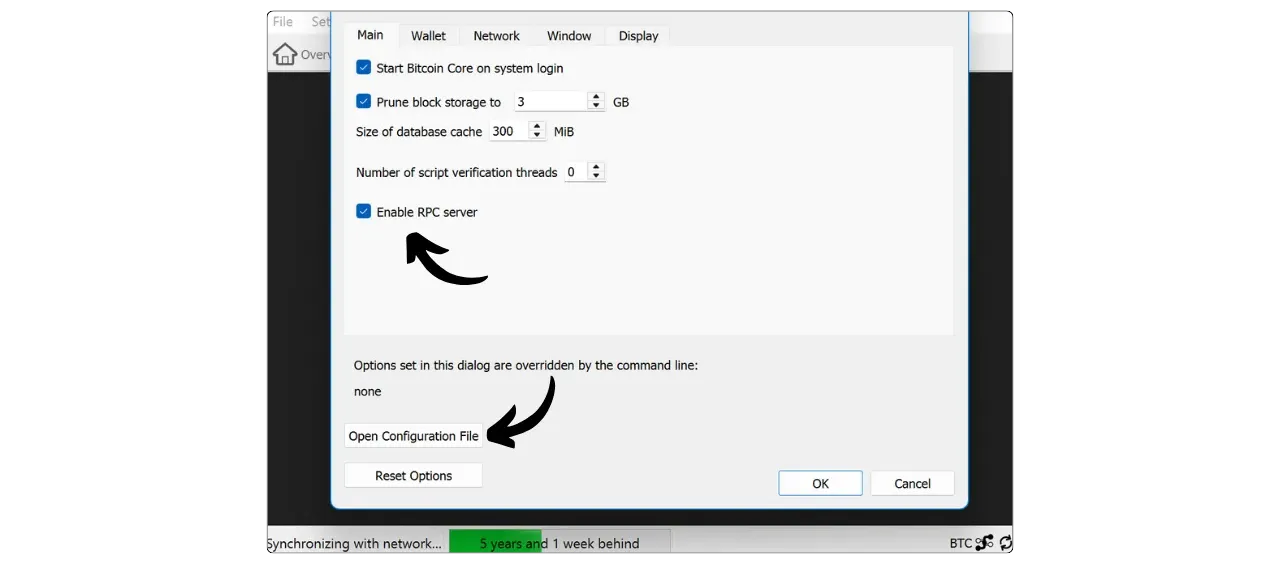
You can also do this via Bitcoin-QT’s Interface graphic by navigating to “Settings” > “Options…” and activating the “Enable RPC server” option.
Don’t forget to restart the software after making these changes.
Then return to Sparrow Wallet and enter the path to your cookie file, usually located in the same folder as Bitcoin.conf, depending on your operating system:
| macOS | ~/Library/Application Support/Bitcoin |
|---|---|
| Windows | %APPDATA%\Bitcoin |
| Linux | ~/.Bitcoin |
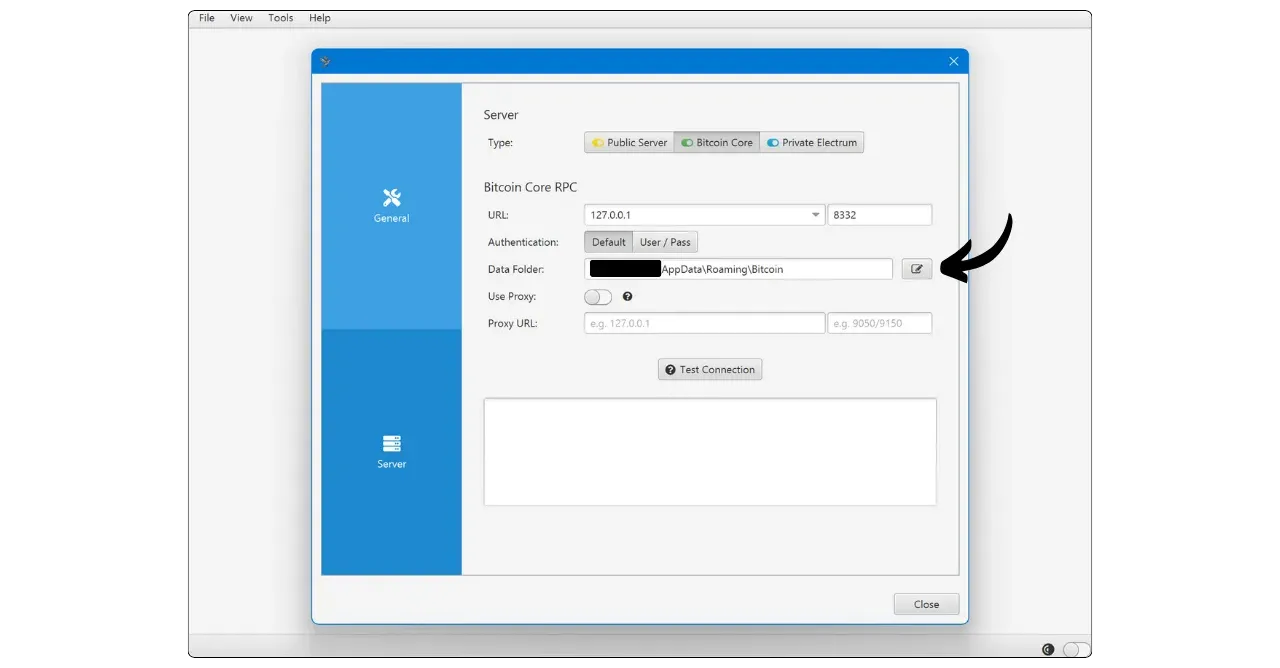
Leave the other parameters as default, URL 127.0.0.1 and port 8332, then click on “Test Connection”.
The connection is established. A green tick will appear in the bottom right-hand corner to indicate that you are connected to a Bitcoin Core node.

With Bitcoin Core remote:
If Bitcoin Core is installed on another machine connected to the same network, first locate the Bitcoin.conf file among the software files. If this file does not yet exist, you can create it. Open this file with a text editor and add the following line:
1
server=1
After editing the file, make sure you save it in the appropriate folder for your operating system:
| macOS | ~/Library/Application Support/Bitcoin |
|---|---|
| Windows | %APPDATA%\Bitcoin |
| Linux | ~/.Bitcoin |
This operation can also be performed via the Bitcoin-QT Interface graphical interface. Go to the “Settings” menu, then “Options…”, and activate the “Enable RPC server” option by checking the corresponding box. If the Bitcoin.conf file doesn’t exist, you can create it directly from this Interface by clicking on “Open Configuration File”.
Find the IP address of the machine hosting Bitcoin Core on your local network. To do this, you can use a tool such as Angry IP Scanner. Let’s assume, for the sake of argument, that the IP address of your node is 192.168.1.18.
In the Bitcoin.conf file, add the following lines, setting rpcbind=192.168.1.18 to match the IP address of your node.
1
2
3
4
5
[main]
rpcbind=127.0.0.1
rpcbind=192.168.1.18
rpcallowip=127.0.0.1
rpcallowip=192.168.1.0/24

In the Bitcoin.conf file, add a username and password for remote connections. Be sure to replace loic with your username and my_password with a strong password:
1
2
rpcuser=loic
rpcpassword=my_password

Use a strong rpcpassword and restrict rpcallowip to your LAN. Never expose Bitcoin Core RPC to the public internet.
After modifying and saving the file, restart the Bitcoin-QT software.
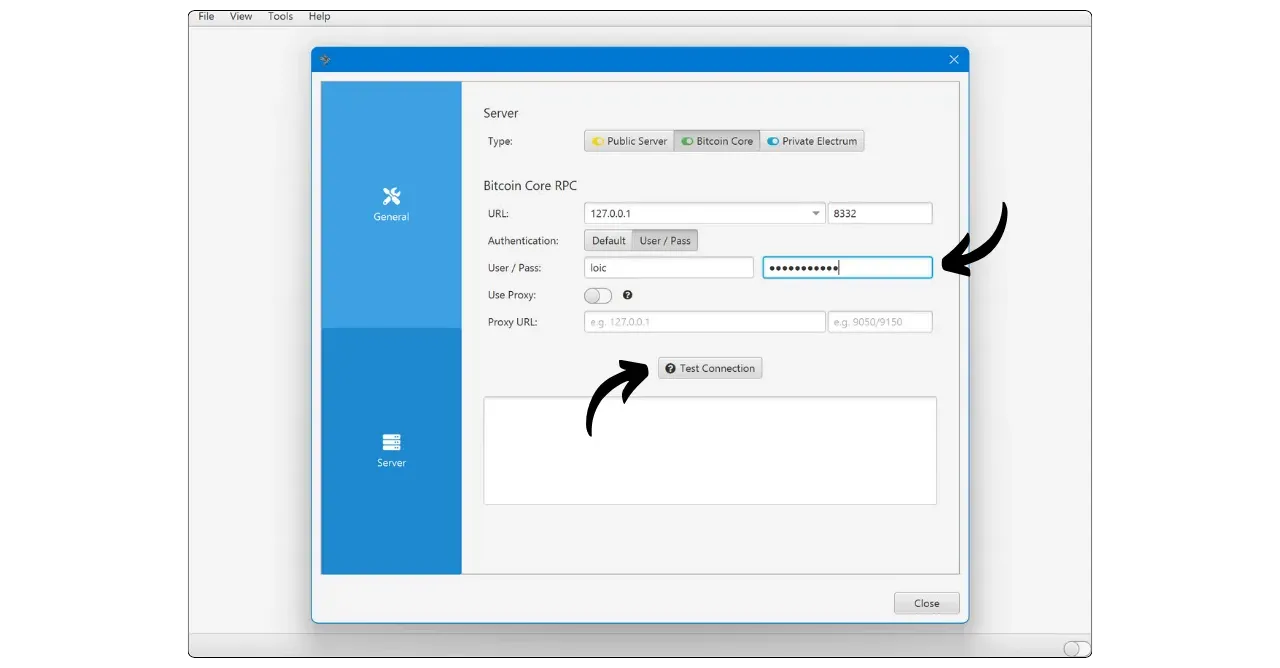
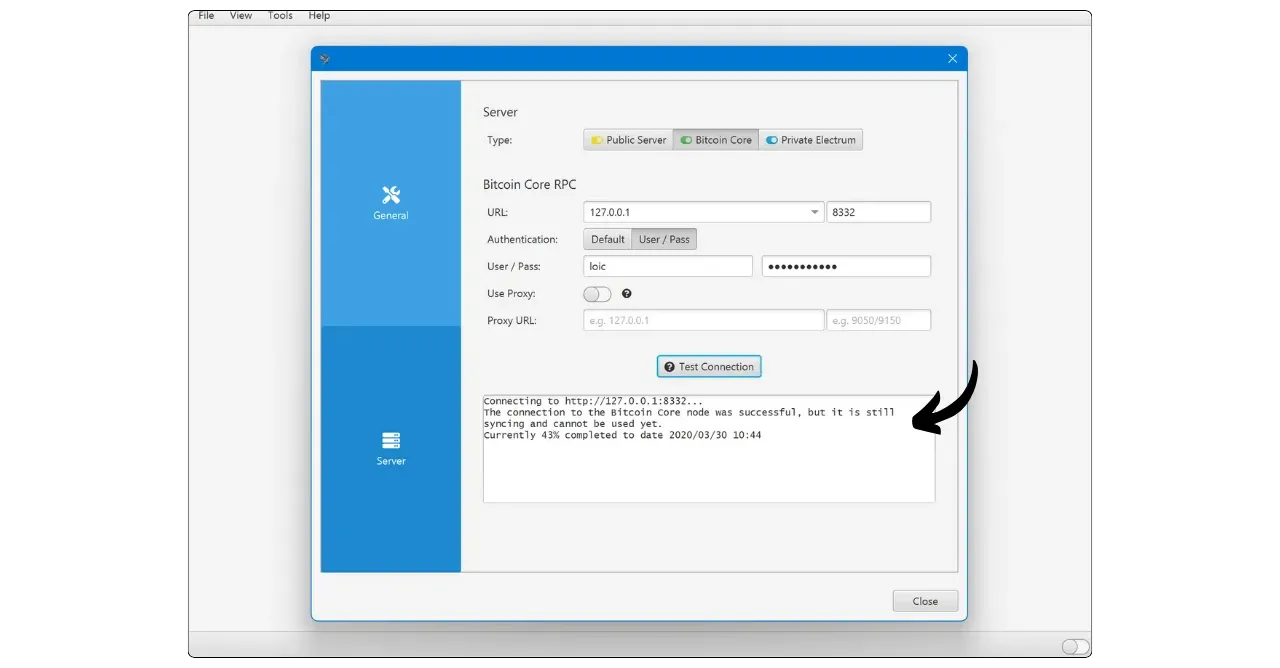
You can now return to Sparrow Wallet. Go to the “User / Pass” tab. Enter the username and password you configured in the Bitcoin.conf file. Leave the other parameters as default, i.e. URL 127.0.0.1 and port 8332. Then click on “Test Connection”.
The connection is established. A green tick will appear in the bottom right-hand corner to indicate that you are connected to a Bitcoin Core node.
Connecting to an Electrum server 🔵
The final option for connecting is to use a remote Electrum server. This method lets you connect to your node via Tor from another device, and takes advantage of an indexer to browse your wallets on Sparrow more quickly. It’s particularly suitable if you have a node-in-a-box solution like Umbrel or Start9, which allow you to install Electrs with a single click.
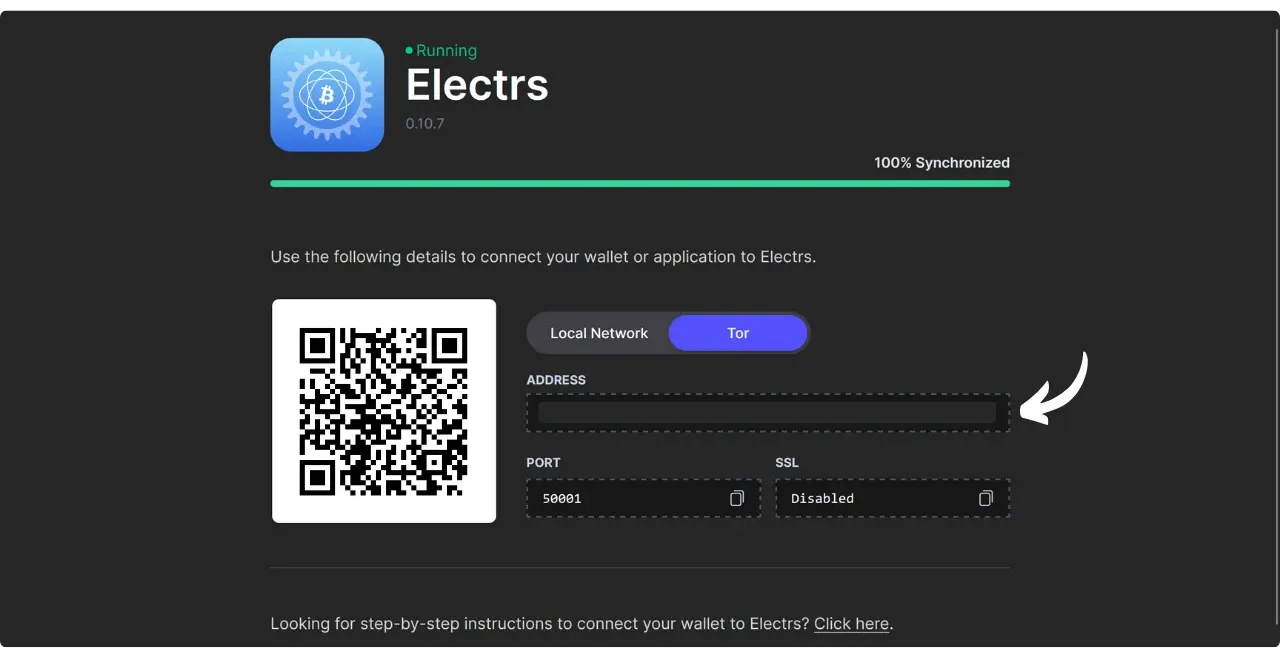
To do this, obtain the Tor `.onion’ address of your Electrum server. With Umbrel, for example, you’ll find it in the Electrs application.
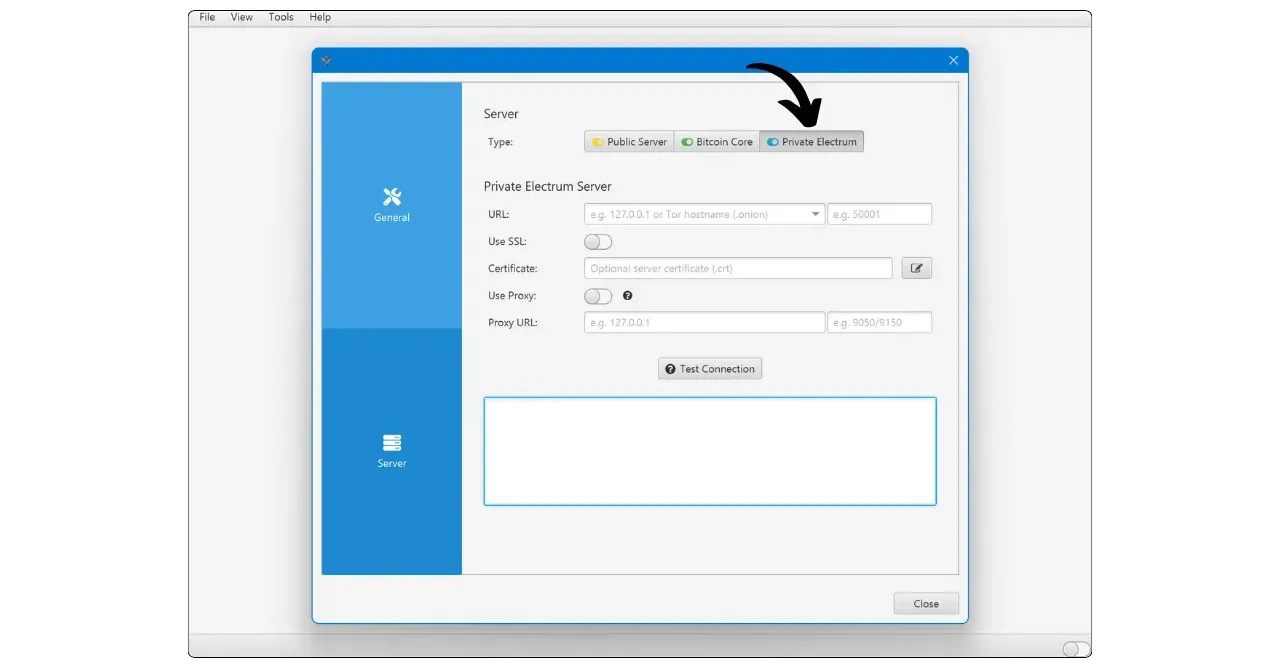
On Sparrow Wallet, access the “Private Electrum” tab.
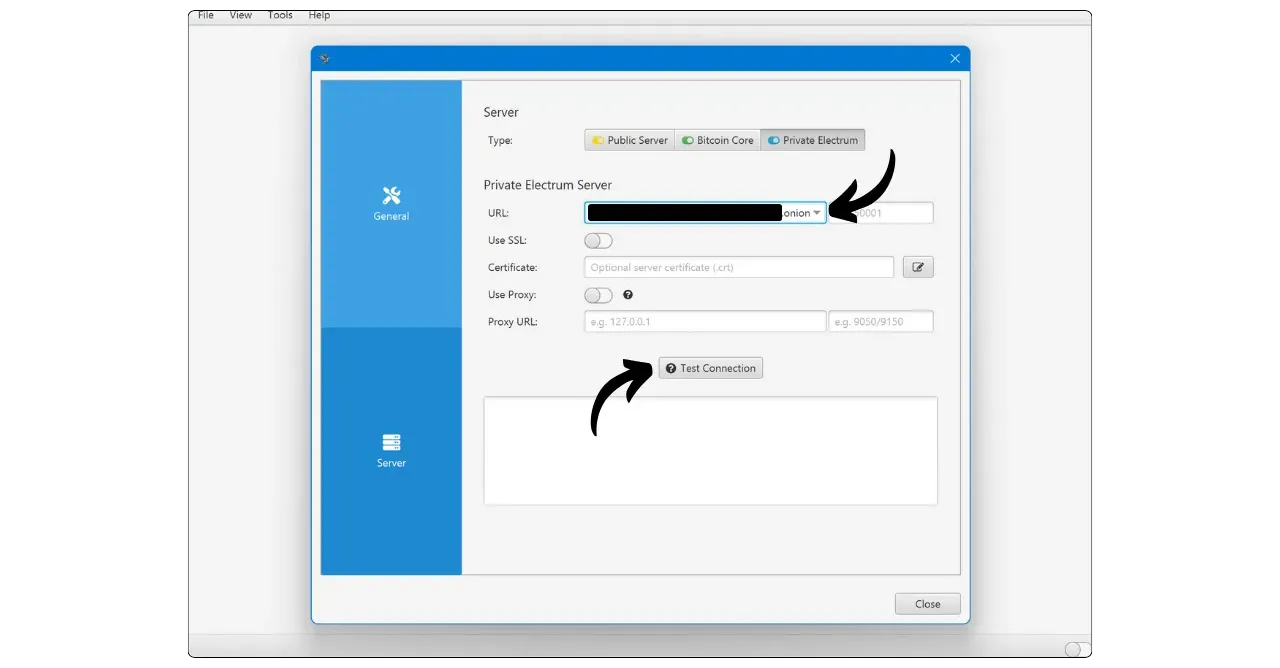
Enter your Tor address in the space provided. Other settings can remain default. Then click on “Test Connection”.
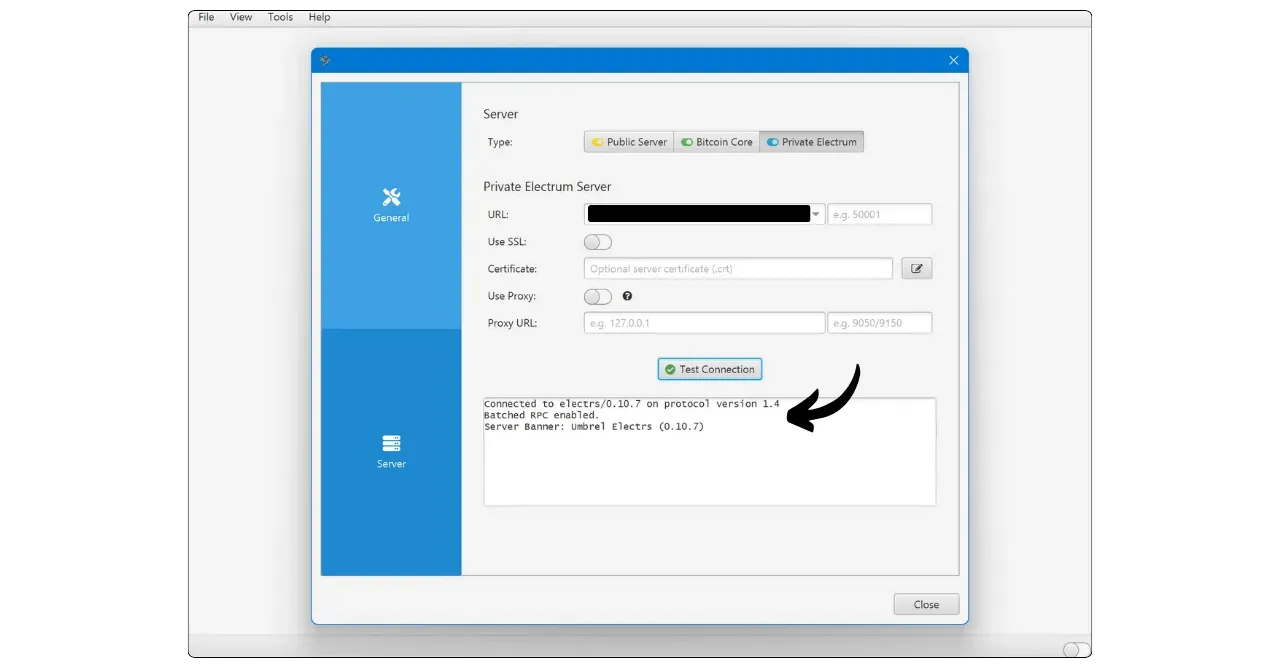
The connection is confirmed. If you close this window, a blue tick will appear in the bottom right-hand corner, indicating that you are connected to an Electrum server.
Use your own Electrum server onion; third‑party servers can learn wallet activity and reduce privacy.
Create a hot wallet
Now that Sparrow Wallet is configured to communicate with the Bitcoin network, you’re ready to create your first wallet. This section guides you through the creation of a hot wallet, i.e. a wallet whose private keys are stored on your computer. Since your computer is a complex machine connected to the Internet, it presents a very large attack surface. Consequently, a hot wallet should only be used for limited amounts of bitcoins. To store larger amounts, opt for a secure wallet with a Hardware Wallet. If this is what you’re looking for, you can skip ahead to the next section.
Treat hot wallets as spending wallets only — keep limited amounts; use a Hardware Wallet for savings.
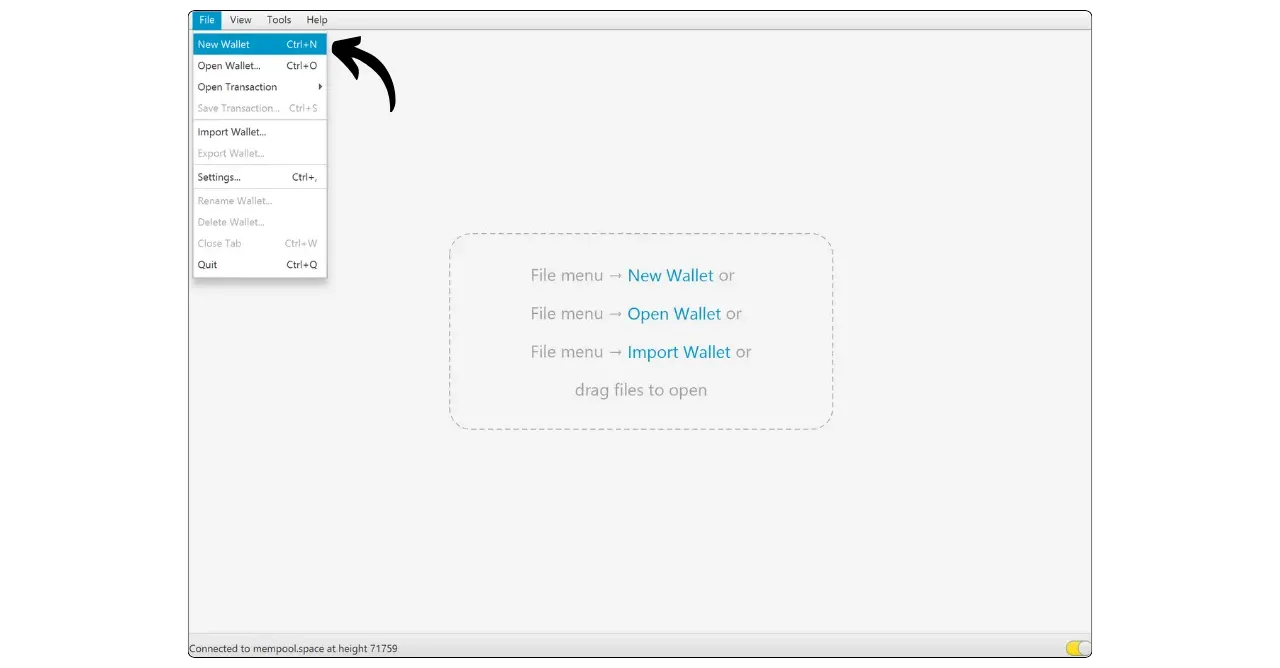
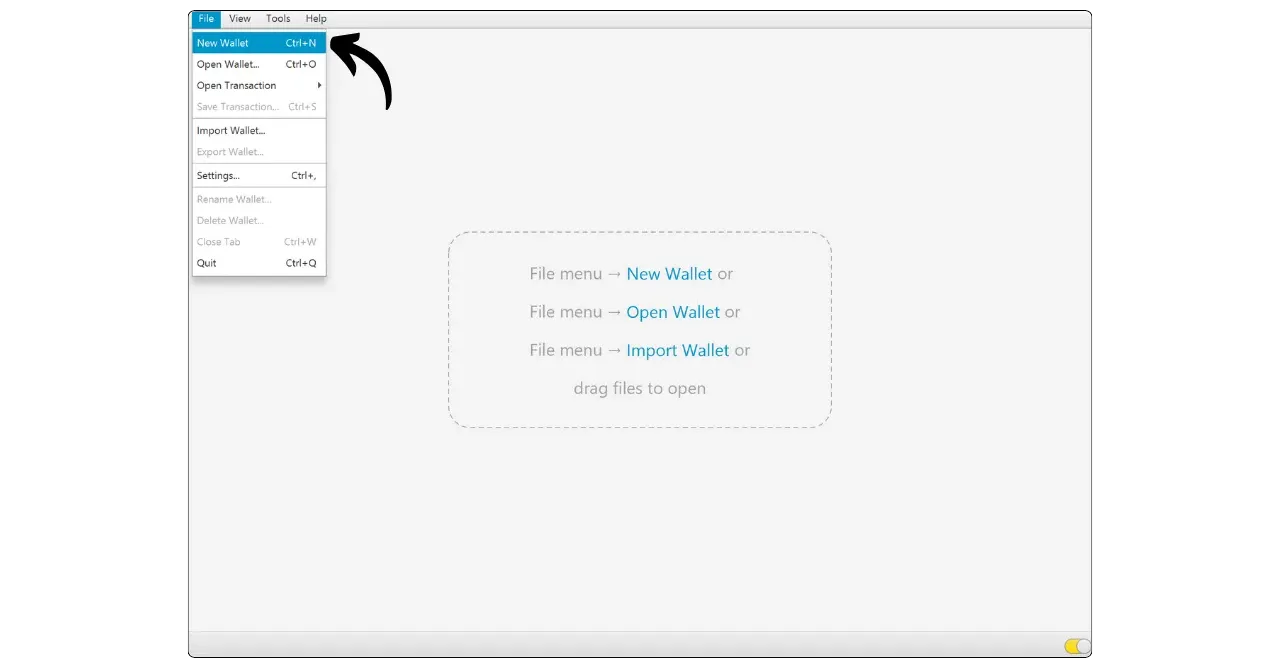
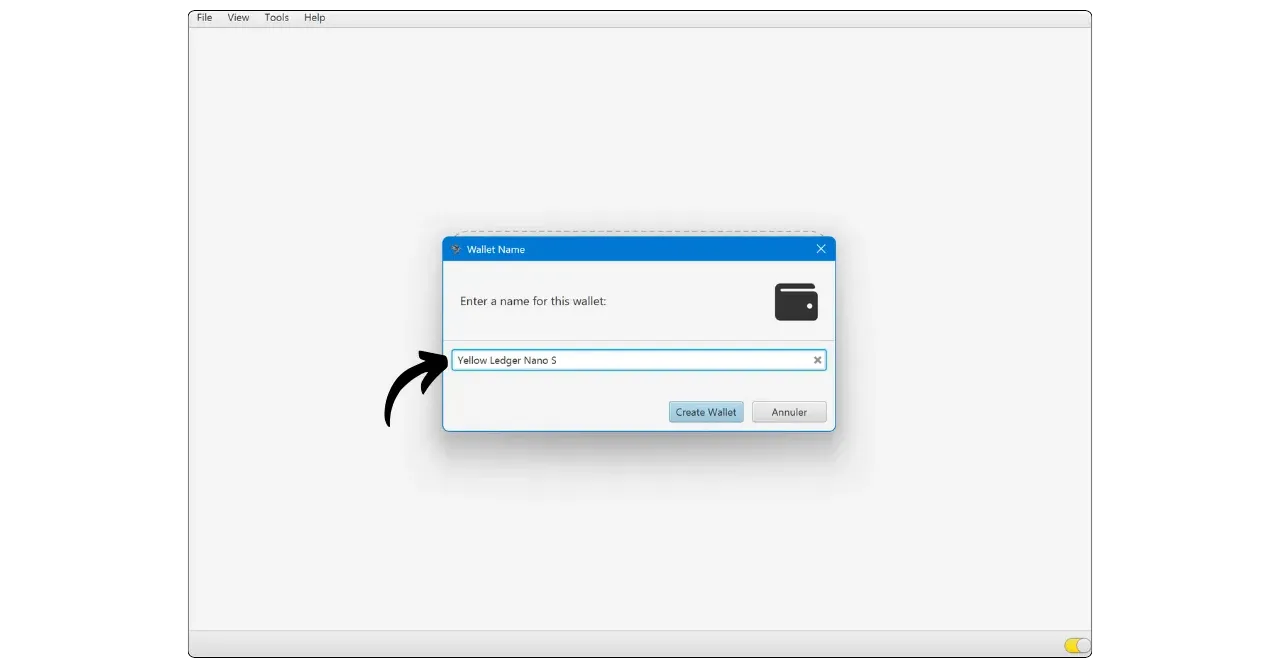
To create a hot wallet, from the Sparrow Wallet home screen, click on the “File” tab and then on “New Wallet”.
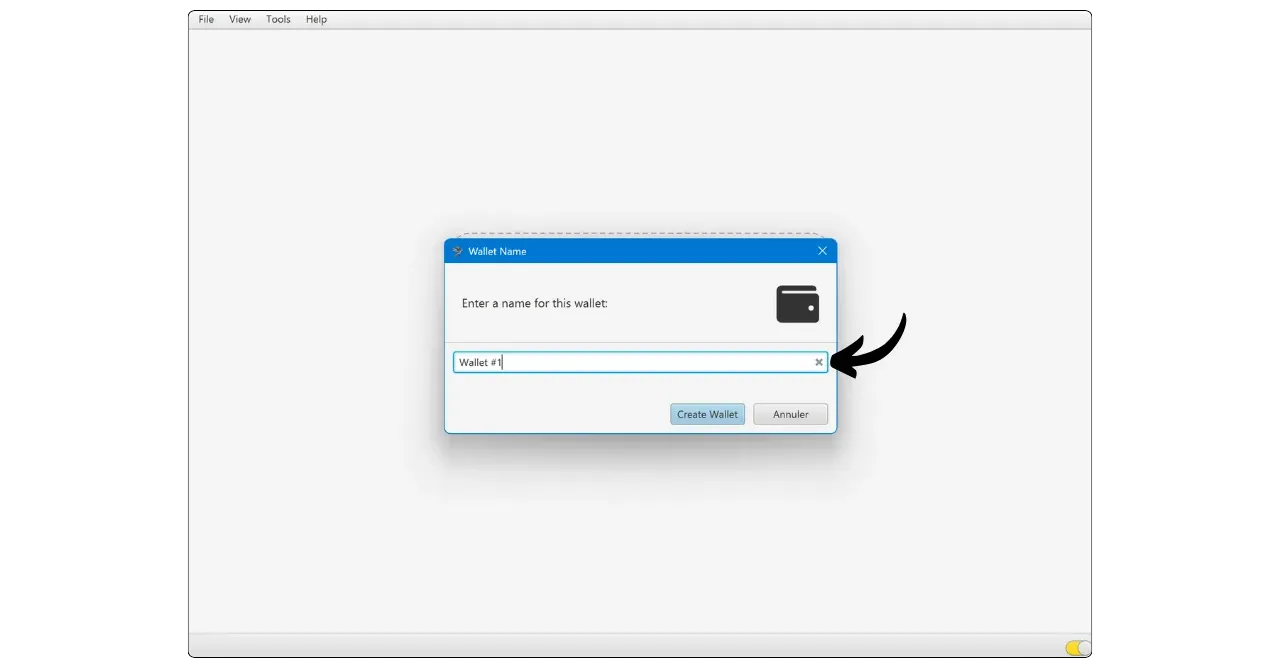
Enter a name for your wallet and click on “Create Wallet”.
At the top of the Interface, you can choose whether to create a “Single Signature” or “Multi Signature” wallet. Just below, select the type of script to lock your UTXOs. I recommend you use the latest standard: “Taproot (P2TR)”.

Then click on “New or Imported Software Wallet”.

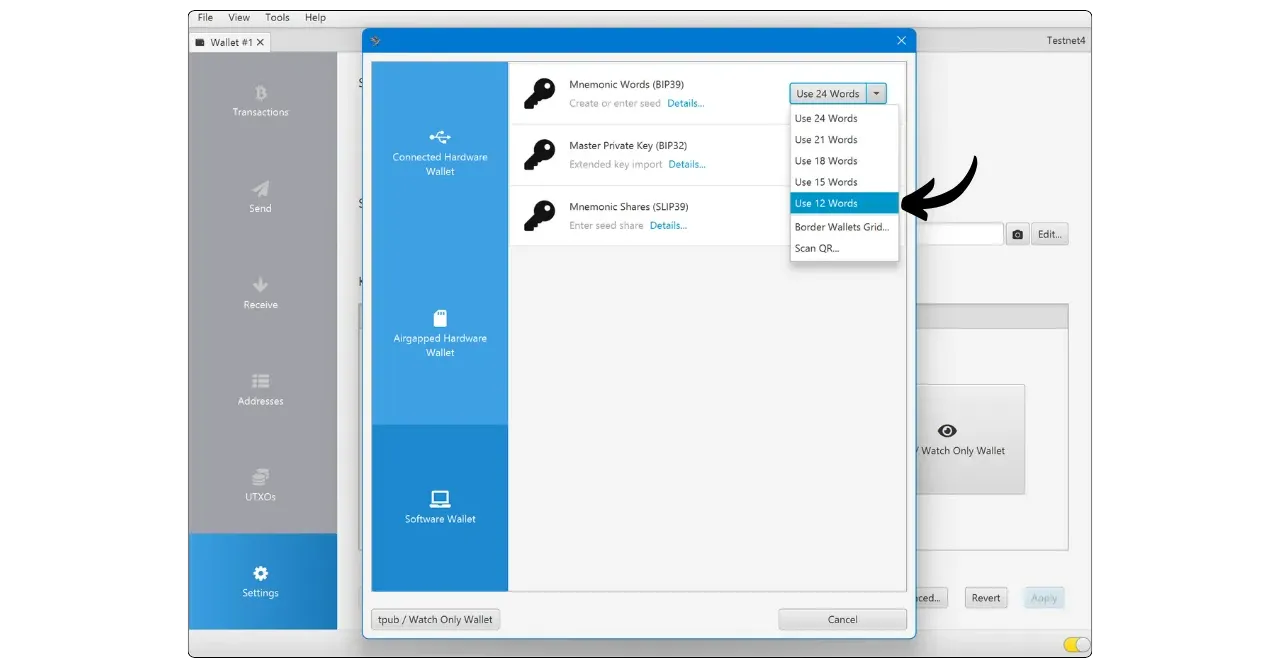
Choose the BIP39 standard, as it is supported by virtually all Bitcoin wallet software. Next, choose the length of your recovery phrase. Currently, a 12-word phrase is sufficient, as both offer similar security, but the 12-word phrase is simpler to save.
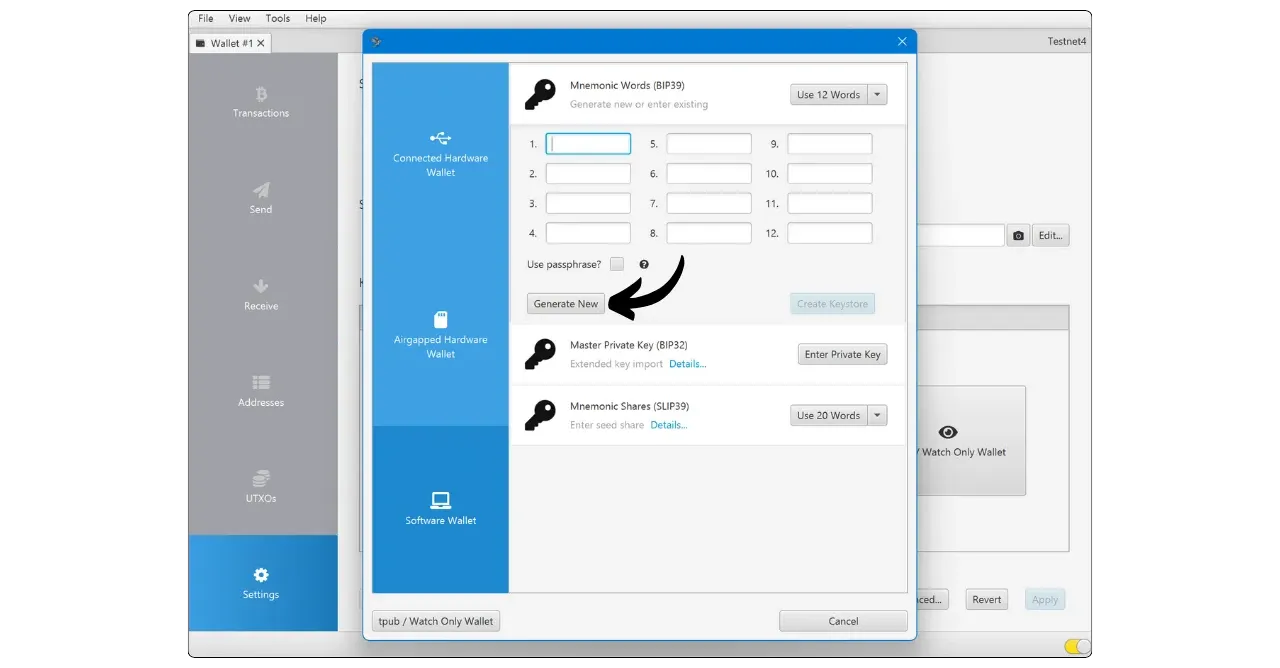
Click on the “generate New” button to generate your wallet’s mnemonic phrase. This phrase gives full, unrestricted access to all your bitcoins. Anyone in possession of this phrase can steal your funds, even without physical access to your computer.
The 12-word phrase restores access to your bitcoins in the event of loss, theft or breakage of your computer. It is therefore very important to save it carefully and store it in a safe place.
Never digitize your seed (no photos, files, cloud). Anyone with the words can steal your funds — keep backups offline and private.
You can inscribe it on paper or, for added security, engrave it on stainless steel to protect it from fire, flood or collapse. The choice of medium for your mnemonic will depend on your security strategy, but if you’re using Sparrow as a warm spending wallet containing moderate amounts, paper should be sufficient.
For more information on the proper way to save and manage your mnemonic phrase, I highly recommend following this other tutorial, especially if you’re a beginner:
https://planb.network/tutorials/wallet/backup/backup-mnemonic-22c0ddfa-fb9f-4e3a-96f9-46e2a7954270
Obviously, you must never share these words on the Internet, as I do in this tutorial. This example wallet will be used only on the Testnet and will be deleted at the end of the tutorial.
You can also choose to add a passphrase BIP39 by clicking on the “Use passphrase” box. Warning: using a passphrase can be very useful, but if you don’t understand how it works, it can be very risky. That’s why I strongly advise you to read this short theoretical article on the subject:
https://planb.network/tutorials/wallet/backup/passphrase-a26a0220-806c-44b4-af14-bafdeb1adce7
Losing or mistyping your passphrase is unrecoverable and creates a different wallet. Back it up physically and test it.
Once you’ve saved your mnemonic and any passphrase to a physical medium, click on “Confirm Backup”.
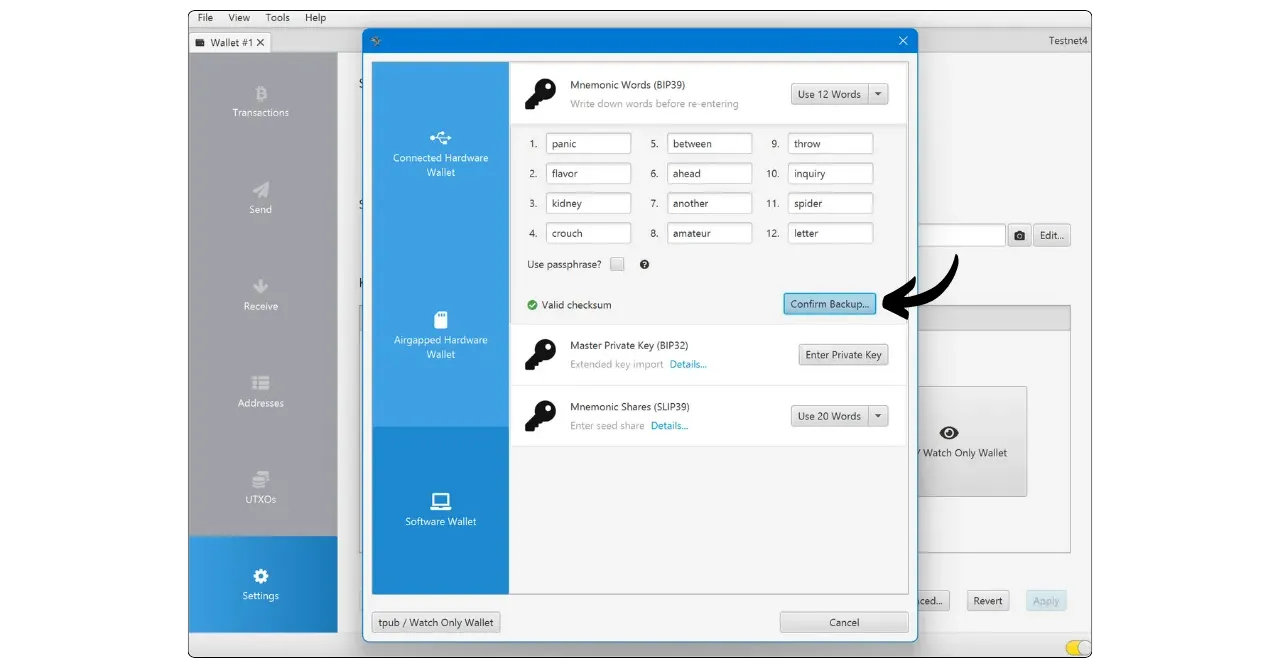
Re-enter your 12 words to confirm that they have been saved correctly, then click on “Create Keystore”.

Then click on “Import Keystore” to generate your wallet keys from the mnemonic phrase.
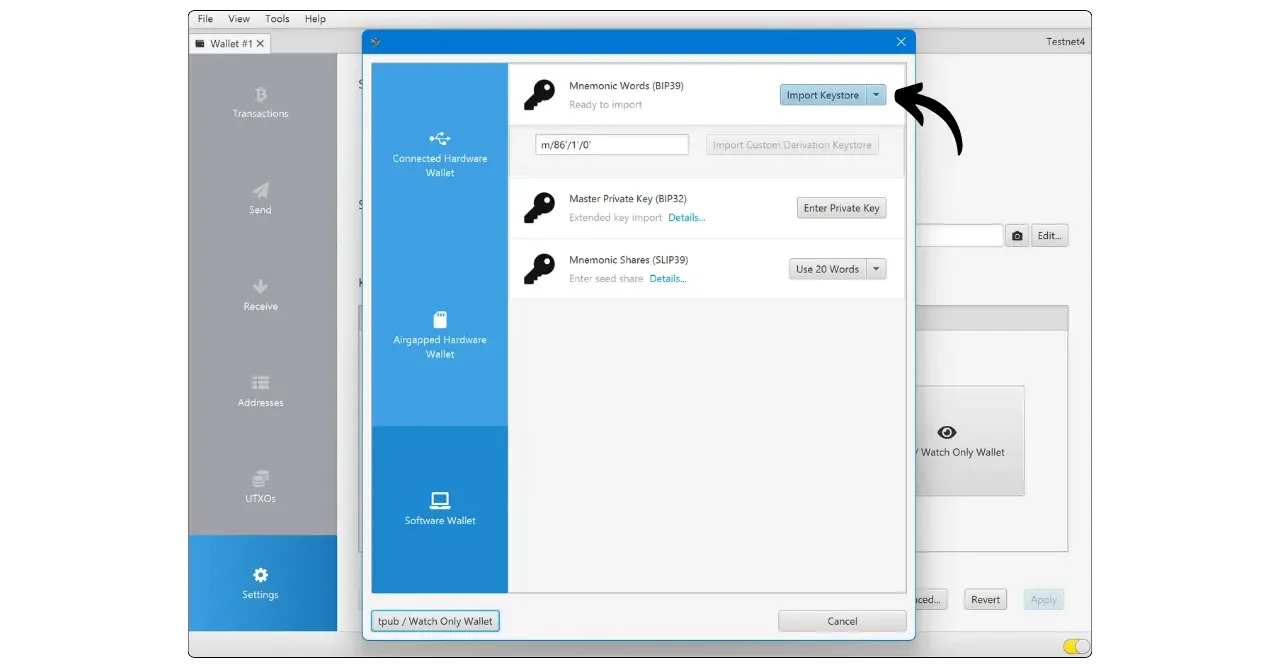
Click on “Apply” to finalize wallet creation.

Set a strong password to secure access to your Sparrow wallet. It’s a good idea to keep this password in a password manager, so you don’t forget it. Note that this password plays no part in the derivation of your keys. It is only used to access your wallet via Sparrow Wallet. So, even without this password, your mnemonic phrase will suffice to access your bitcoins from any BIP39-compatible application.
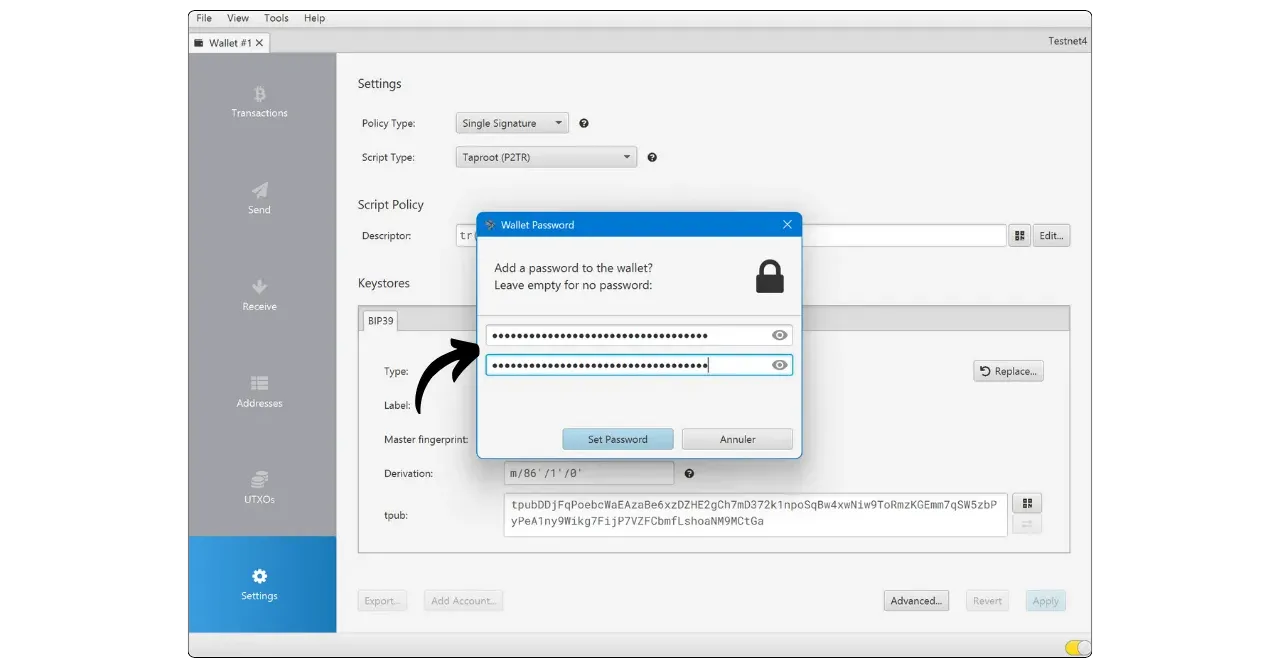
The Sparrow password encrypts the local wallet file; it is not part of key derivation and cannot recover your seed.
Your hot wallet is now created. You can skip to the Receiving Bitcoins section of this tutorial if you don’t plan to use a Hardware Wallet with Sparrow.
Managing a cold wallet
The second way to use Sparrow Wallet is to set it up as a wallet manager with a Hardware Wallet. In this configuration, the private keys of your Bitcoin wallet remain exclusively on the Hardware Wallet, while Sparrow only accesses the public information. This approach offers a higher level of security than the hot wallets discussed above, as the private keys are kept on a specialized device, often with a secure chip, which is not connected to the Internet and therefore presents a much smaller attack surface than a traditional computer.
There are two main ways to connect your Hardware Wallet to Sparrow:
- By cable, commonly used with entry-level models such as Trezor Safe 3 or Ledger Nano S Plus ;
- In Air-Gap mode, i.e. without a direct wired connection, via a MicroSD card or QR code exchange.
Sparrow supports all these communication methods and is compatible with most hardware wallets on the market.
For this tutorial, I’ll be using a Ledger Nano S with a cable, but the procedure is similar in Air-Gap mode. You’ll find details specific to your Hardware Wallet in its dedicated tutorial on Plan ₿ Network.
Before starting, make sure that the wallet is already configured on your Hardware Wallet. If you’re using a wired connection, connect it to your computer via the cable.
To import the so-called “Keystore” (the public information needed to manage the wallet) into Sparrow Wallet, click on the “File” tab, then on “New Wallet”.
Name your wallet and click on “Create Wallet”. I advise you to enter the name of your Hardware Wallet to identify it easily later.
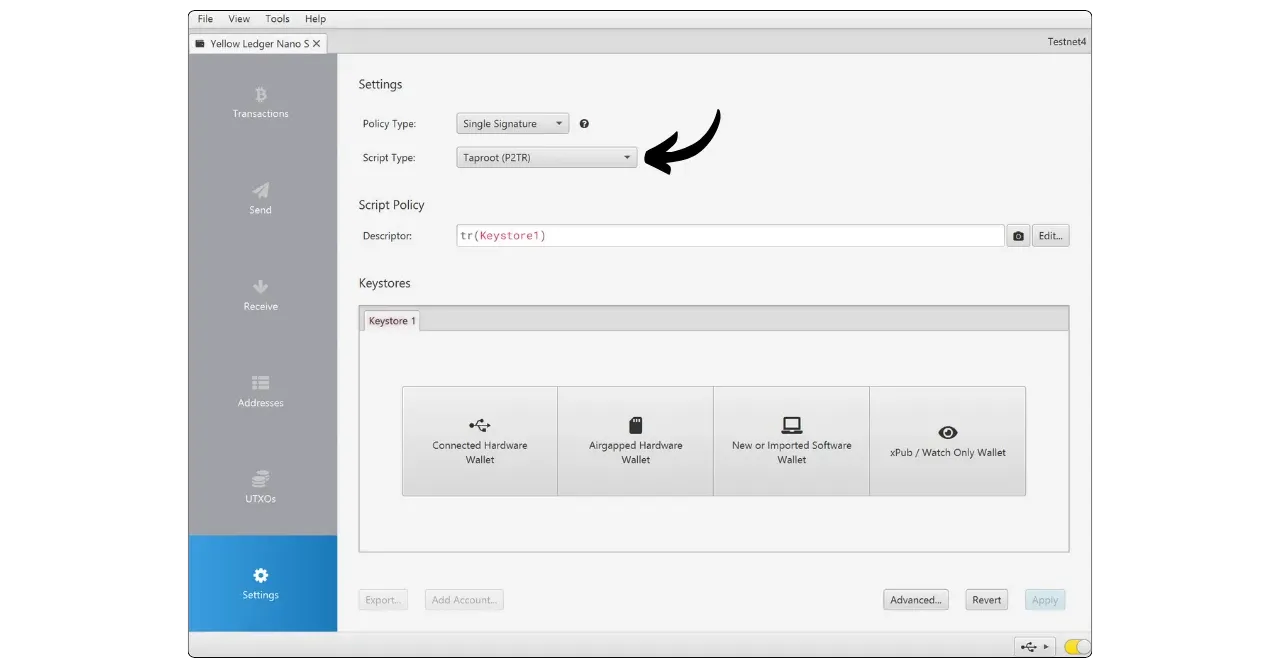
At the top of the Interface, choose between a “Single Signature” or “Multi Signature” wallet. For our example, we’ll configure a single-sig wallet.
Just below, select the type of script to lock your UTXOs. If your Hardware Wallet supports it, I suggest you choose “Taproot (P2TR)”.
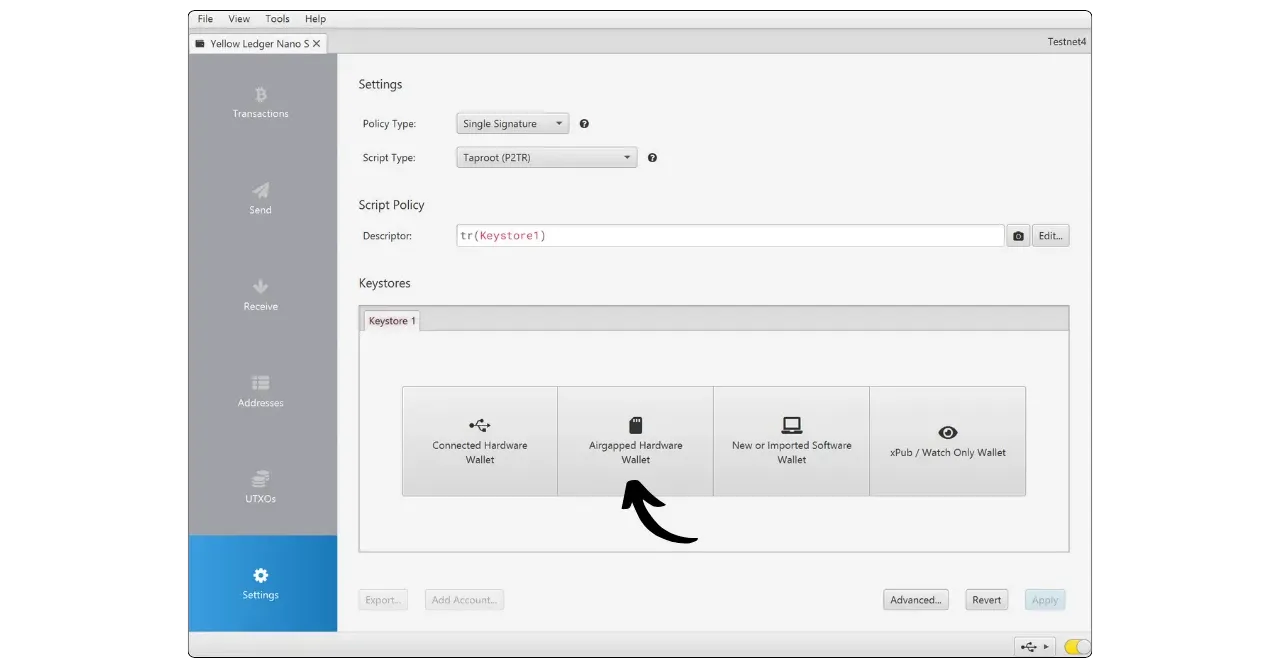
Next, the procedure differs according to your connection method. If you’re using an Air-Gap method, select “Airgapped Hardware Wallet”. Then follow the instructions specific to your device.
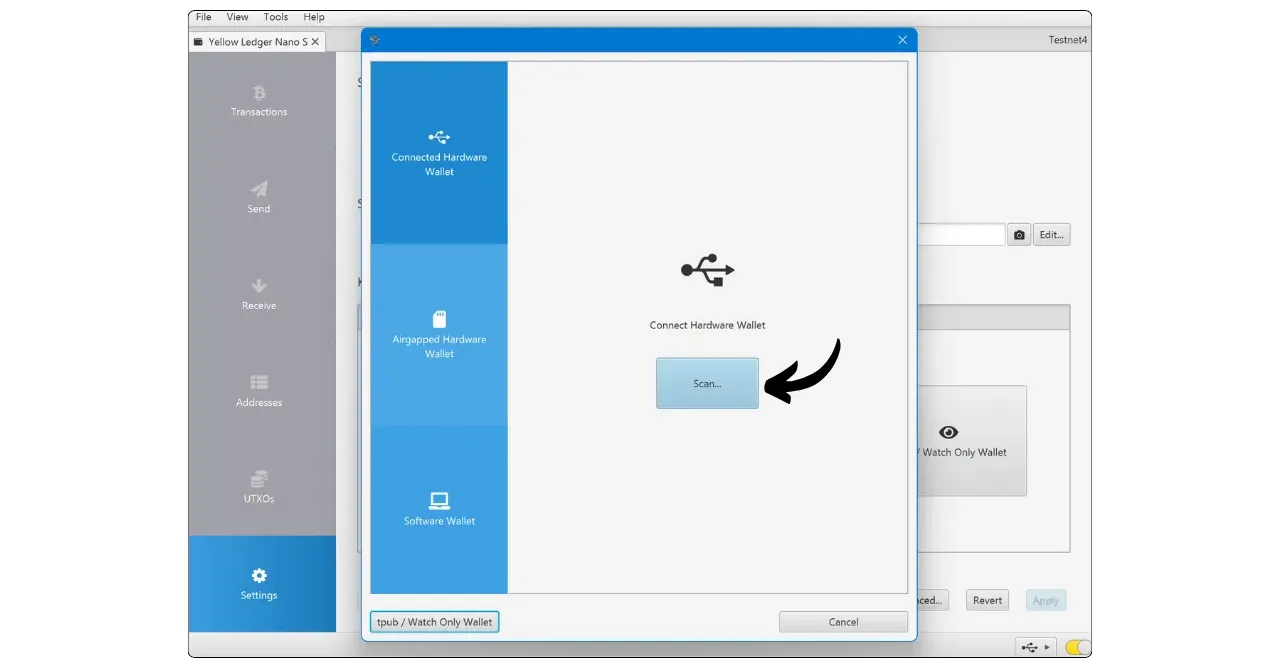
If you’re using a cable connection, as in my case, choose “Connected Hardware Wallet”.
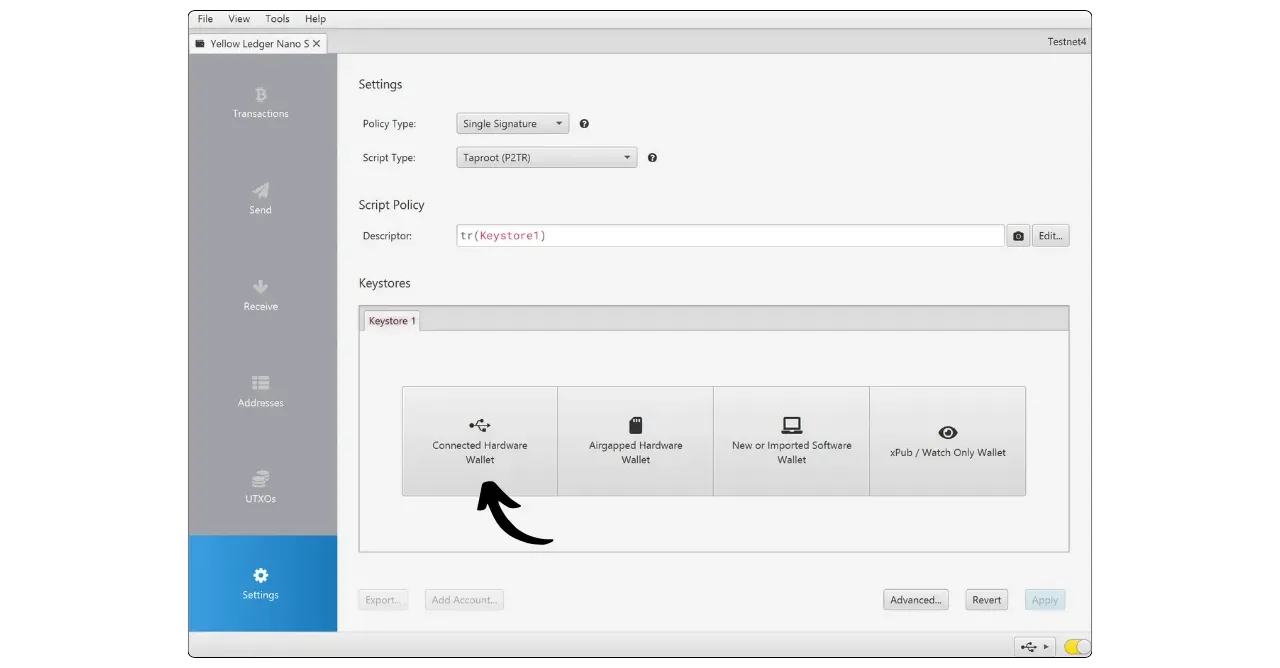
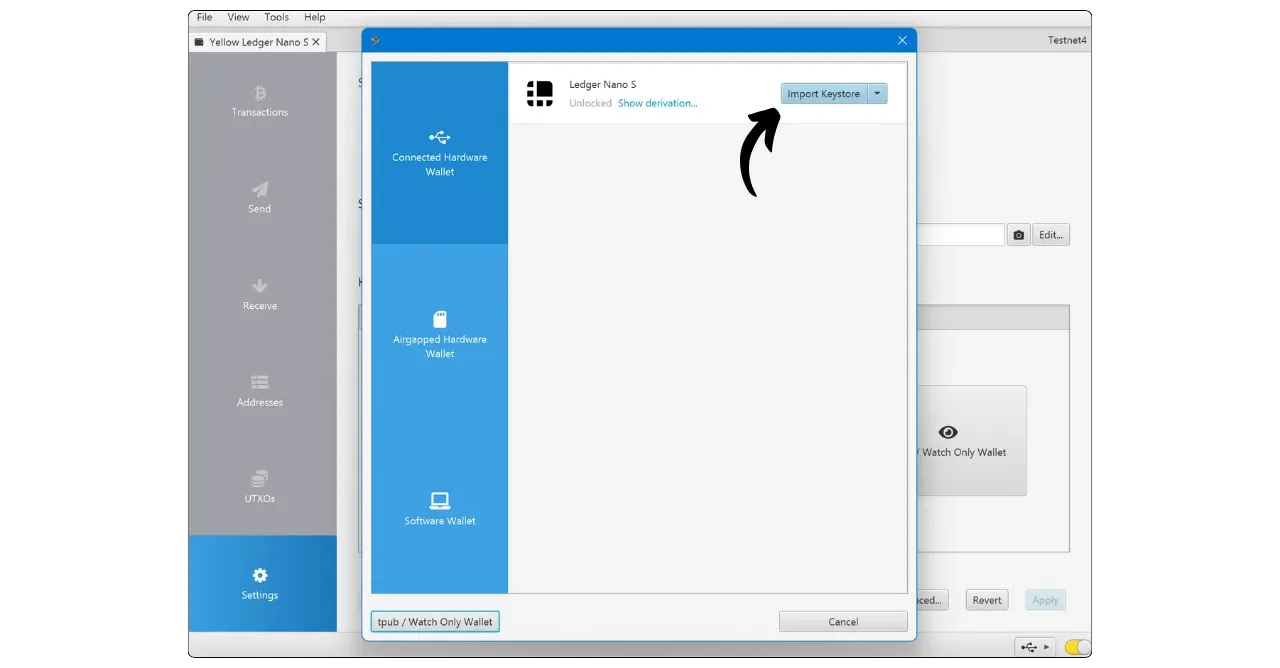
Click on “Scan” to have Sparrow detect your device. Make sure it’s plugged in and unlocked. For some models, such as the Ledger, you’ll need to open the “Bitcoin” application to enable detection.
Select “Import Keystore”.
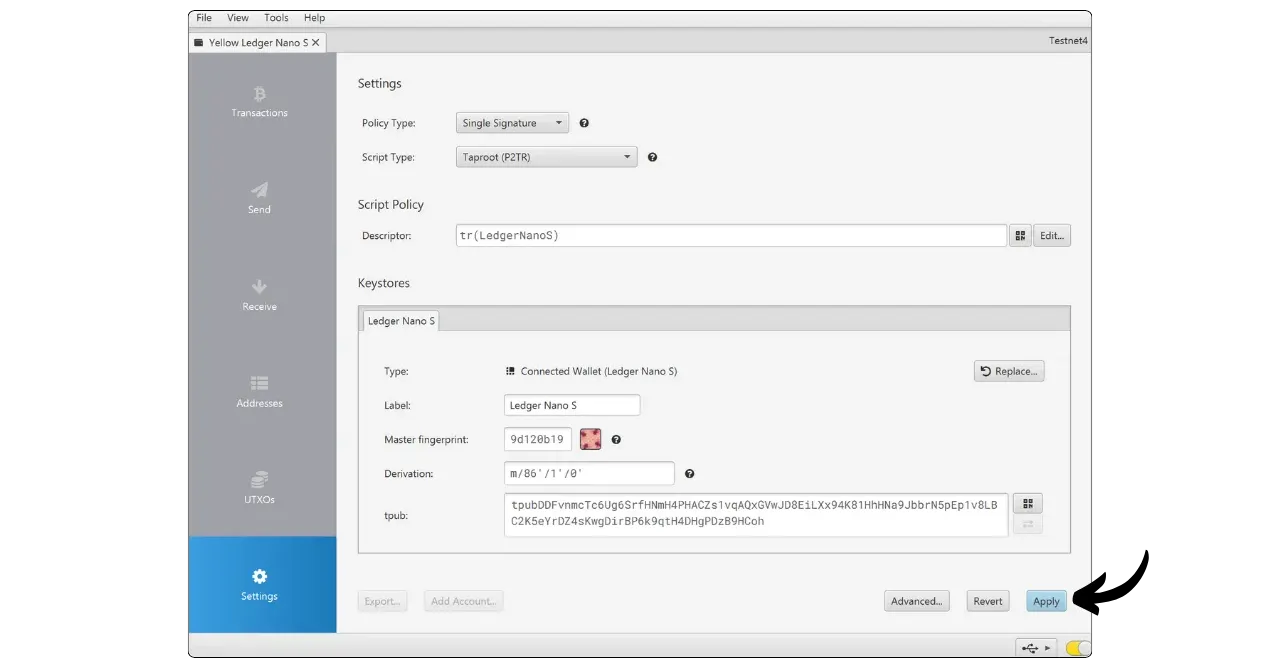
Click on “Apply” to finalize wallet creation.
Set a strong password to secure access to your Sparrow wallet. This password will protect your public keys, addresses and transaction history. We recommend that you save it in a password manager. Note that this password plays no part in the derivation of your keys. Even without it, you can recover access to your bitcoins with your mnemonic via any BIP39-compatible software.

The Sparrow password protects local wallet data only; it does not secure your Hardware Wallet’s seed.
Your management wallet is now configured on Sparrow.
Receive bitcoins
Now that your wallet is set up on Sparrow, you can receive bitcoins. Simply access the “Receive” menu.
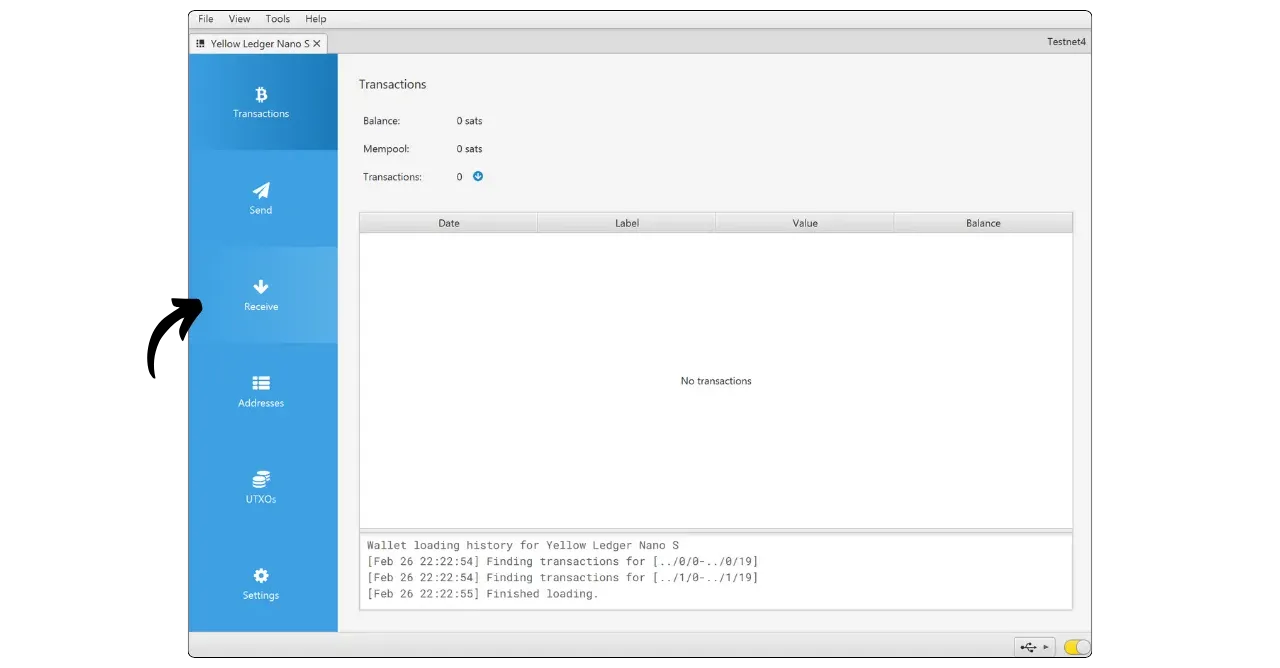
Sparrow will display the first unused address in your wallet. You can add a “Label” to this address to remind you of the origin of these satoshis in the future.
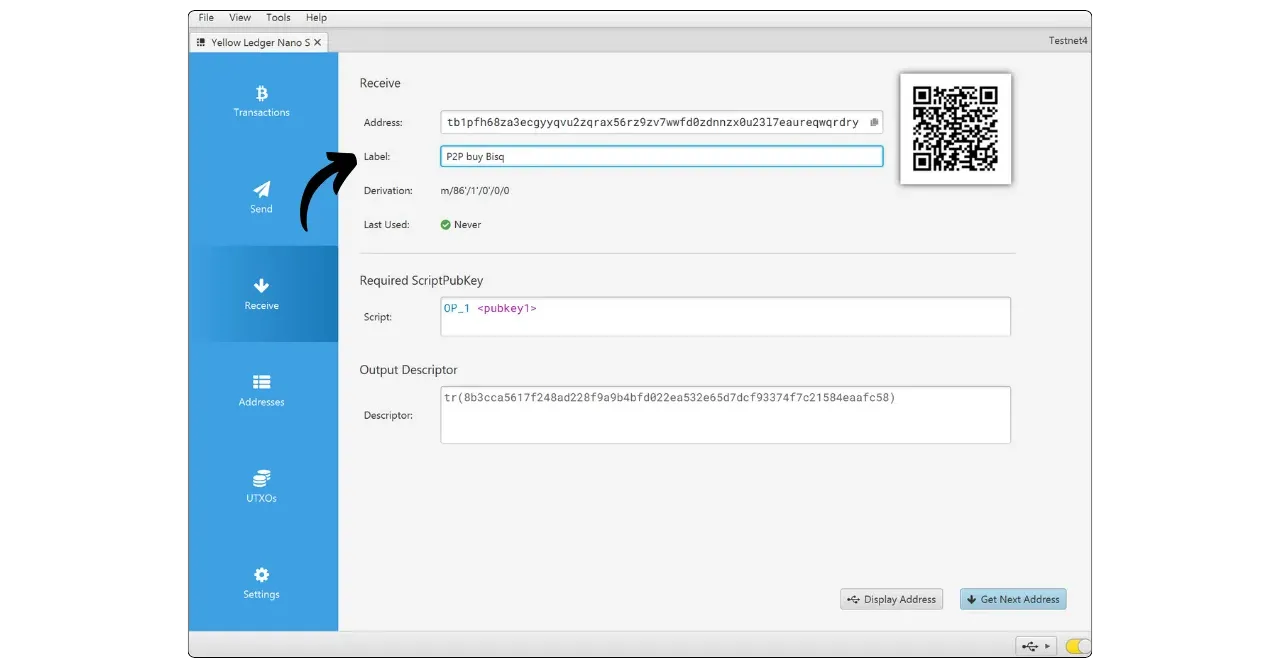
If you’re using a hot wallet, the address displayed can be used immediately, either by copying it or by scanning the associated QR code.
If you’re using a Hardware Wallet, it’s very important to check the address on the device screen before using it. For wired devices, connect and unlock your Hardware Wallet, then in Sparrow, click on “Display Address”. Make sure that the address displayed on your Hardware Wallet matches that shown on Sparrow.
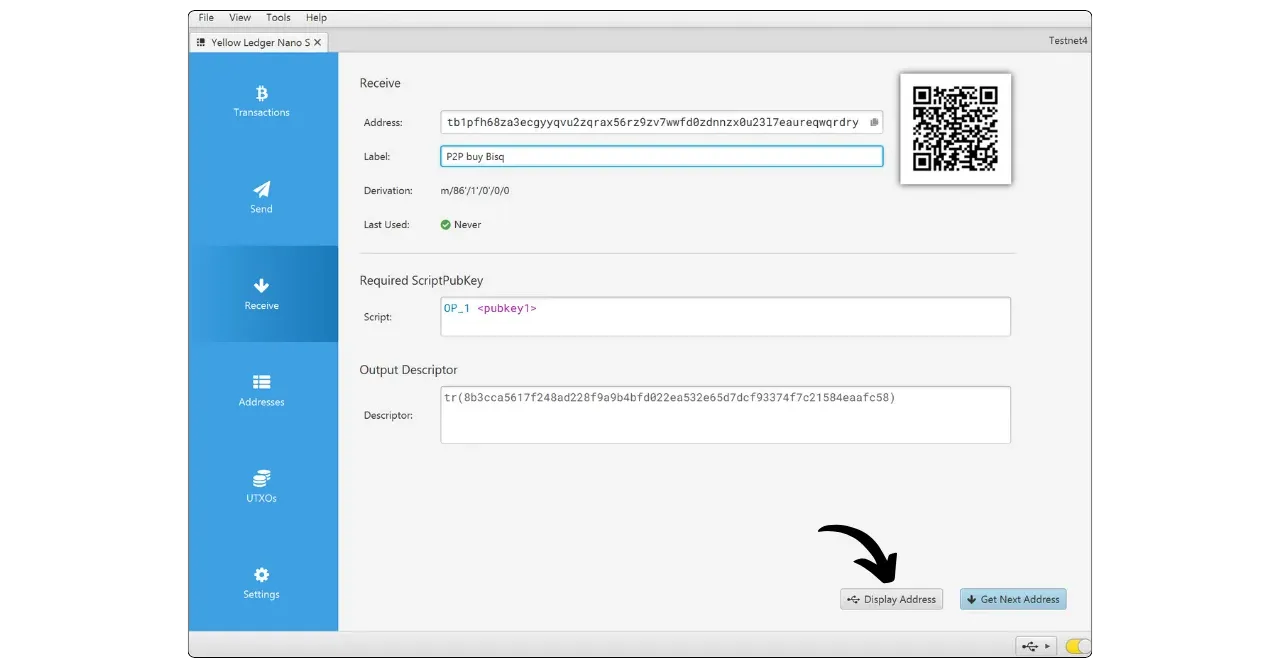
Always verify receive addresses on your Hardware Wallet before using them; wrong addresses mean irreversible loss.
For Hardware Wallet Air-Gap users, address verification varies according to device model. See the dedicated Plan ₿ Network tutorial for precise instructions.
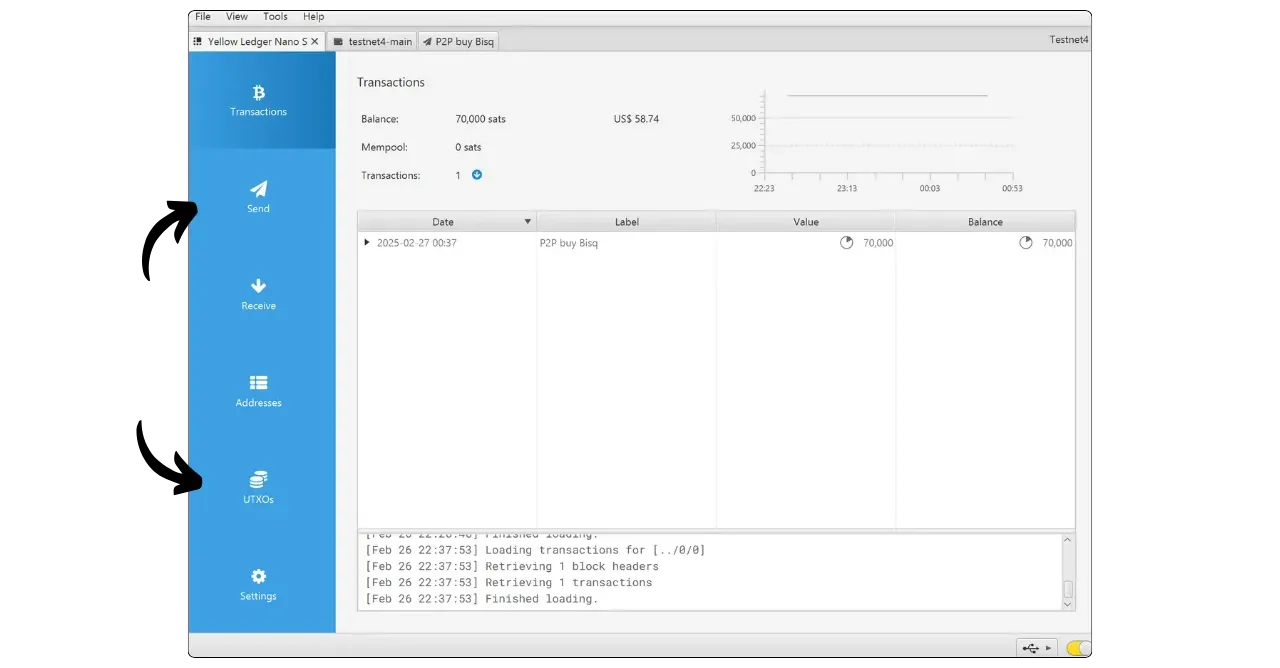
Once the transaction has been broadcast by the payer, you’ll see it appear in the “Transactions” tab. You can click on it for more details, such as the txid.

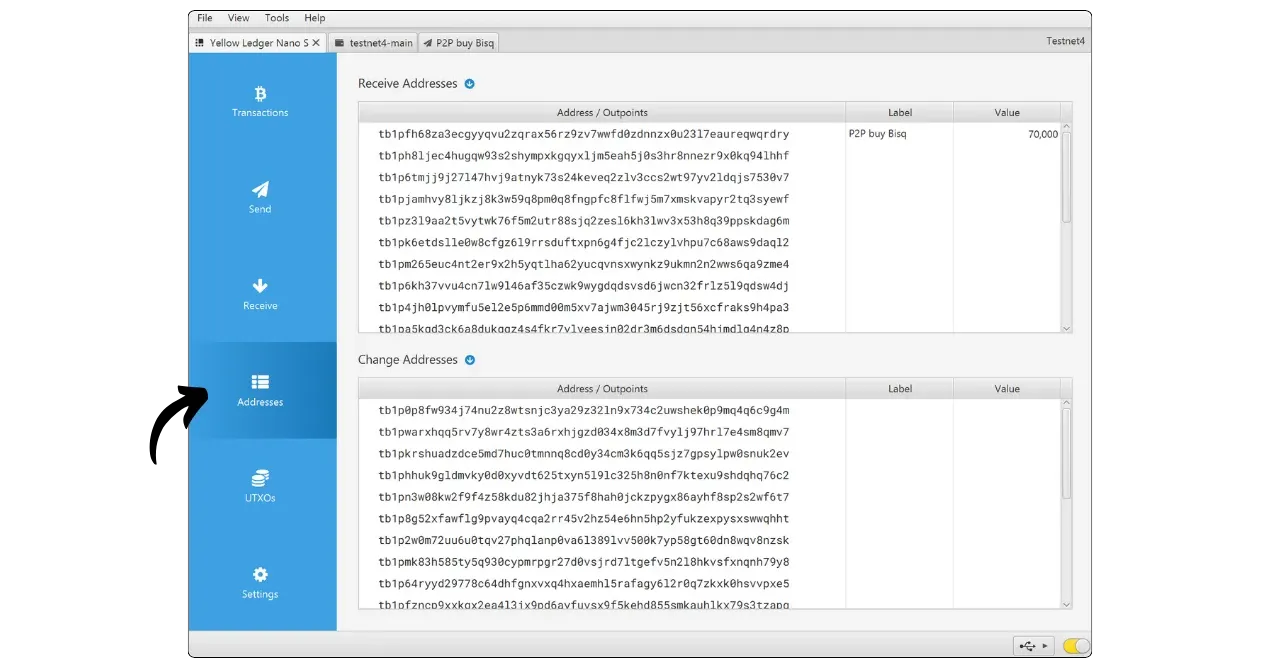
In the “Addresses” tab, you’ll find a list of all your inbox addresses. You can see if they’ve already been used and if a label has been added. Receive” addresses are those Sparrow shows when you click on “Receive” and are intended for incoming payments. The “Change” addresses are used for exchange in your transactions, i.e. to recover the unused portion of your UTXOs in inputs.
The “UTXOs” tab shows you all your UTXOs, i.e. the bitcoin fragments you hold. You can see the amount of each UTXO and the associated label.
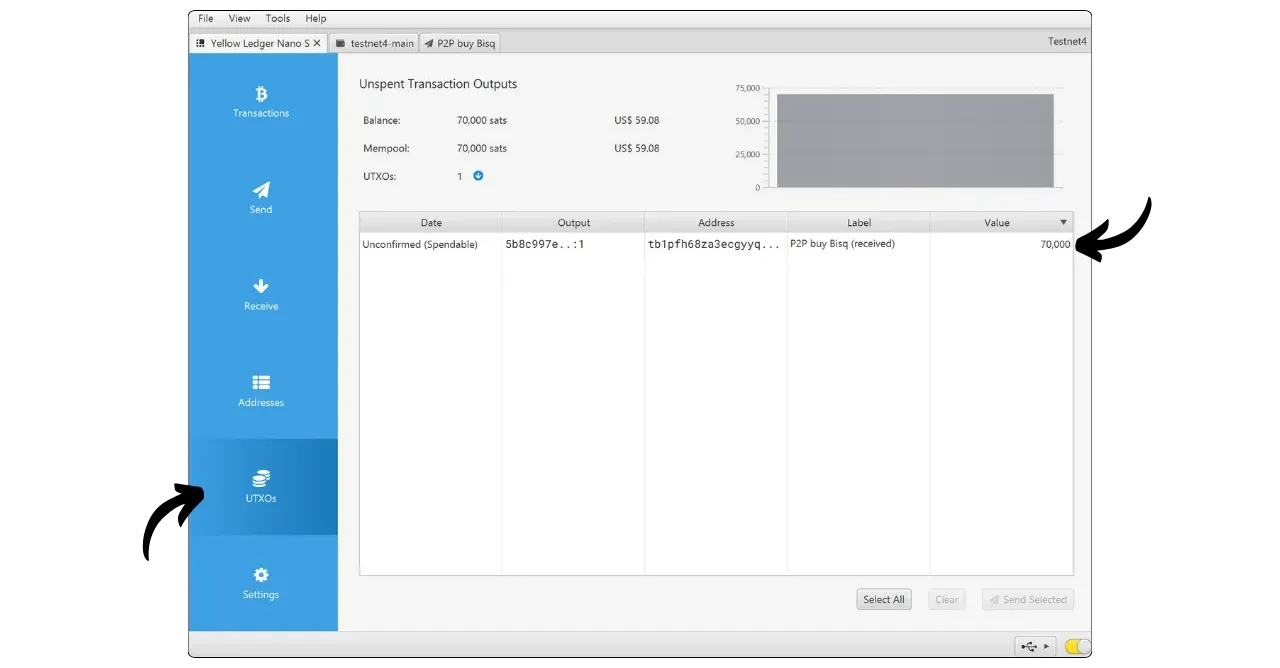
Send bitcoins
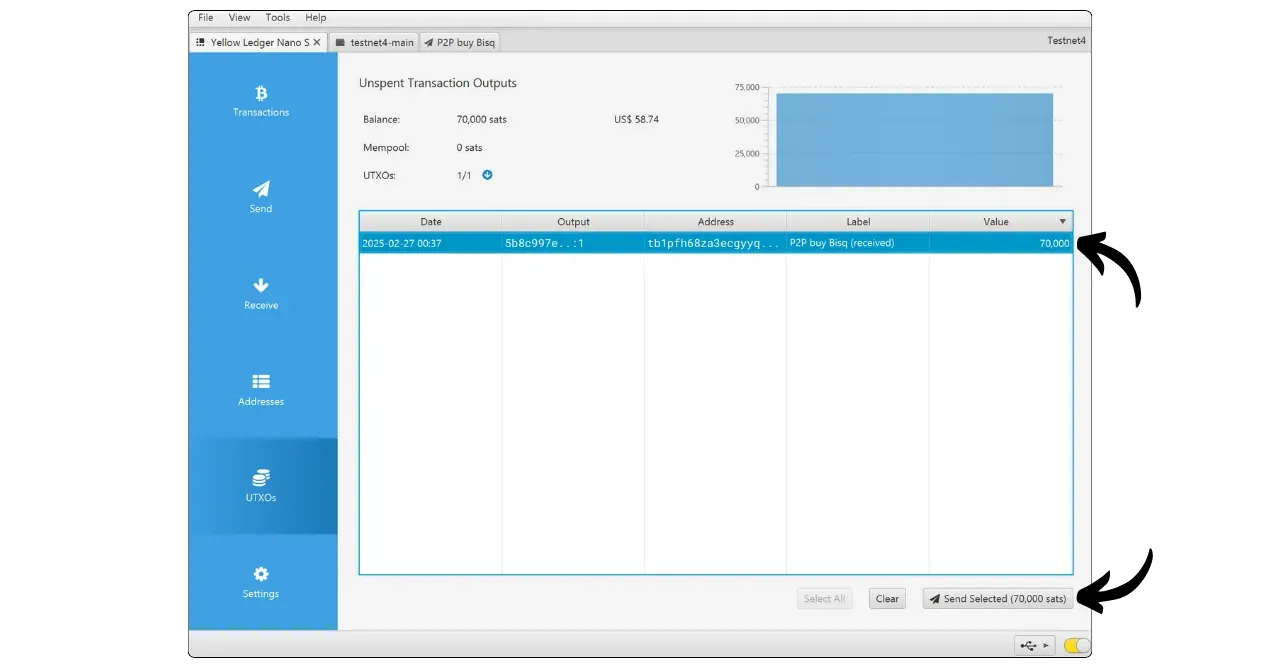
Now that you have a few satoshis in your wallet, you also have the option of sending some. Although there are several ways of doing this, I recommend that you use the “UTXOs” menu for more precise control over the coins you spend (coin control), rather than going directly to the “Send” menu (although the latter may suffice if you’re a beginner).
Select the UTXOs you wish to use as inputs for this transaction, then click on “Send Selected”. This approach allows you to select the most appropriate sources among your UTXOs, according to your expenses and the labels applied when they are received, in order to optimize the confidentiality of your payments. Make sure that the sum of the selected UTXOs is greater than the amount you wish to send.
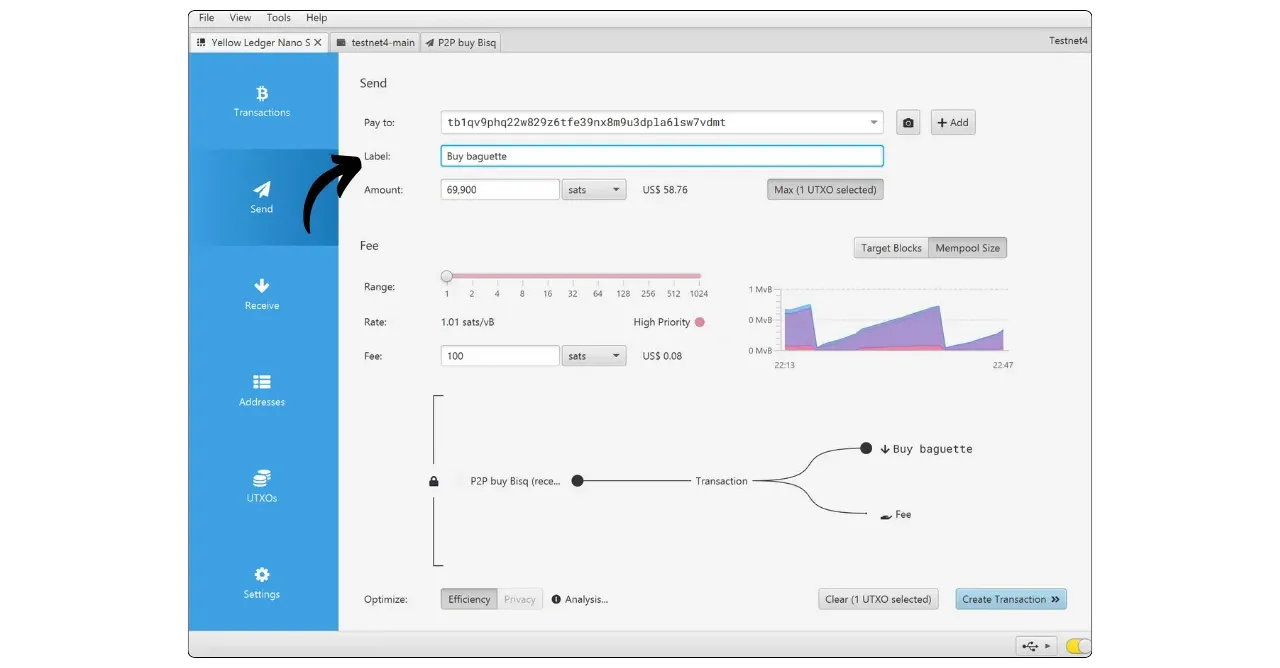
Enter the recipient’s address in the “Pay to” field. You can also scan the address with your webcam by clicking on the camera icon. The “+Add” button lets you pay multiple addresses in a single transaction.
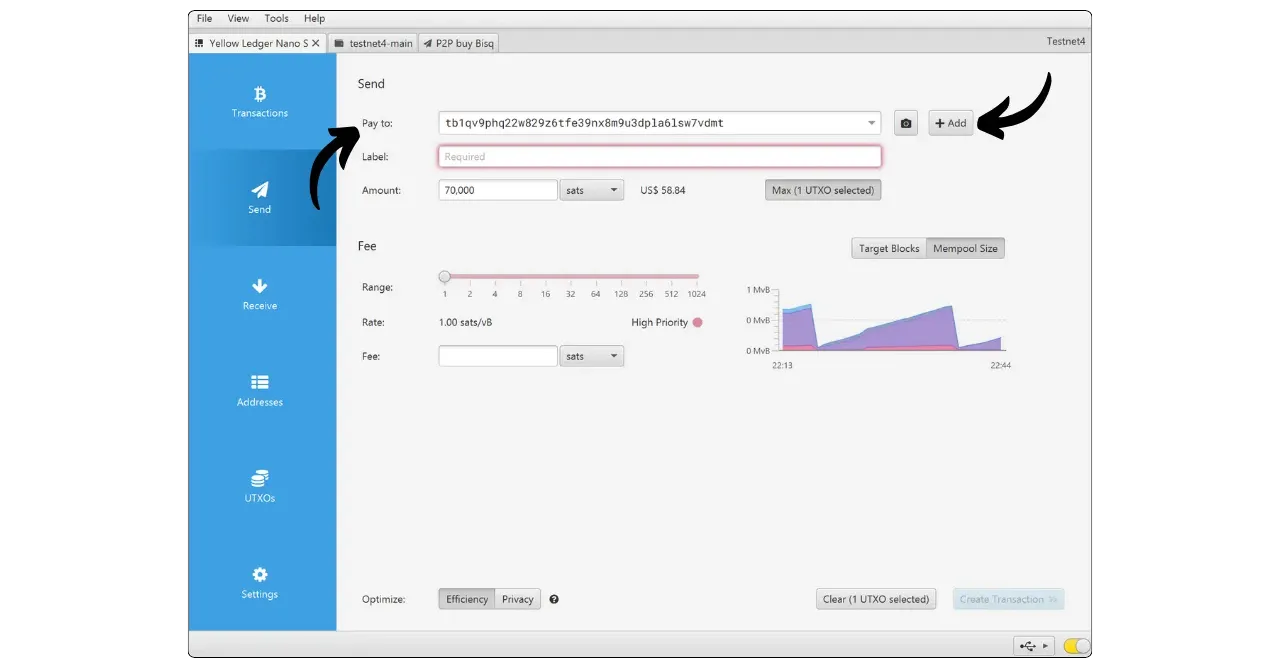
Add a label to your transaction to remind you of its purpose. This label will also be associated with your eventual exchange.
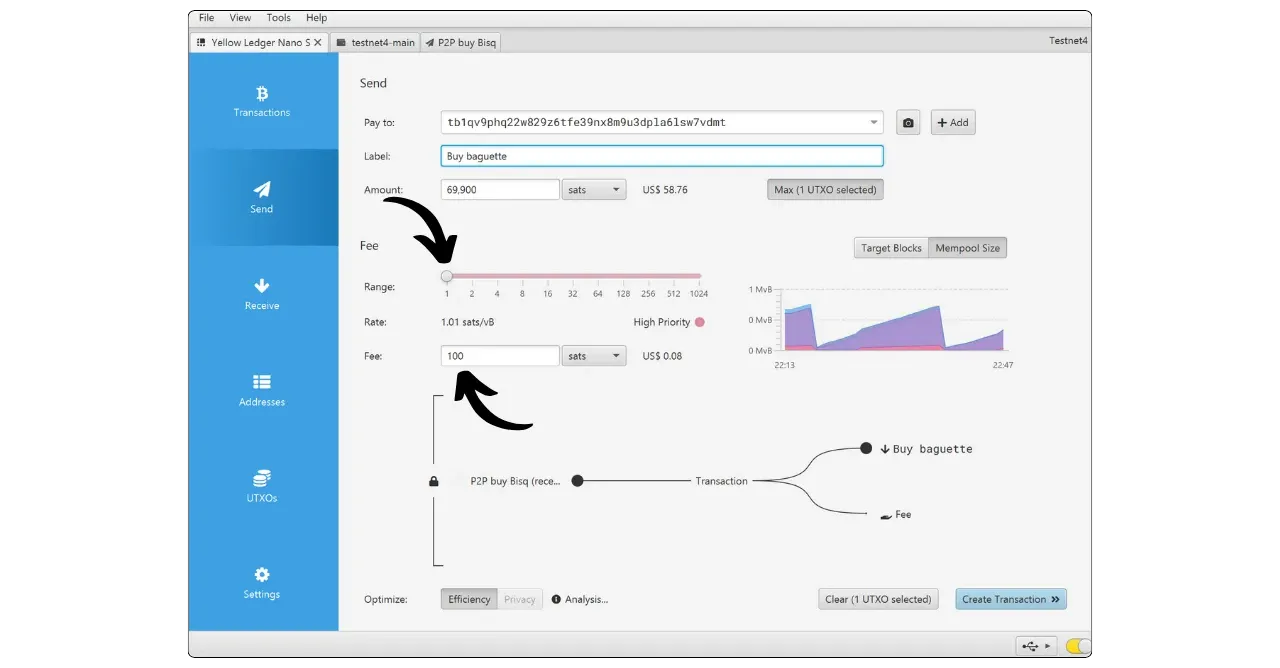
Enter the amount to be sent to this address.

Adjust the fee rate according to current market conditions. You can do this by entering an absolute fee value or by adjusting the fee rate with the slider.
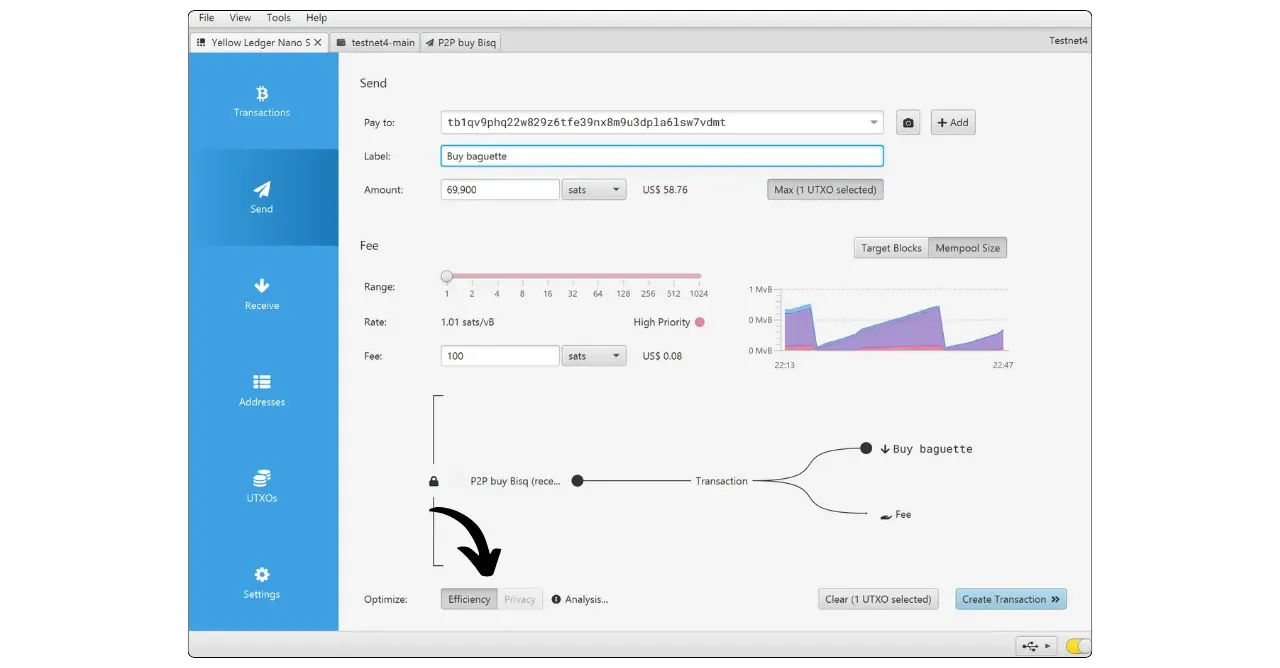
At the bottom of the Interface, you can choose between “Efficiency” and “Privacy”. In my case, the “Privacy” option is not available, as I only have one UTXO in this wallet. “Efficiency” corresponds to a classic transaction, while “Privacy” is a Stonewall-type transaction, a transaction structure that reinforces your confidentiality by simulating a mini-CoinJoin, which makes chain analysis more complex.
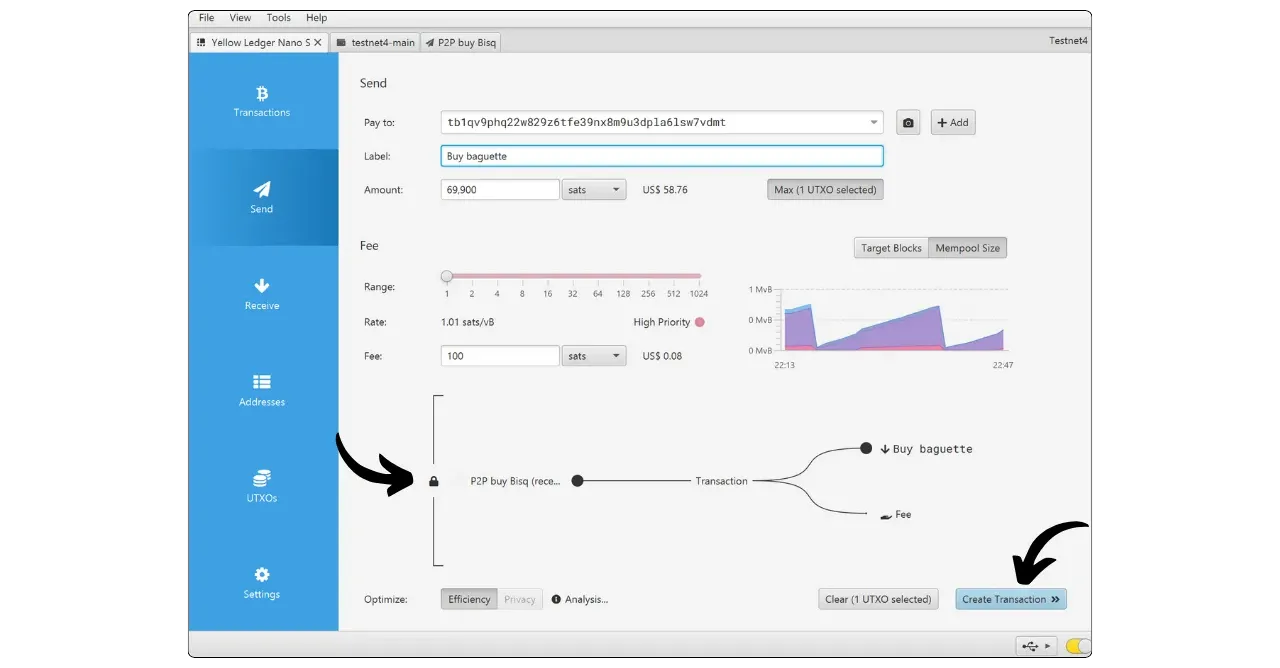
Sparrow displays a summary diagram showing your inputs, outputs and transaction fees (note that fees are not actually an output, contrary to what this diagram suggests). If you’re happy with everything, click on “Create Transaction”.
This takes you to a page detailing the elements of your transaction. Check that all the information is correct, then click on “Finalize Transaction for Signing”.
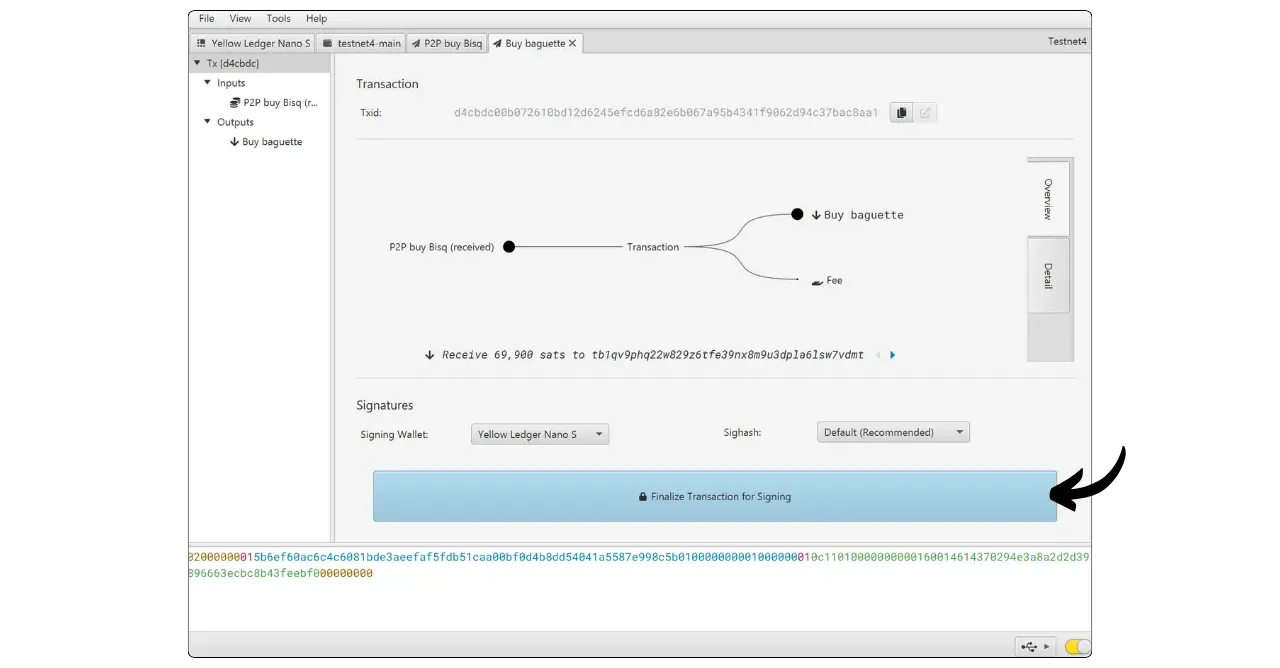
On the next screen, the options vary according to the type of wallet you are using:
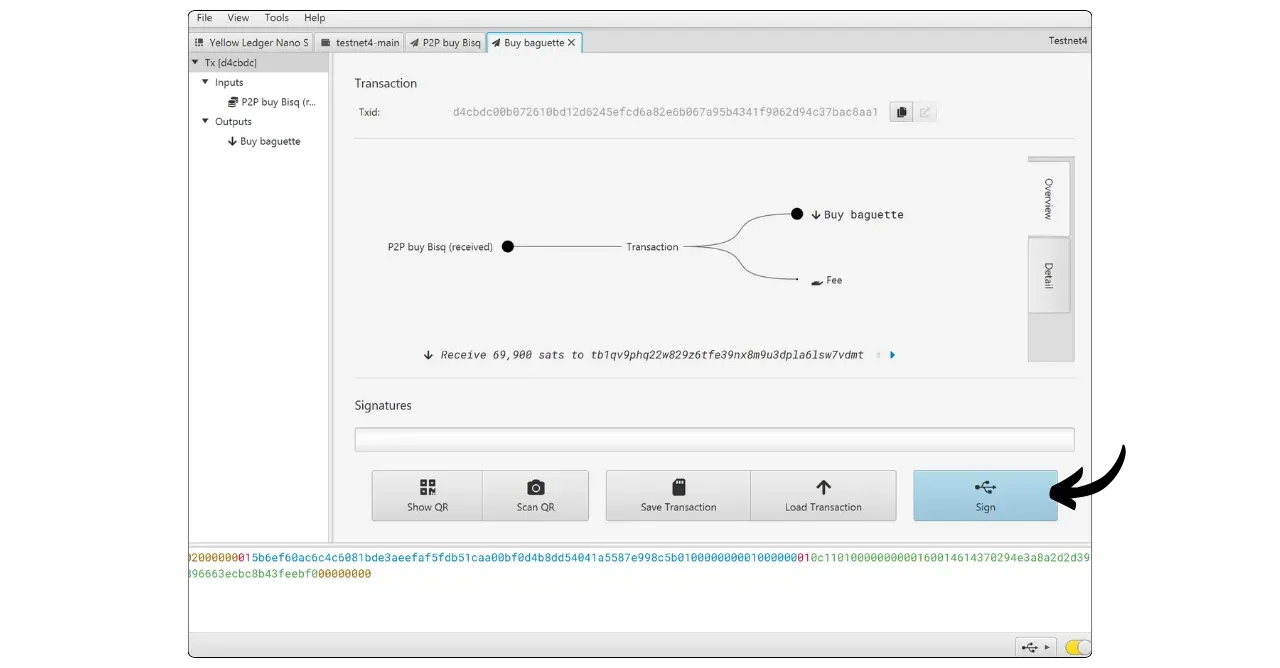
- For a Hardware Wallet Air-Gap, click on “Show QR” to display a PSBT that you can sign with your device, then load the signed PSBT into Sparrow using “Scan QR”. The “Save Transaction” option works in a similar way, but with exchanges on a microSD ;
- For a hot wallet, simply click on “Sign” and enter the wallet password to sign ;
- For a wired Hardware Wallet, also click on “Sign” to send the unsigned transaction to your device.
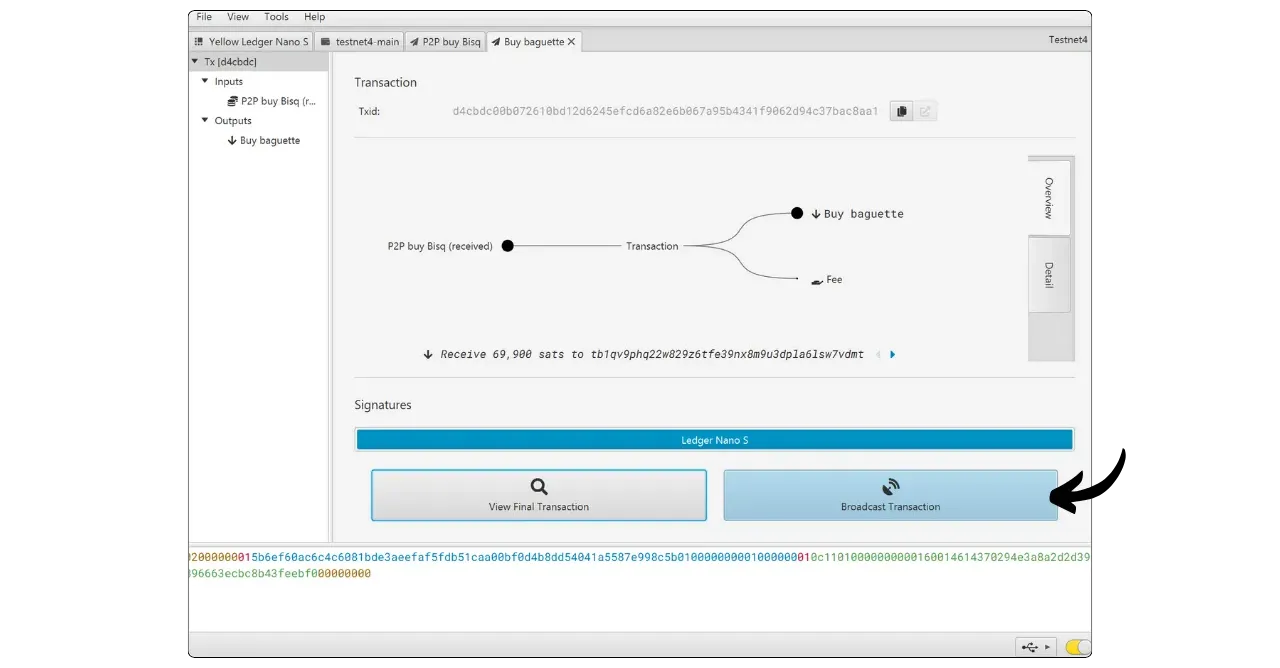
On your Hardware Wallet, check the recipient’s address, the amount sent and the charges. If everything is correct, proceed with the signature.
Before signing, verify on your Hardware Wallet the destination address, change address (if present), amount, and fee. A wrong output cannot be reversed.
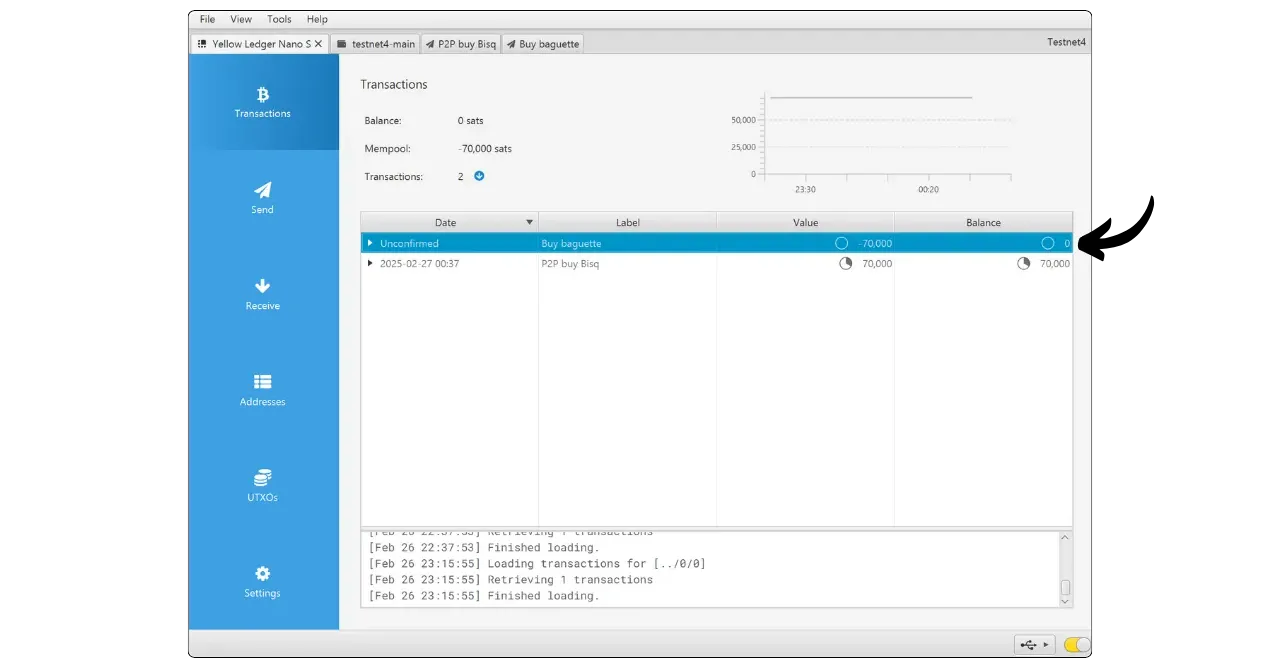
Once the transaction has been signed, it will reappear in Sparrow, ready to be broadcast on the Bitcoin network for subsequent inclusion in a block. If everything is correct, click on “Broadcast Transaction”.
Your transaction is now broadcast and awaiting confirmation.
Managing and configuring wallets on Sparrow
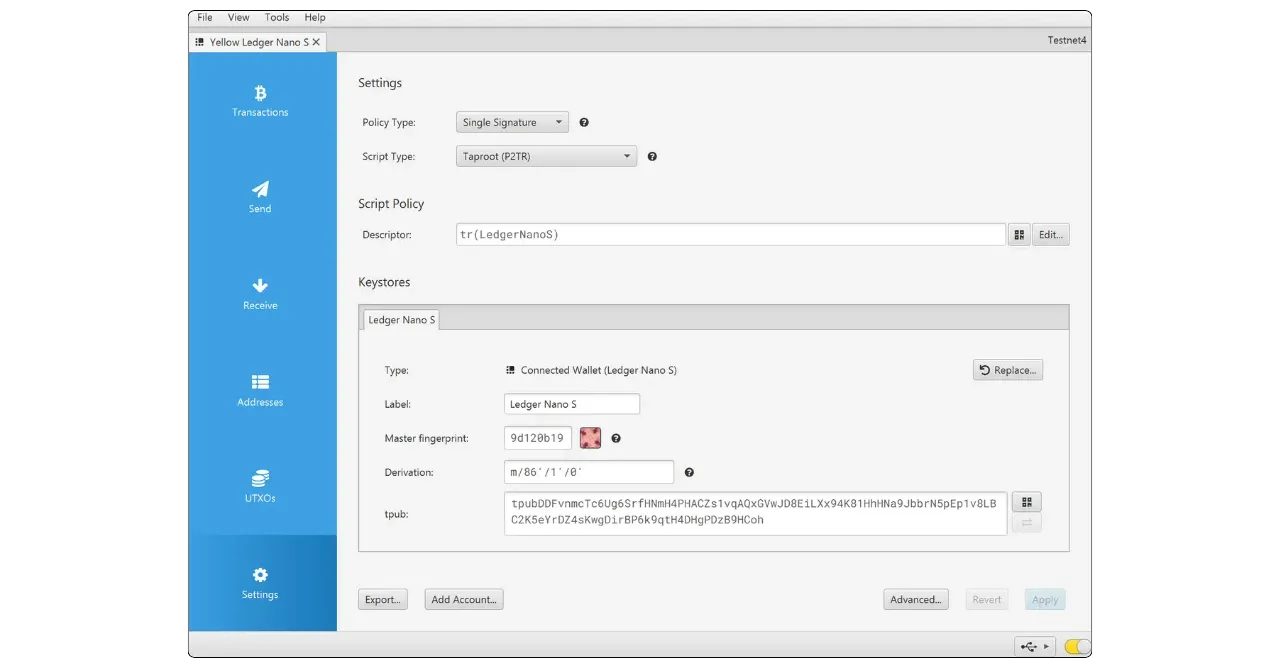
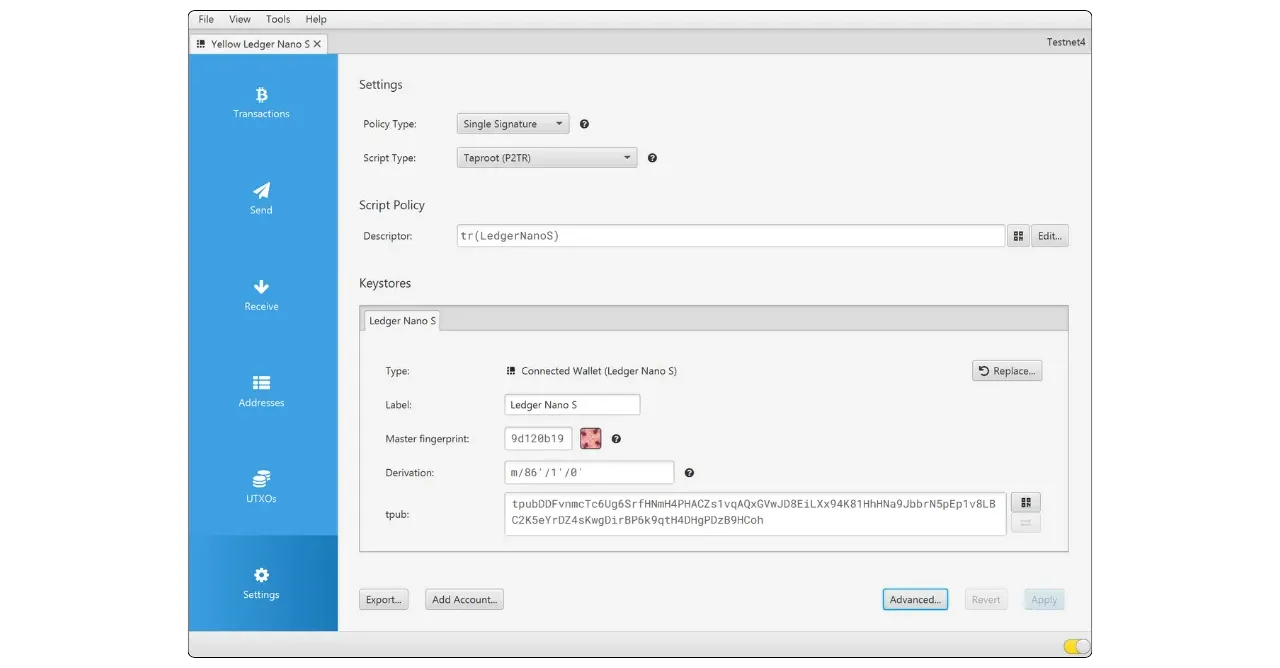
In the “Settings” tab, you will find detailed information on your wallet, such as :
- Portfolio type (single-sig or multi-sig) ;
- Type of script used ;
- The name you have assigned to the wallet ;
- Master key imprint;
- The bypass path ;
- The account’s extended public key.
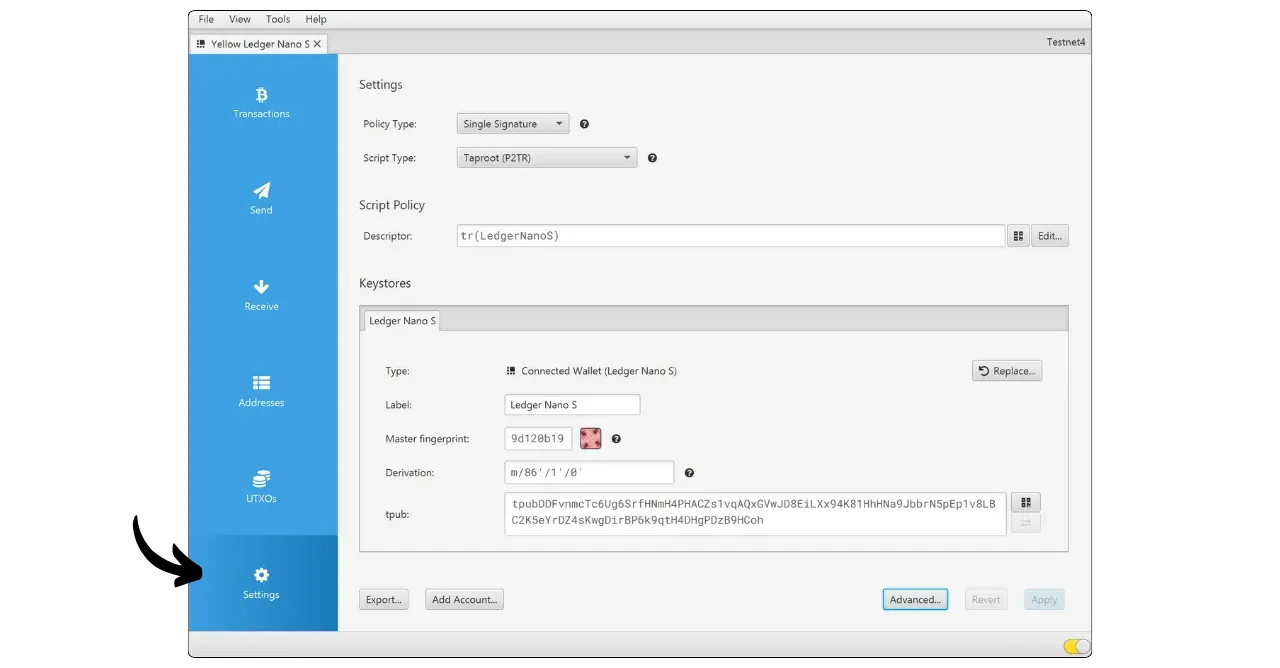
The “Export” button allows you to export your wallet information so that you can use it in other software while retaining the information set up in Sparrow.
The “Add Account” button lets you add an additional account to your wallet. An account corresponds to a separate set of inbox addresses. This feature can be useful, for example, if you wish to separate a personal and a business account, with a single mnemonic phrase.
The “Advanced” button gives access to advanced settings, such as customizing Sparrow’s address search and changing the wallet password.
When you close Sparrow Wallet, your wallet locks automatically. The next time you open the software, a window will prompt you to unlock your wallet with its password.
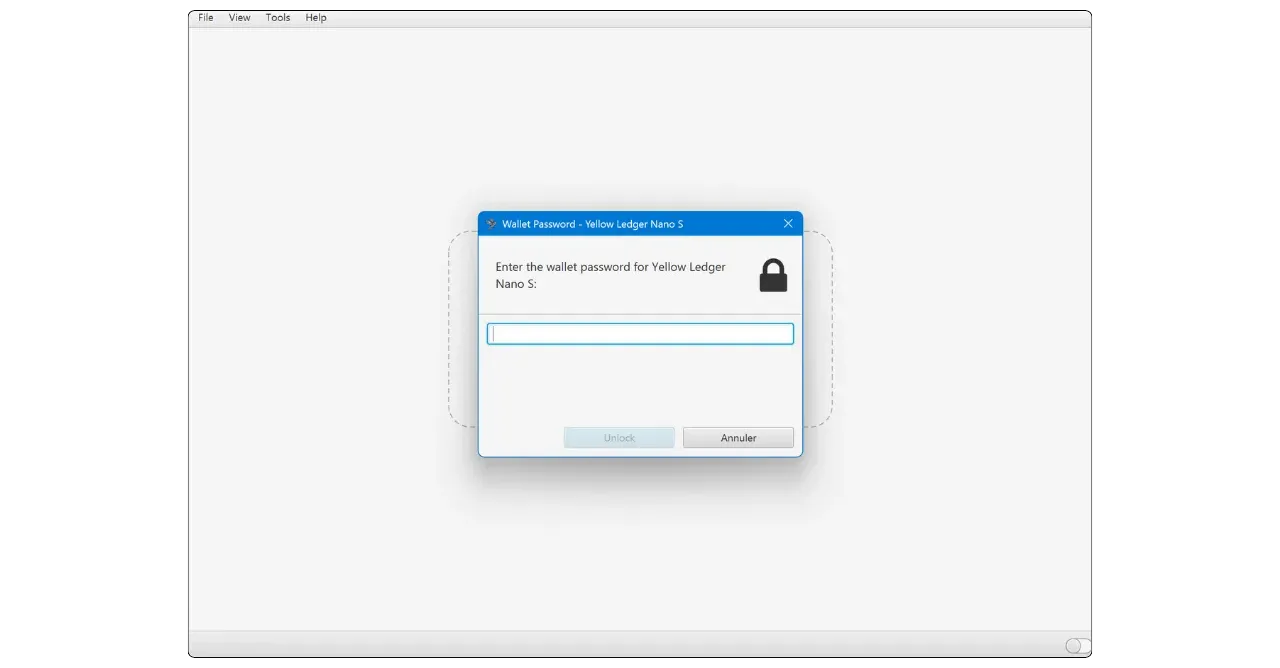
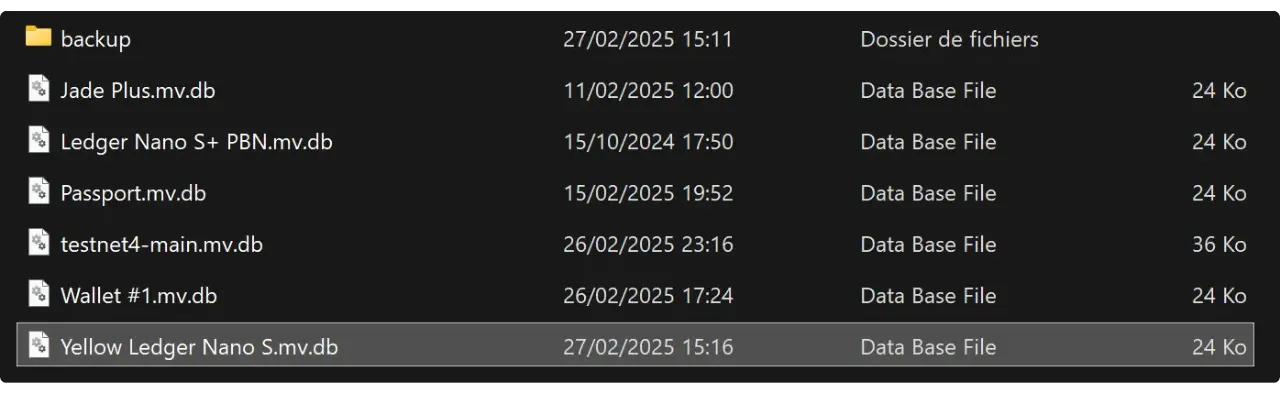
If this window does not open, or if you wish to open another wallet on Sparrow, click on the “File” tab and select “Open Wallet”.
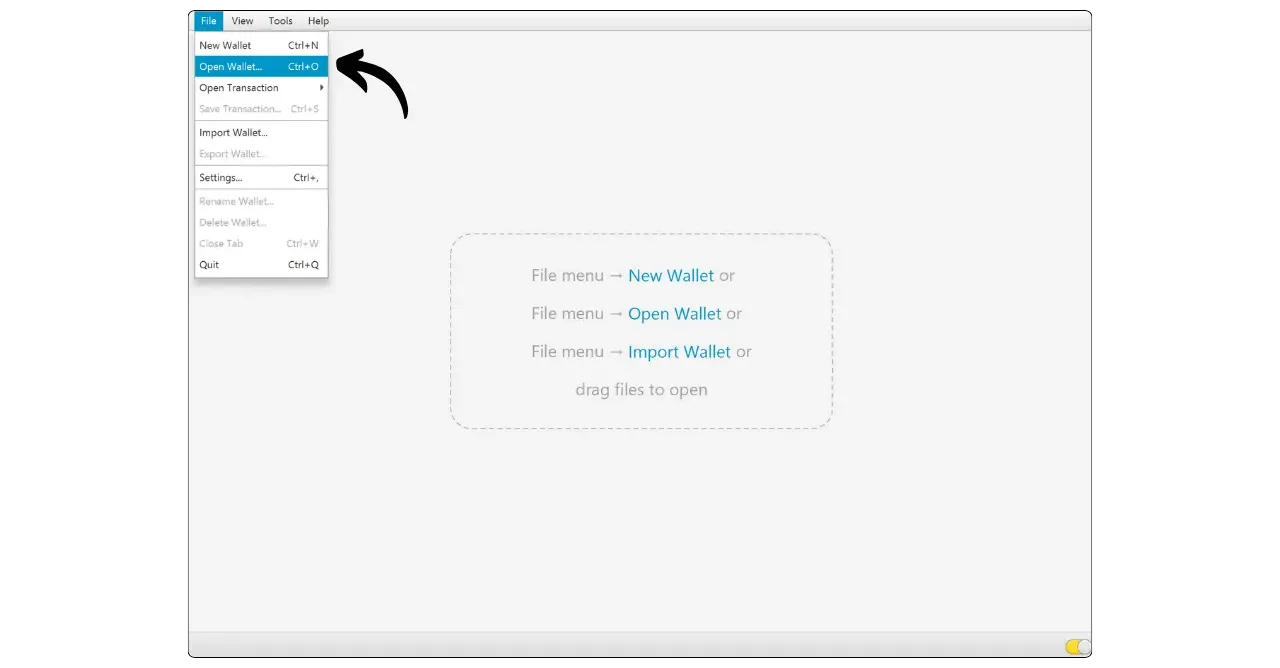
This will open your File Manager to the folder where Sparrow stores your wallets. Simply select the wallet you wish to open and enter the password to unlock it.
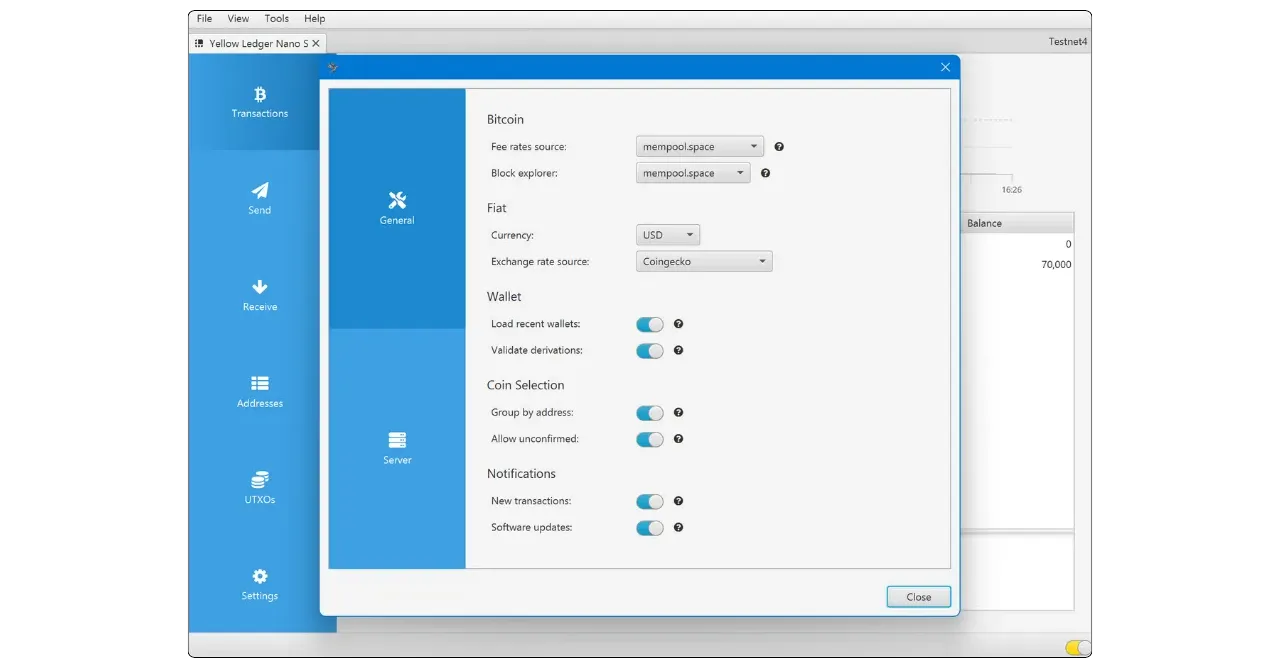
In the “File” menu under “Settings”, you’ll find the Bitcoin network connection parameters already explored in previous sections. You can also adjust various parameters such as the unit used, fiat currency for conversions, and information sources.
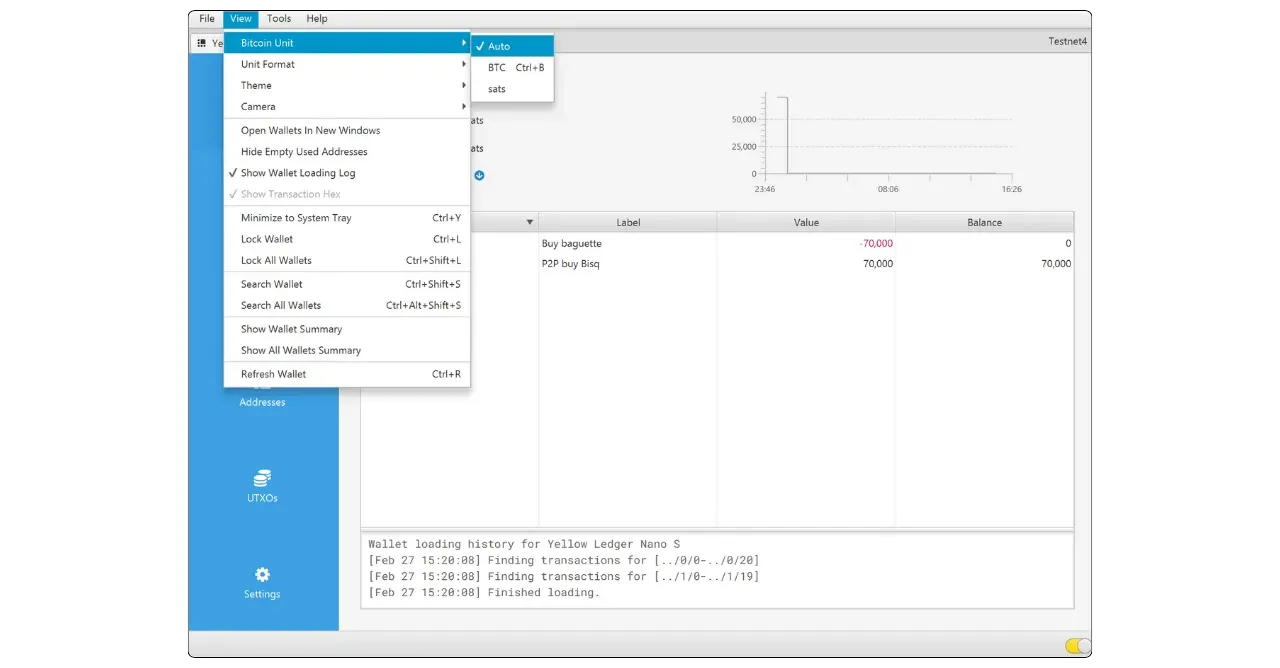
The “View” tab offers customization options and access to some useful commands, such as “Refresh Wallet”, which refreshes the transaction search for your wallet.
The “Tools” tab groups together several advanced tools, including :
- “Sign/Verify Message” allows you to prove possession of a receiving address or verify a signature.
- “Send To Many” offers a simplified Interface for performing transactions to multiple receiving addresses at once, which is convenient for batch spending.
- “Sweep Private Key” allows you to retrieve bitcoins secured by a simple private key and transfer them to your Sparrow wallet. This can be particularly useful for those with bitcoins dating back to the early 2010s, before the era of HD wallets.
- “Verify Download” verifies the integrity and authenticity of downloaded software before installing it on your device.
- “Restart In” allows you to switch to your wallets on Testnet or Signet networks. This can be useful if you wish to access test networks with coins of no real value.

You now know all about Sparrow Wallet software, an excellent tool for managing your Bitcoin wallets.