Ashigaru Full Stack
Combined guide for Ashigaru Whirlpool, Stonewall x2, Stowaway (PayJoin), Stonewall, Ricochet, Terminal Setup, and Mobile usage
A complete Ashigaru guide covering setup, wallet creation, Whirlpool coinjoins, and advanced spending tools in one place.
Ashigaru is the continuation of the Samourai Wallet project in a new form. After the April 2024 arrest of Samourai Wallet’s founders and the seizure of its infrastructure, the original app remained usable but unmaintained. Ashigaru emerged as a free and open fork, maintained anonymously, to preserve Samourai’s features and philosophy: self-custody, open-source software, and strong Bitcoin privacy.
Ashigaru keeps the core DNA of Samourai: a similar interface, a self‑custodial approach, open‑source code, and a strong focus on privacy. The code is licensed under GNU GPLv3, which guarantees anyone can audit, modify, or redistribute the software.
Across mobile and desktop, Ashigaru integrates advanced tools for privacy and UTXO management:
- Whirlpool, a coinjoin protocol based on Zerolink, to break deterministic links between transaction inputs and outputs without surrendering custody.
- PayNym, which implements reusable payment codes (BIP47), now represented via “Pepehash” avatars.
- Ricochet, which adds intermediate hops to transactions to complicate tracing.
- Coin Control to precisely select, freeze, and label your UTXOs.
- Batch Spending to reduce fees by grouping multiple payments into one transaction.
- Stealth Mode, which hides the app behind a decoy launcher to pass unnoticed during a physical phone inspection.
- Advanced spending tools to optimize privacy (payjoin, stonewall etc).
- An optimized recovery flow using a BIP39 passphrase.
- Automatic fee selection to optimize miner fees.

Ashigaru is designed for users who are mindful of transaction traceability on Bitcoin. Whether you care about preserving privacy, you’re an experienced bitcoiner focused on self‑custody, or you face heightened surveillance risks, this wallet gives you the tools to take back control of your on‑chain activity.
This guide combines the following previously separate tutorials into one monolithic reference:
- Ashigaru Mobile Guide
- Ashigaru Terminal Setup Guide
- Ashigaru Whirlpool
- Stonewall x2
- Ashigaru Stowaway (PayJoin)
- Ashigaru Stonewall
- Ashigaru Ricochet
1. Ashigaru Mobile prerequisites
Ashigaru is available as a mobile app, which we’ll explore first. It has a companion desktop application called Ashigaru Terminal, covered later in this guide.

Ashigaru requires a few prerequisites to work correctly. First, it is not available from mainstream app stores like Google Play or the App Store. It must be sideloaded on your phone from its .apk file, downloaded via Tor. Therefore, if you use an iPhone, this method will not work: you will need an Android device.
To download the .apk via Tor, you’ll need a browser that can access .onion sites. The easiest way is to install Tor Browser on your phone, available on the Google Play Store or directly via its .apk.
Most modern smartphones block app installs from unknown sources by default. You will need to temporarily enable this option for Tor Browser in your device settings to allow the install. Once Ashigaru is installed, disable this option again to keep your phone secure.
Only enable “Install unknown apps” temporarily, and restrict it to Tor Browser for the install — then disable it again.
Another critical prerequisite for using Ashigaru is running a Dojo Bitcoin node. For security and sovereignty, the Ashigaru team does not maintain centralized servers to connect your app. You must run your own Dojo instance or connect to one operated by someone you trust.
Dojo lets your Ashigaru app query blockchain data, view the balance of your addresses, and broadcast transactions to the Bitcoin network.
To learn more about Dojo and how to install it, I have written the following dedicated guides:
How to Run a Bitcoin Node (Advanced)
If you truly cannot run your own Dojo, you can find people willing to share their instance on dojobay.pw. This can be a temporary solution, but for the long term, it is strongly recommended to run your own Dojo to ensure sovereignty and privacy.
Relying on a third‑party Dojo introduces trust and privacy trade‑offs. Treat it as a temporary measure and migrate to your own Dojo as soon as feasible.
2. Verify and install the Ashigaru mobile app
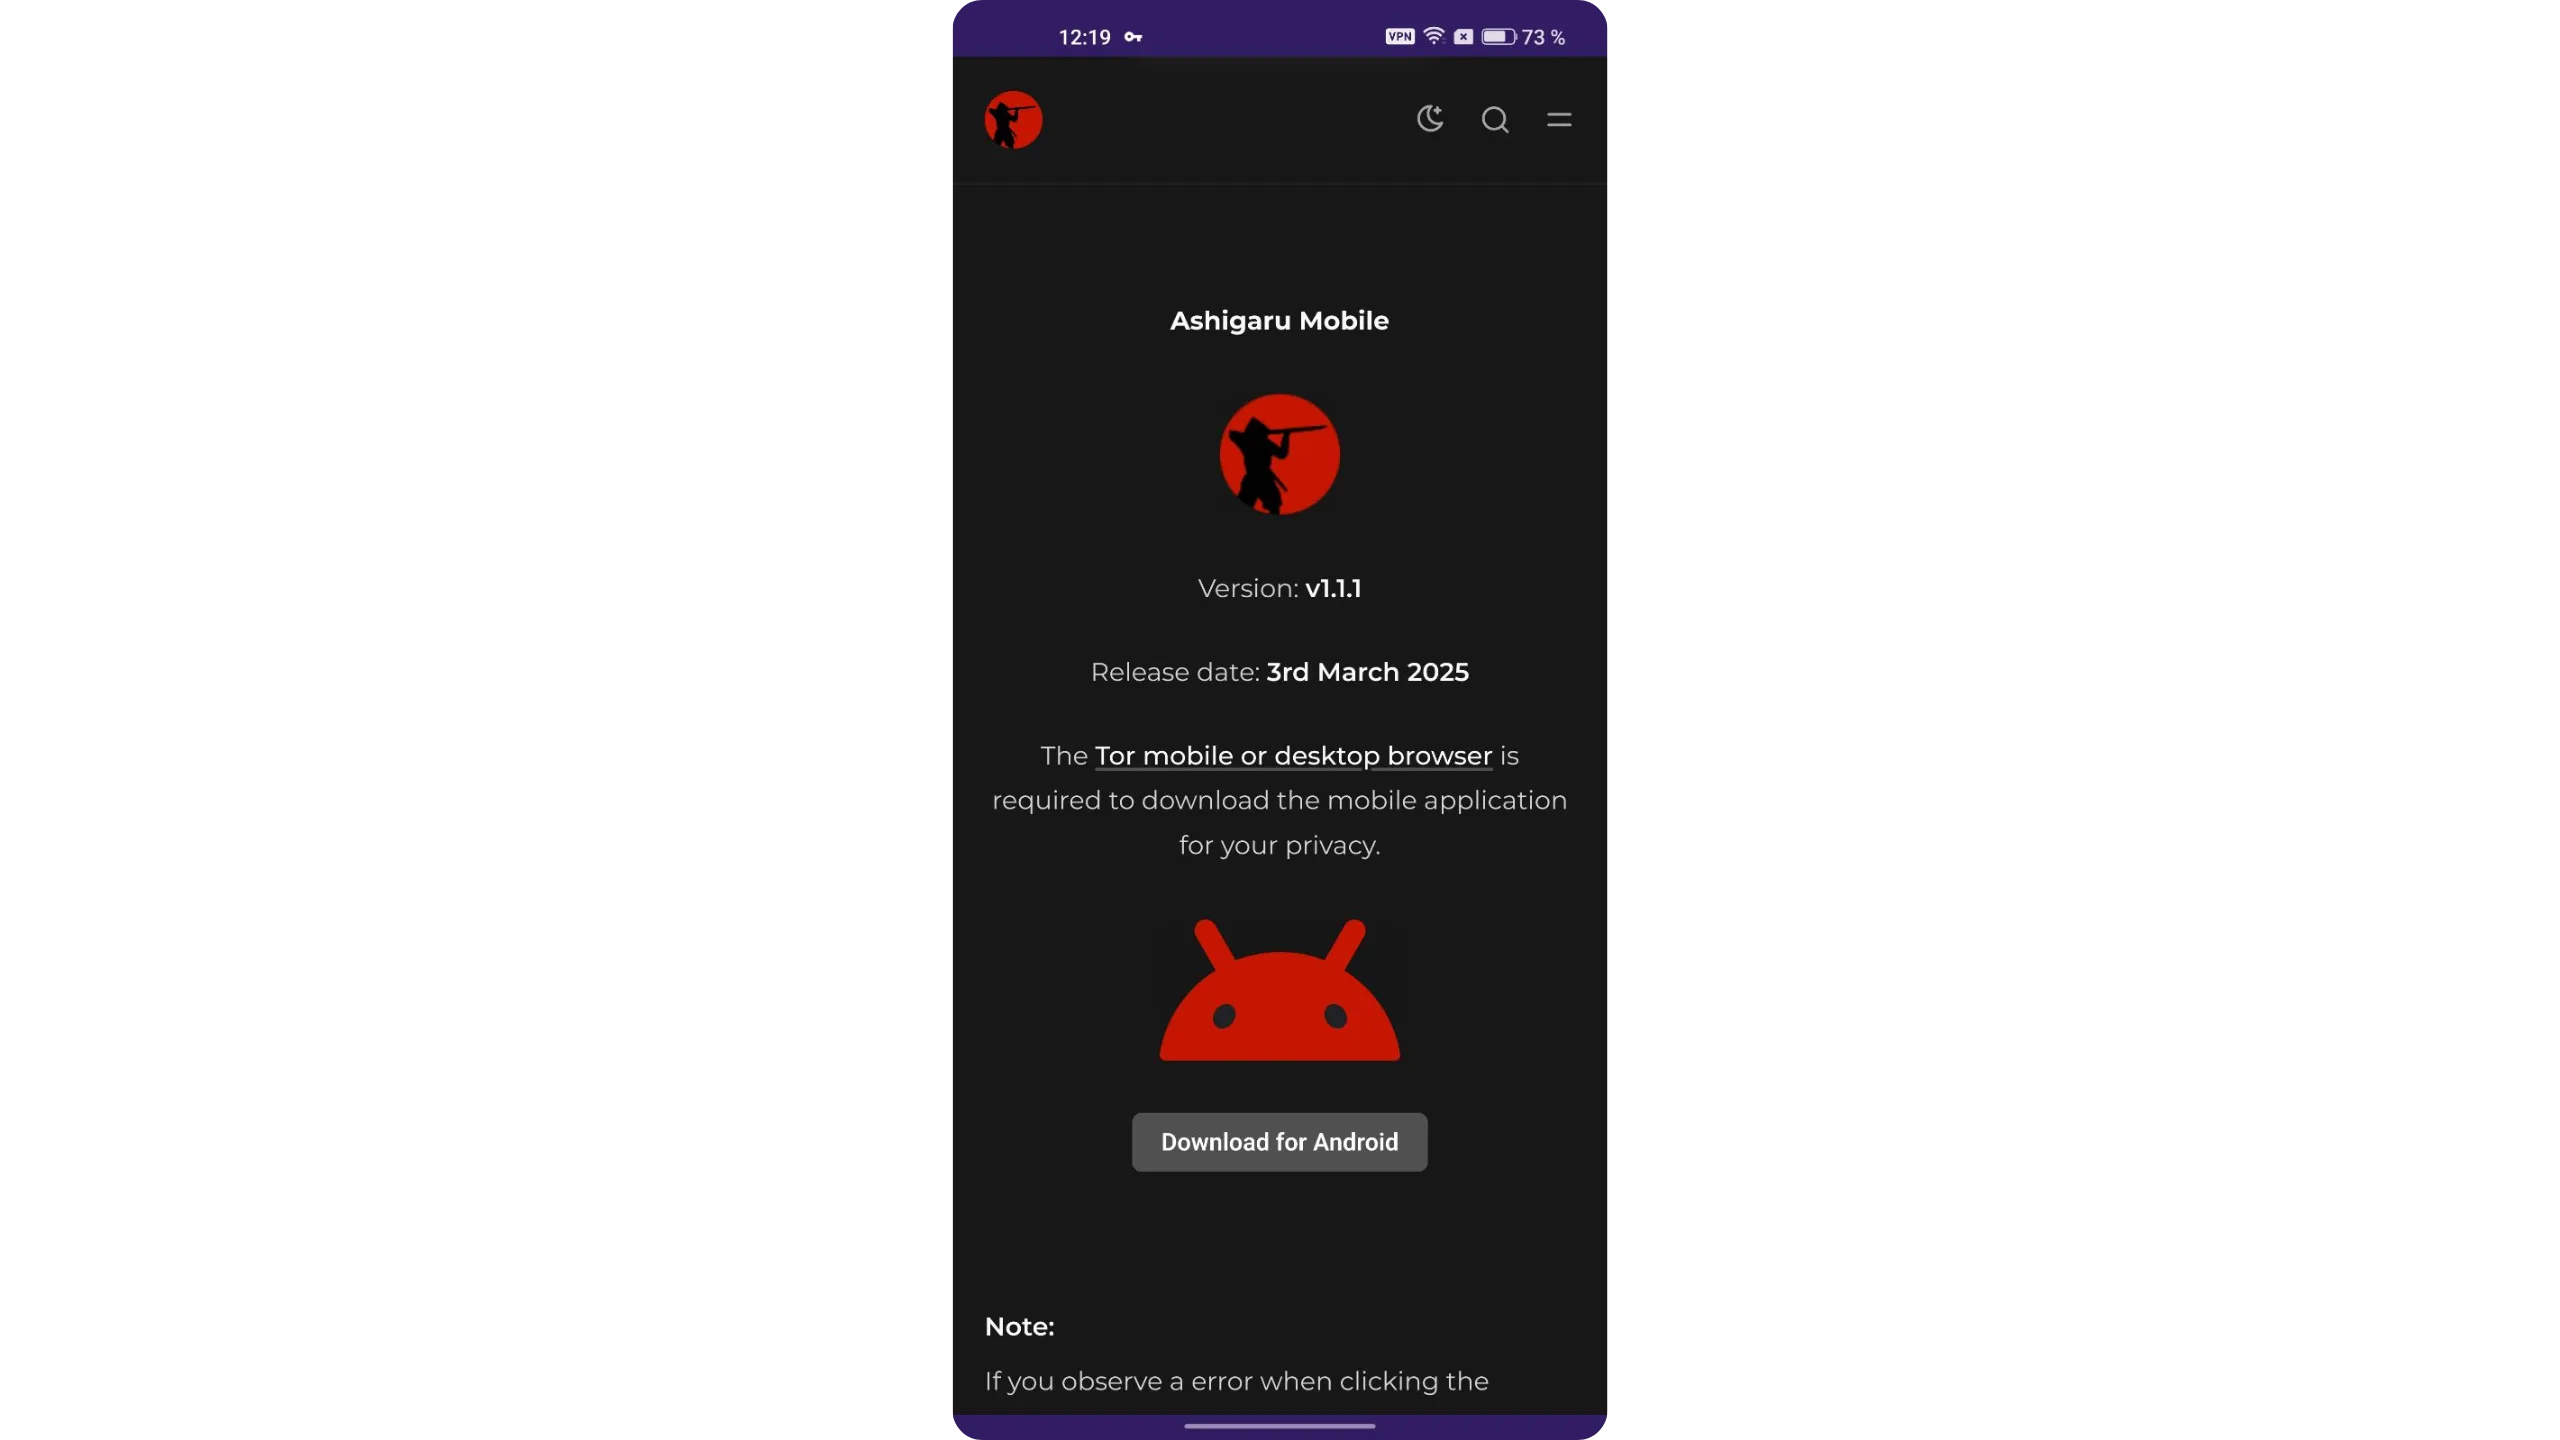
2.1. Download Ashigaru
On your phone, open Tor Browser and go to Ashigaru’s official website, under the “Download” section. Tap “Download for Android” to get the .apk installer.
Before installing, we will verify the app’s authenticity and integrity. This is especially important when installing from a .apk.
2.2. Verify the Ashigaru app
Back on Ashigaru’s official website in the “Download” section, copy the message shown under “SHA-256 Hash of the APK file.” Copy the entire block, from “BEGIN PGP SIGNED MESSAGE” to “END PGP SIGNATURE.”
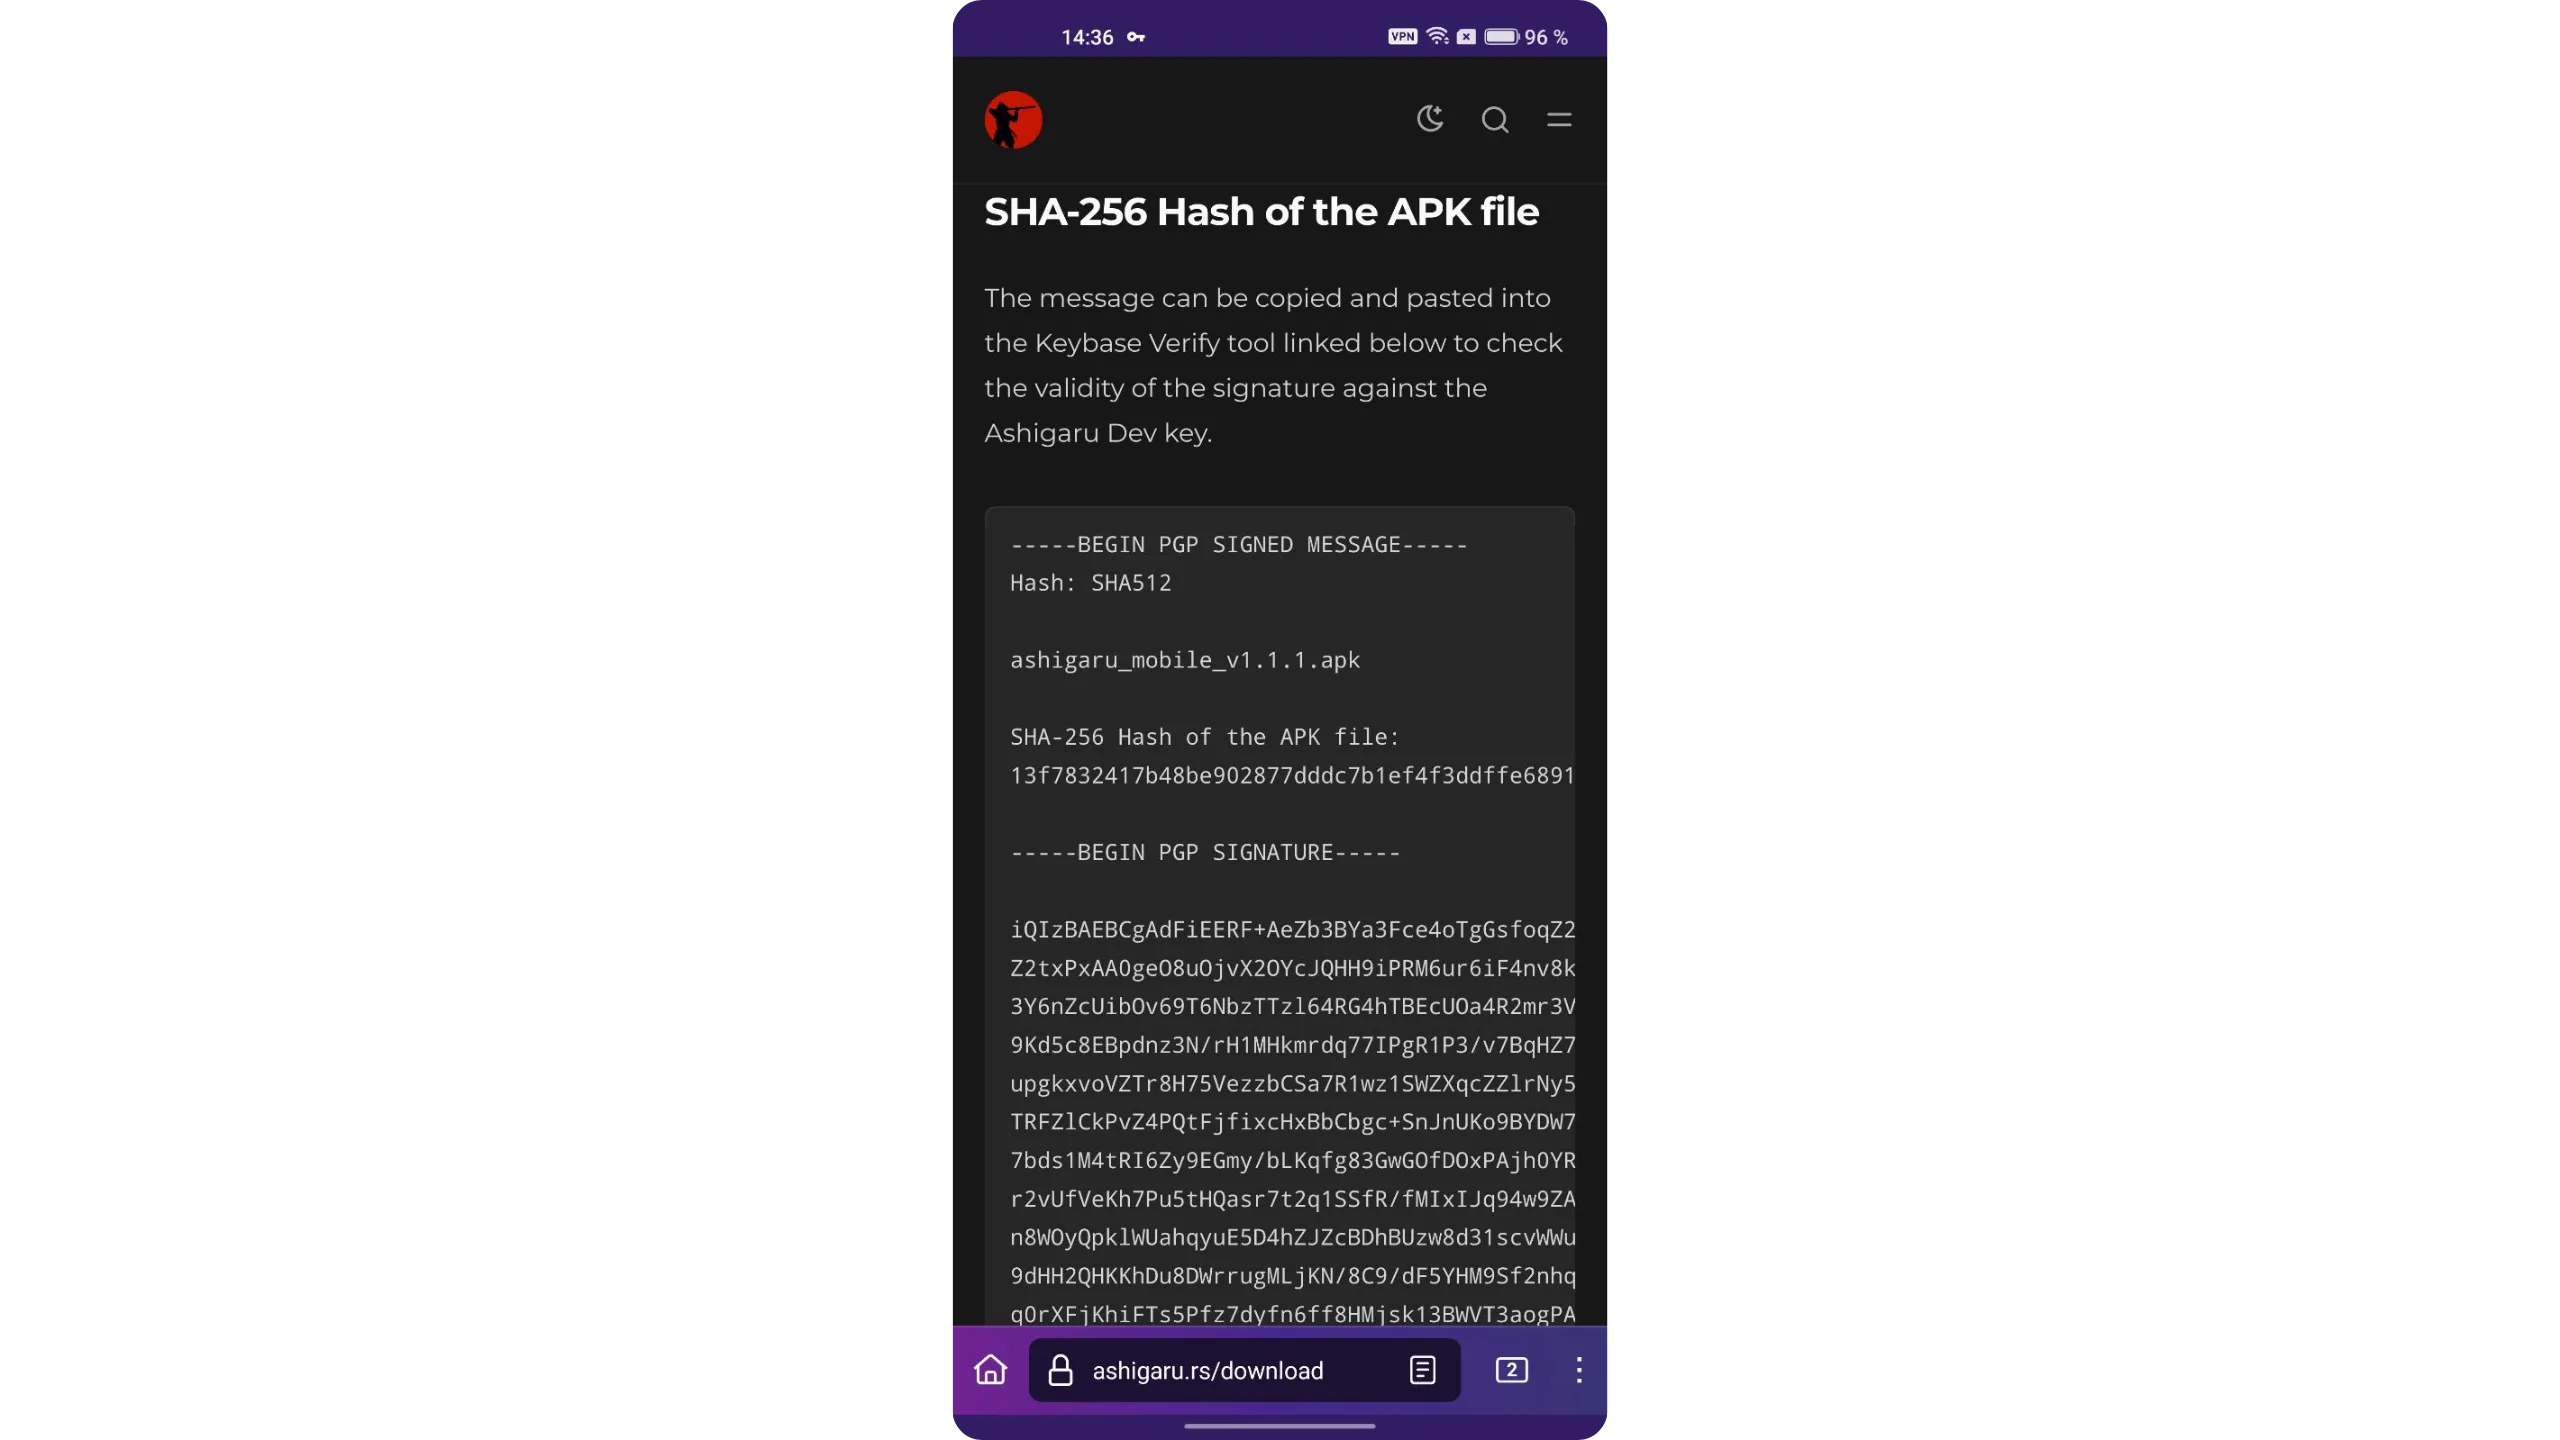
Still on your phone, open a new tab in Tor Browser and visit the Keybase verify tool. Paste the message you just copied and tap “Verify.”
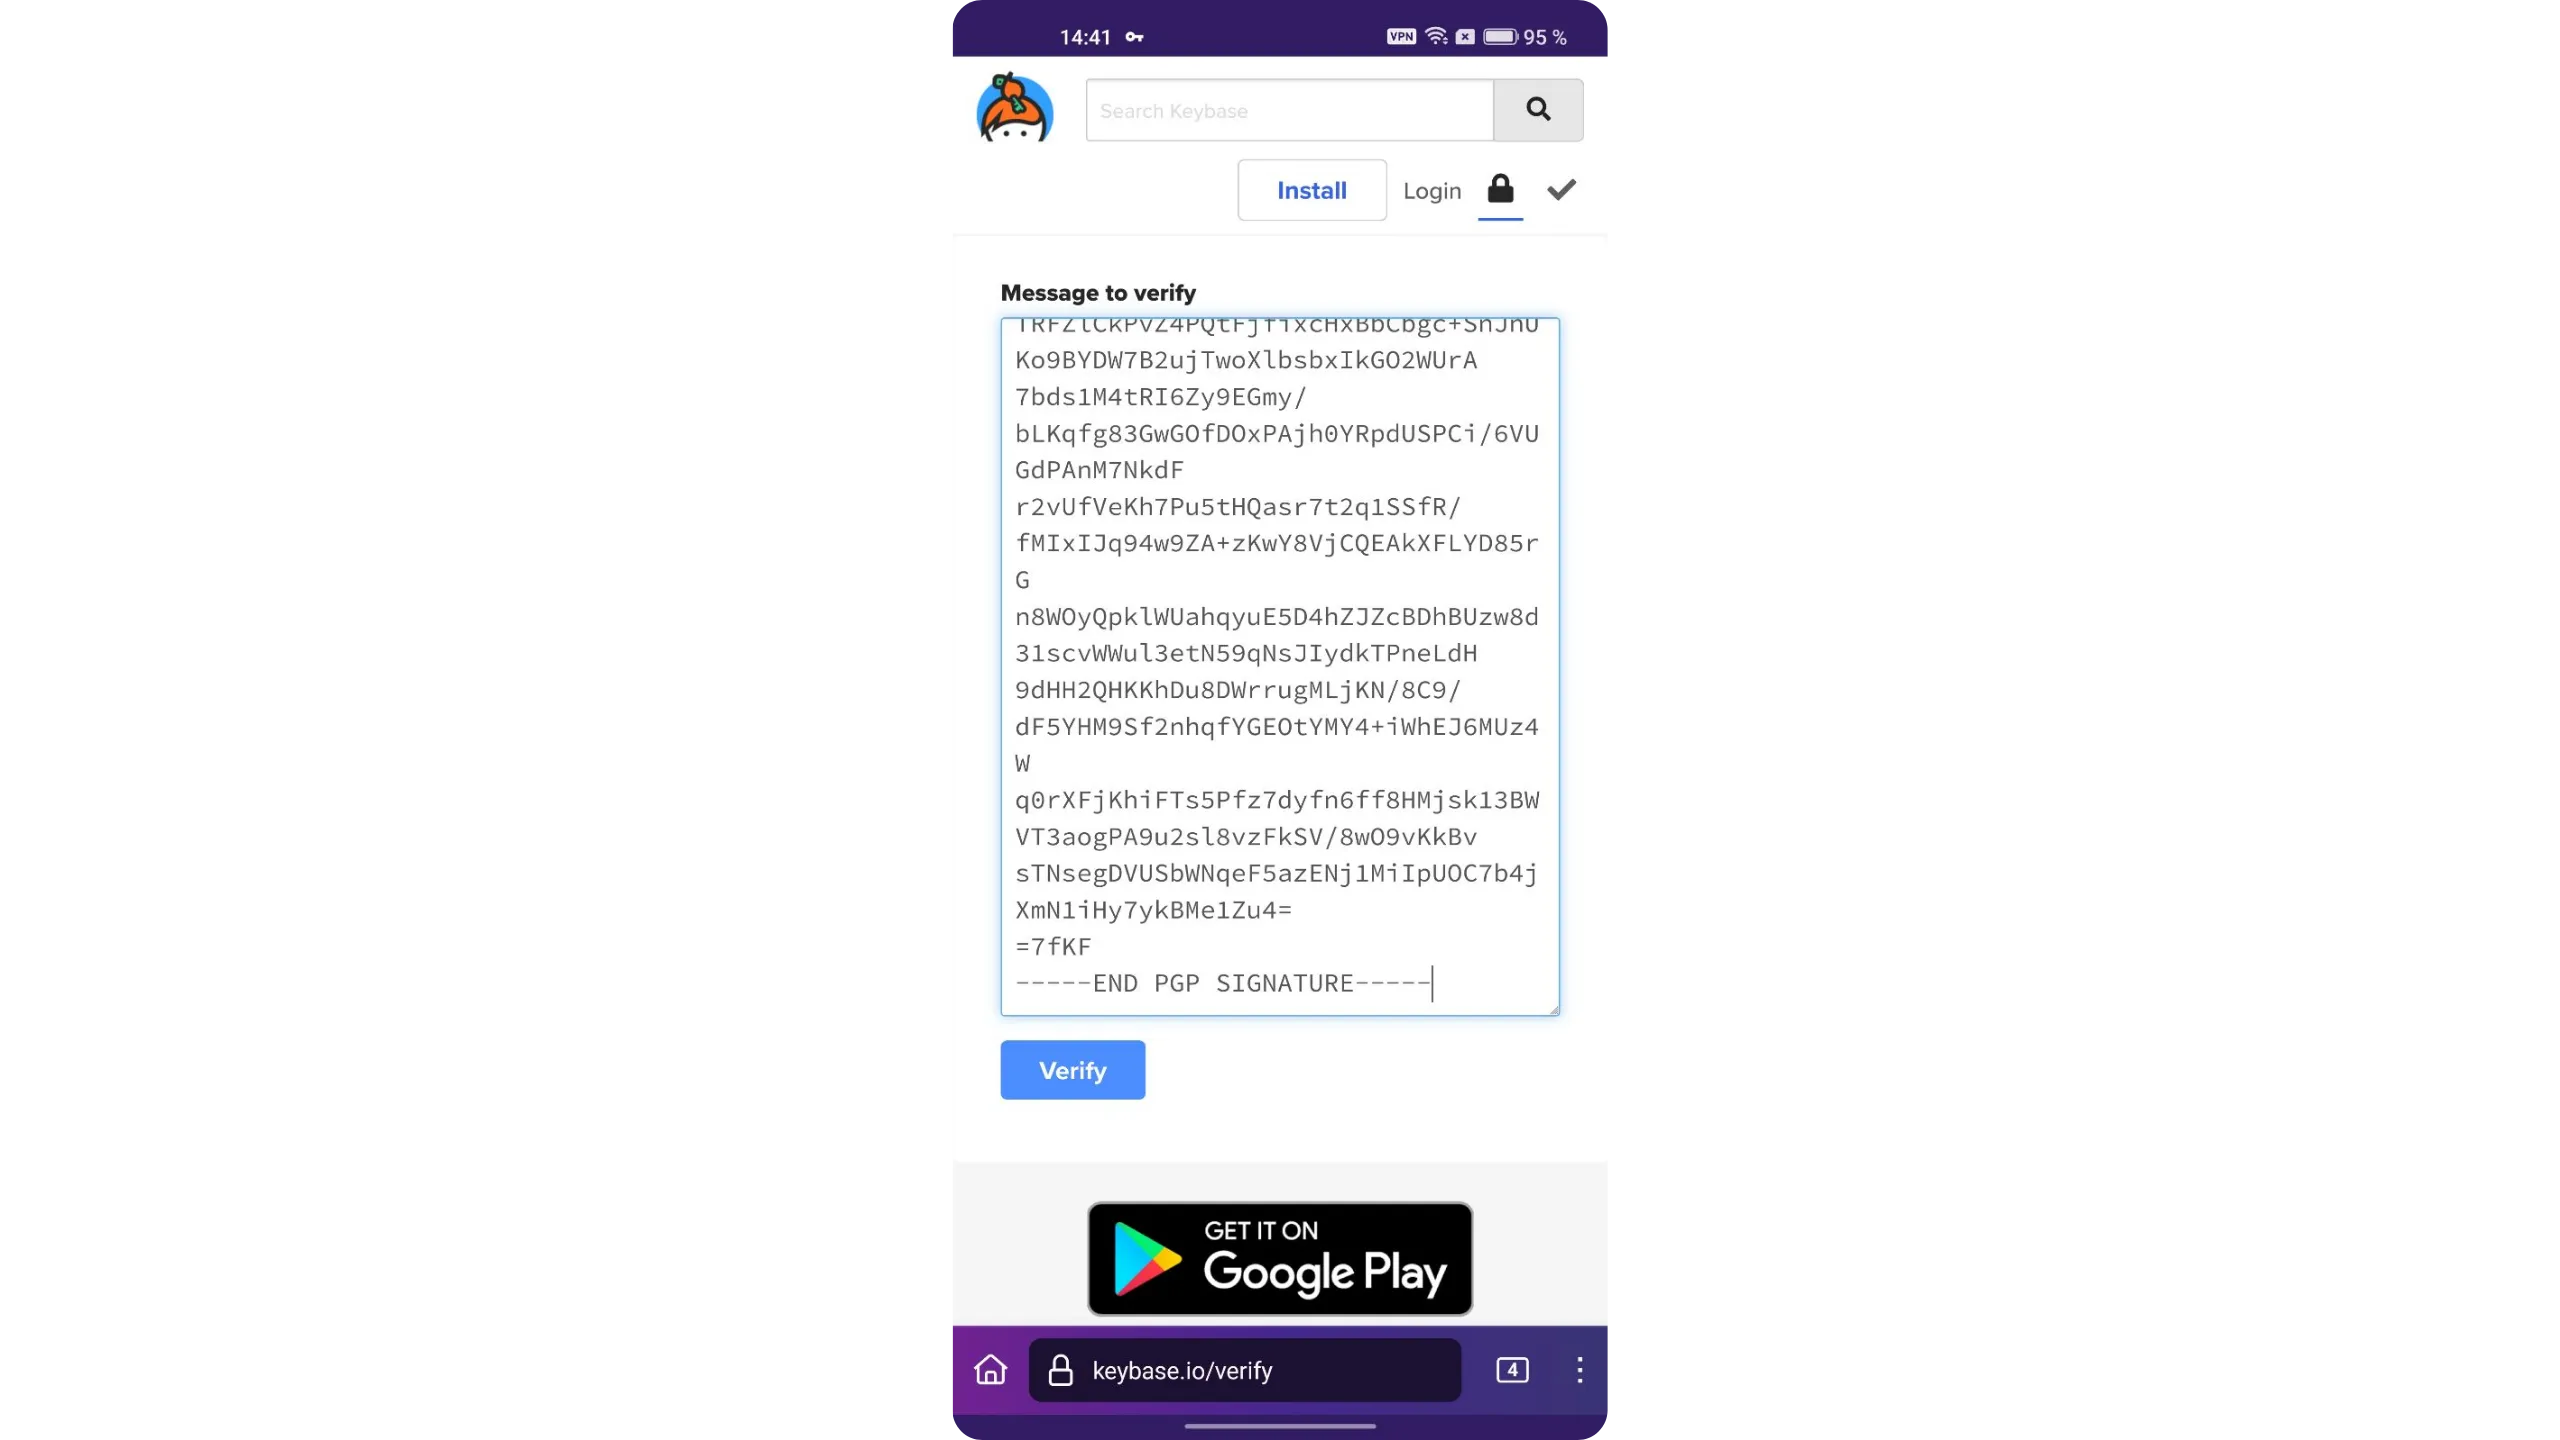
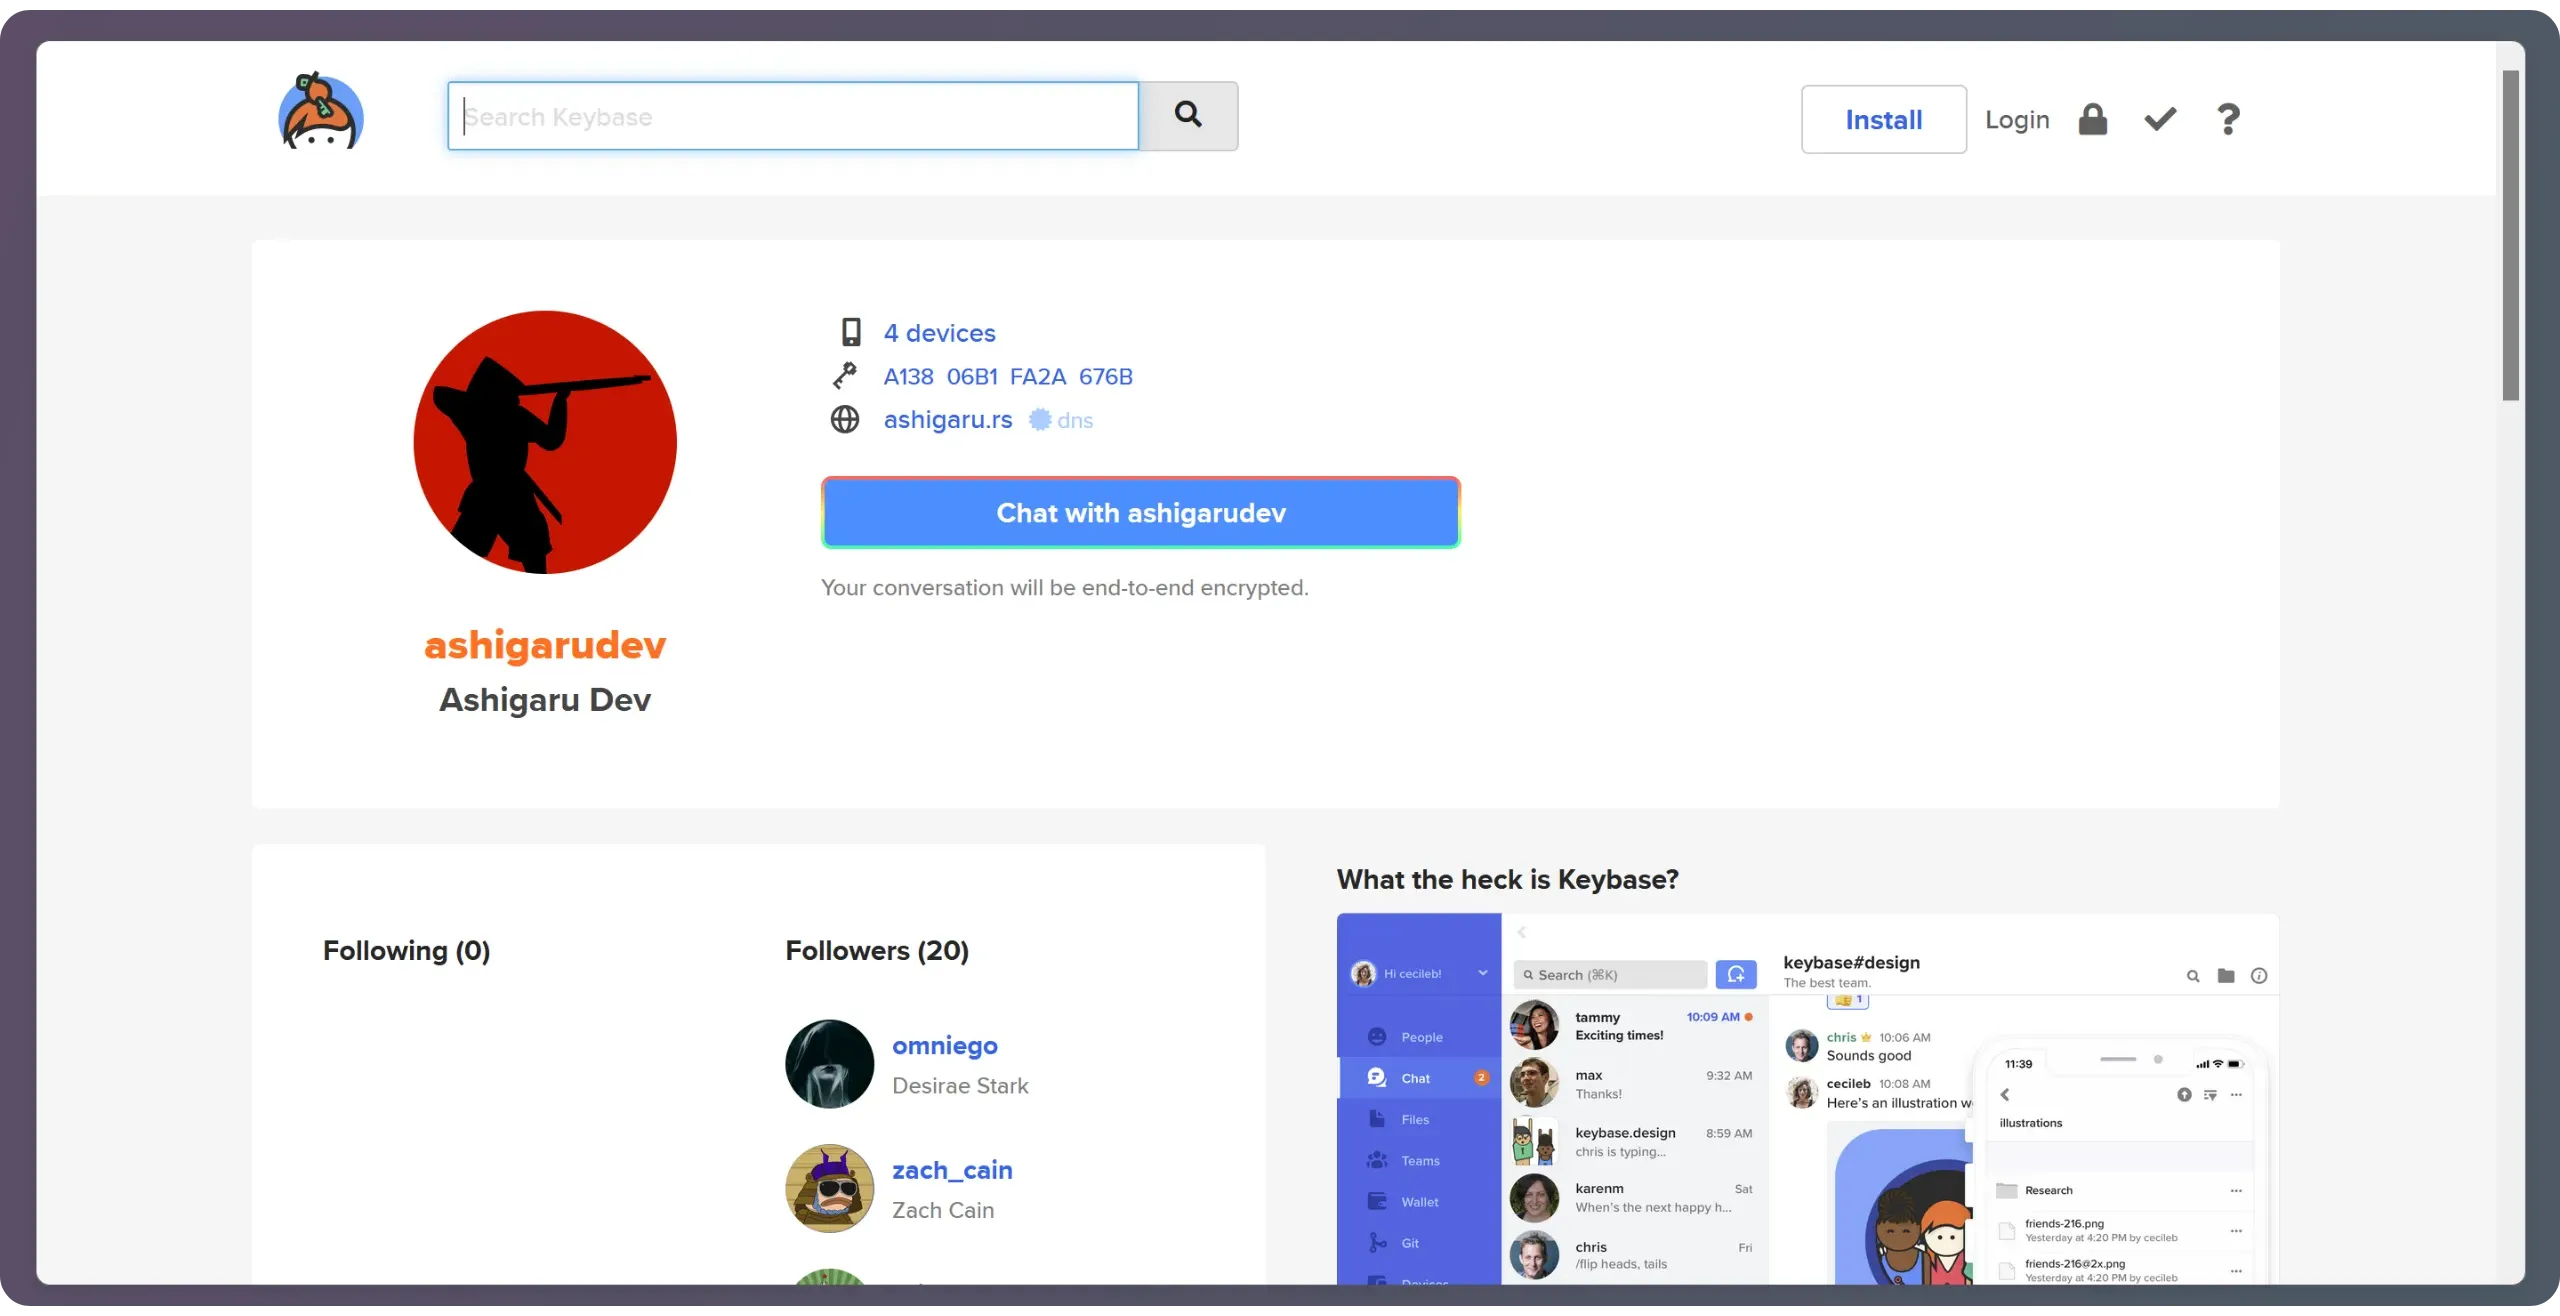
If the signature is valid, Keybase will confirm the file was signed by Ashigaru’s developers. You can also tap the “ashigarudev” profile shown by Keybase and verify that the key fingerprint matches exactly: A138 06B1 FA2A 676B.
If an error appears at this step, the signature is invalid. In that case, do not install the APK. Restart the process from the beginning or ask the community for help before proceeding.
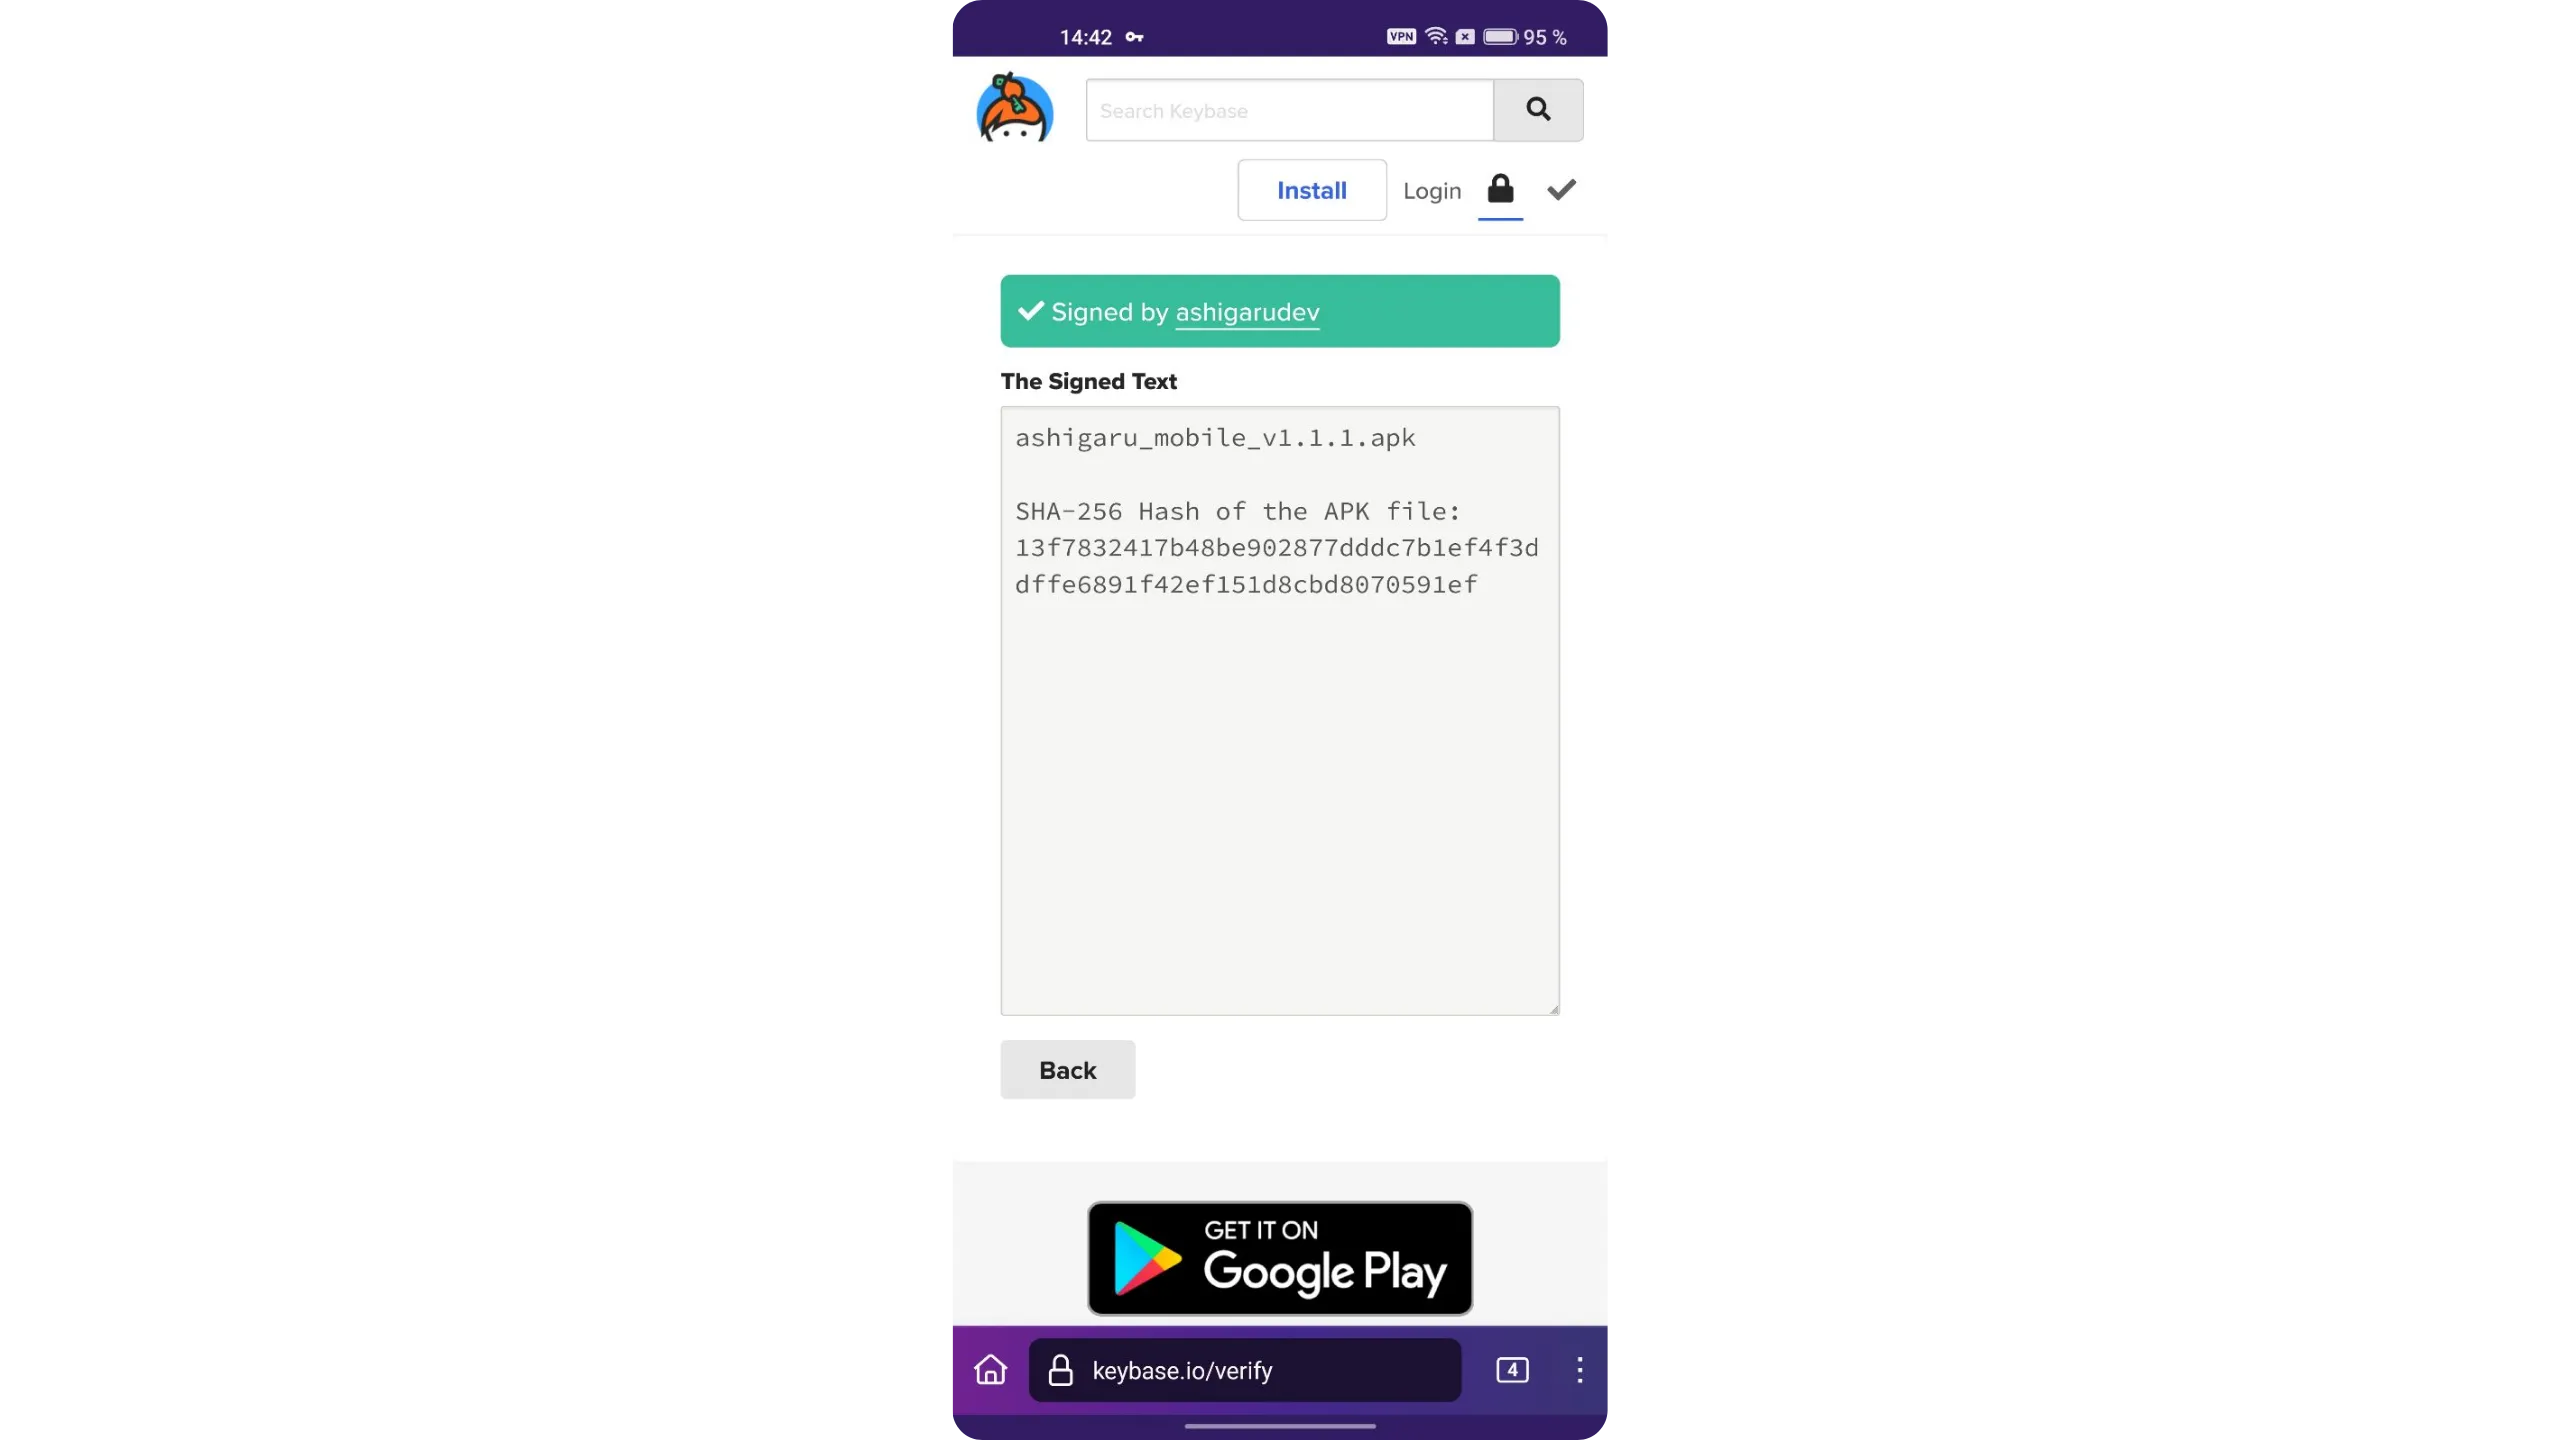
Keybase provided the app’s hash. Next, we’ll verify that the hash of the .apk you downloaded matches the verified value from Keybase. Go to HASH FILE ONLINE.
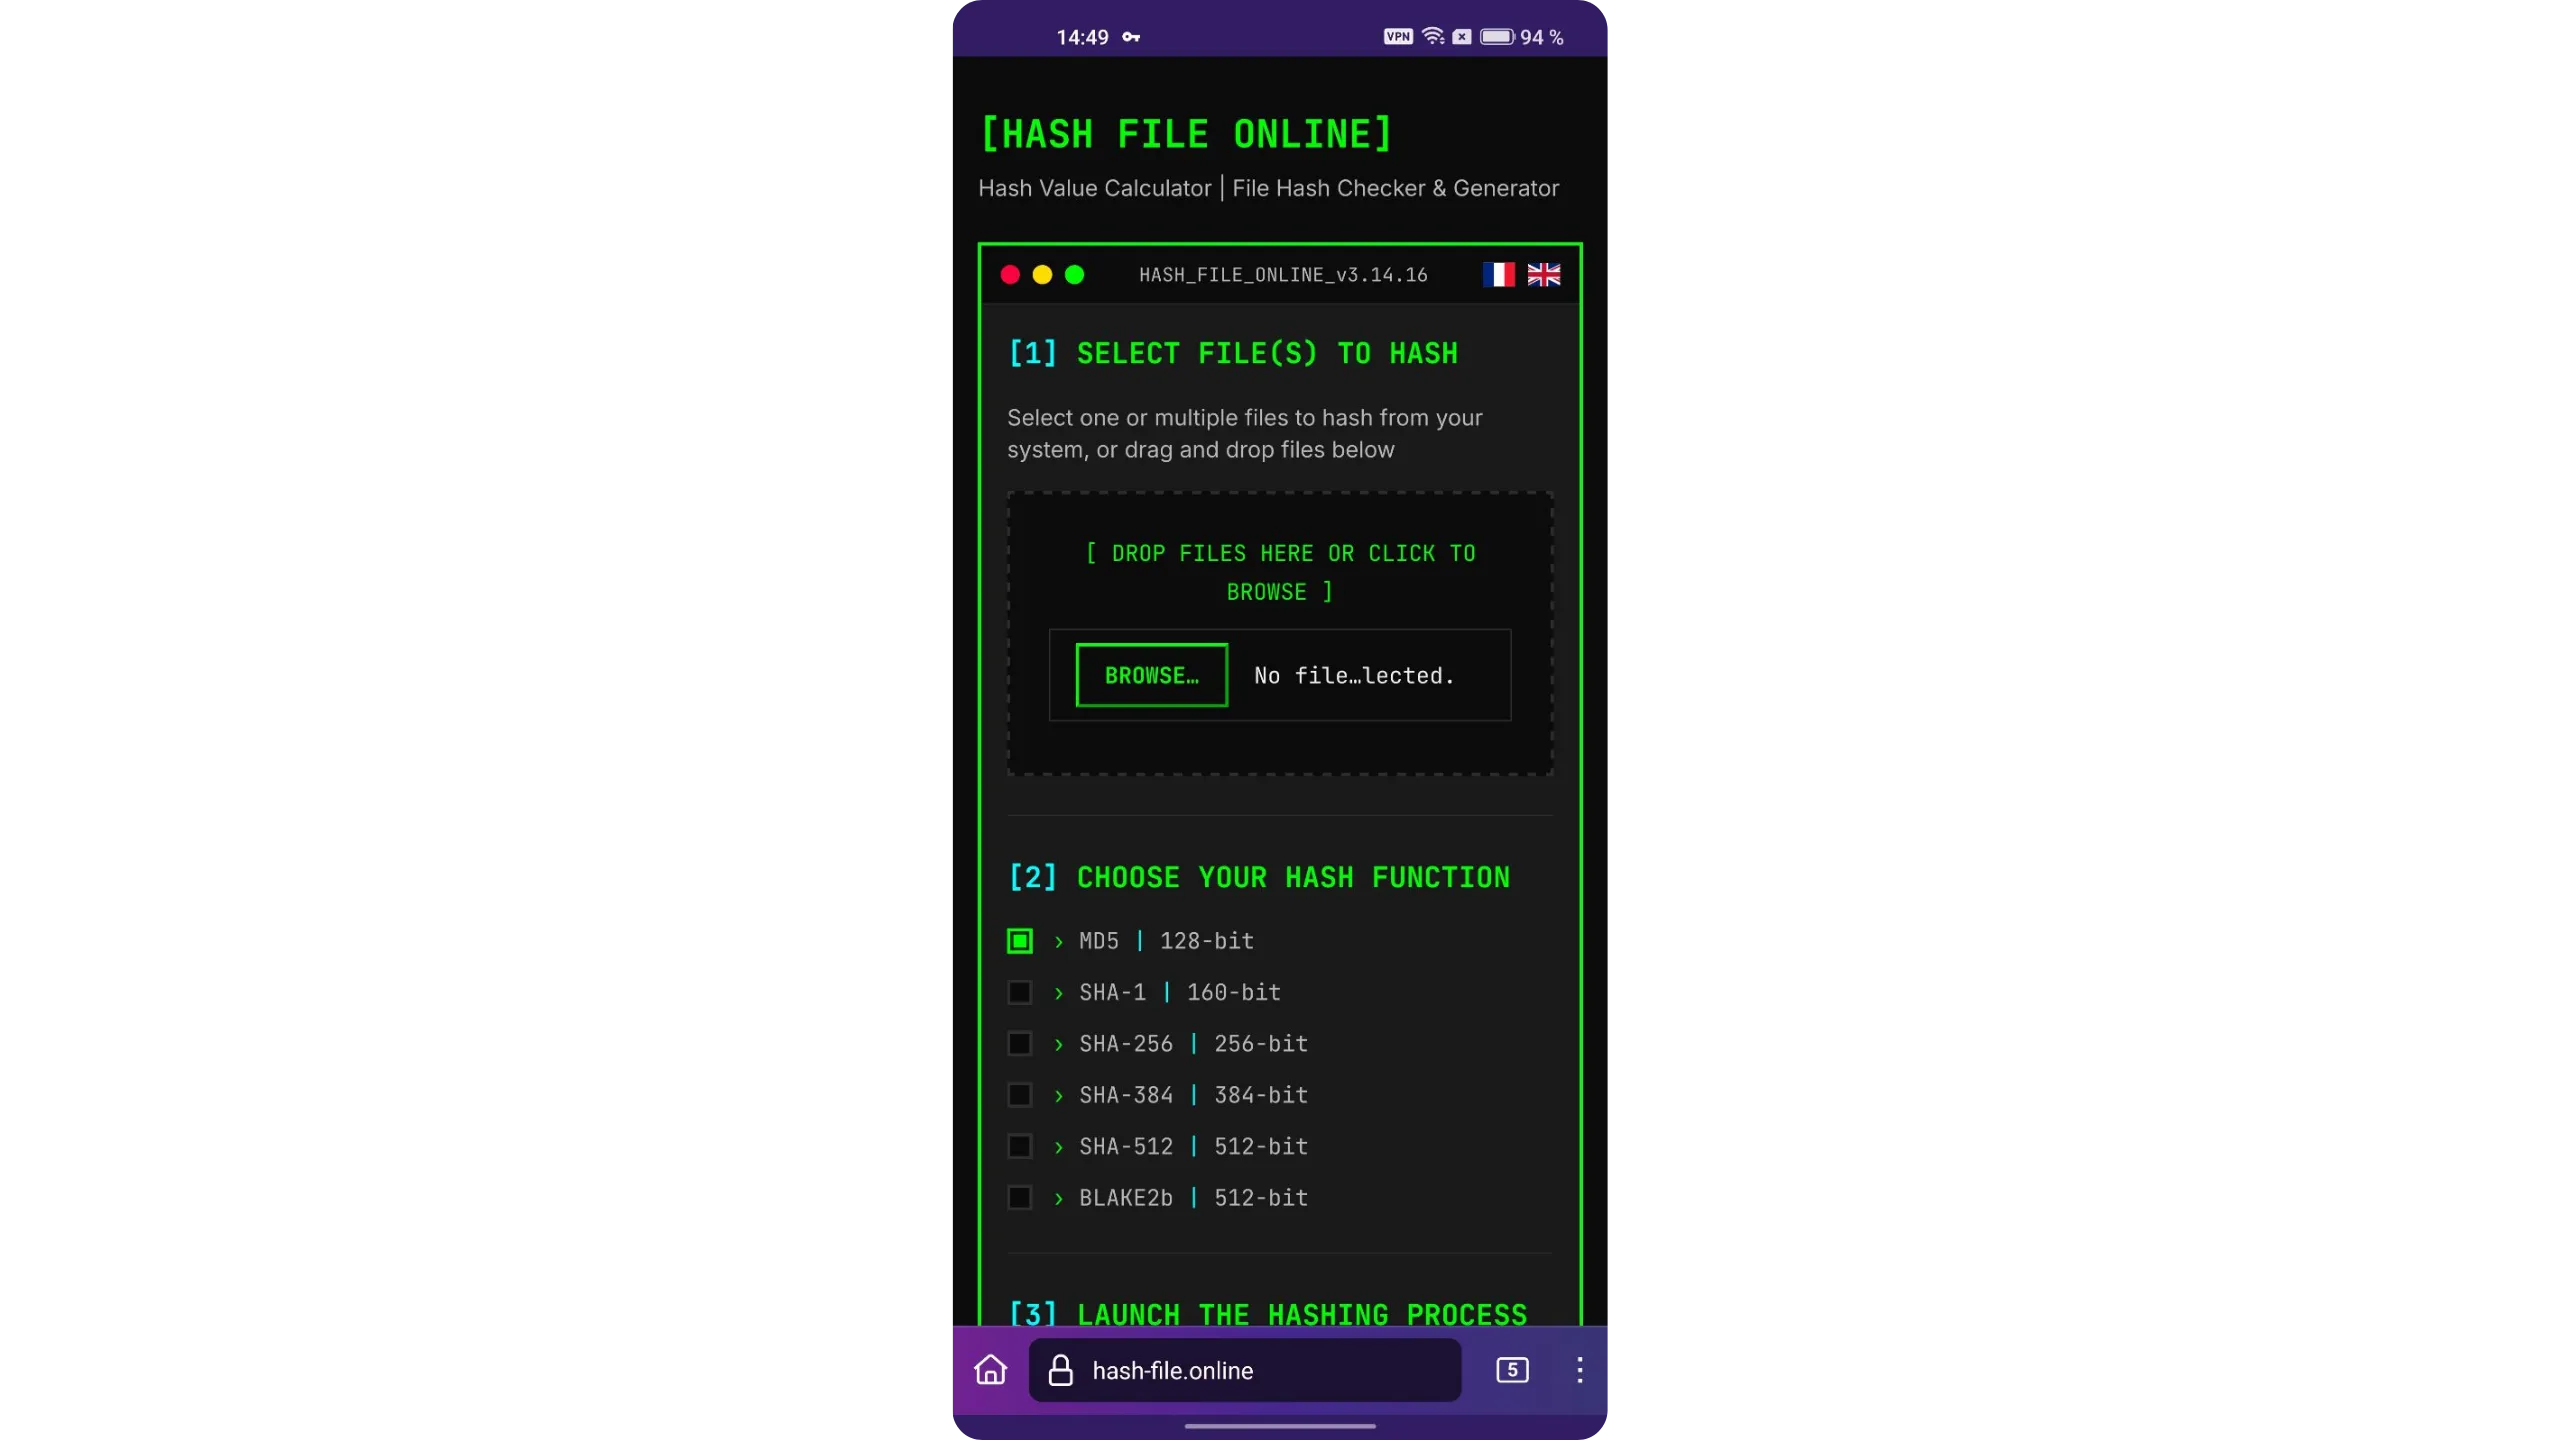
Tap “BROWSE…” and select the .apk file you downloaded in step 2.1. Choose the SHA-256 hashing function, then tap “CALCULATE HASH” to compute your file’s hash.
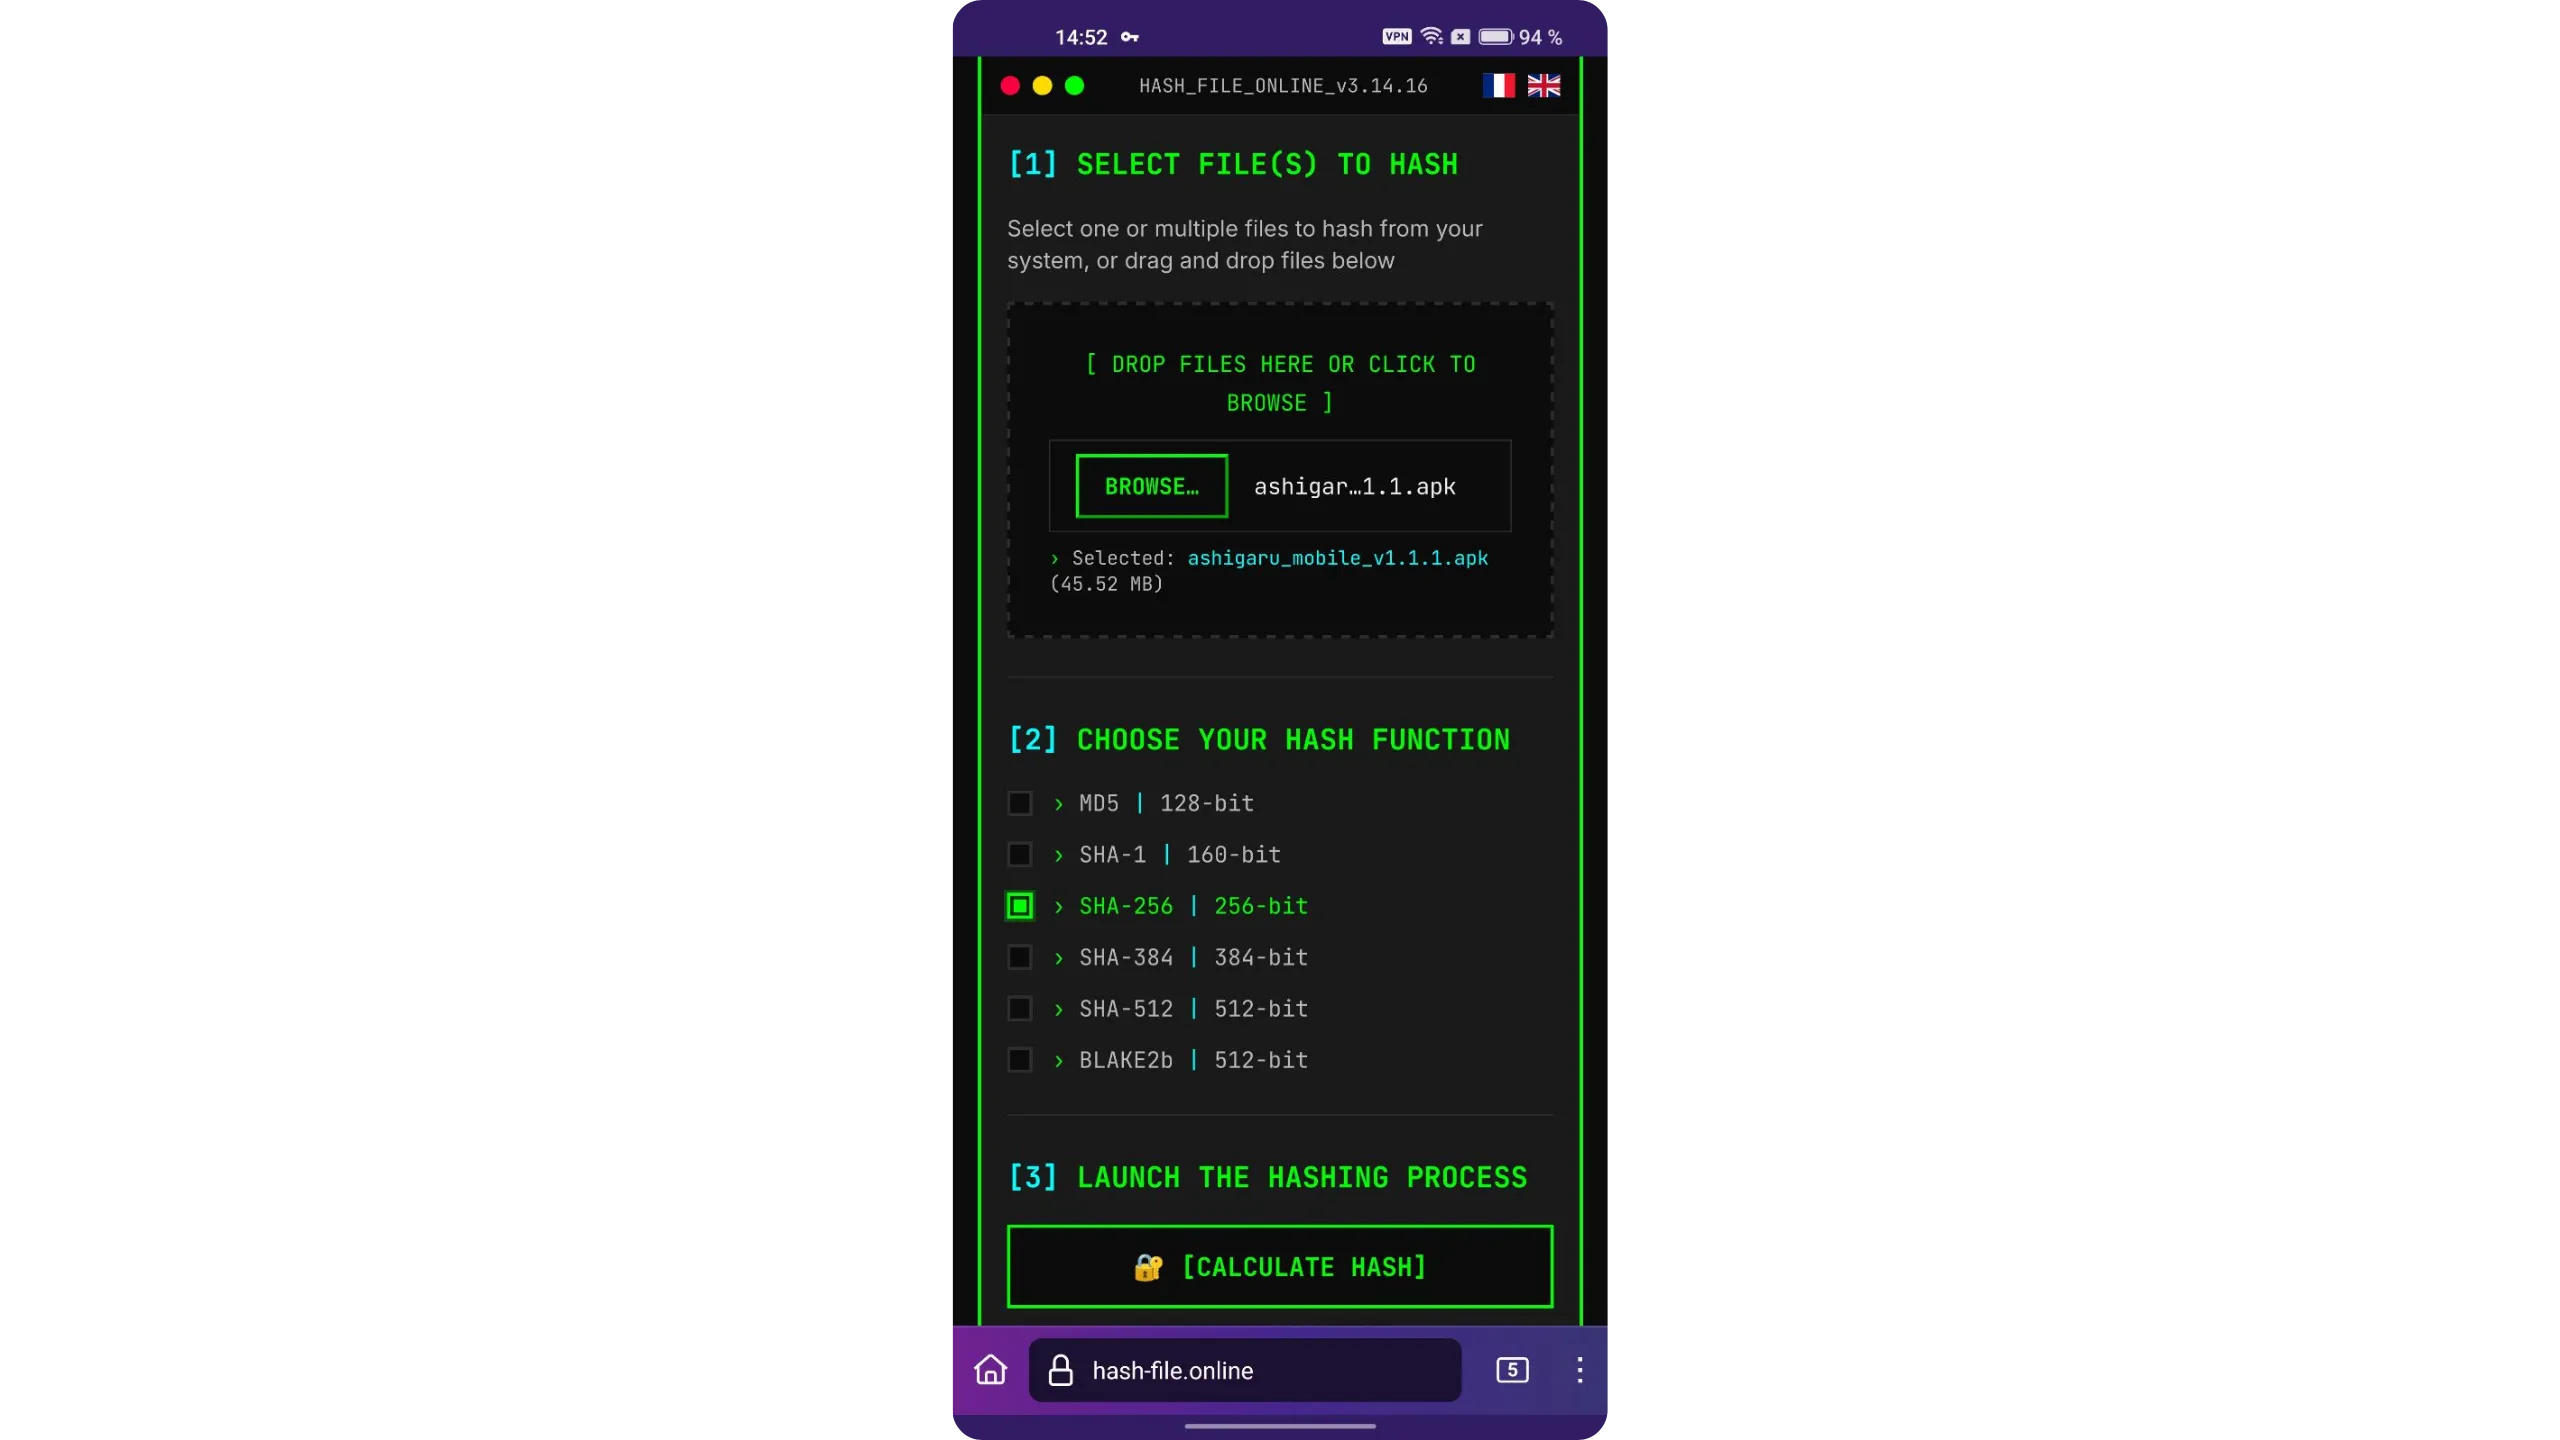
The site will display your .apk file’s hash. Compare it to the value you verified on Keybase.io. If both hashes match exactly, the authenticity and integrity checks are successful. You can now proceed with the installation.

Never install the .apk if the signature check or the hash comparison fails — investigate first.
2.3. Install the Ashigaru app
To install, open your phone’s file manager and go to the downloads folder. Tap the .apk file we just verified, then confirm the installation when prompted.
Ashigaru is now installed on your phone.
3. Initialize the app and create a Bitcoin wallet
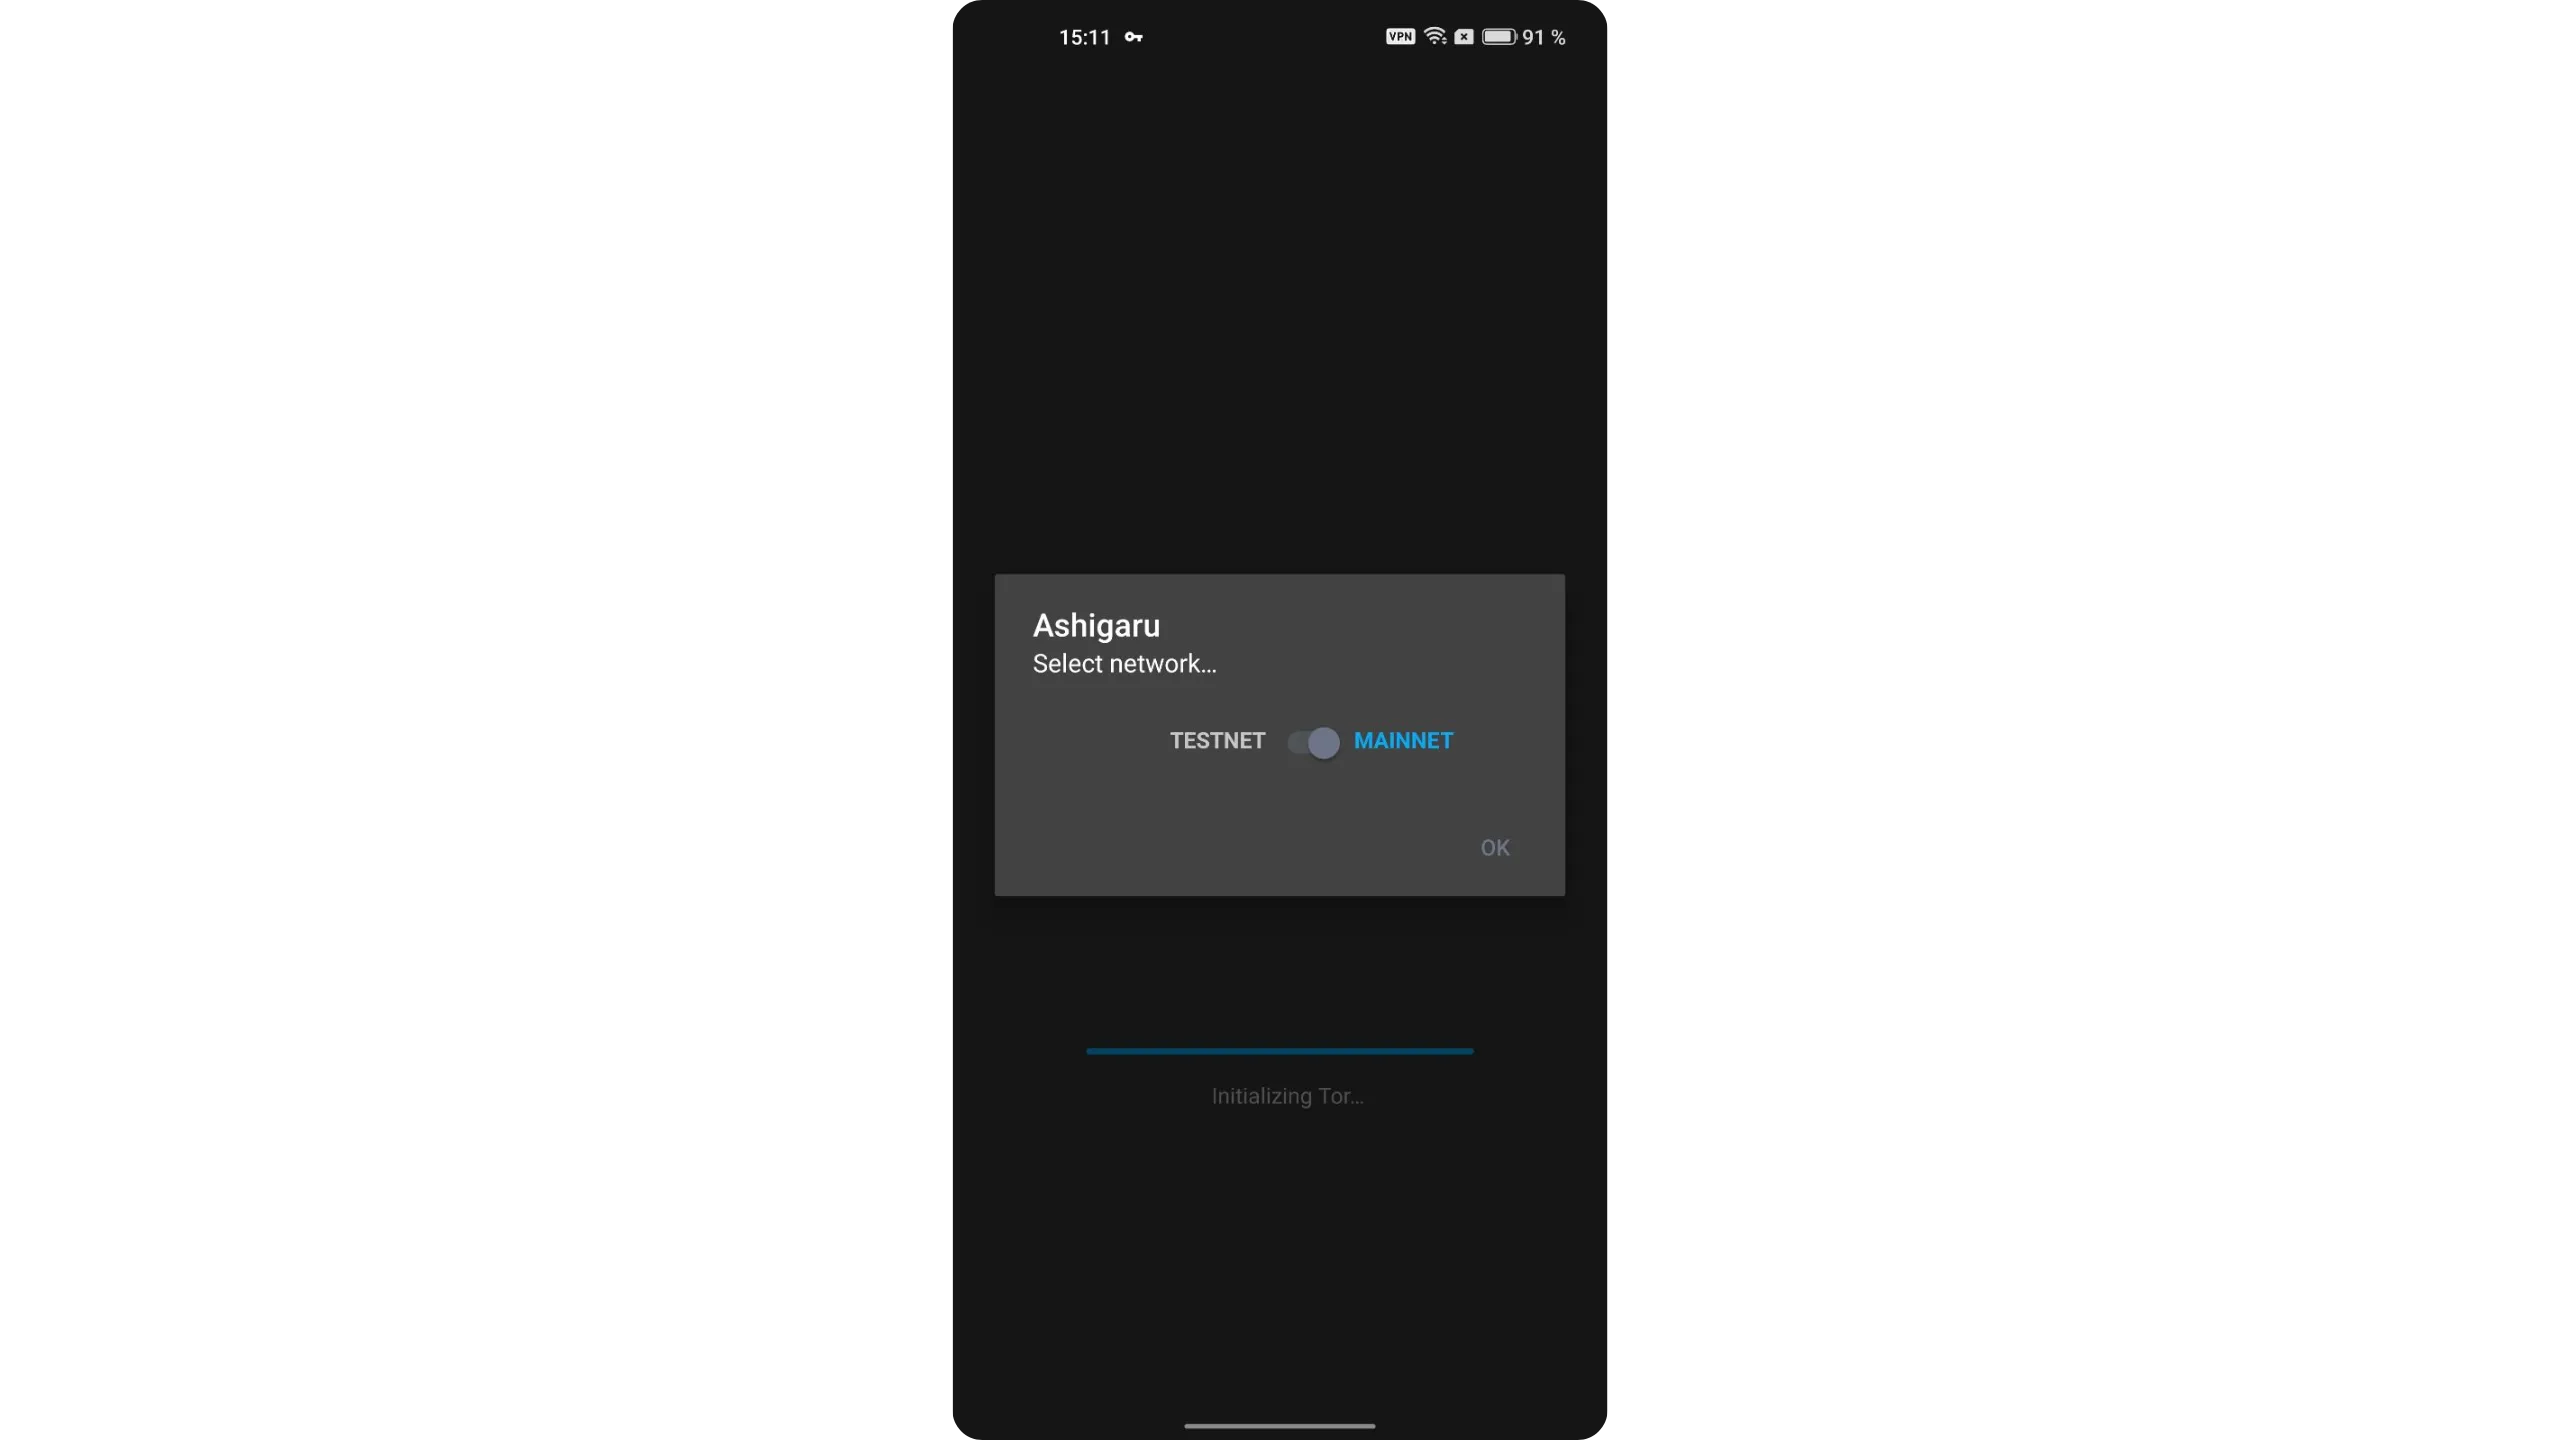
On first launch, select “MAINNET.”
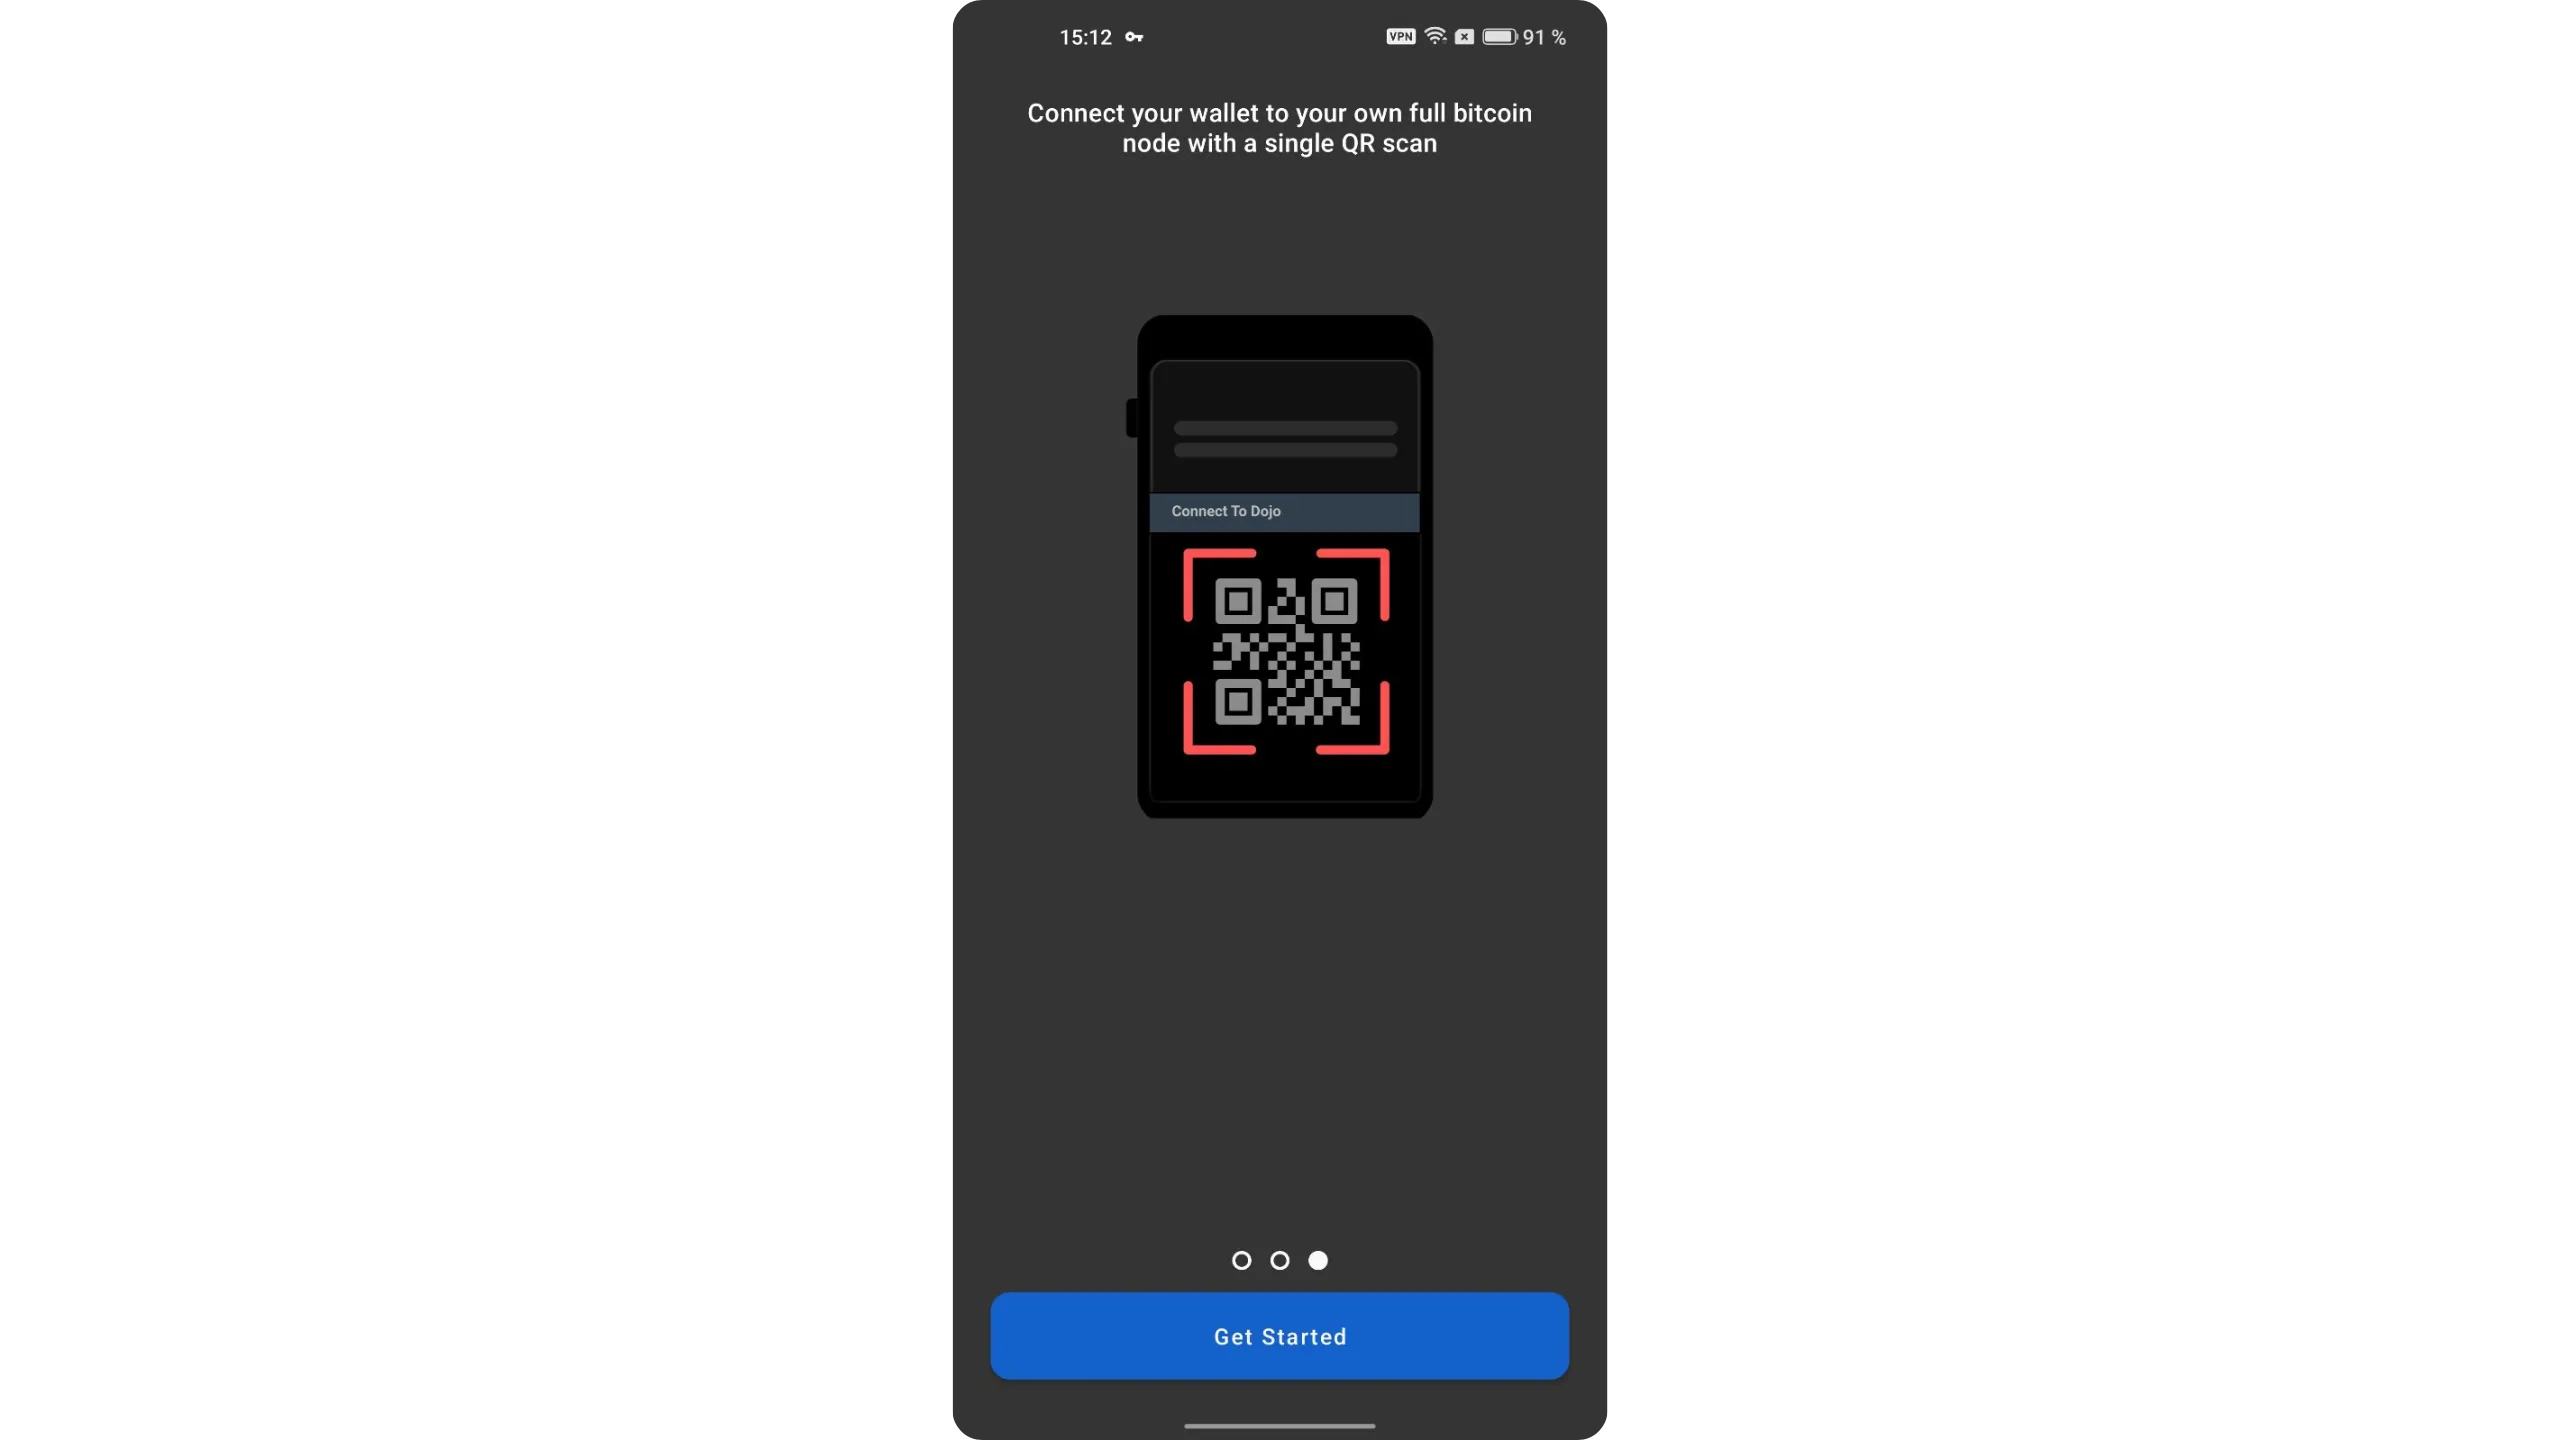
Tap “Get Started.”
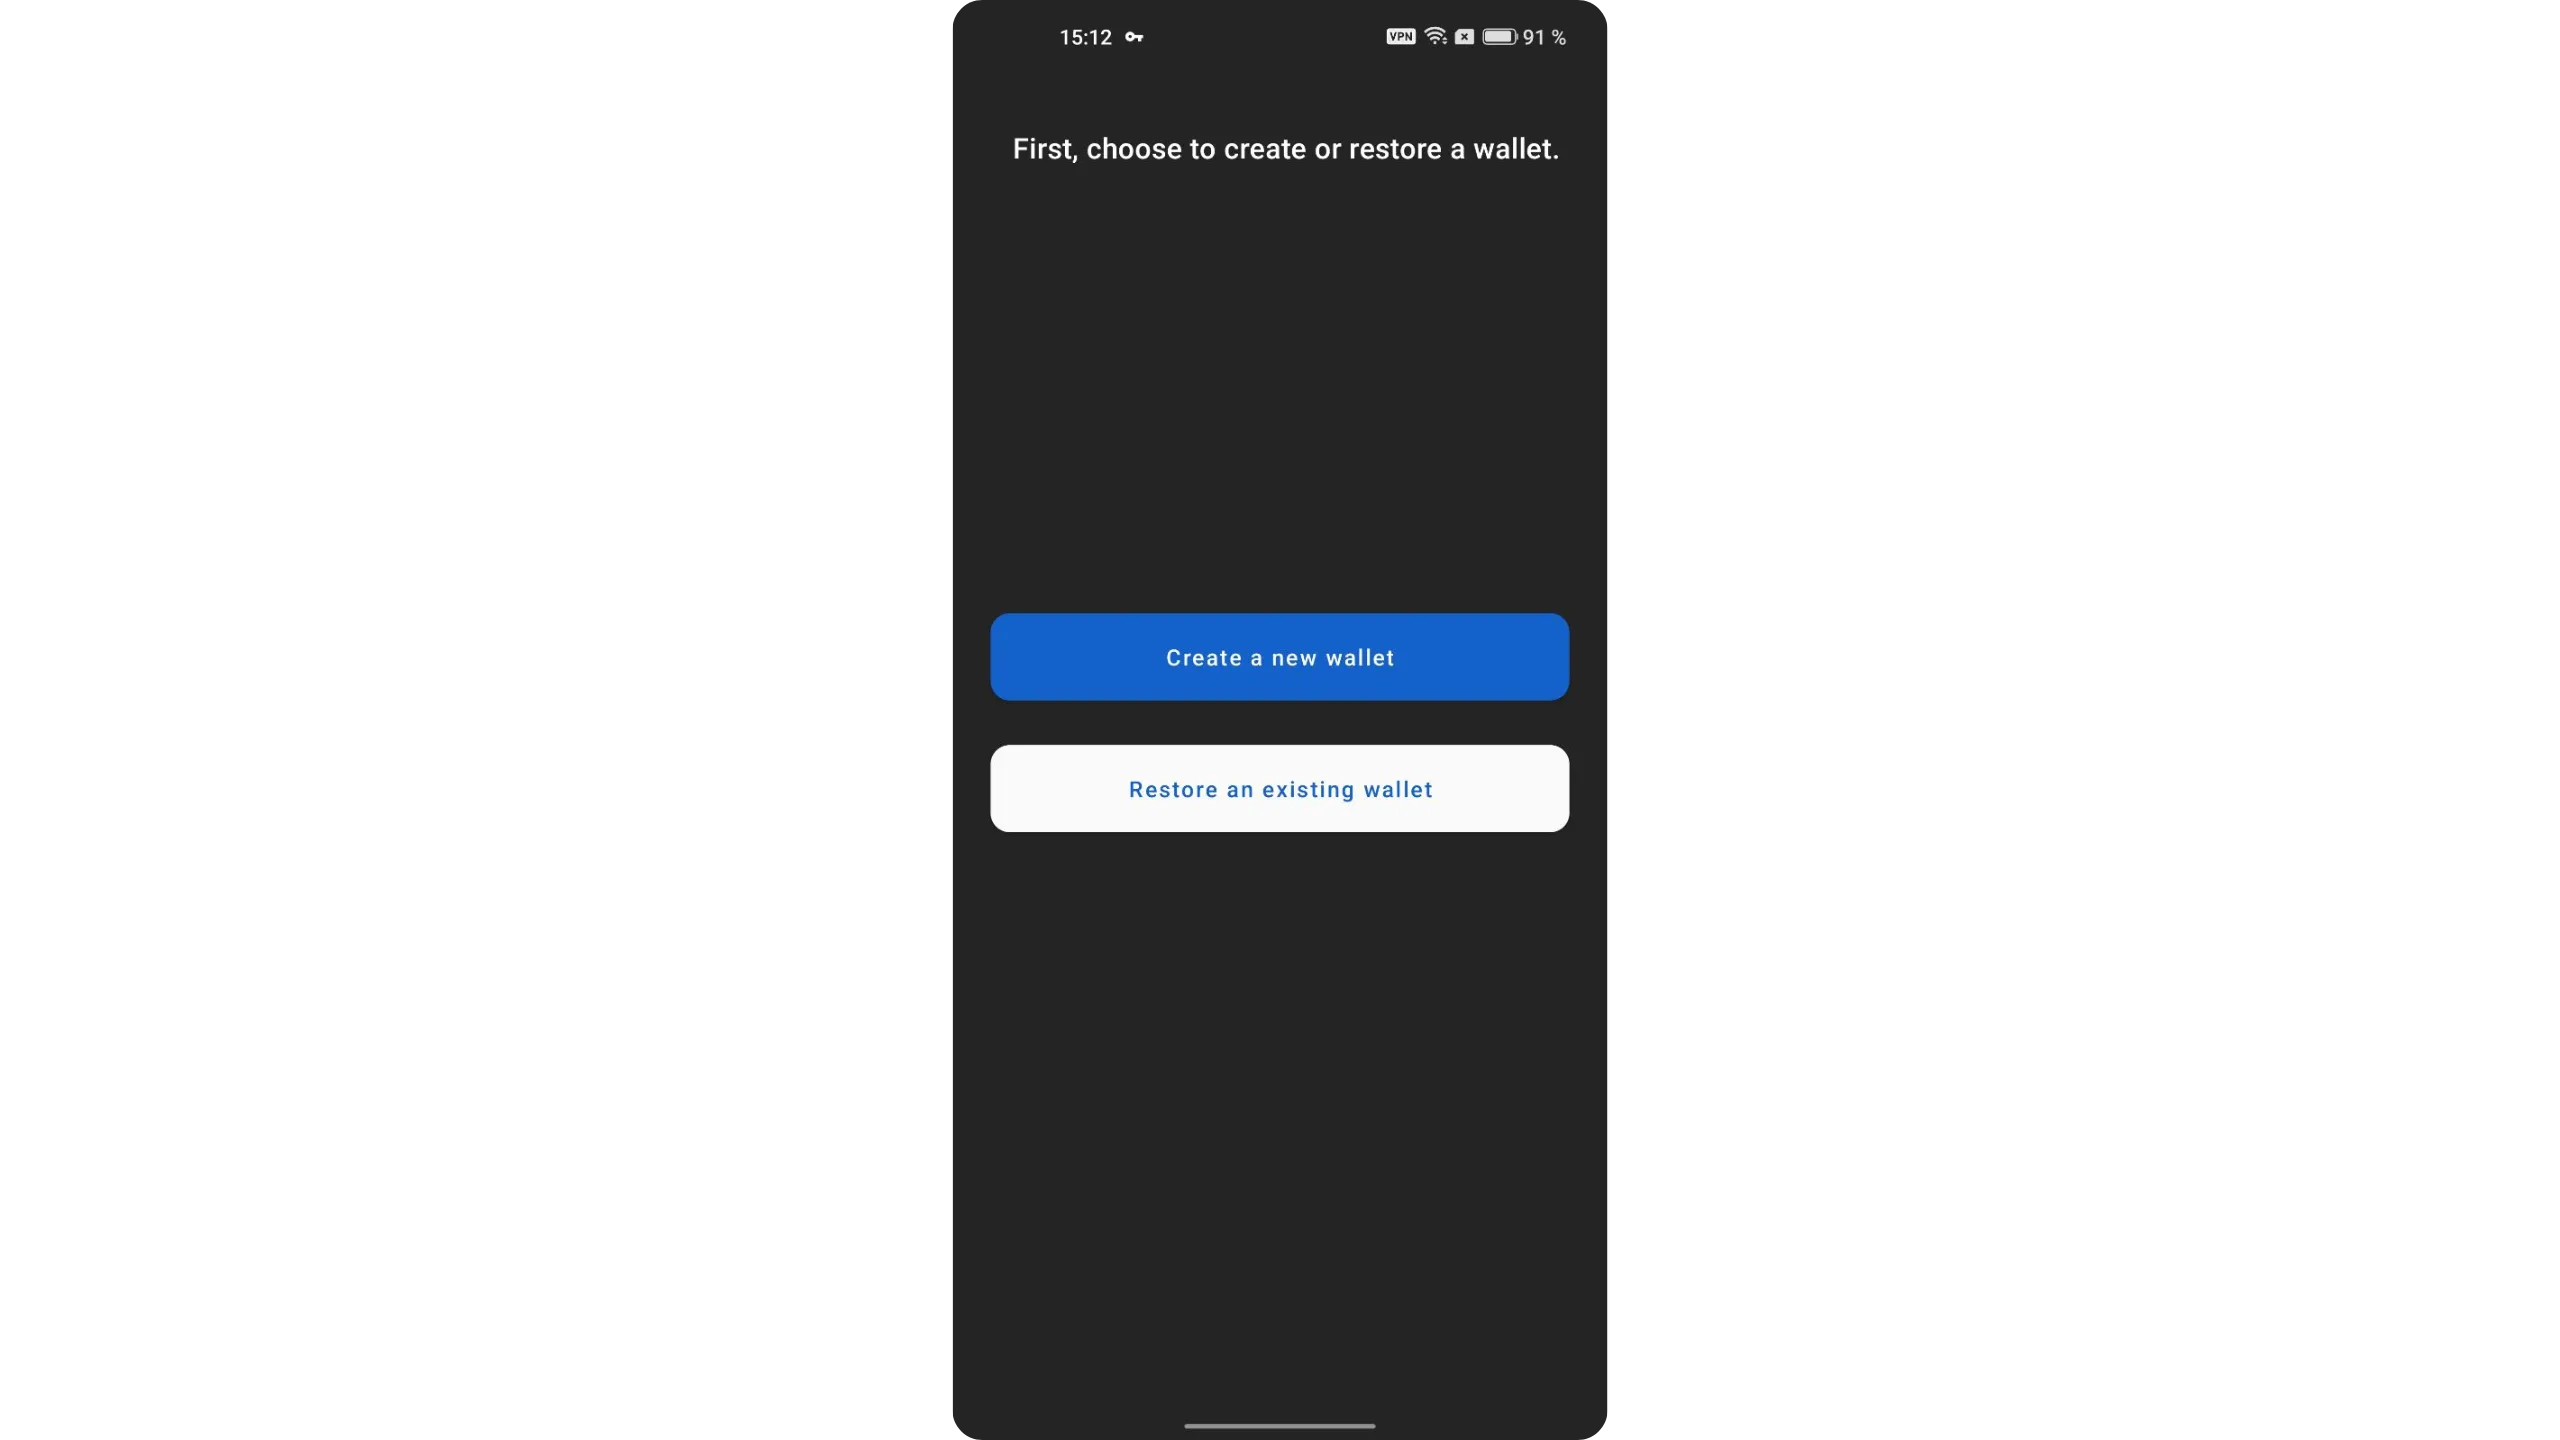
We’ll now create a new Bitcoin wallet. Tap “Create a new wallet.”
3.1. Create a Bitcoin wallet
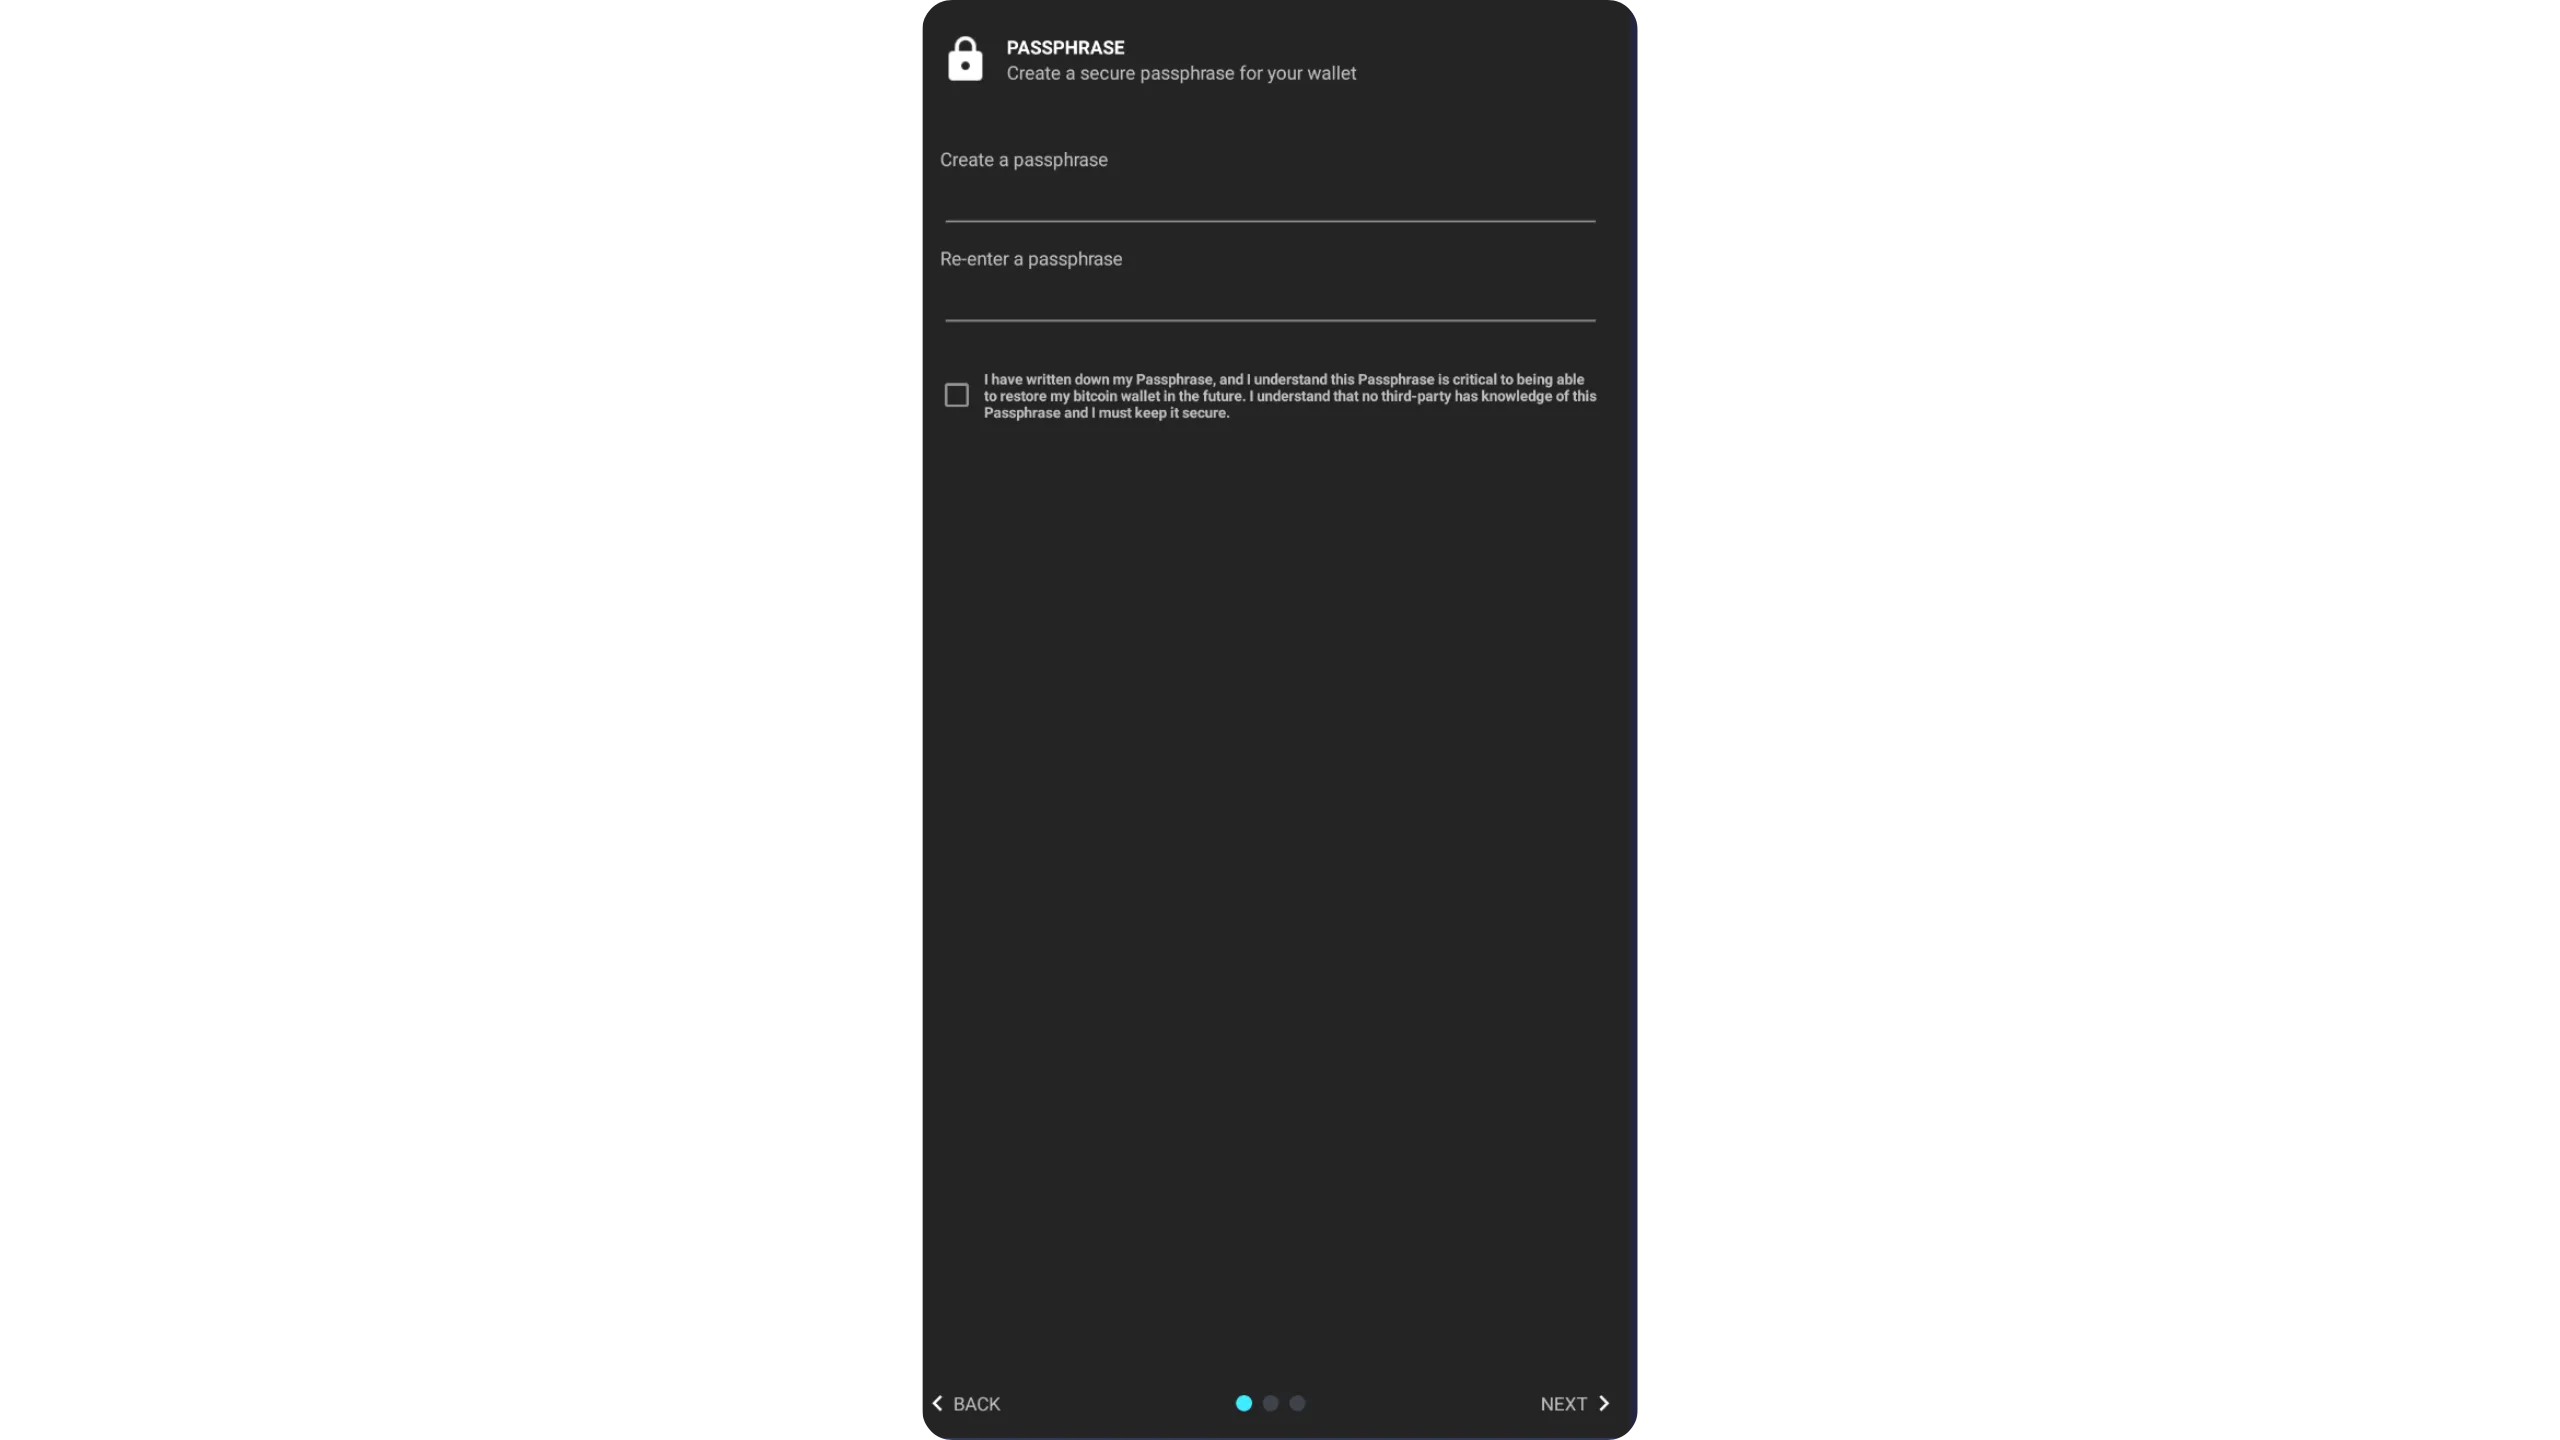
Ashigaru requires a BIP39 passphrase. Choose your passphrase and enter it in the fields. It should be as long and random as possible to resist brute‑force attacks.
Immediately make a physical backup of this passphrase. This step is crucial: if you lose your phone and you no longer have this passphrase, you will not be able to access the bitcoin secured by your Ashigaru wallet. This same passphrase is also used to encrypt the wallet recovery file.
If you don’t fully understand what a passphrase is or how it works, READ this complementary guide first. It’s critical: misunderstanding passphrase usage can cause irreversible loss of funds.
Once entered, tap “NEXT.”
Next, choose a PIN code. This code unlocks your Ashigaru wallet and protects it against unauthorized physical access. It is not part of key derivation for your wallet. This means that even without the PIN, anyone who has your mnemonic and passphrase can regain access to your bitcoin.
Choose a long, random PIN. Keep a backup in a location separate from your phone so they are not compromised together.
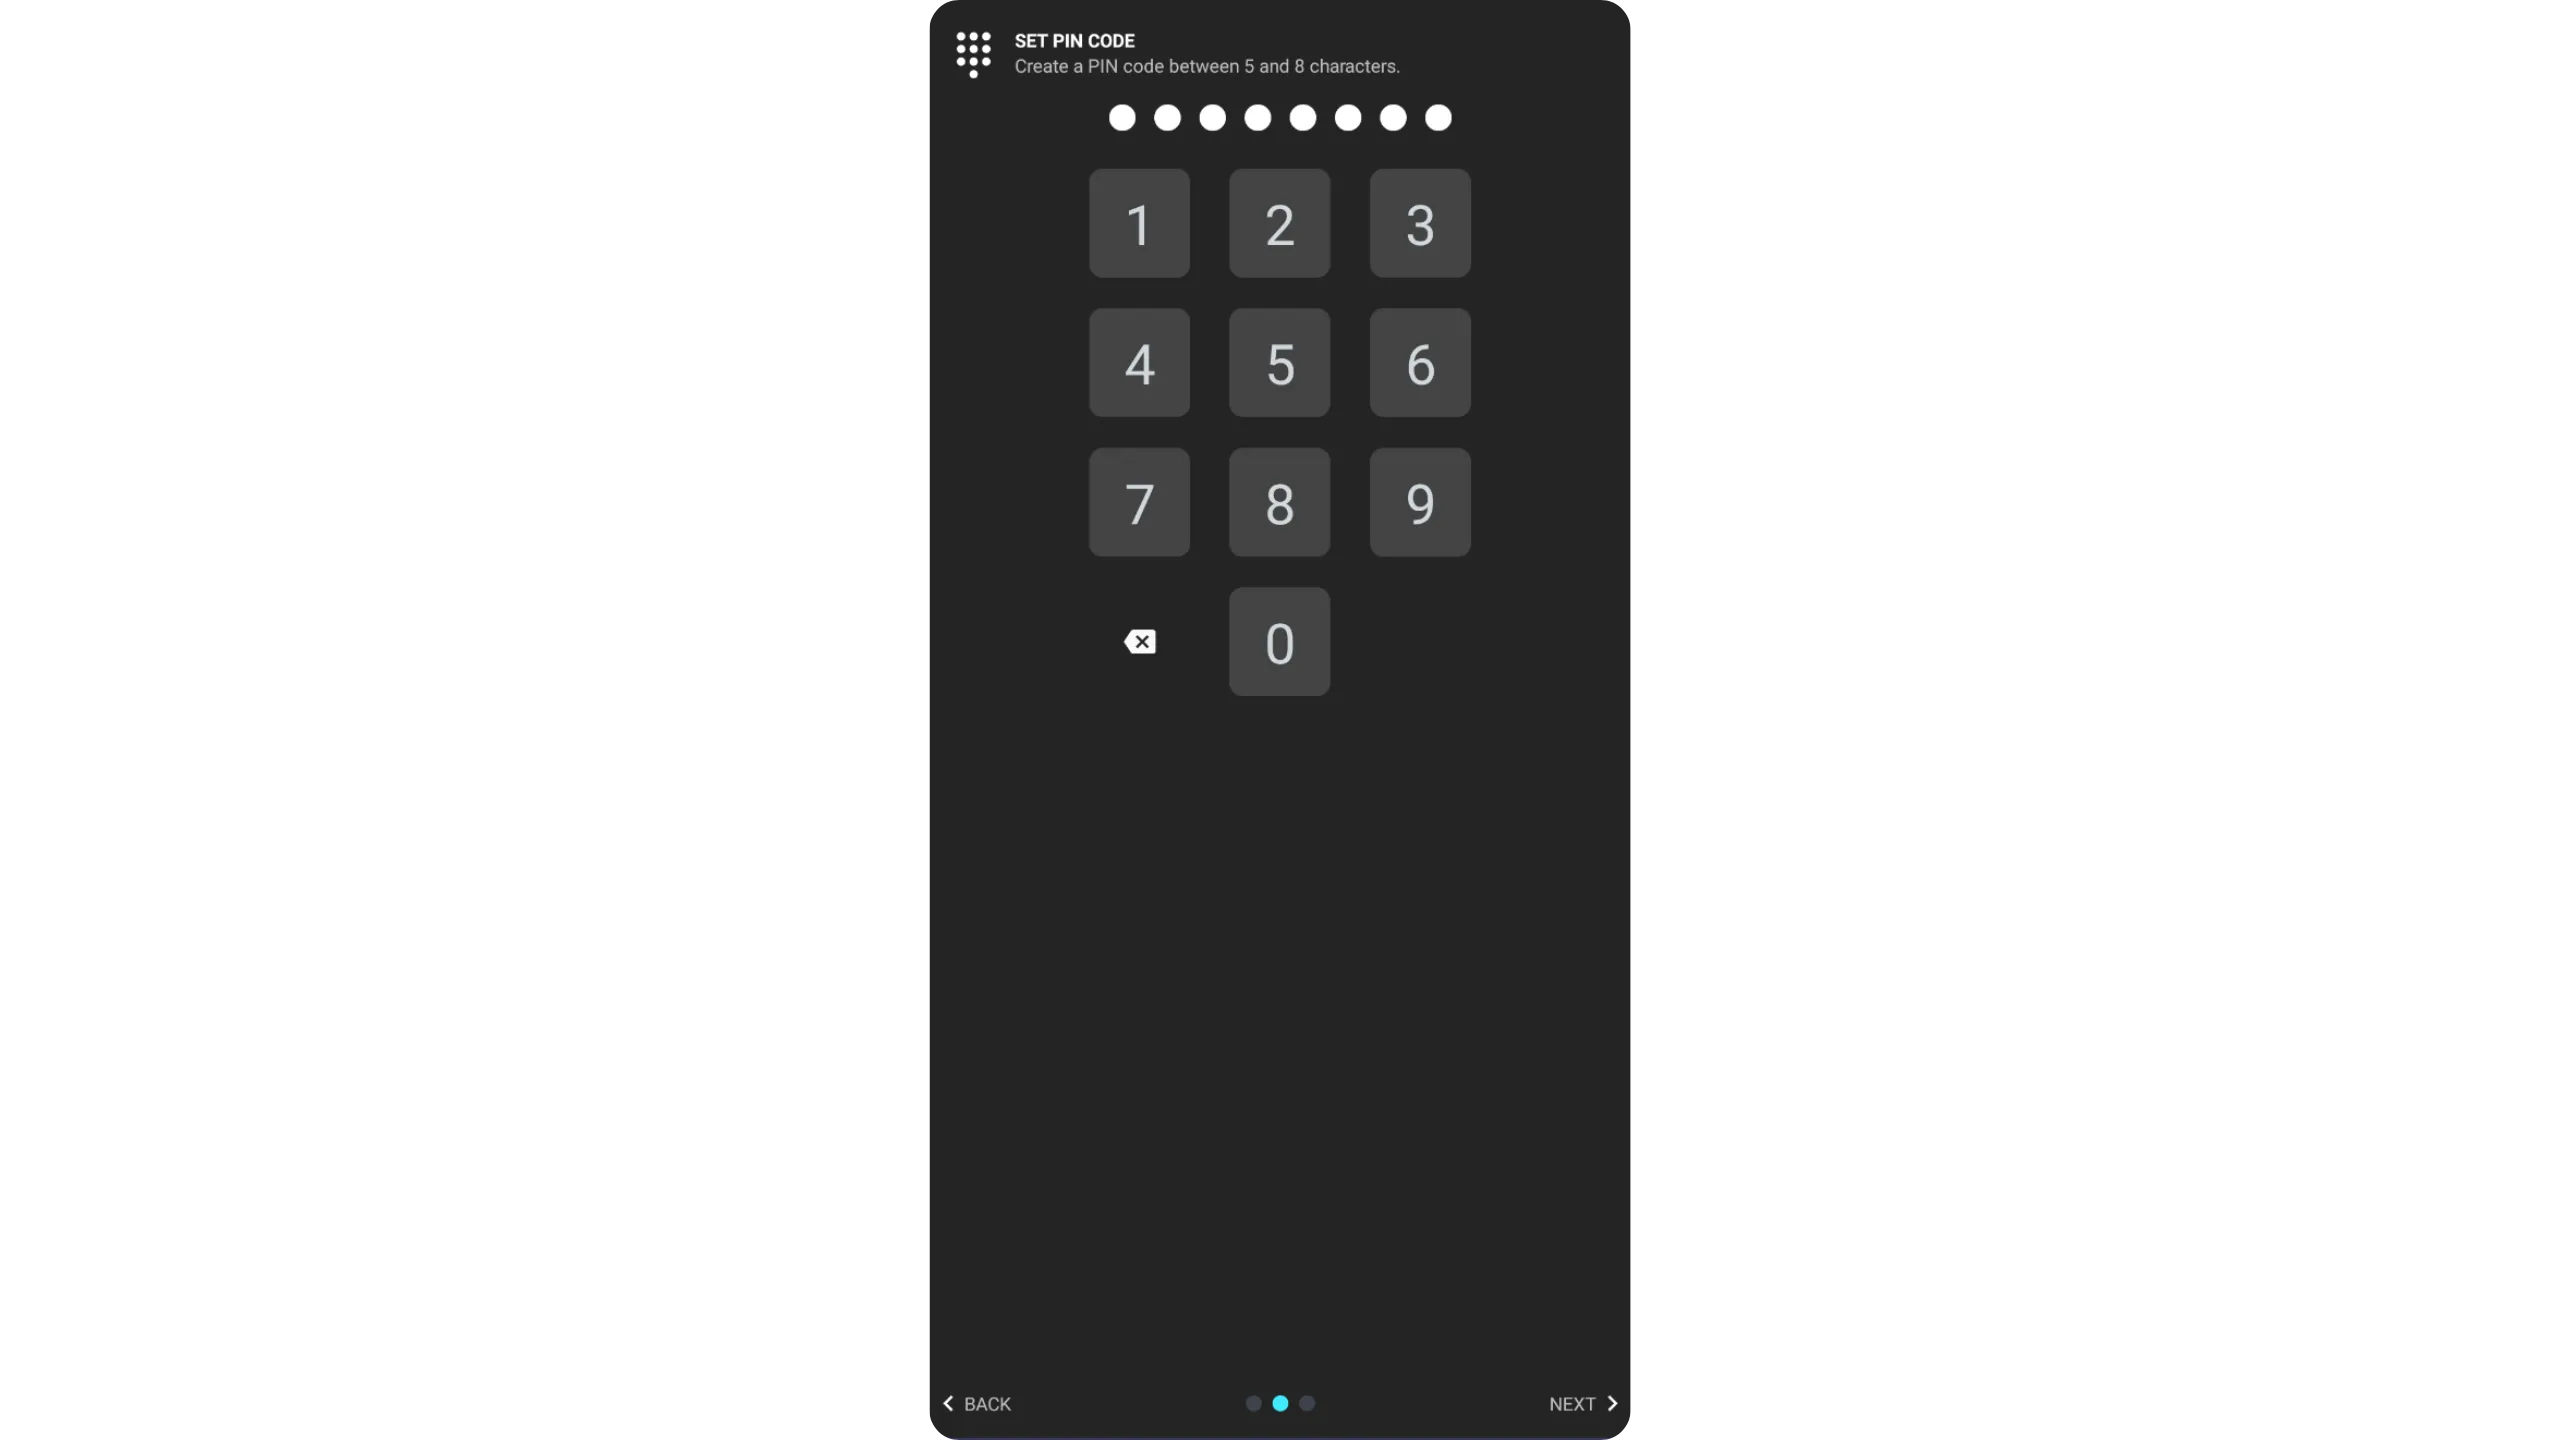
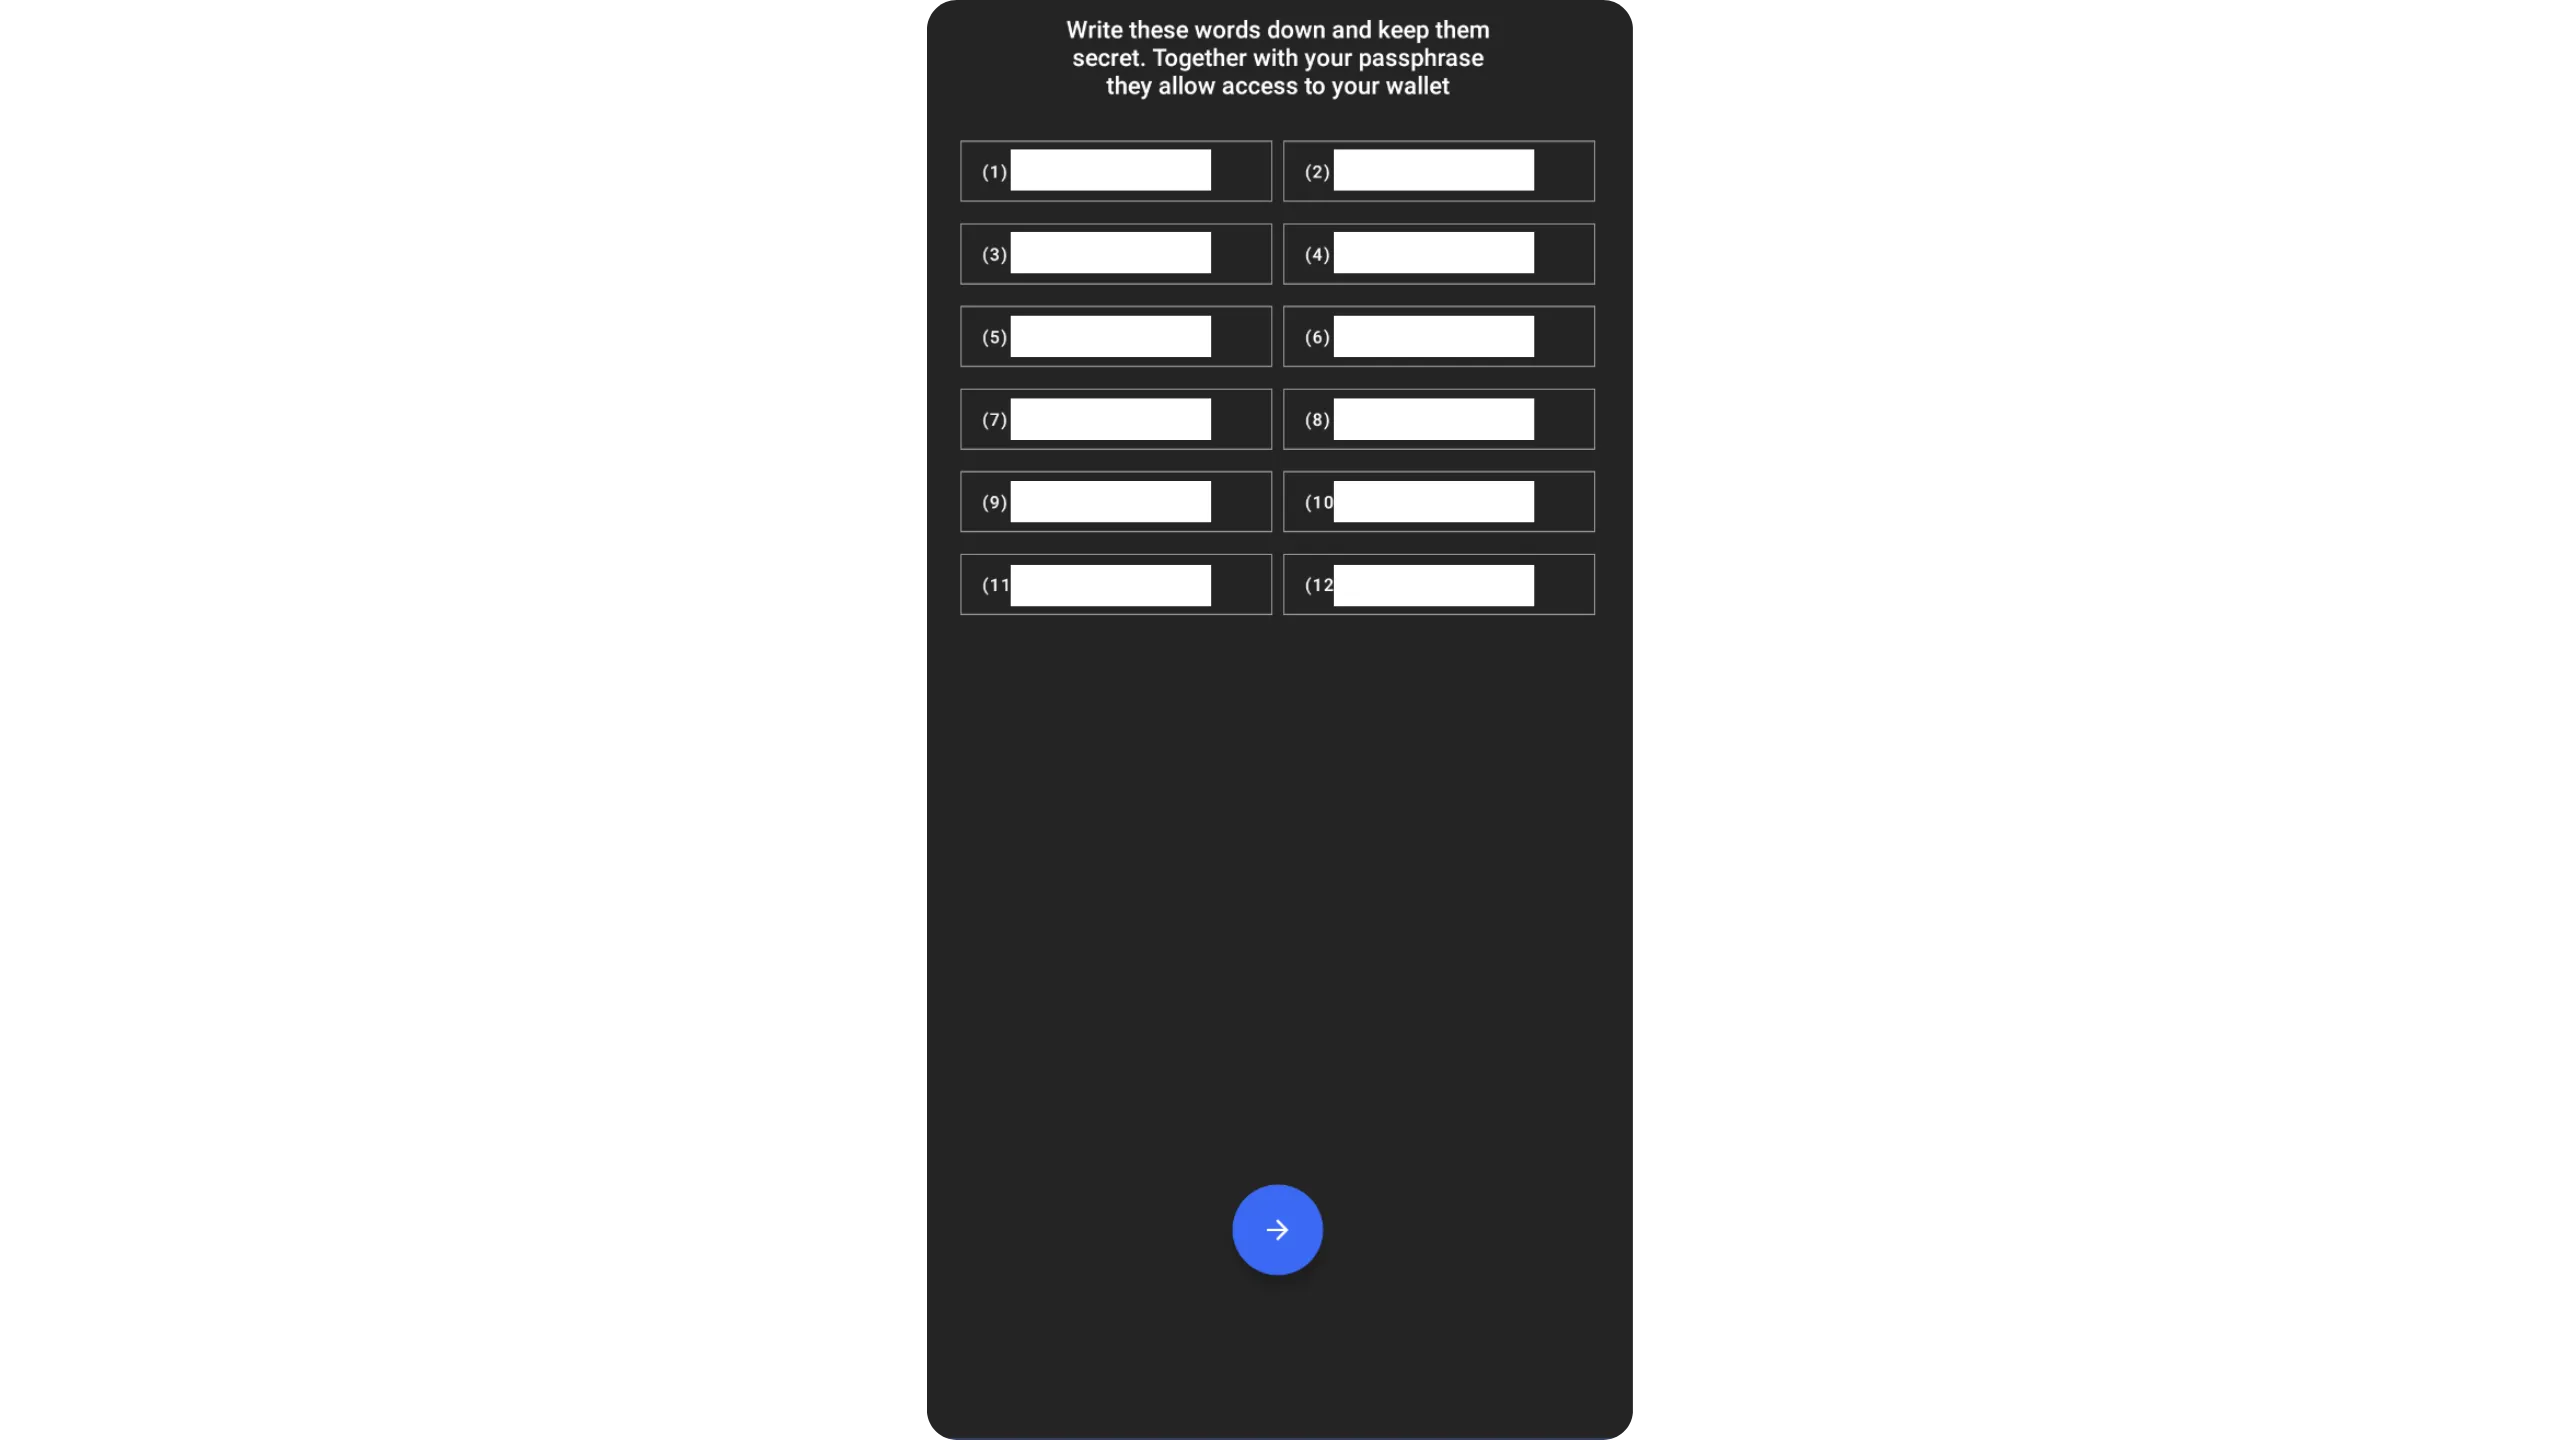
After setting the PIN, Ashigaru displays your wallet’s mnemonic phrase. Warning: this phrase, combined with your passphrase, gives full access to your bitcoin. Anyone with it can steal your funds, even without your phone. This 12‑word list restores your wallet if your phone is lost, stolen, or broken. Back it up carefully on physical media (paper or metal).
Never store this phrase digitally — doing so exposes your funds to theft. Depending on your security model, you can make multiple physical copies, but never split the phrase. Keep the words in order and number them.
Finally, never store the mnemonic phrase and the passphrase in the same place. If both are compromised at once, an attacker can access your wallet.
Ashigaru will then ask you to confirm your passphrase again. Use this step to double‑check your physical backup is accurate.
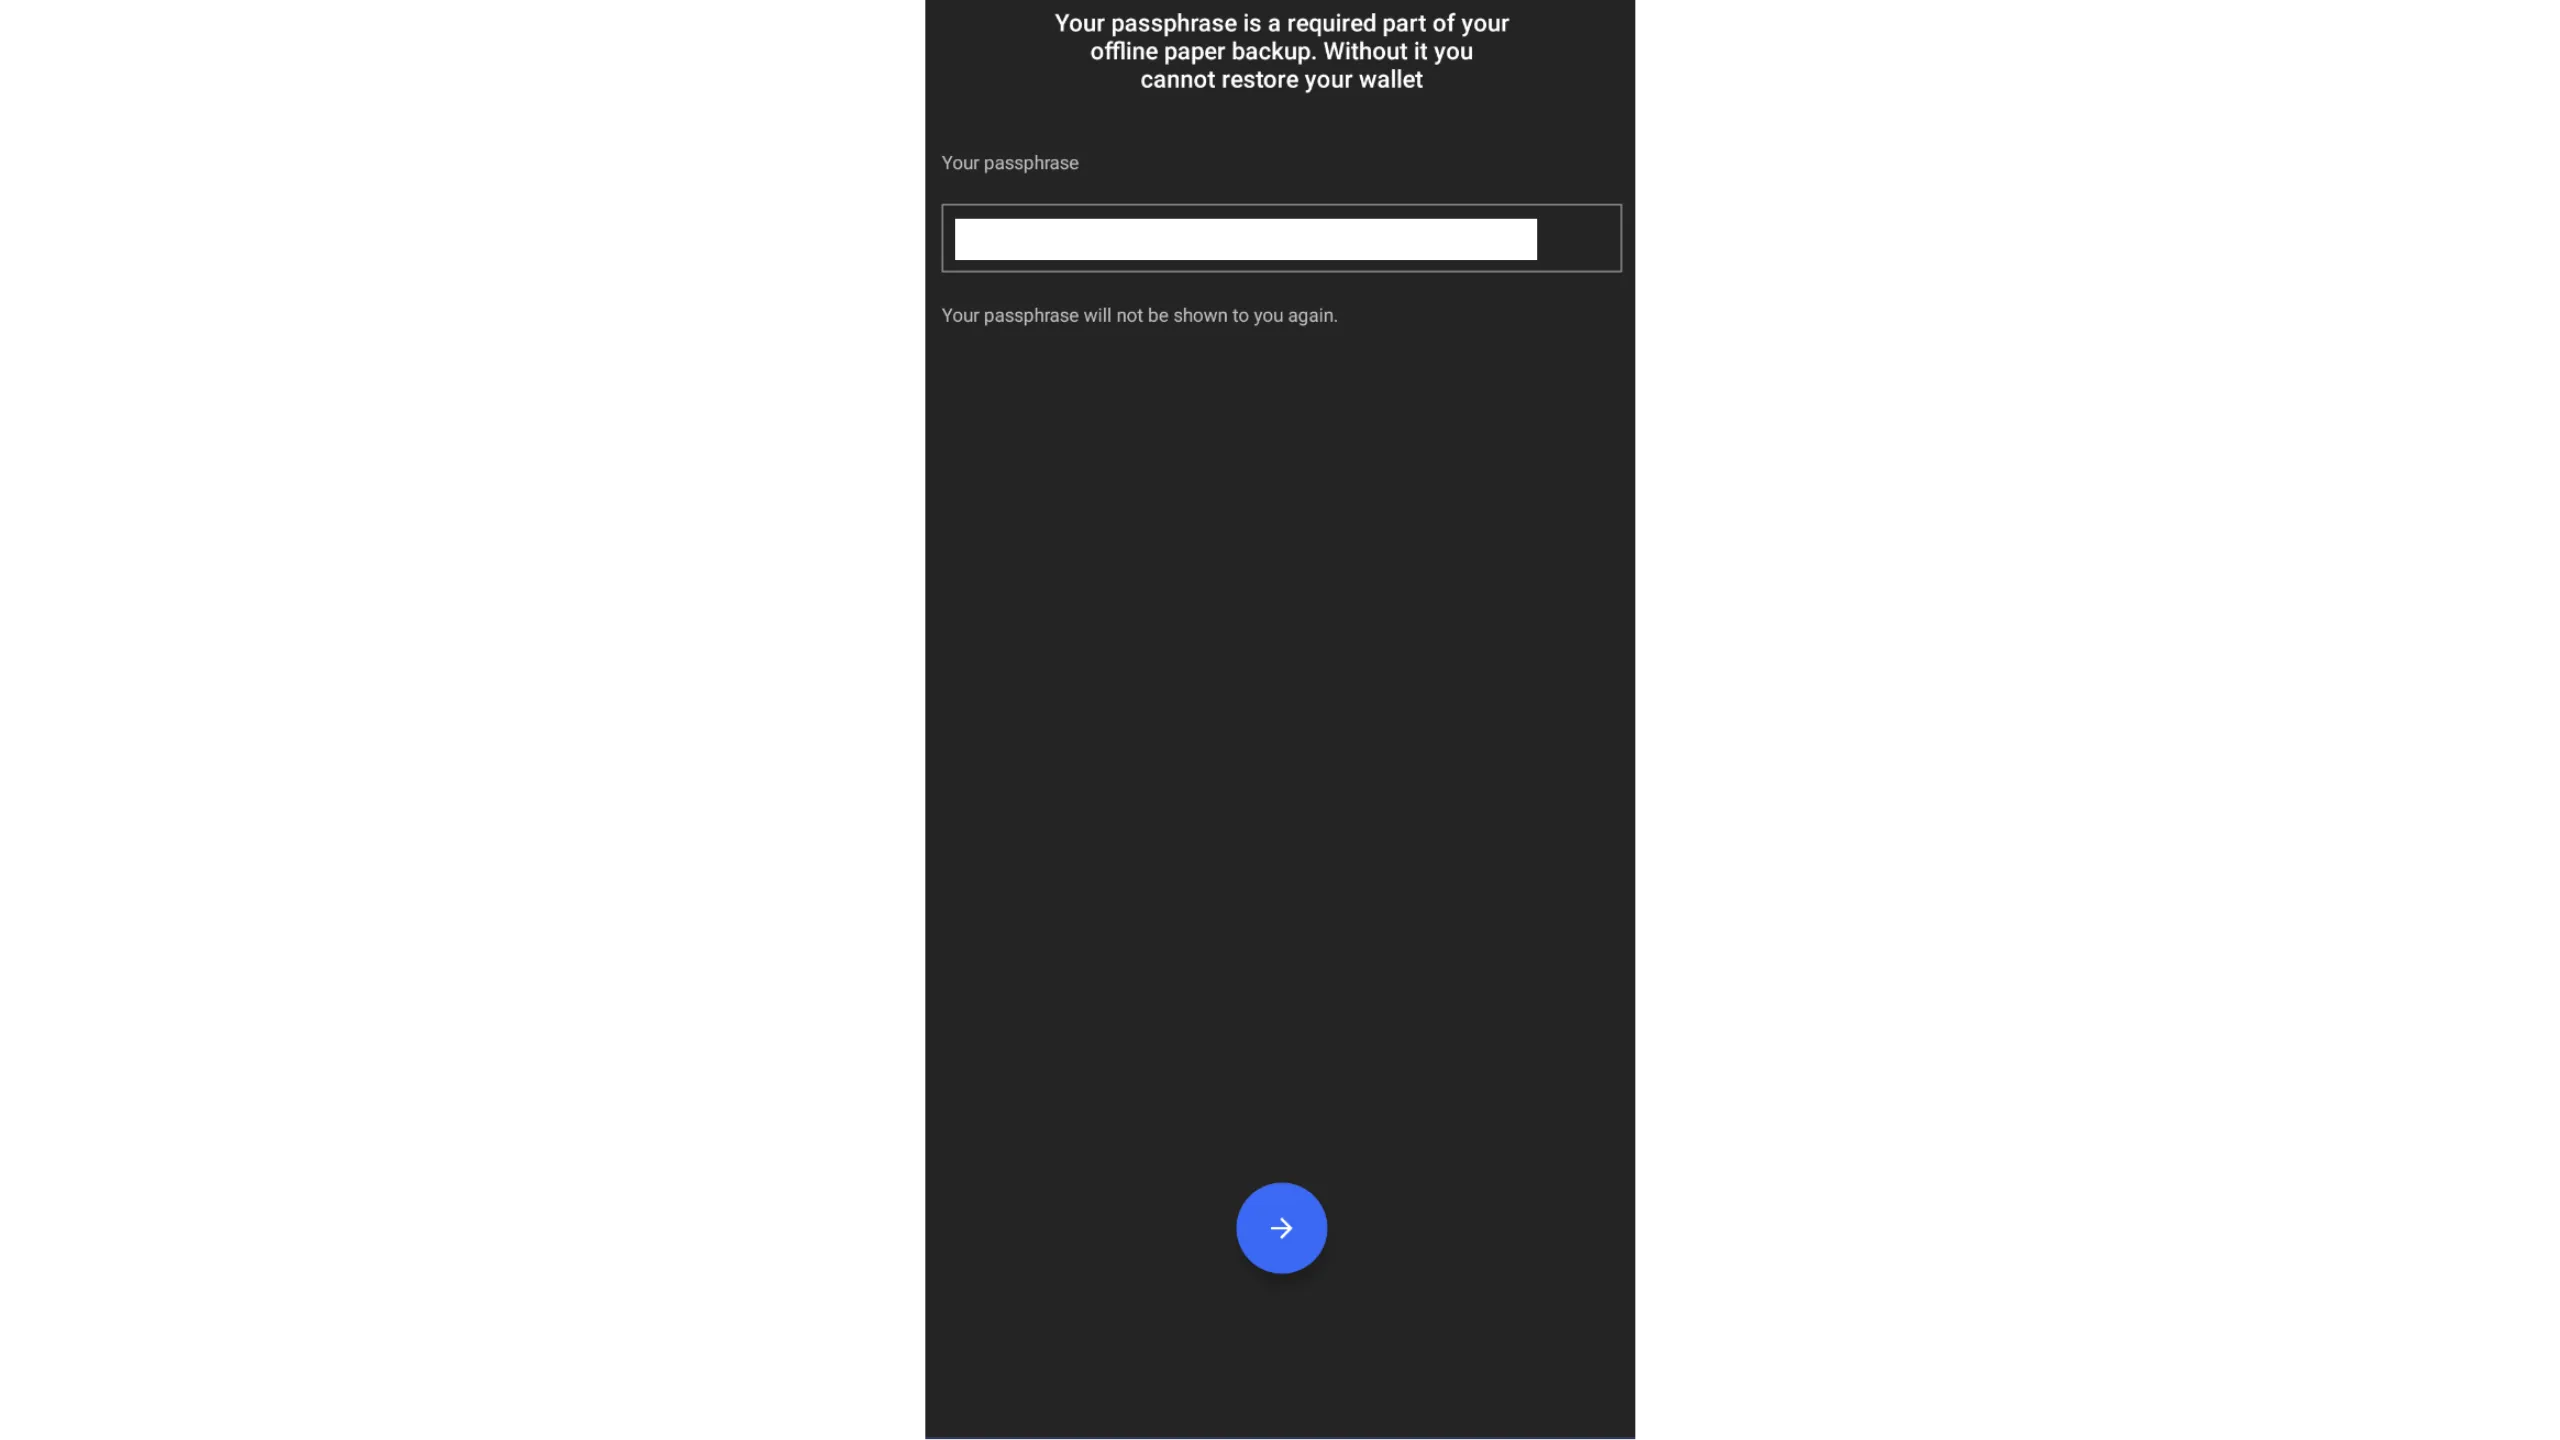
Your mnemonic + passphrase = full wallet access. Treat both with extreme caution — they must be kept private, offline, and never digitized.
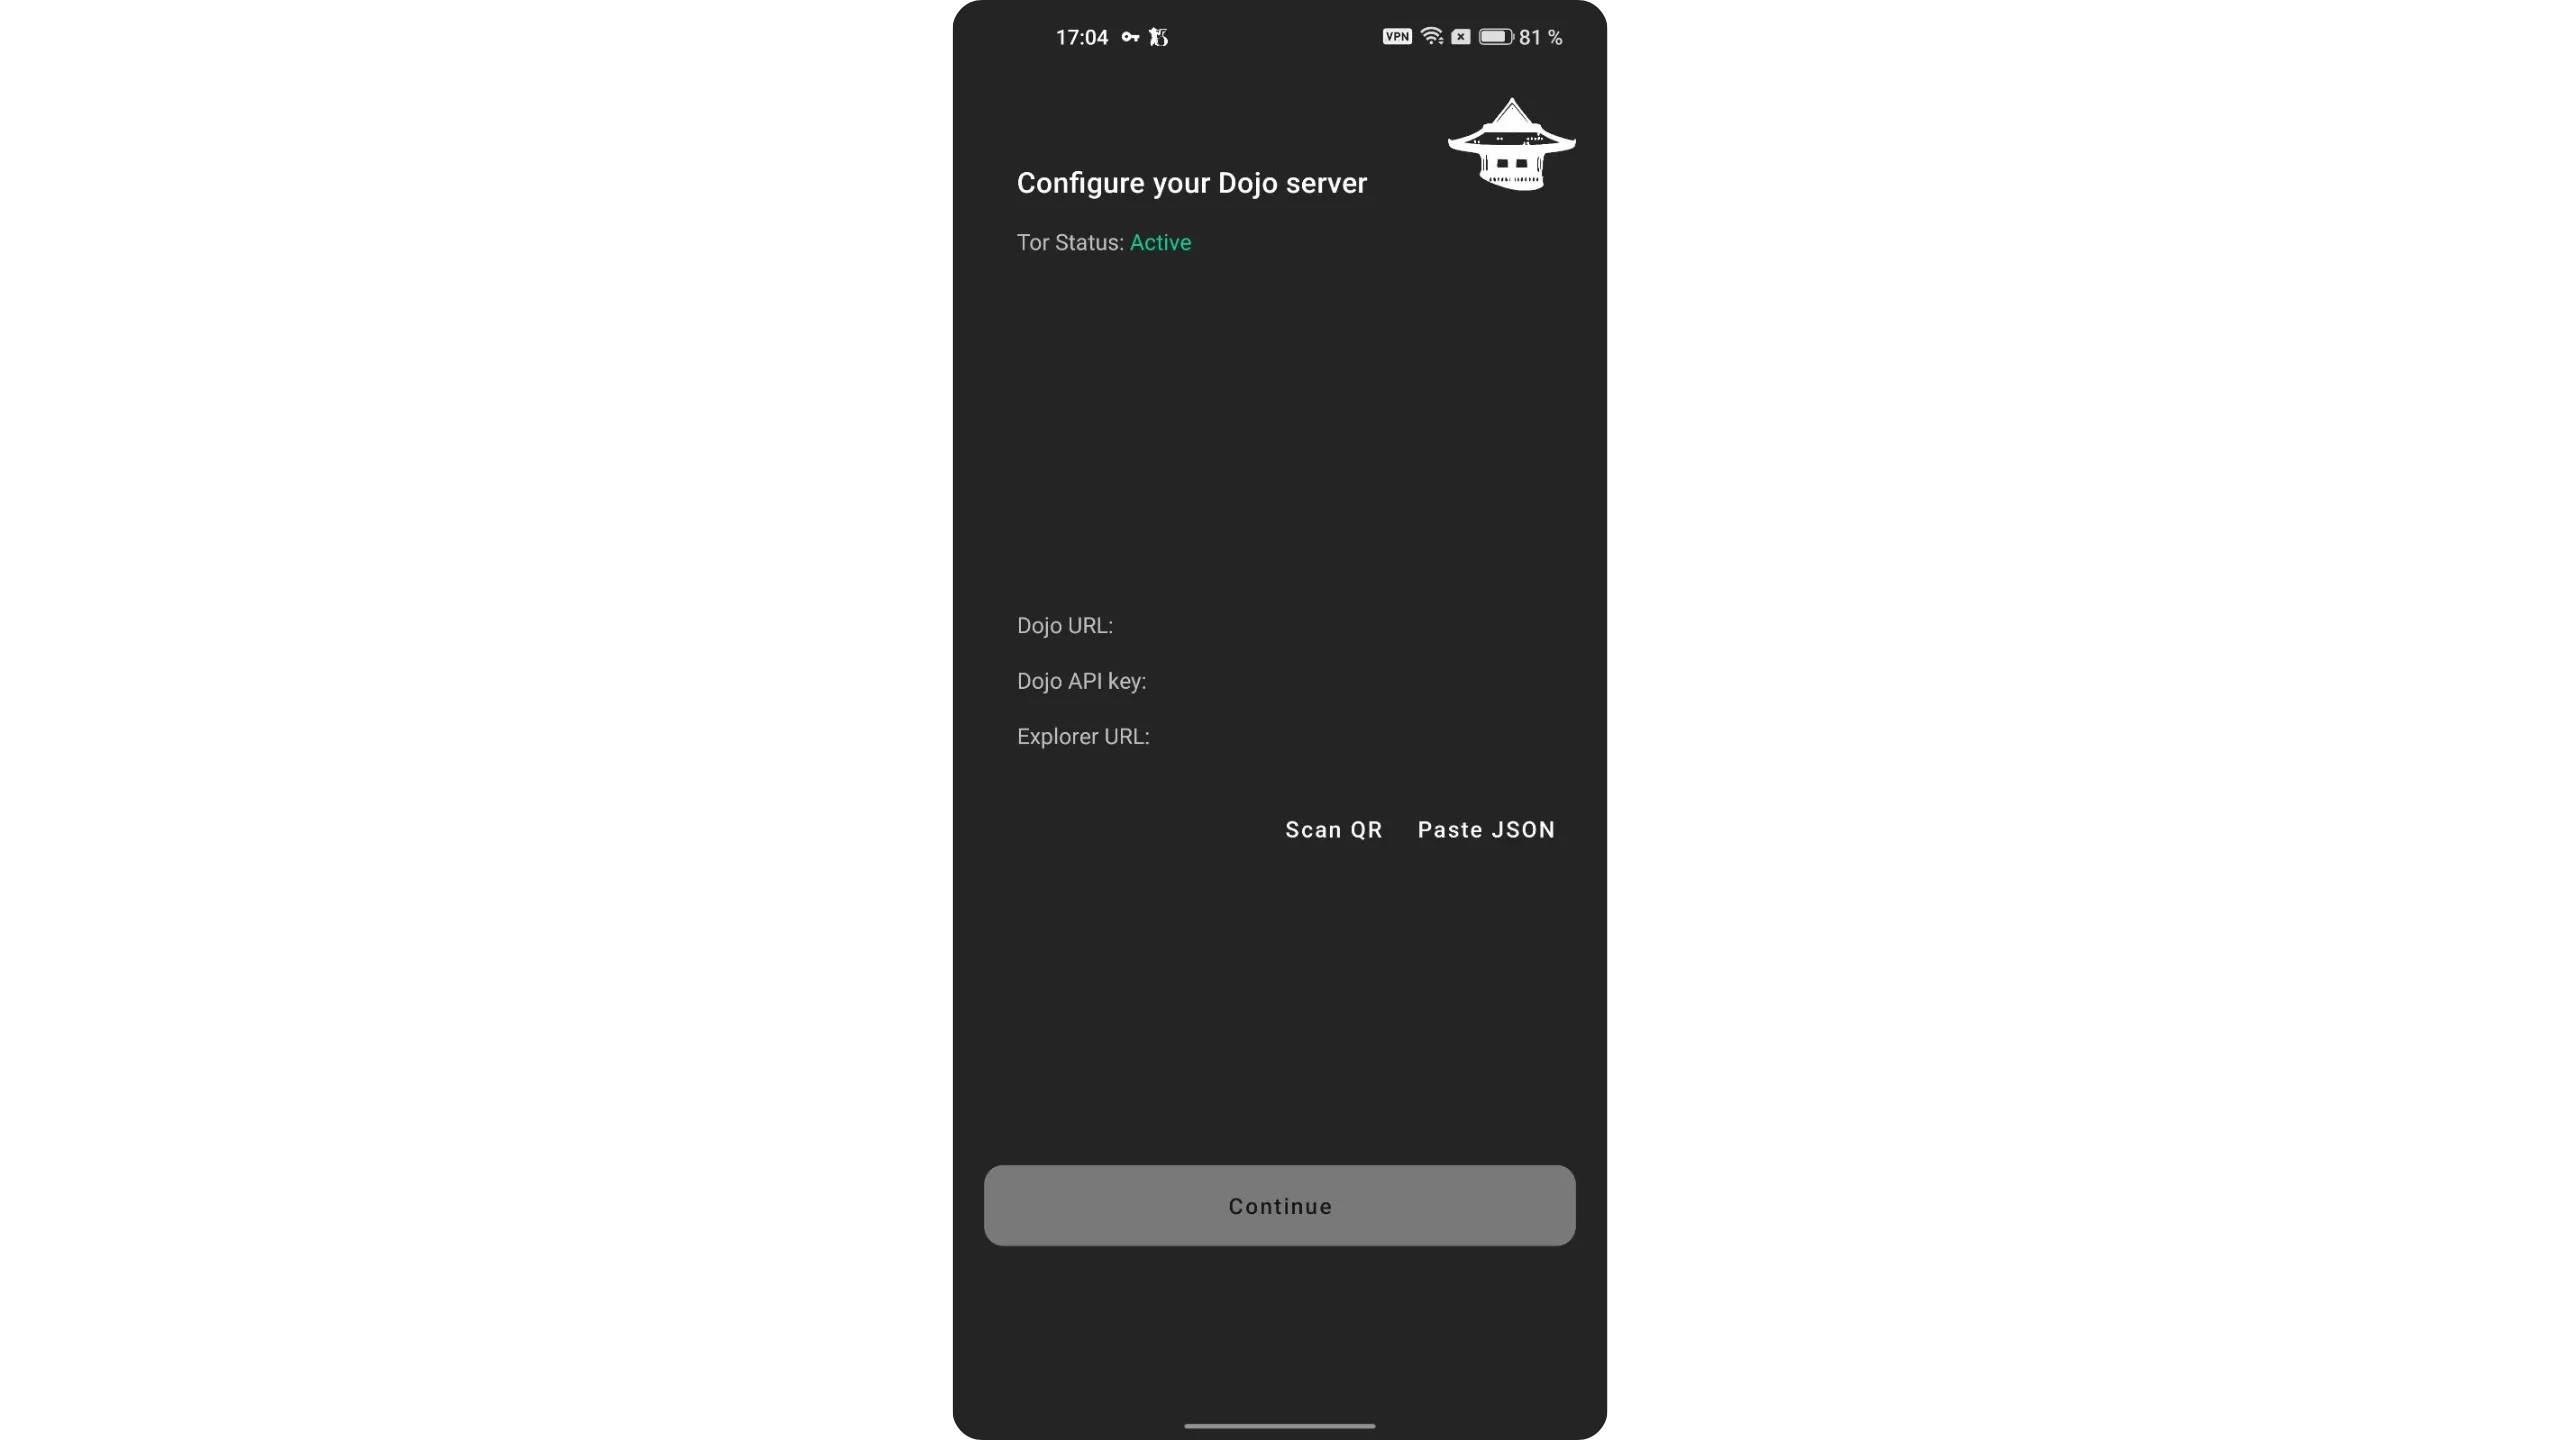
3.2. Connect a Dojo
Next, connect to your Dojo. As explained earlier, Ashigaru requires a Dojo to interact with the Bitcoin network.
Log in to your Dojo’s Maintenance Tool and open the “PAIRING” menu.
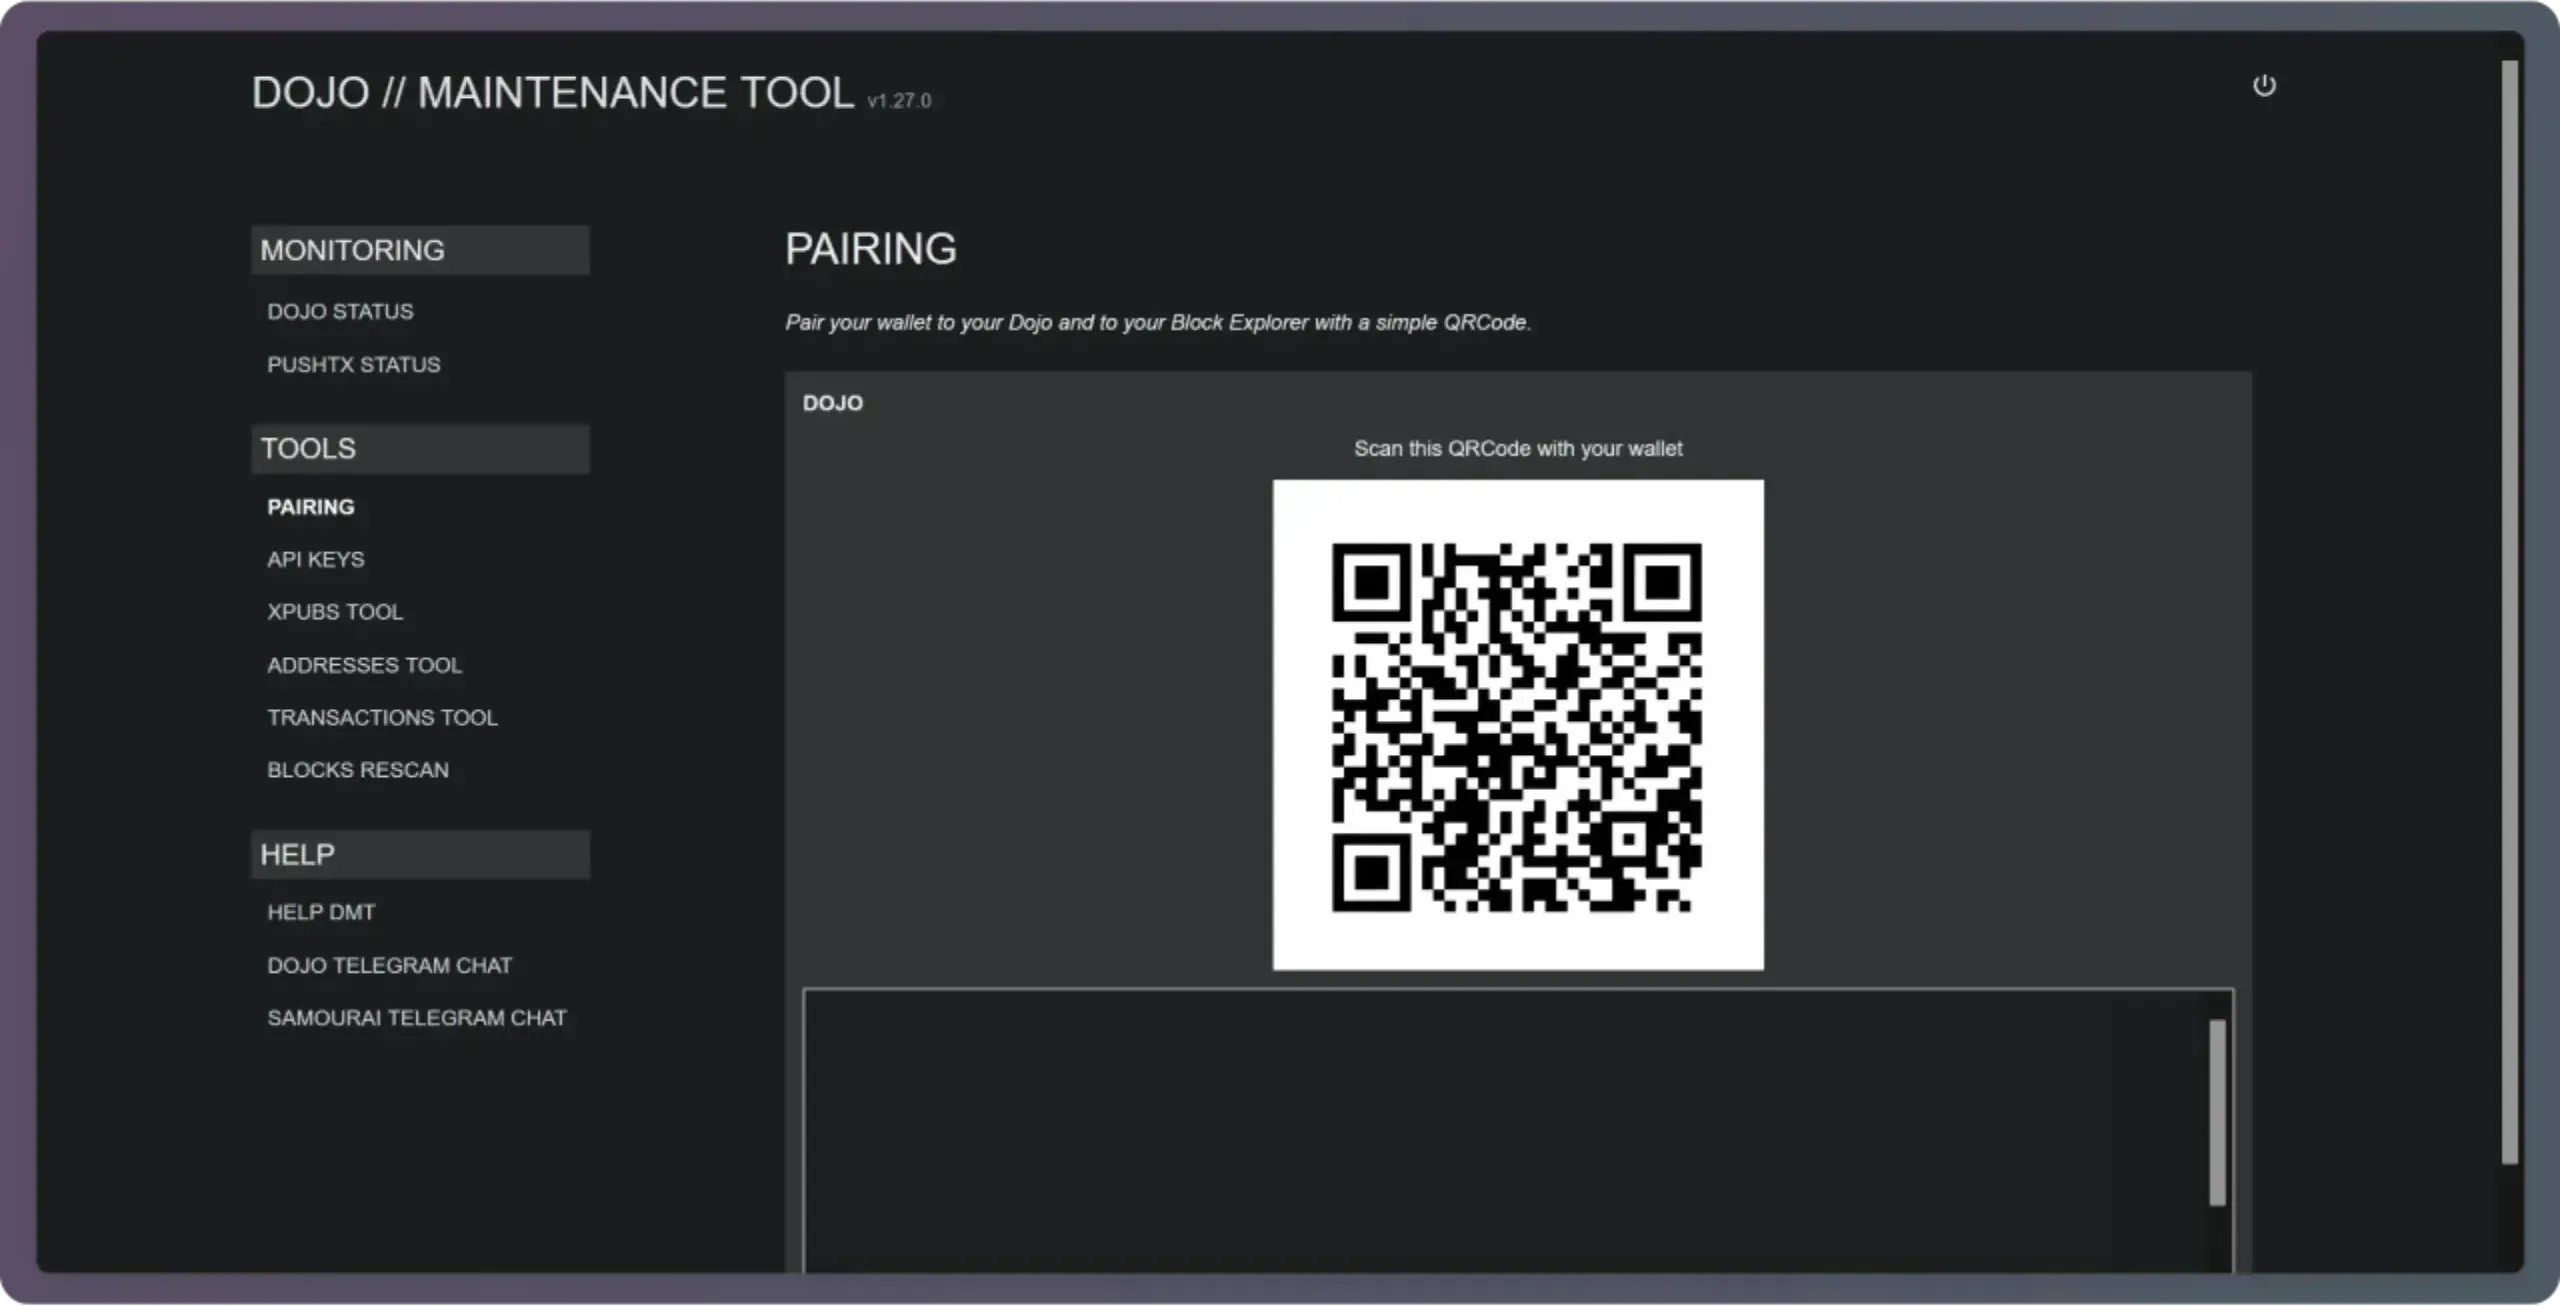
In Ashigaru, tap “Scan QR,” then scan the pairing QR displayed by your DMT. Tap “Continue” to confirm.
Enter your PIN to unlock the wallet. You’ll see the synchronization screen. It’s normal to see PayNym‑related errors at this stage because the wallet is new. Just tap “Continue.”
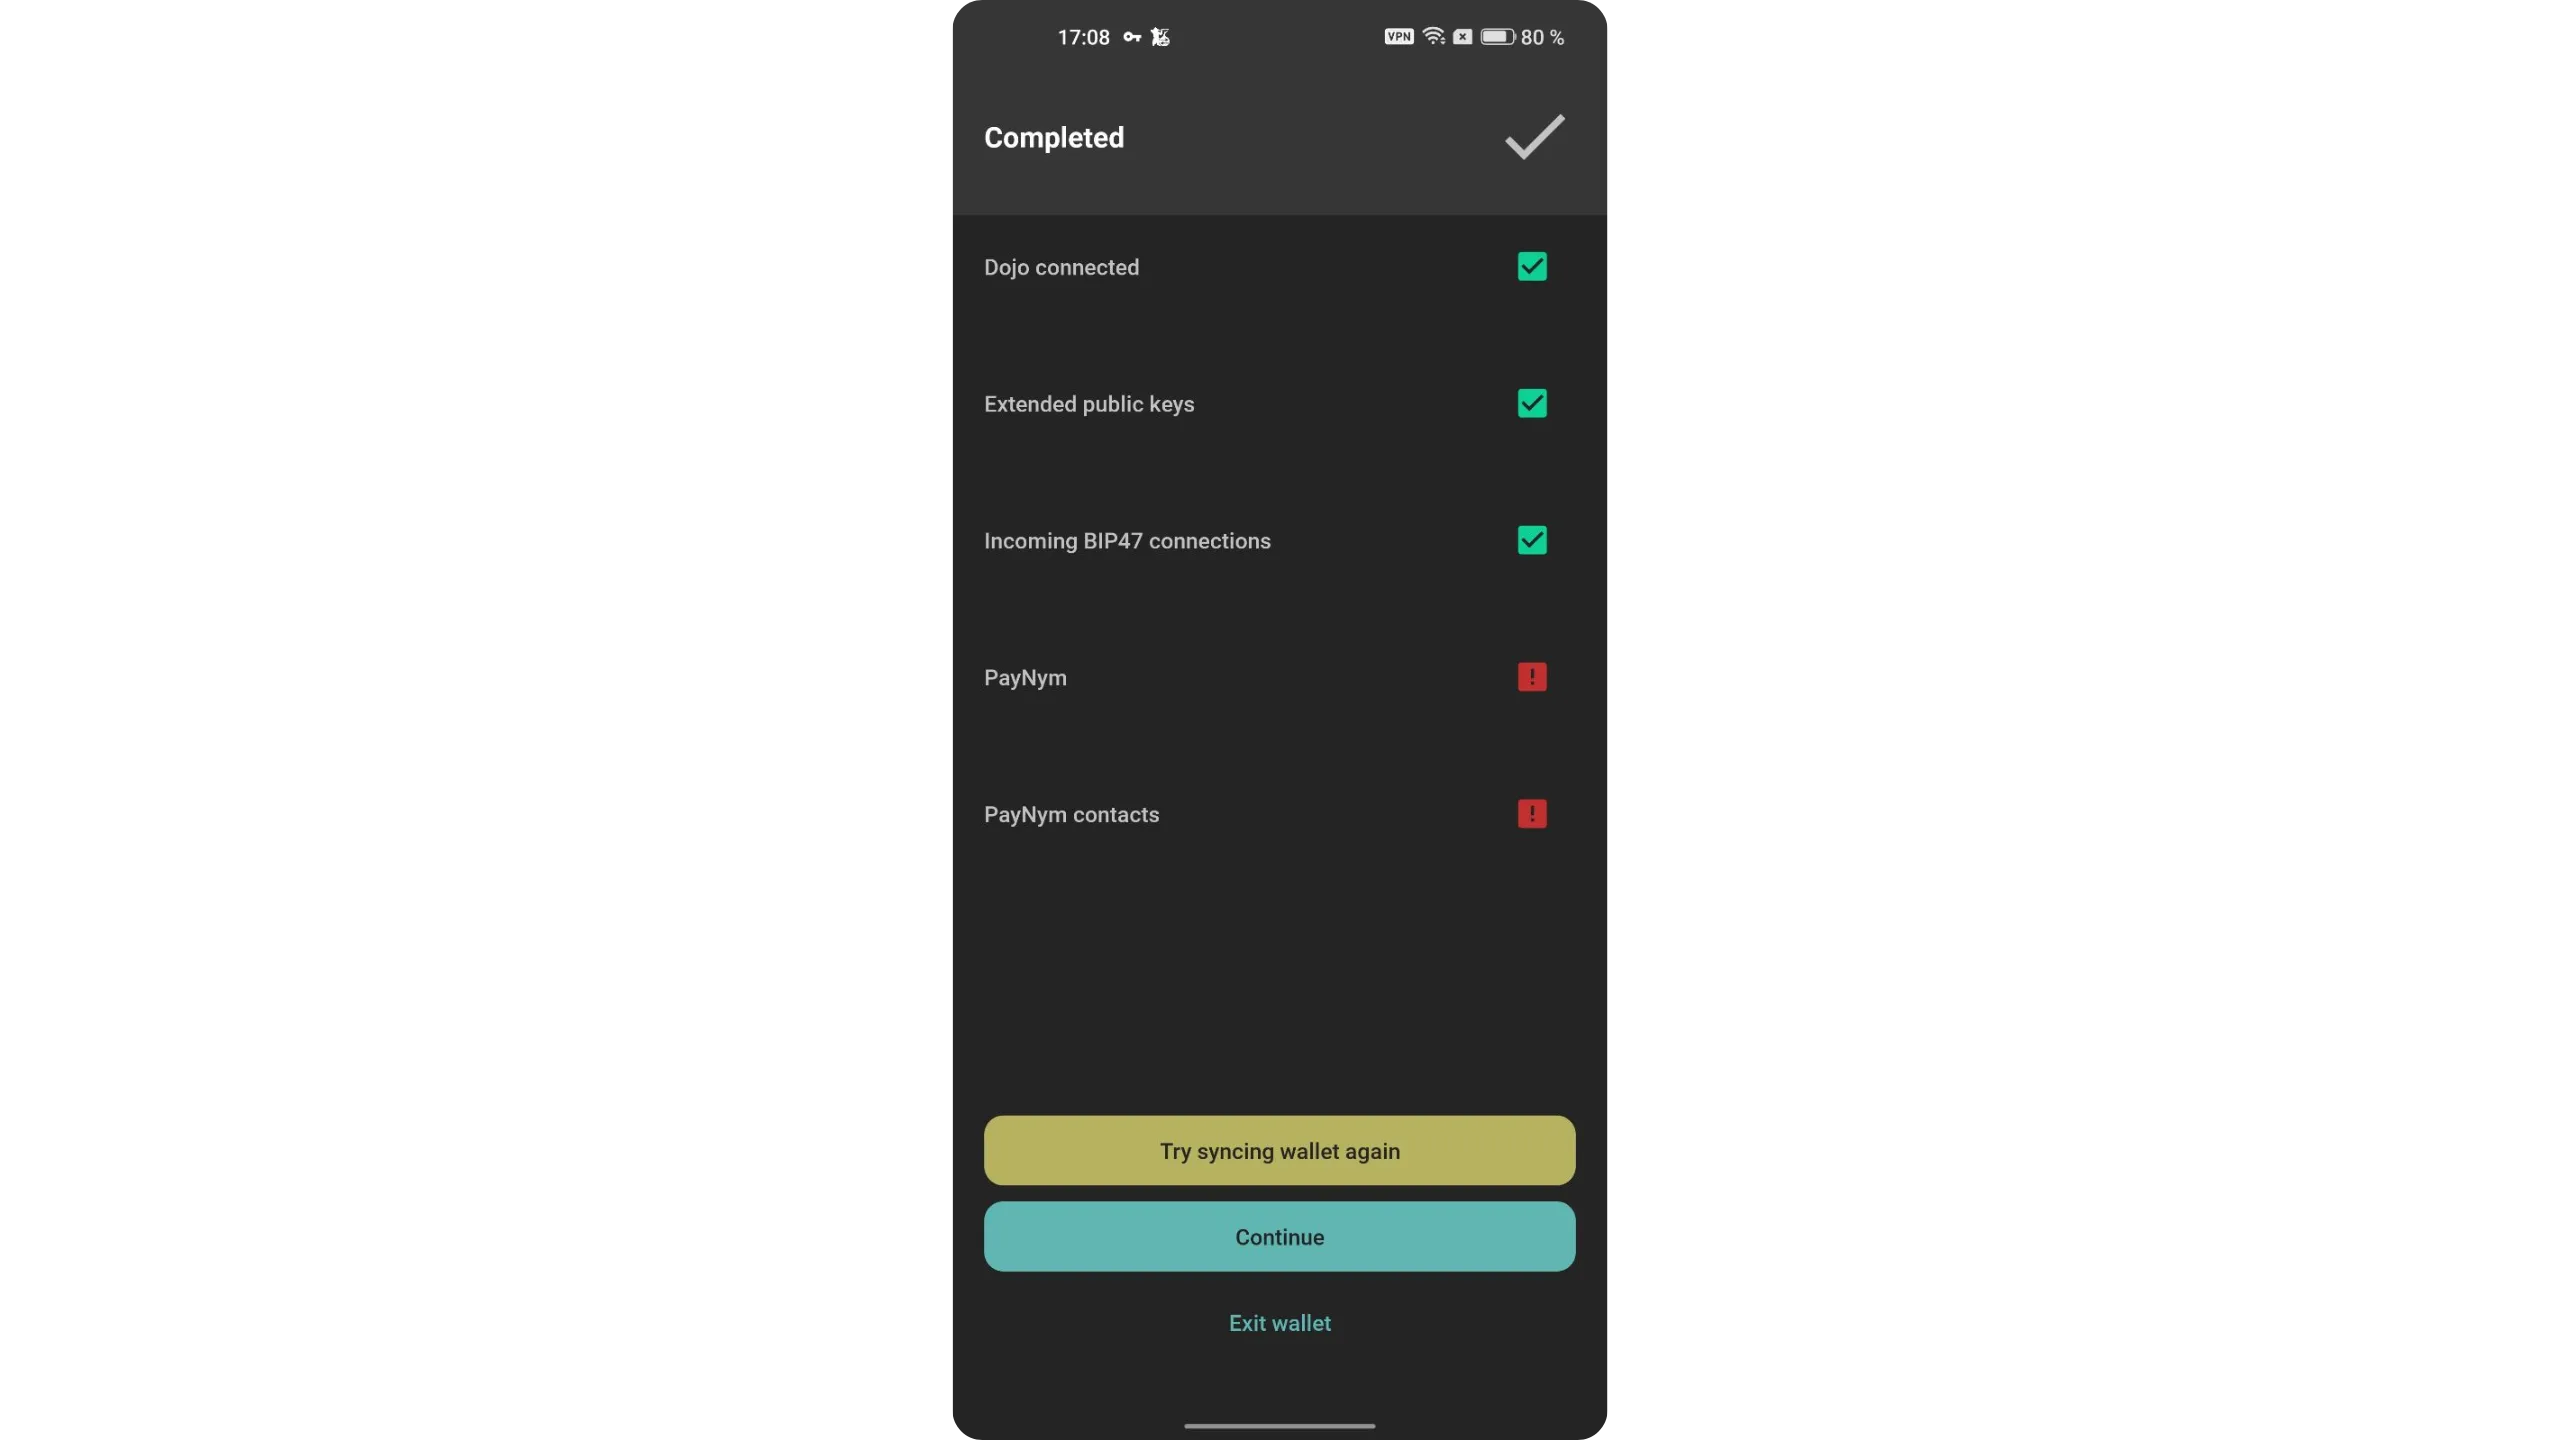
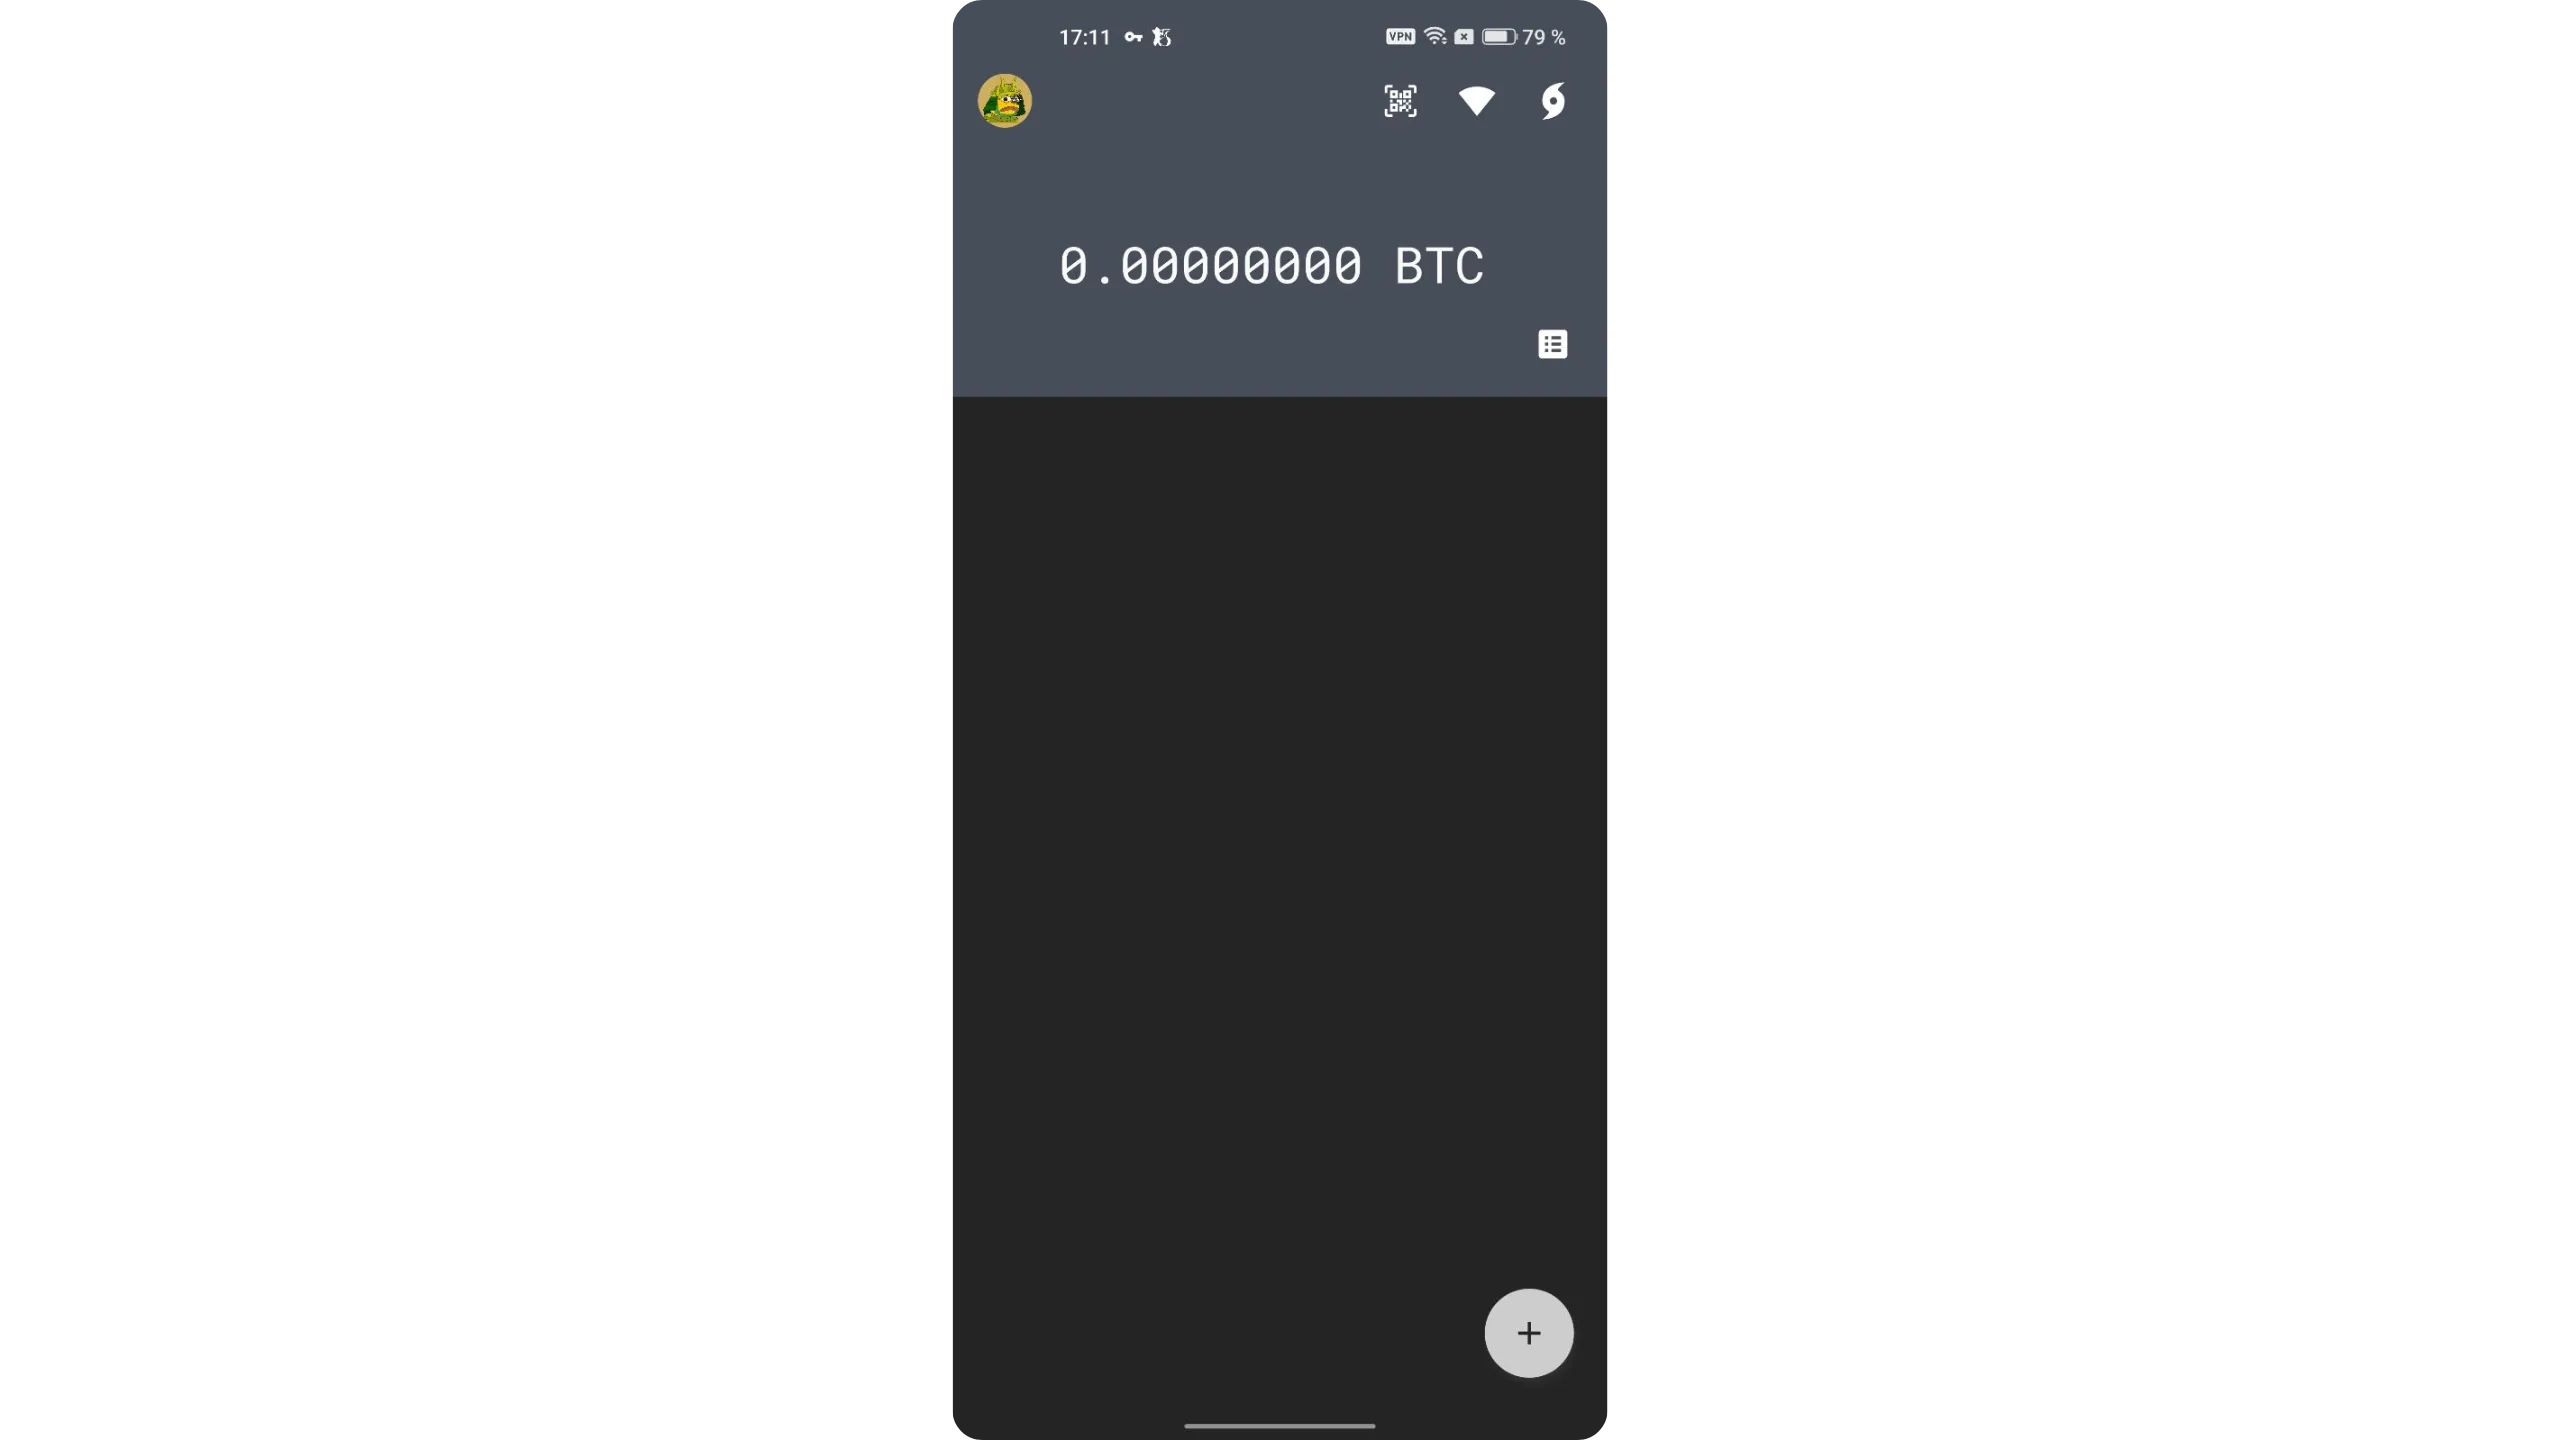
You’ll then arrive at your wallet’s home screen.
4. Configure the Ashigaru mobile app
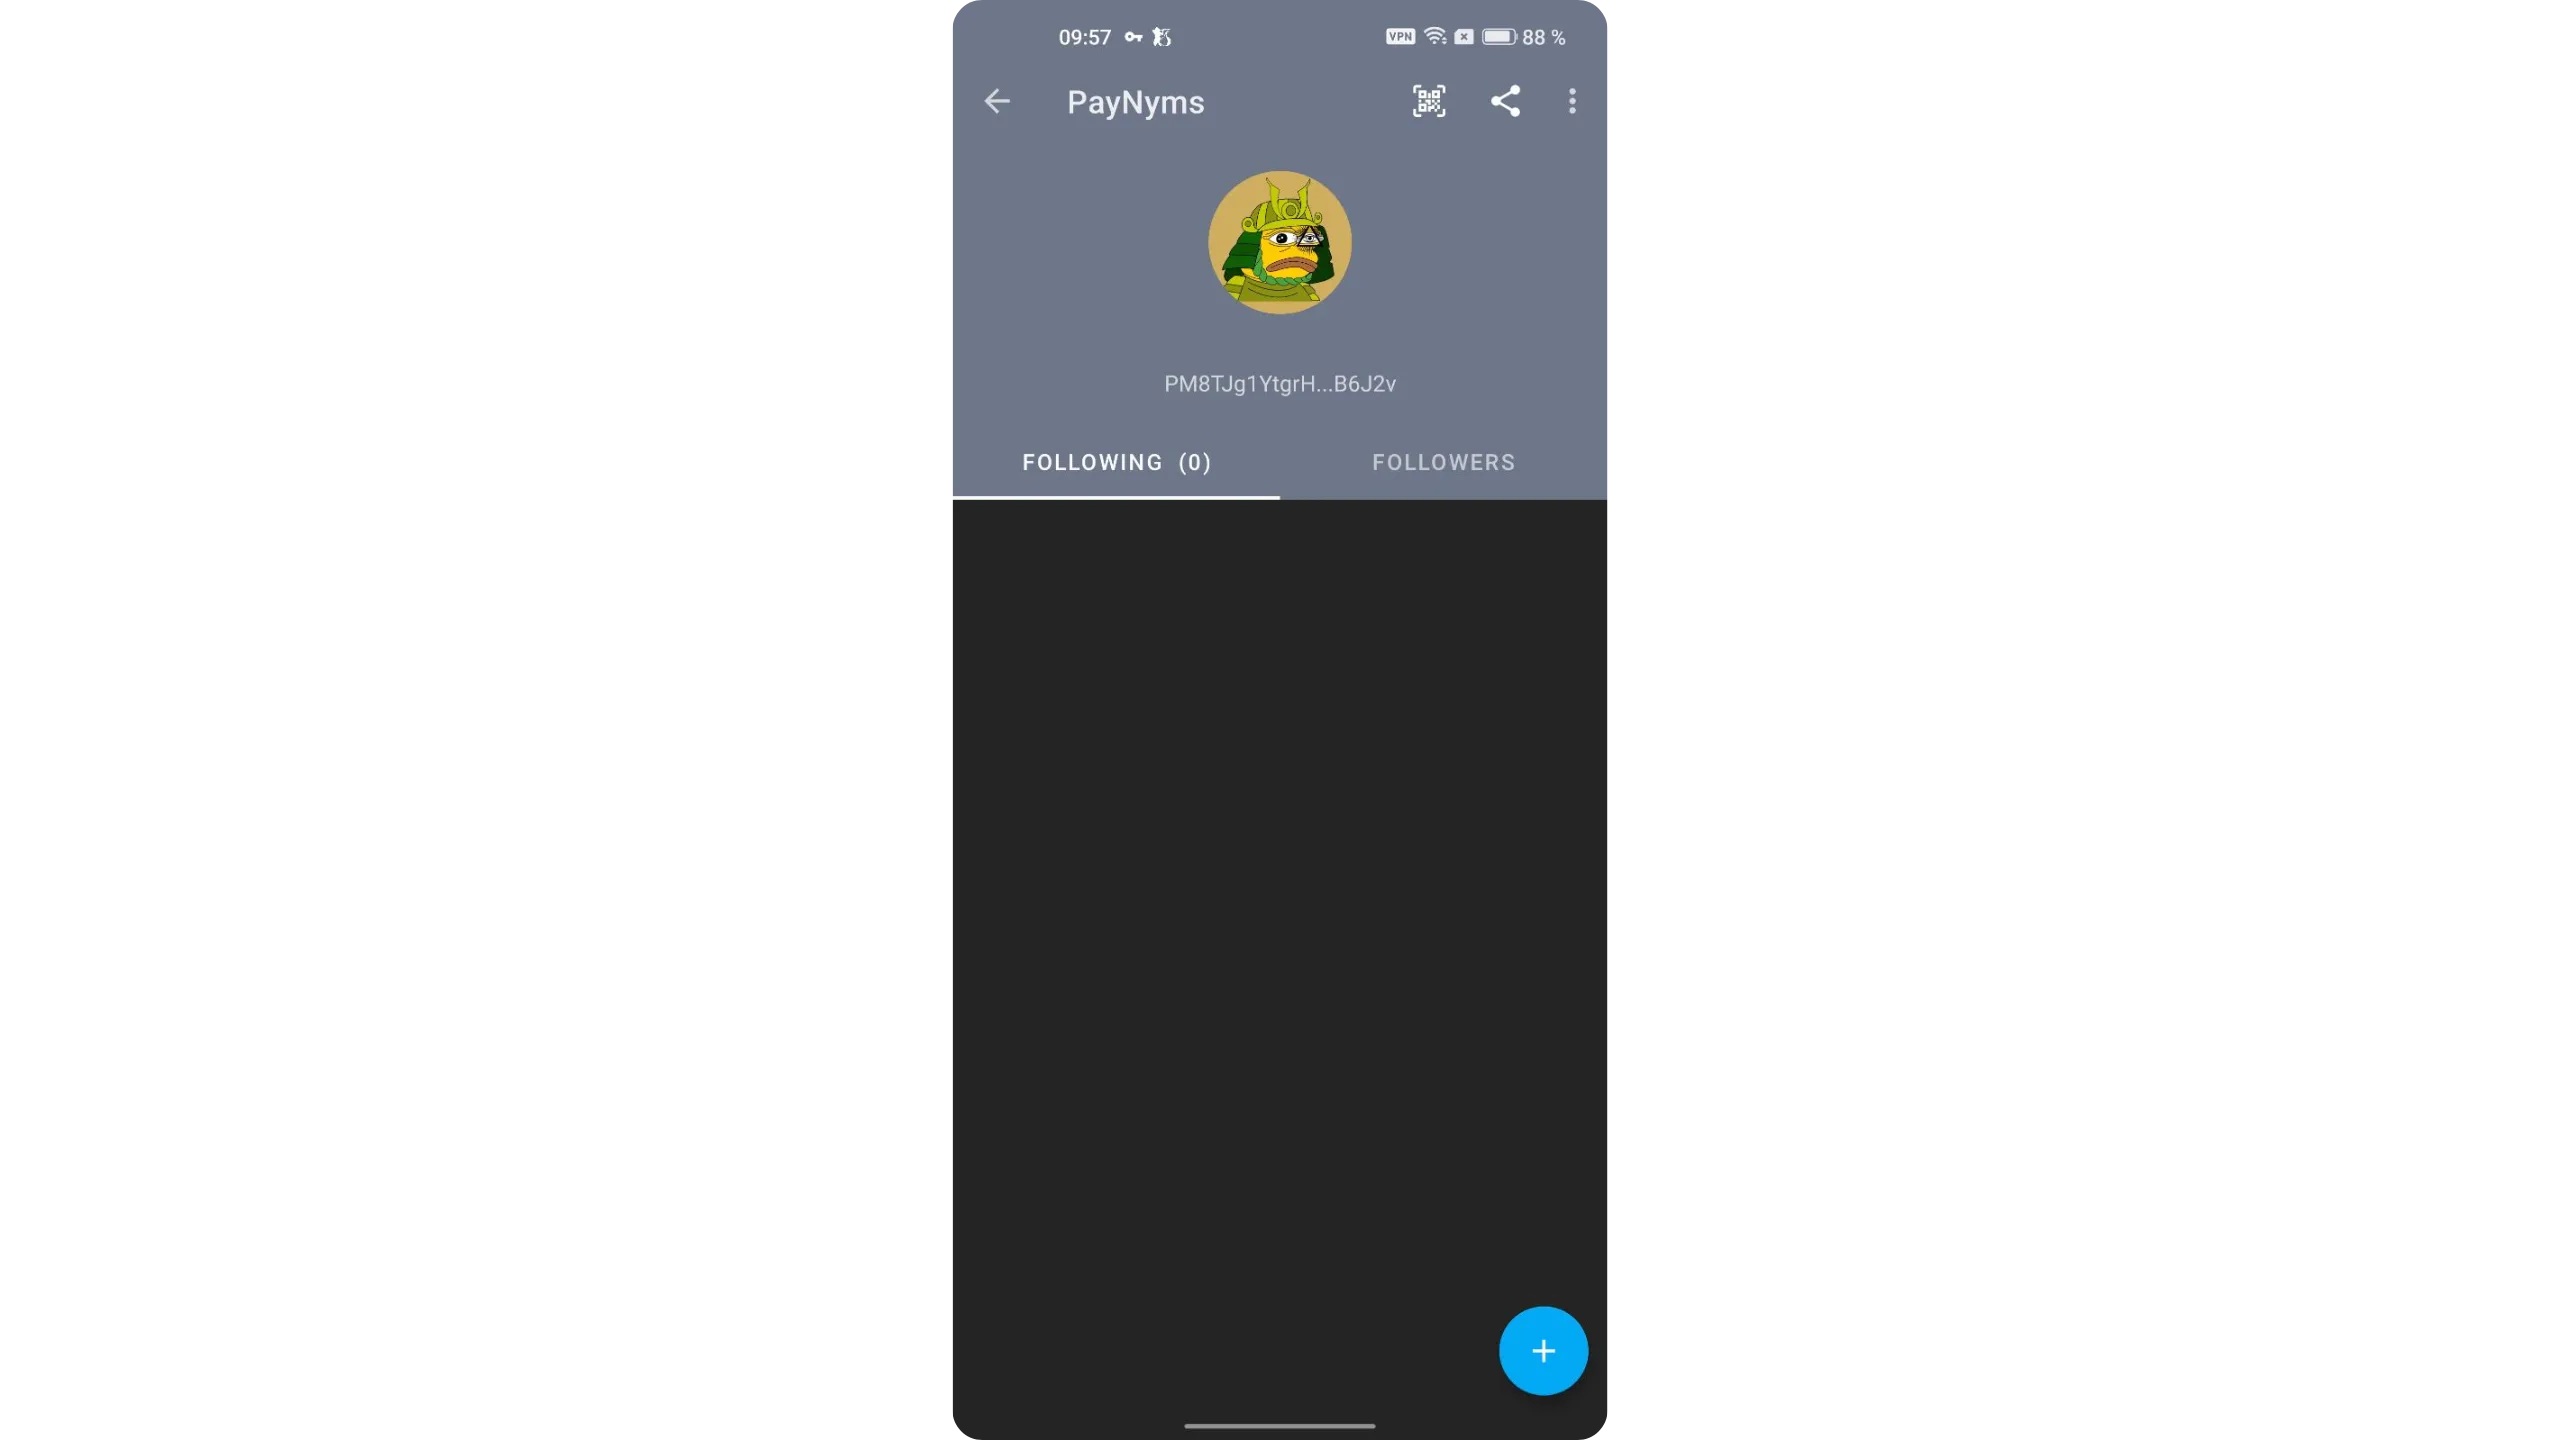
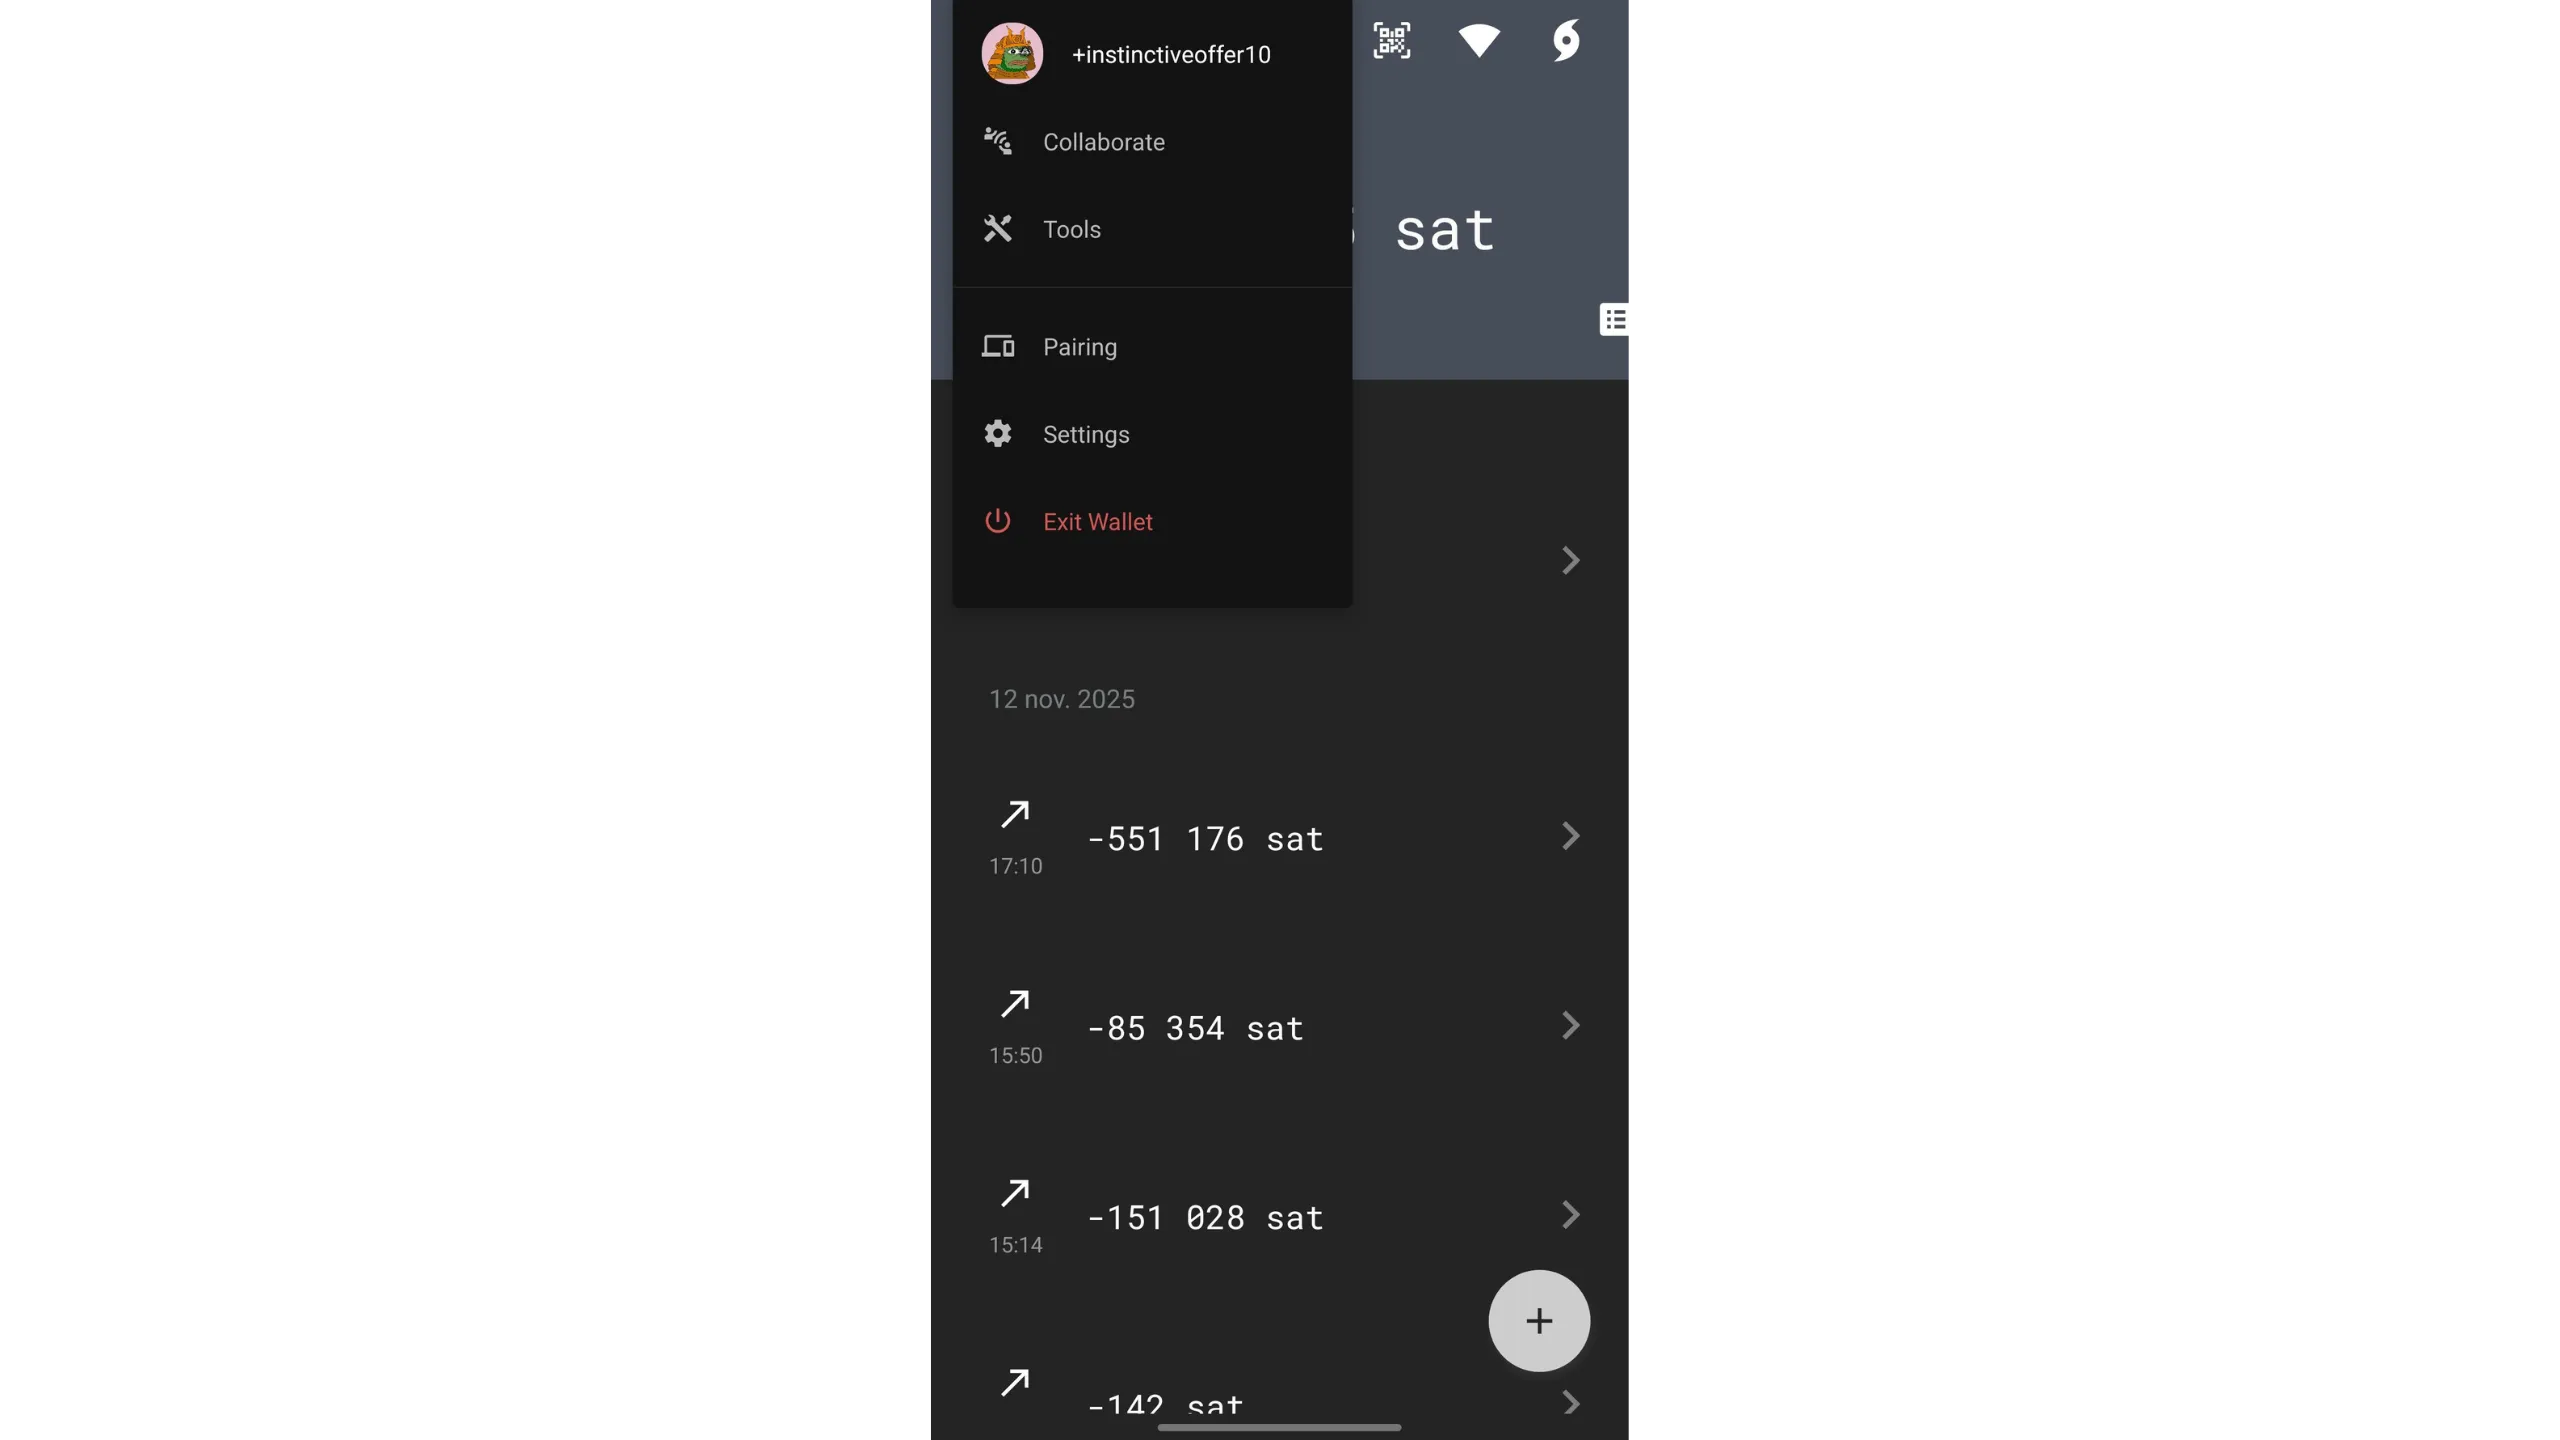
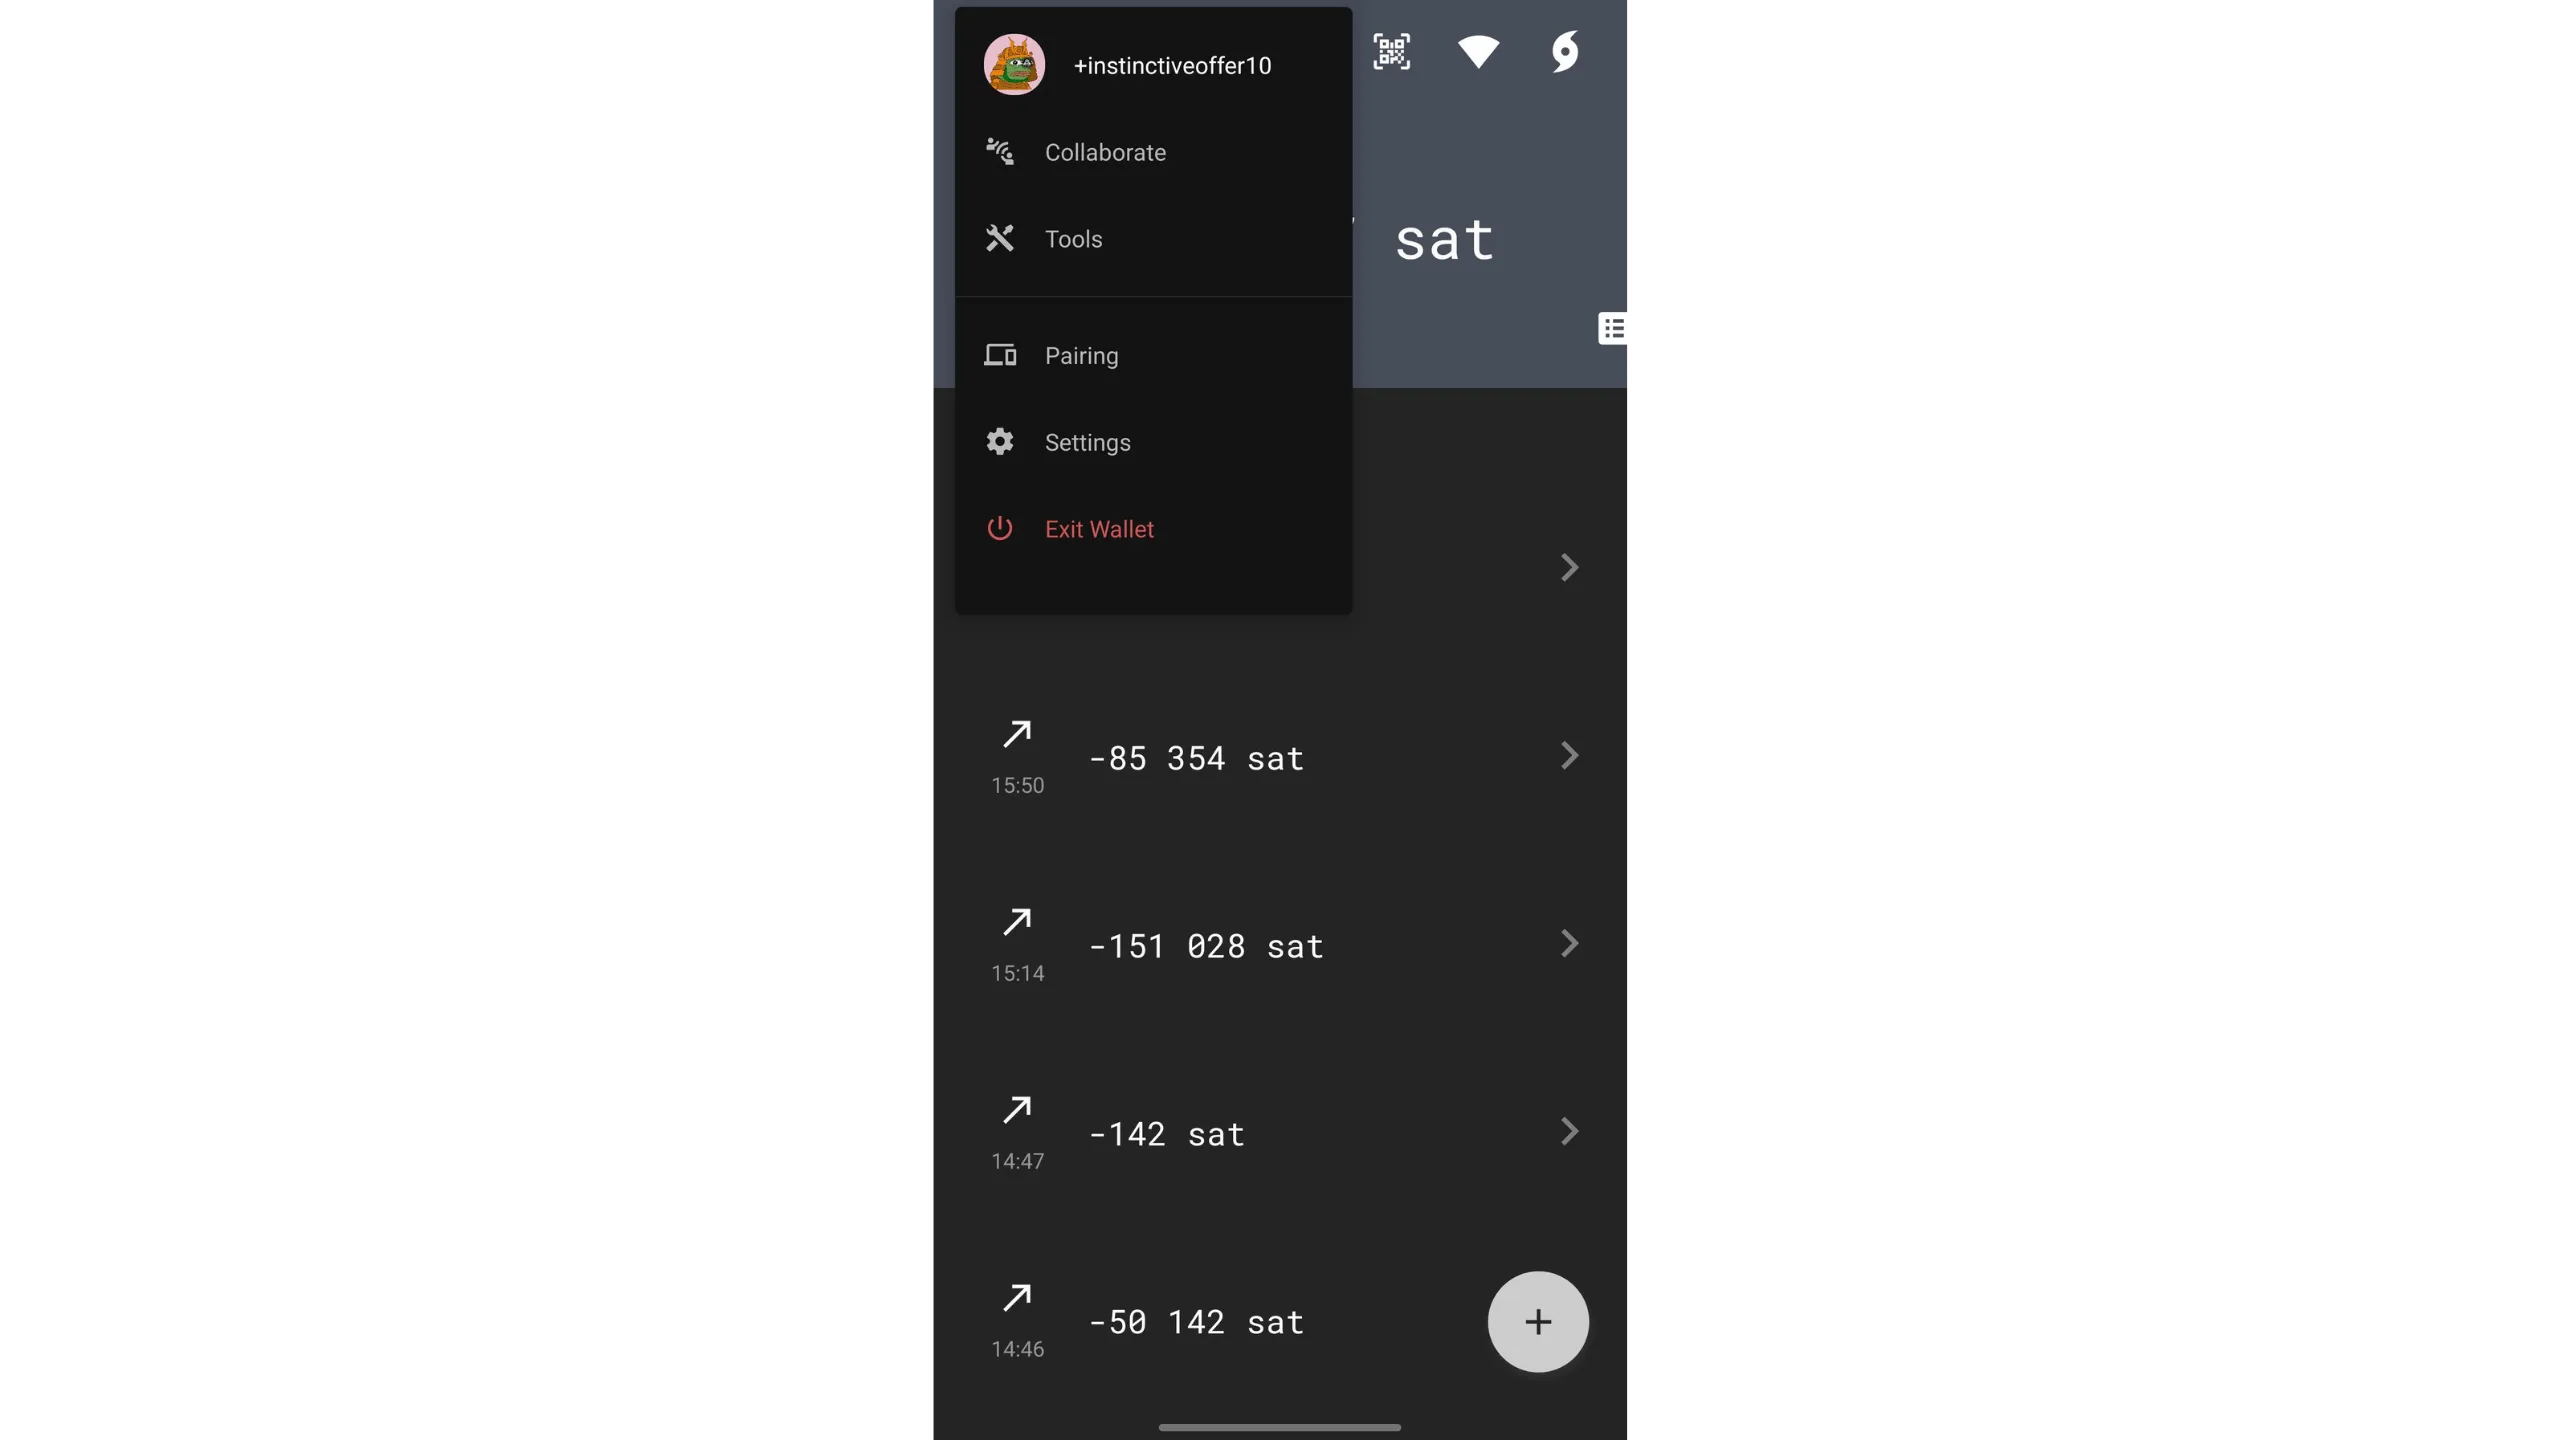
To access app settings, tap your PayNym image at the top left, then select “Settings.”
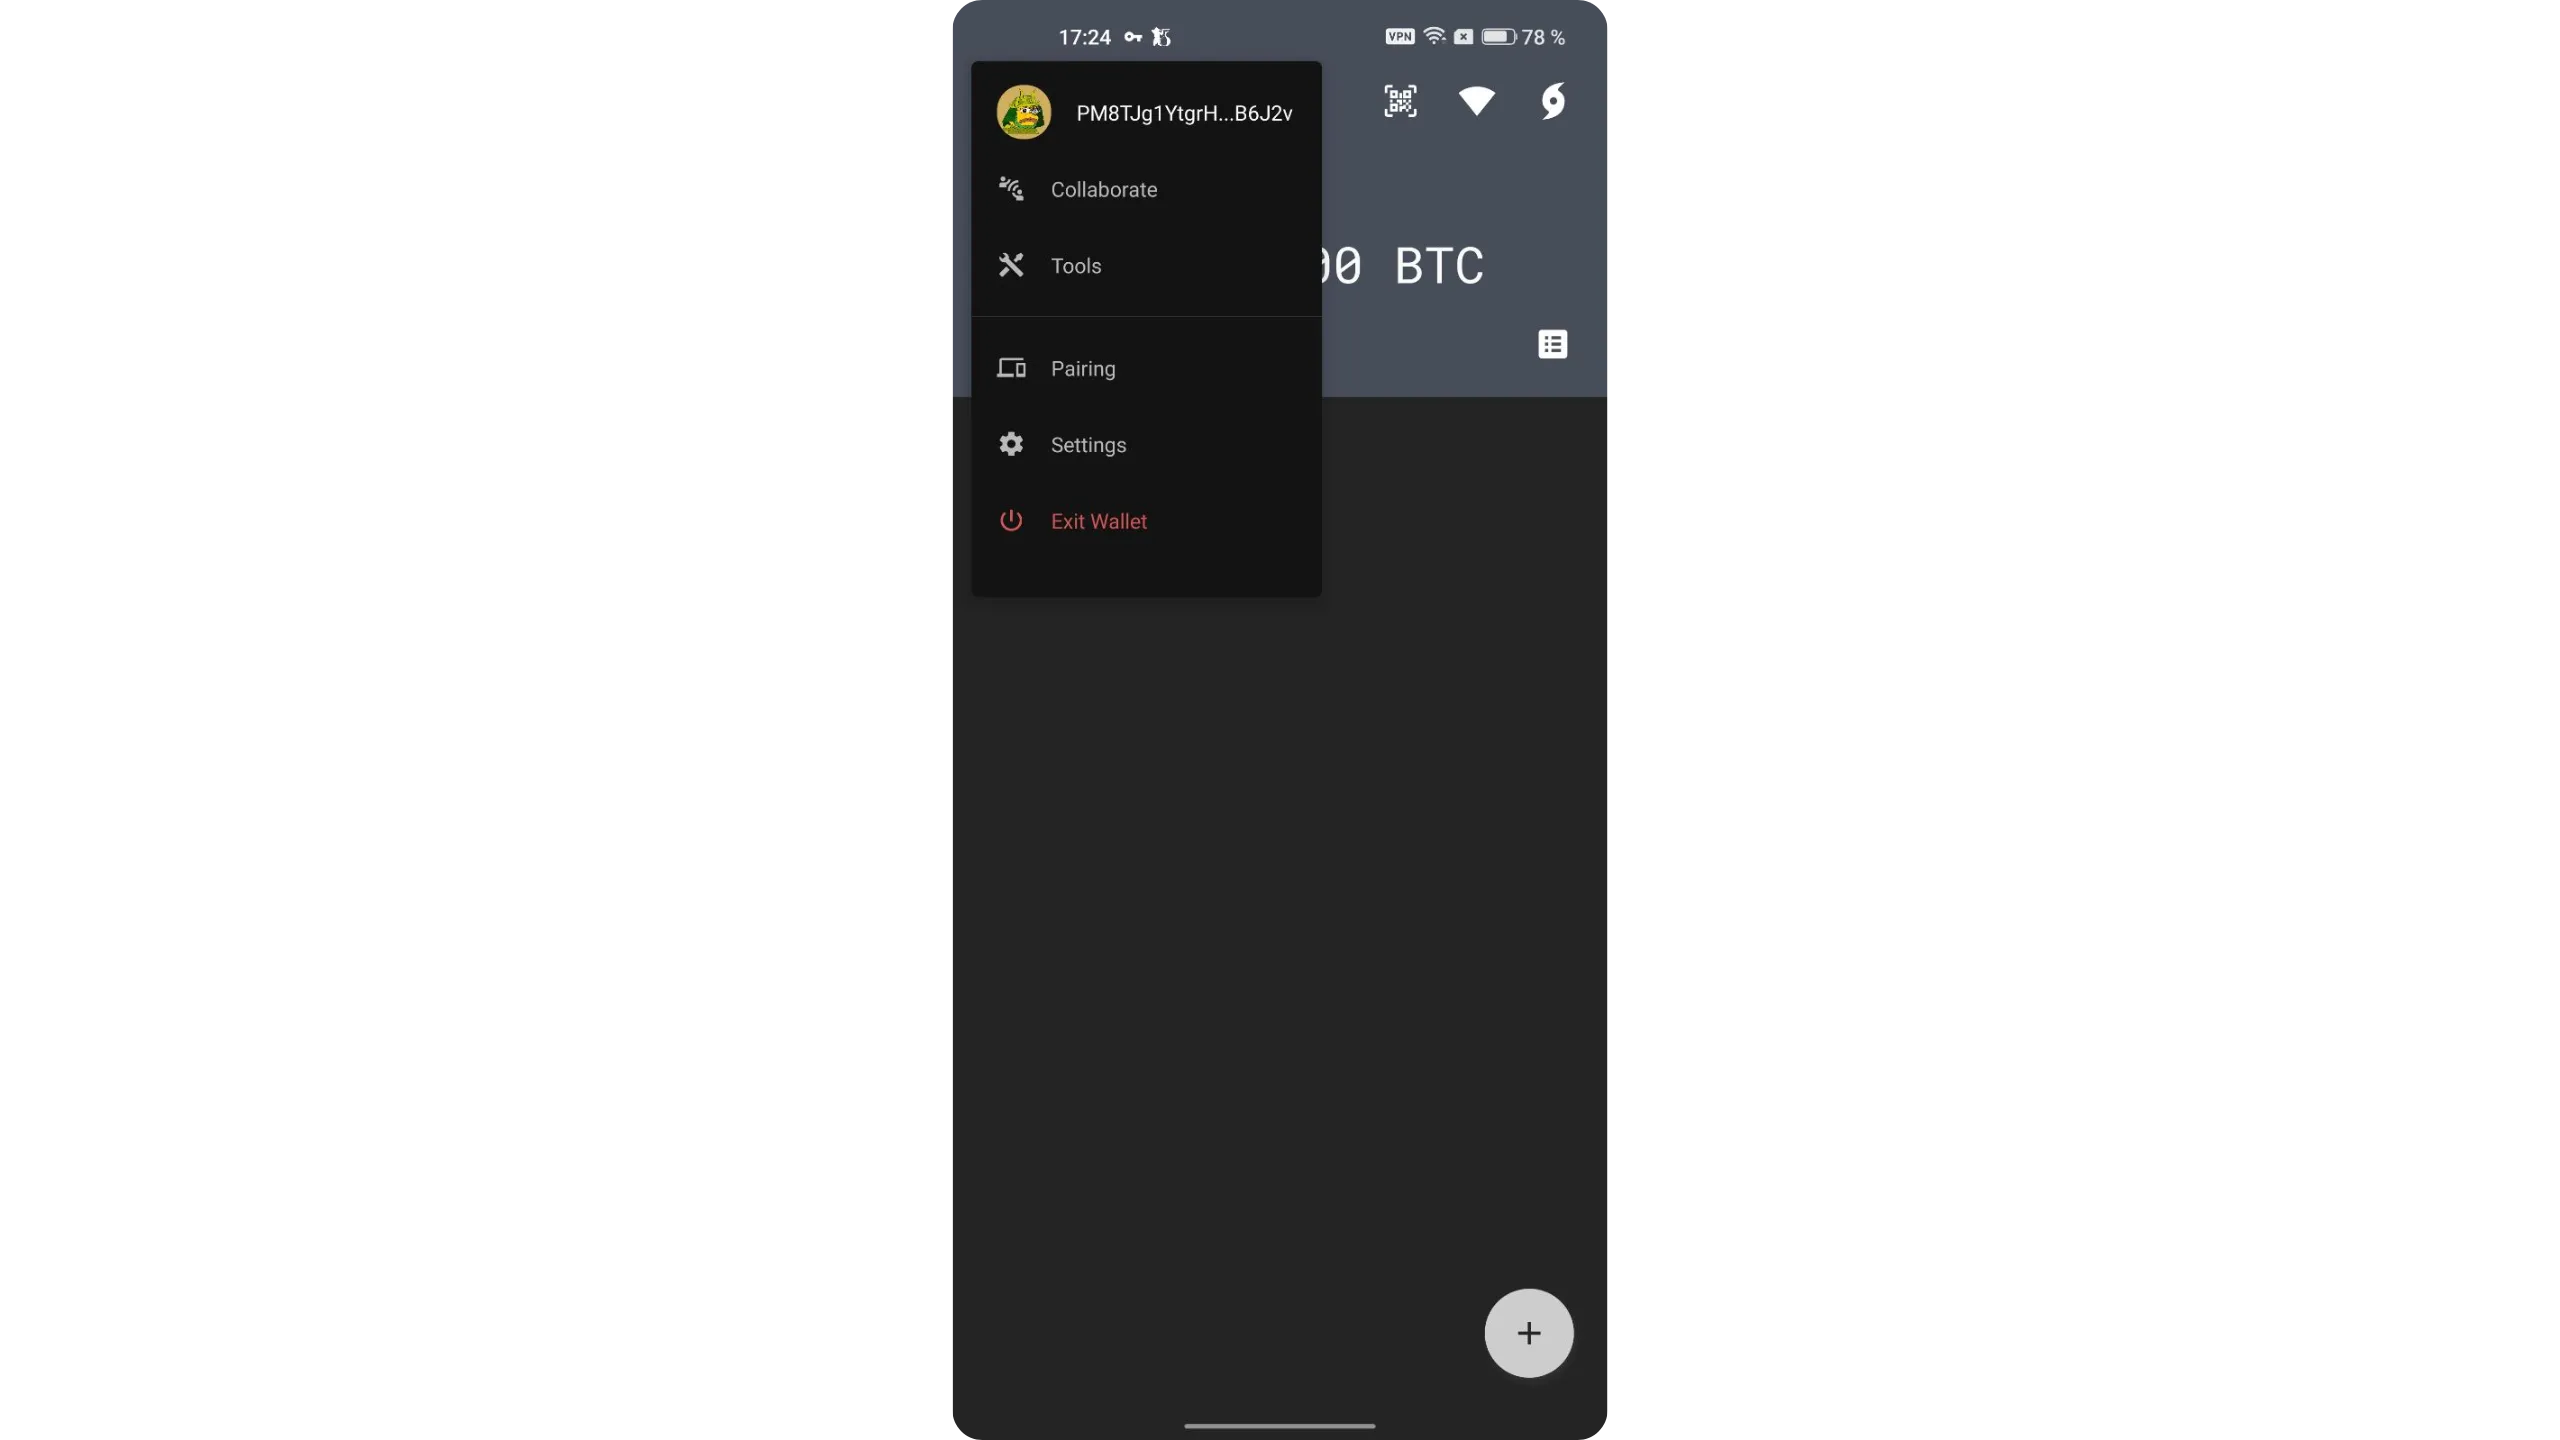
You’ll find several options to tailor Ashigaru to your needs. Two settings are especially important to enable early on.
First, open “Security > Stealth mode,” then enable it if you need it. Stealth Mode hides Ashigaru behind a normal‑looking app on your phone. The goal is to prevent anyone from identifying Ashigaru during a physical inspection of your phone.
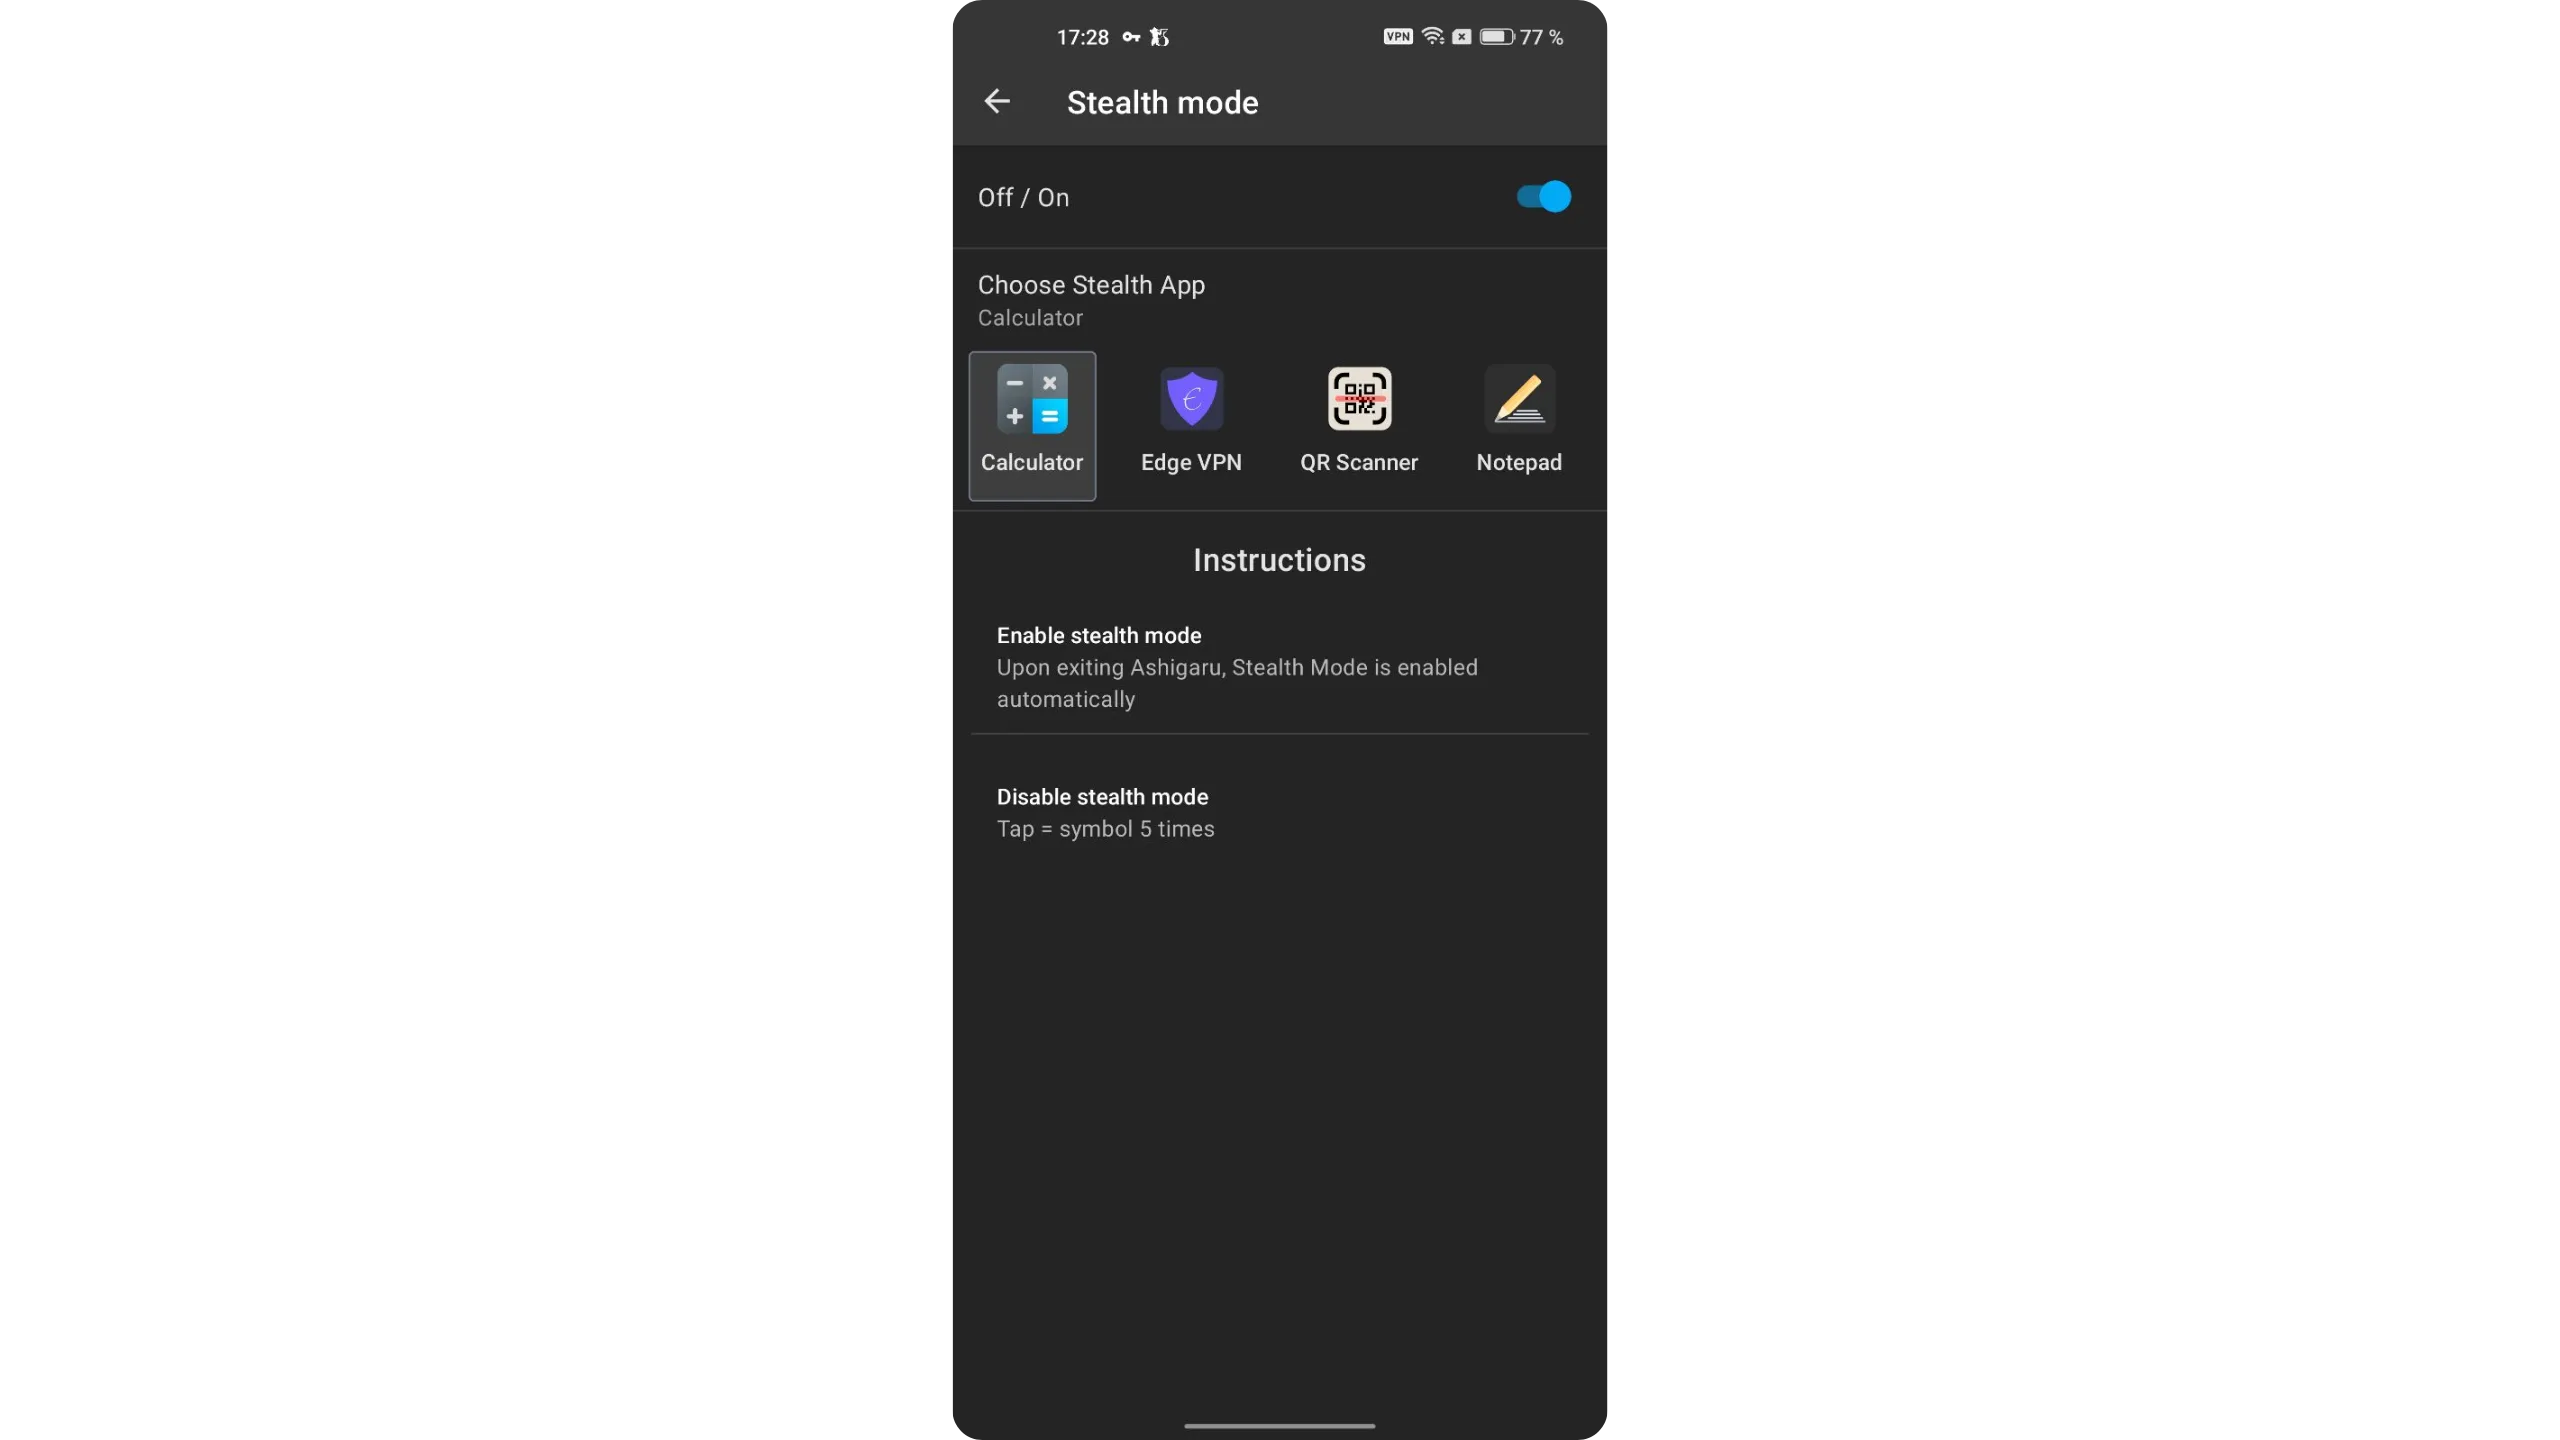
Each decoy app has a specific method to unlock Ashigaru’s real interface. For example, if you choose the calculator, the Ashigaru icon disappears from your home screen and is replaced by a fake calculator. When opened, it works like a regular calculator, but to access Ashigaru, tap the “=” symbol five times quickly.
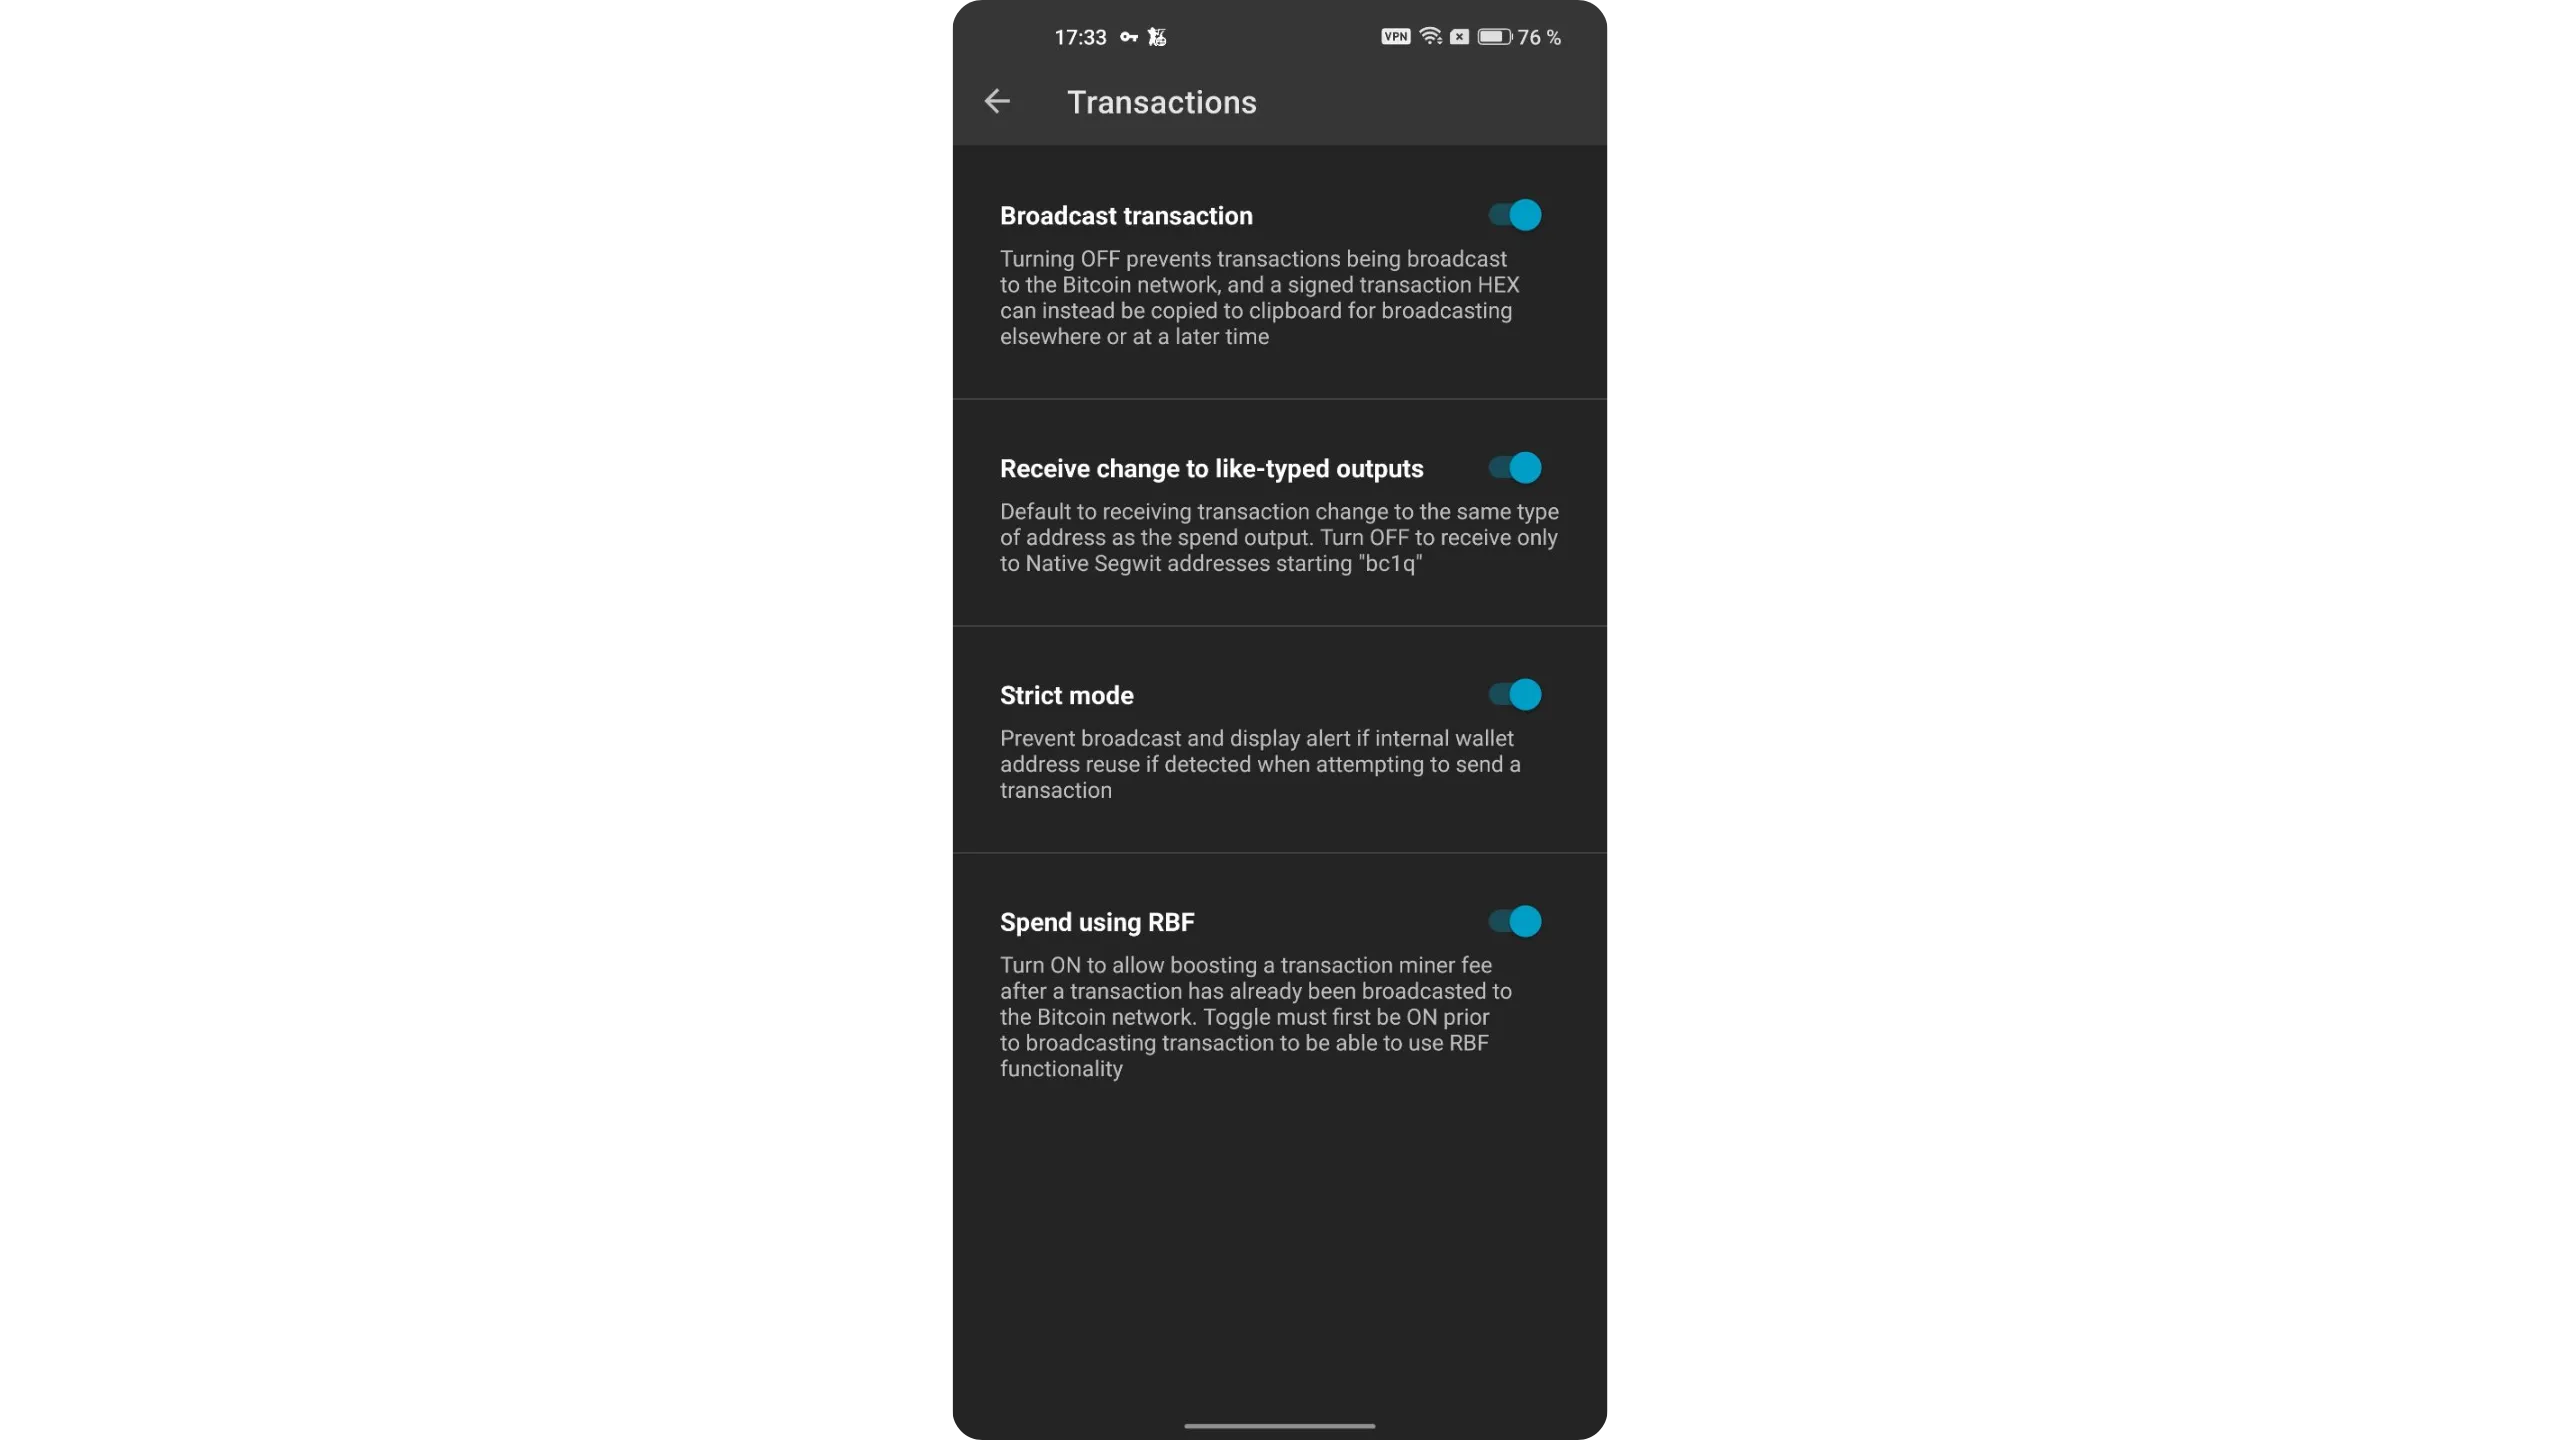
The second key setting is RBF (Replace‑by‑Fee). This lets you bump transaction fees if a transaction is stuck in mempools due to low fees. Enable it in “Transactions > Spend using RBF.”
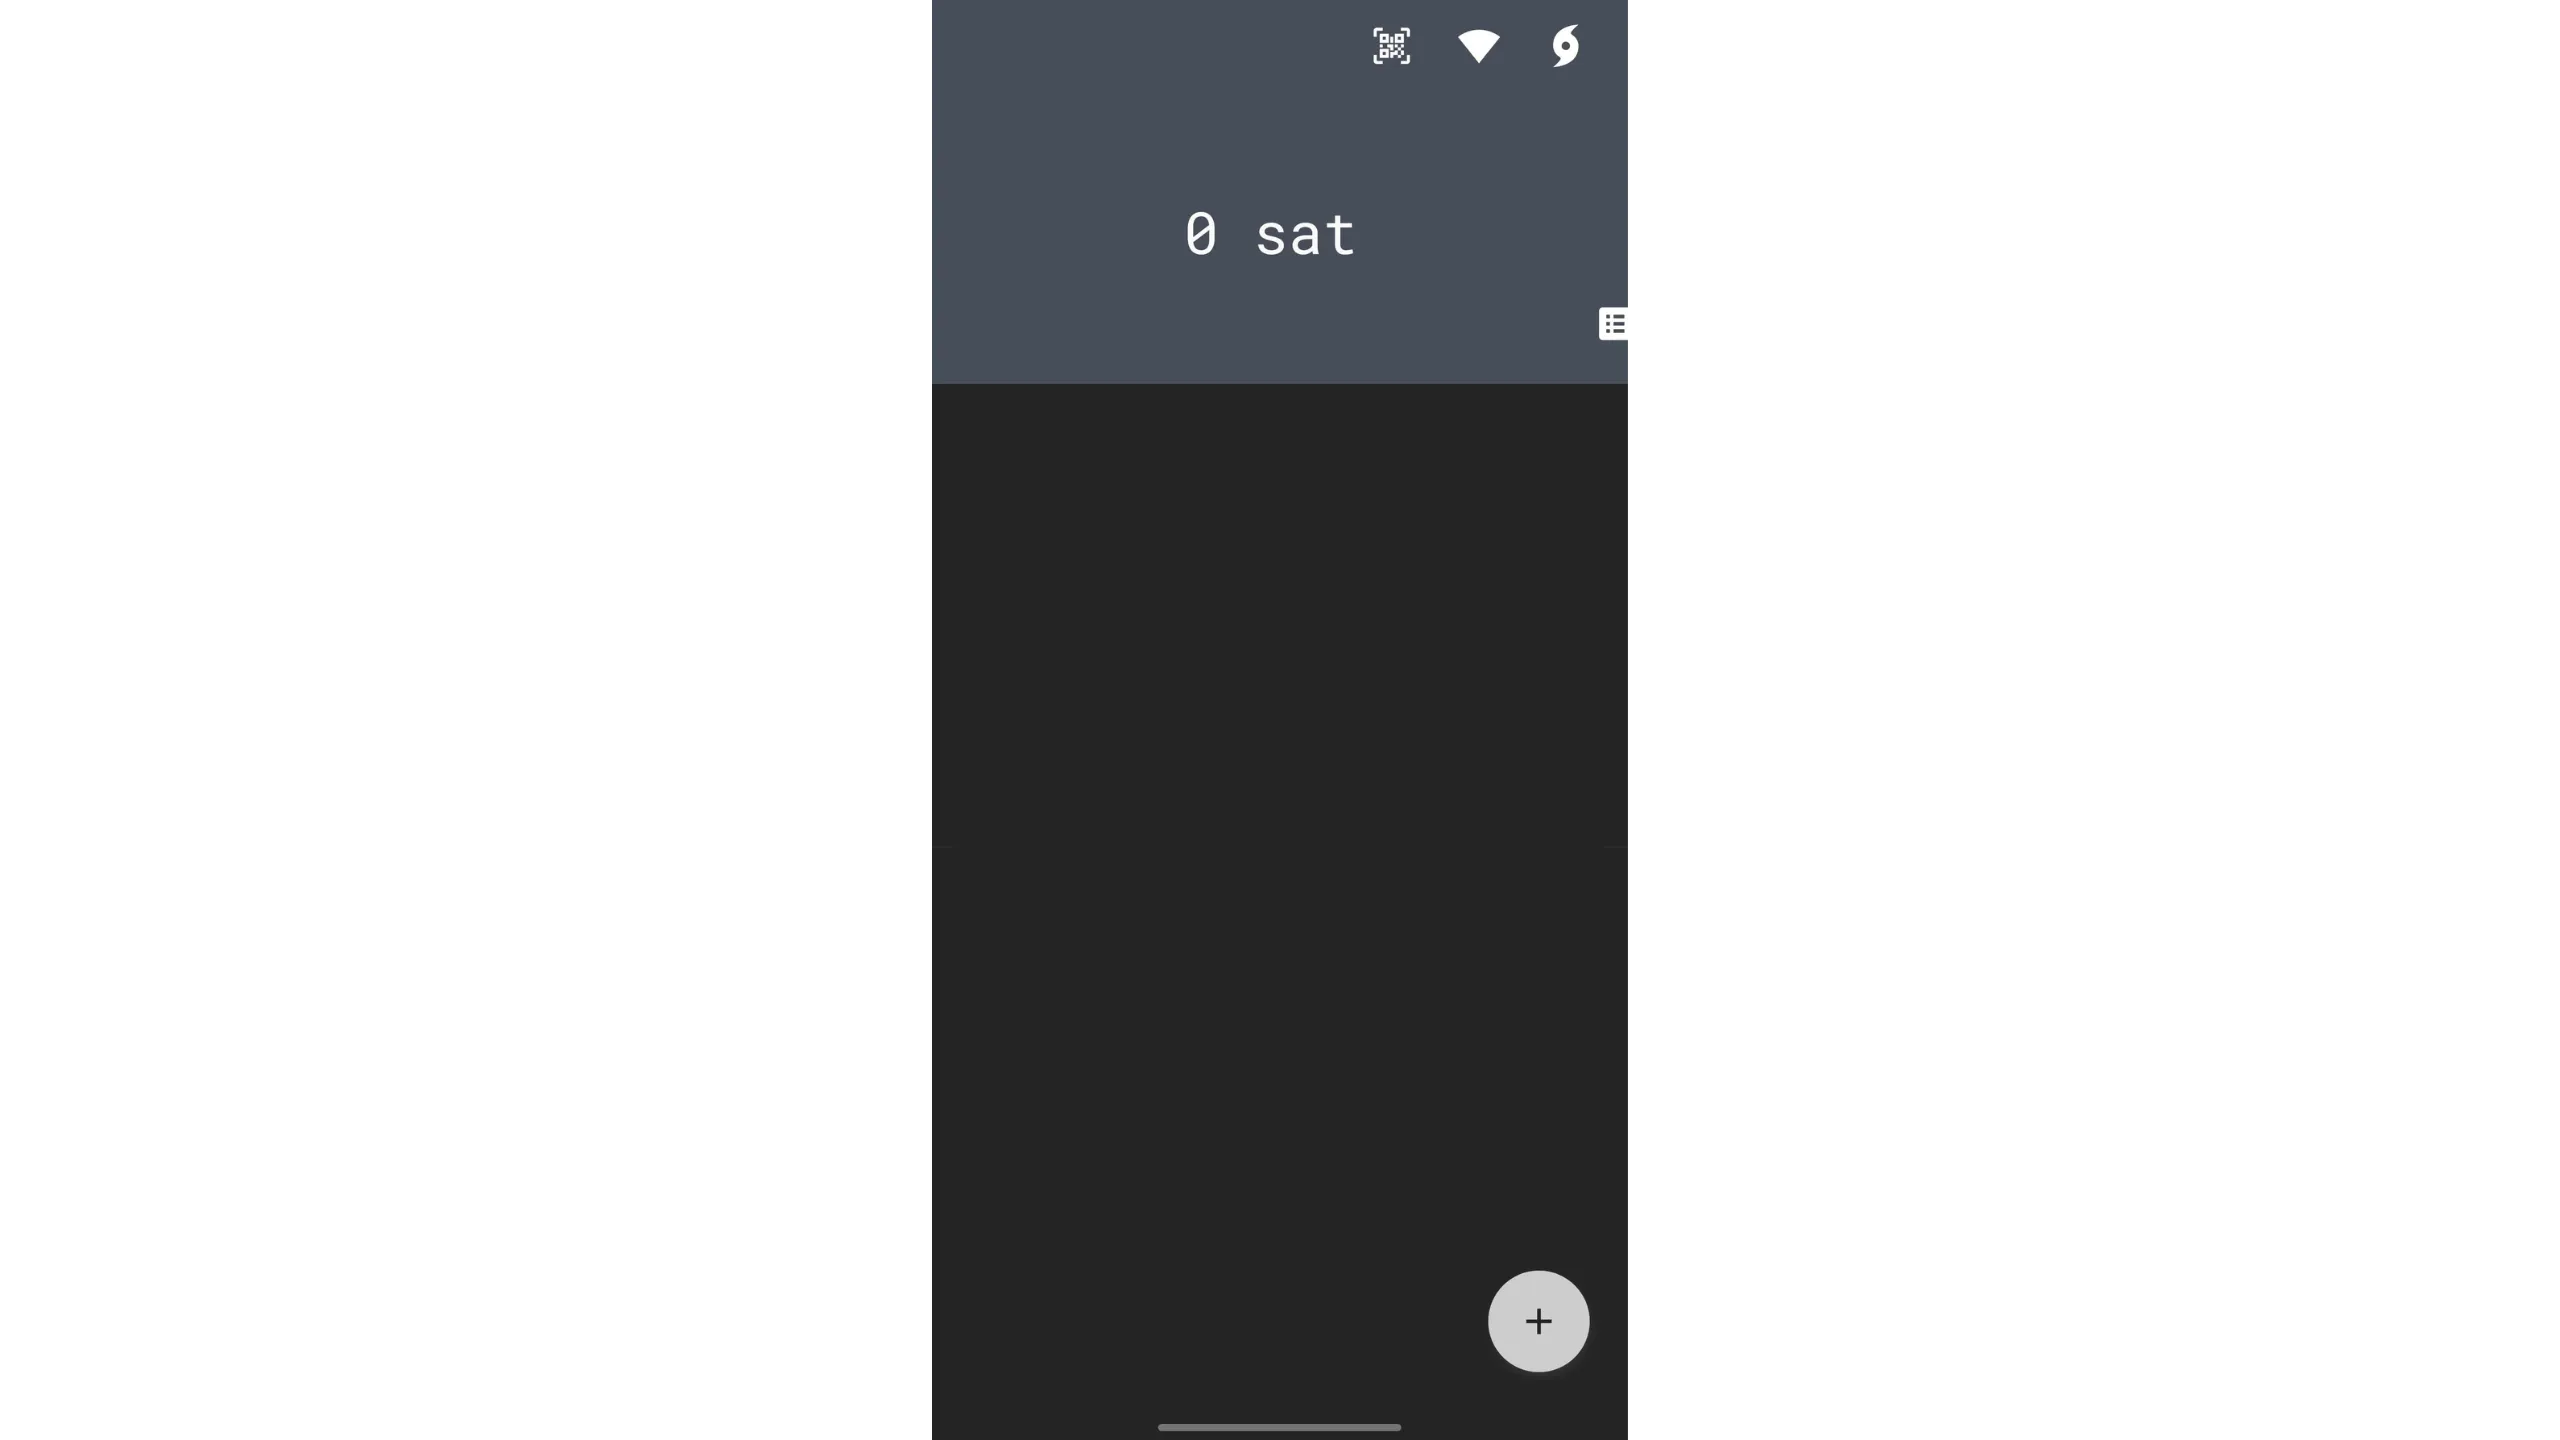
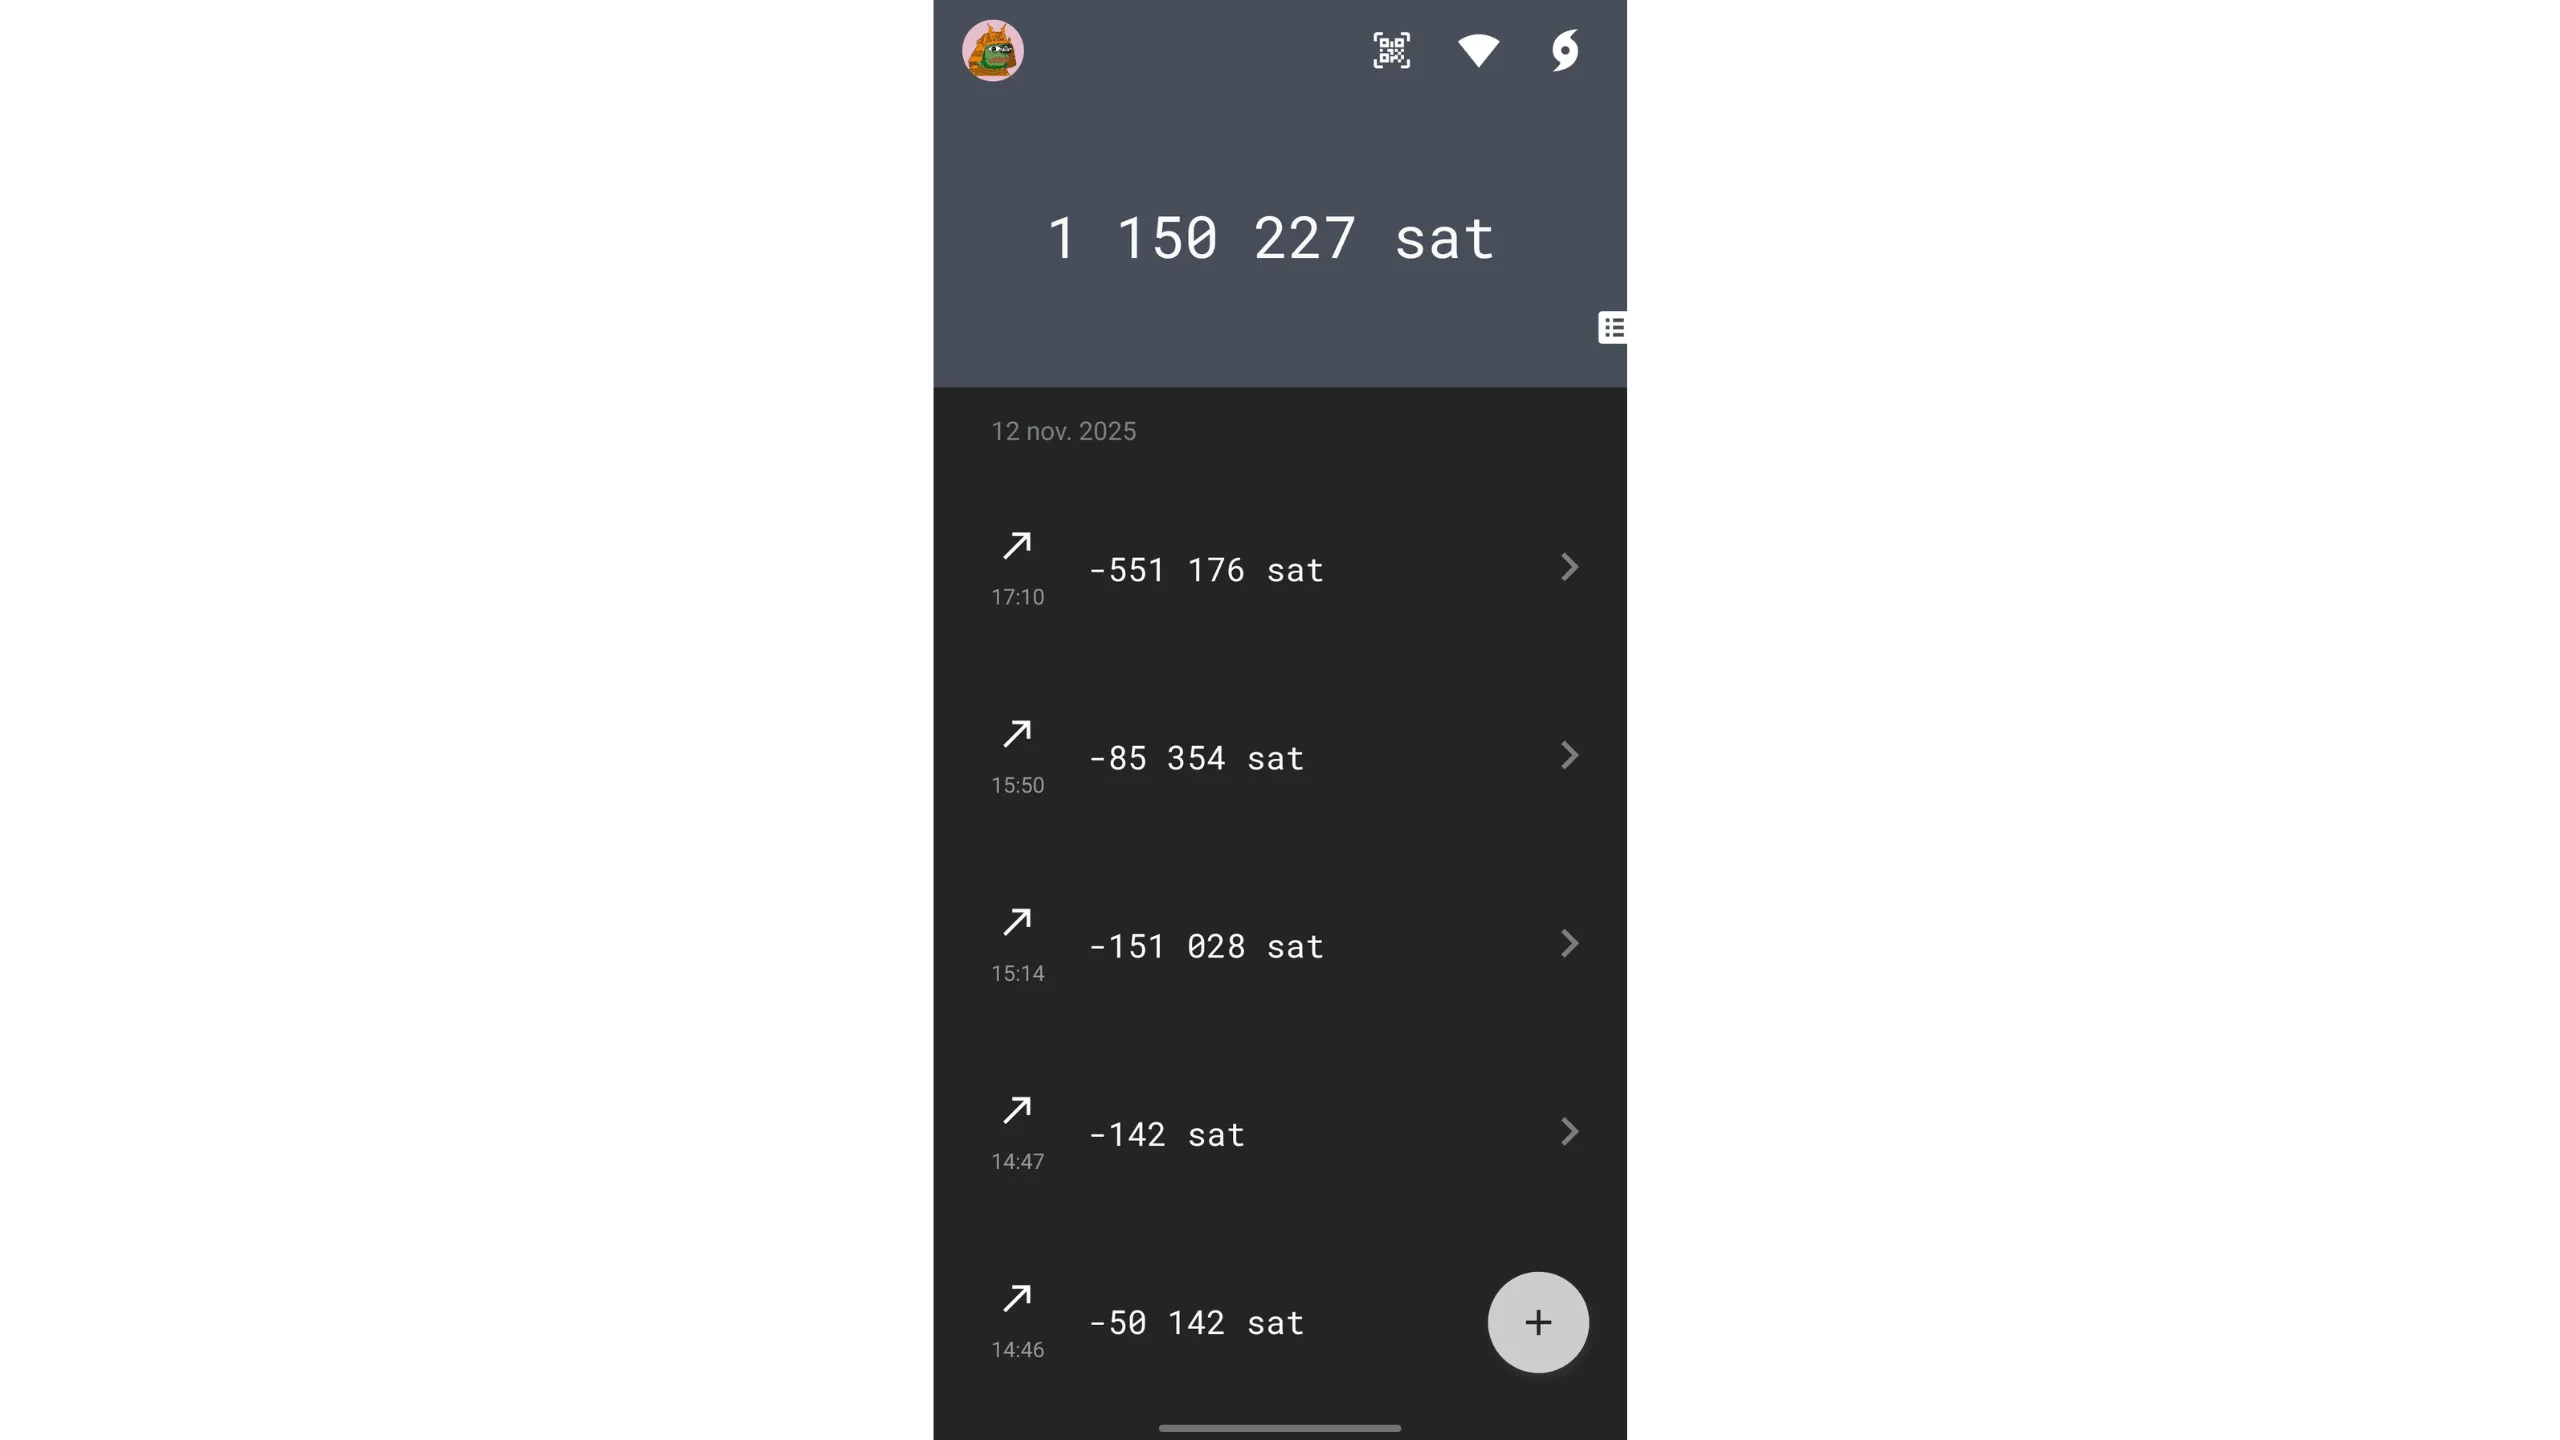
Tip: You can toggle the wallet display unit between BTC and sats by tapping the total balance on the home screen.
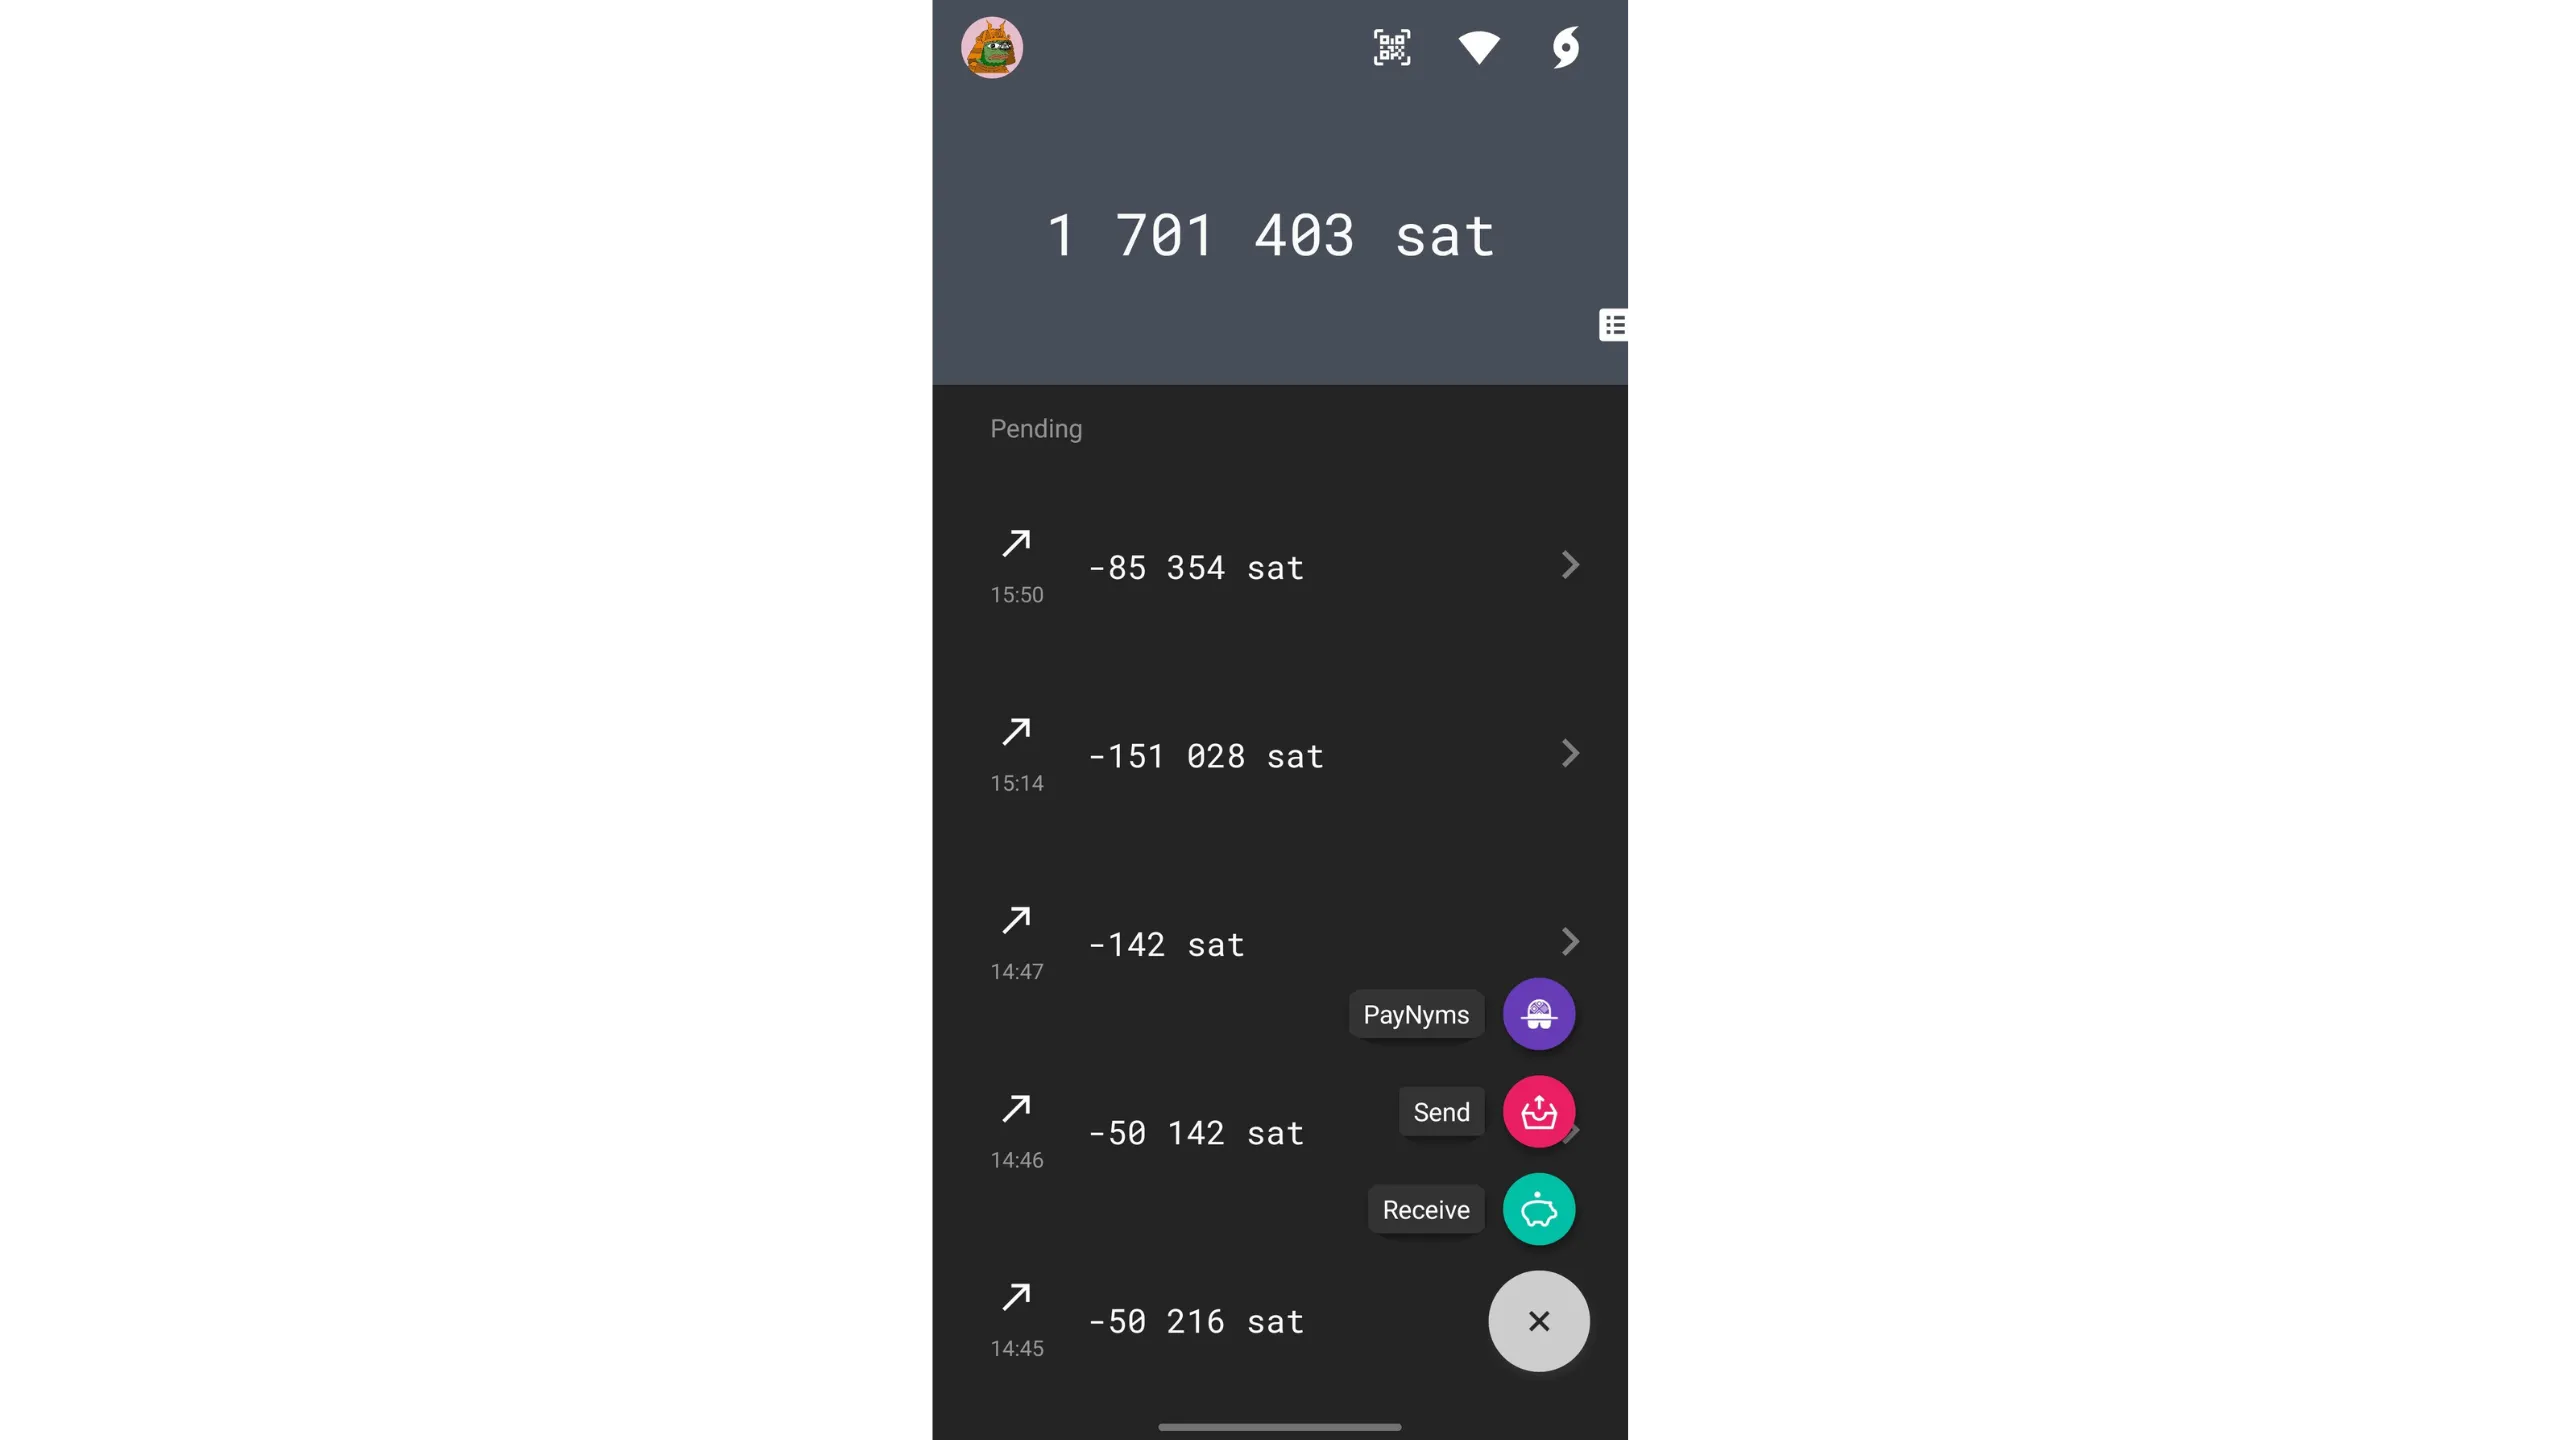
5. Receive bitcoin in Ashigaru
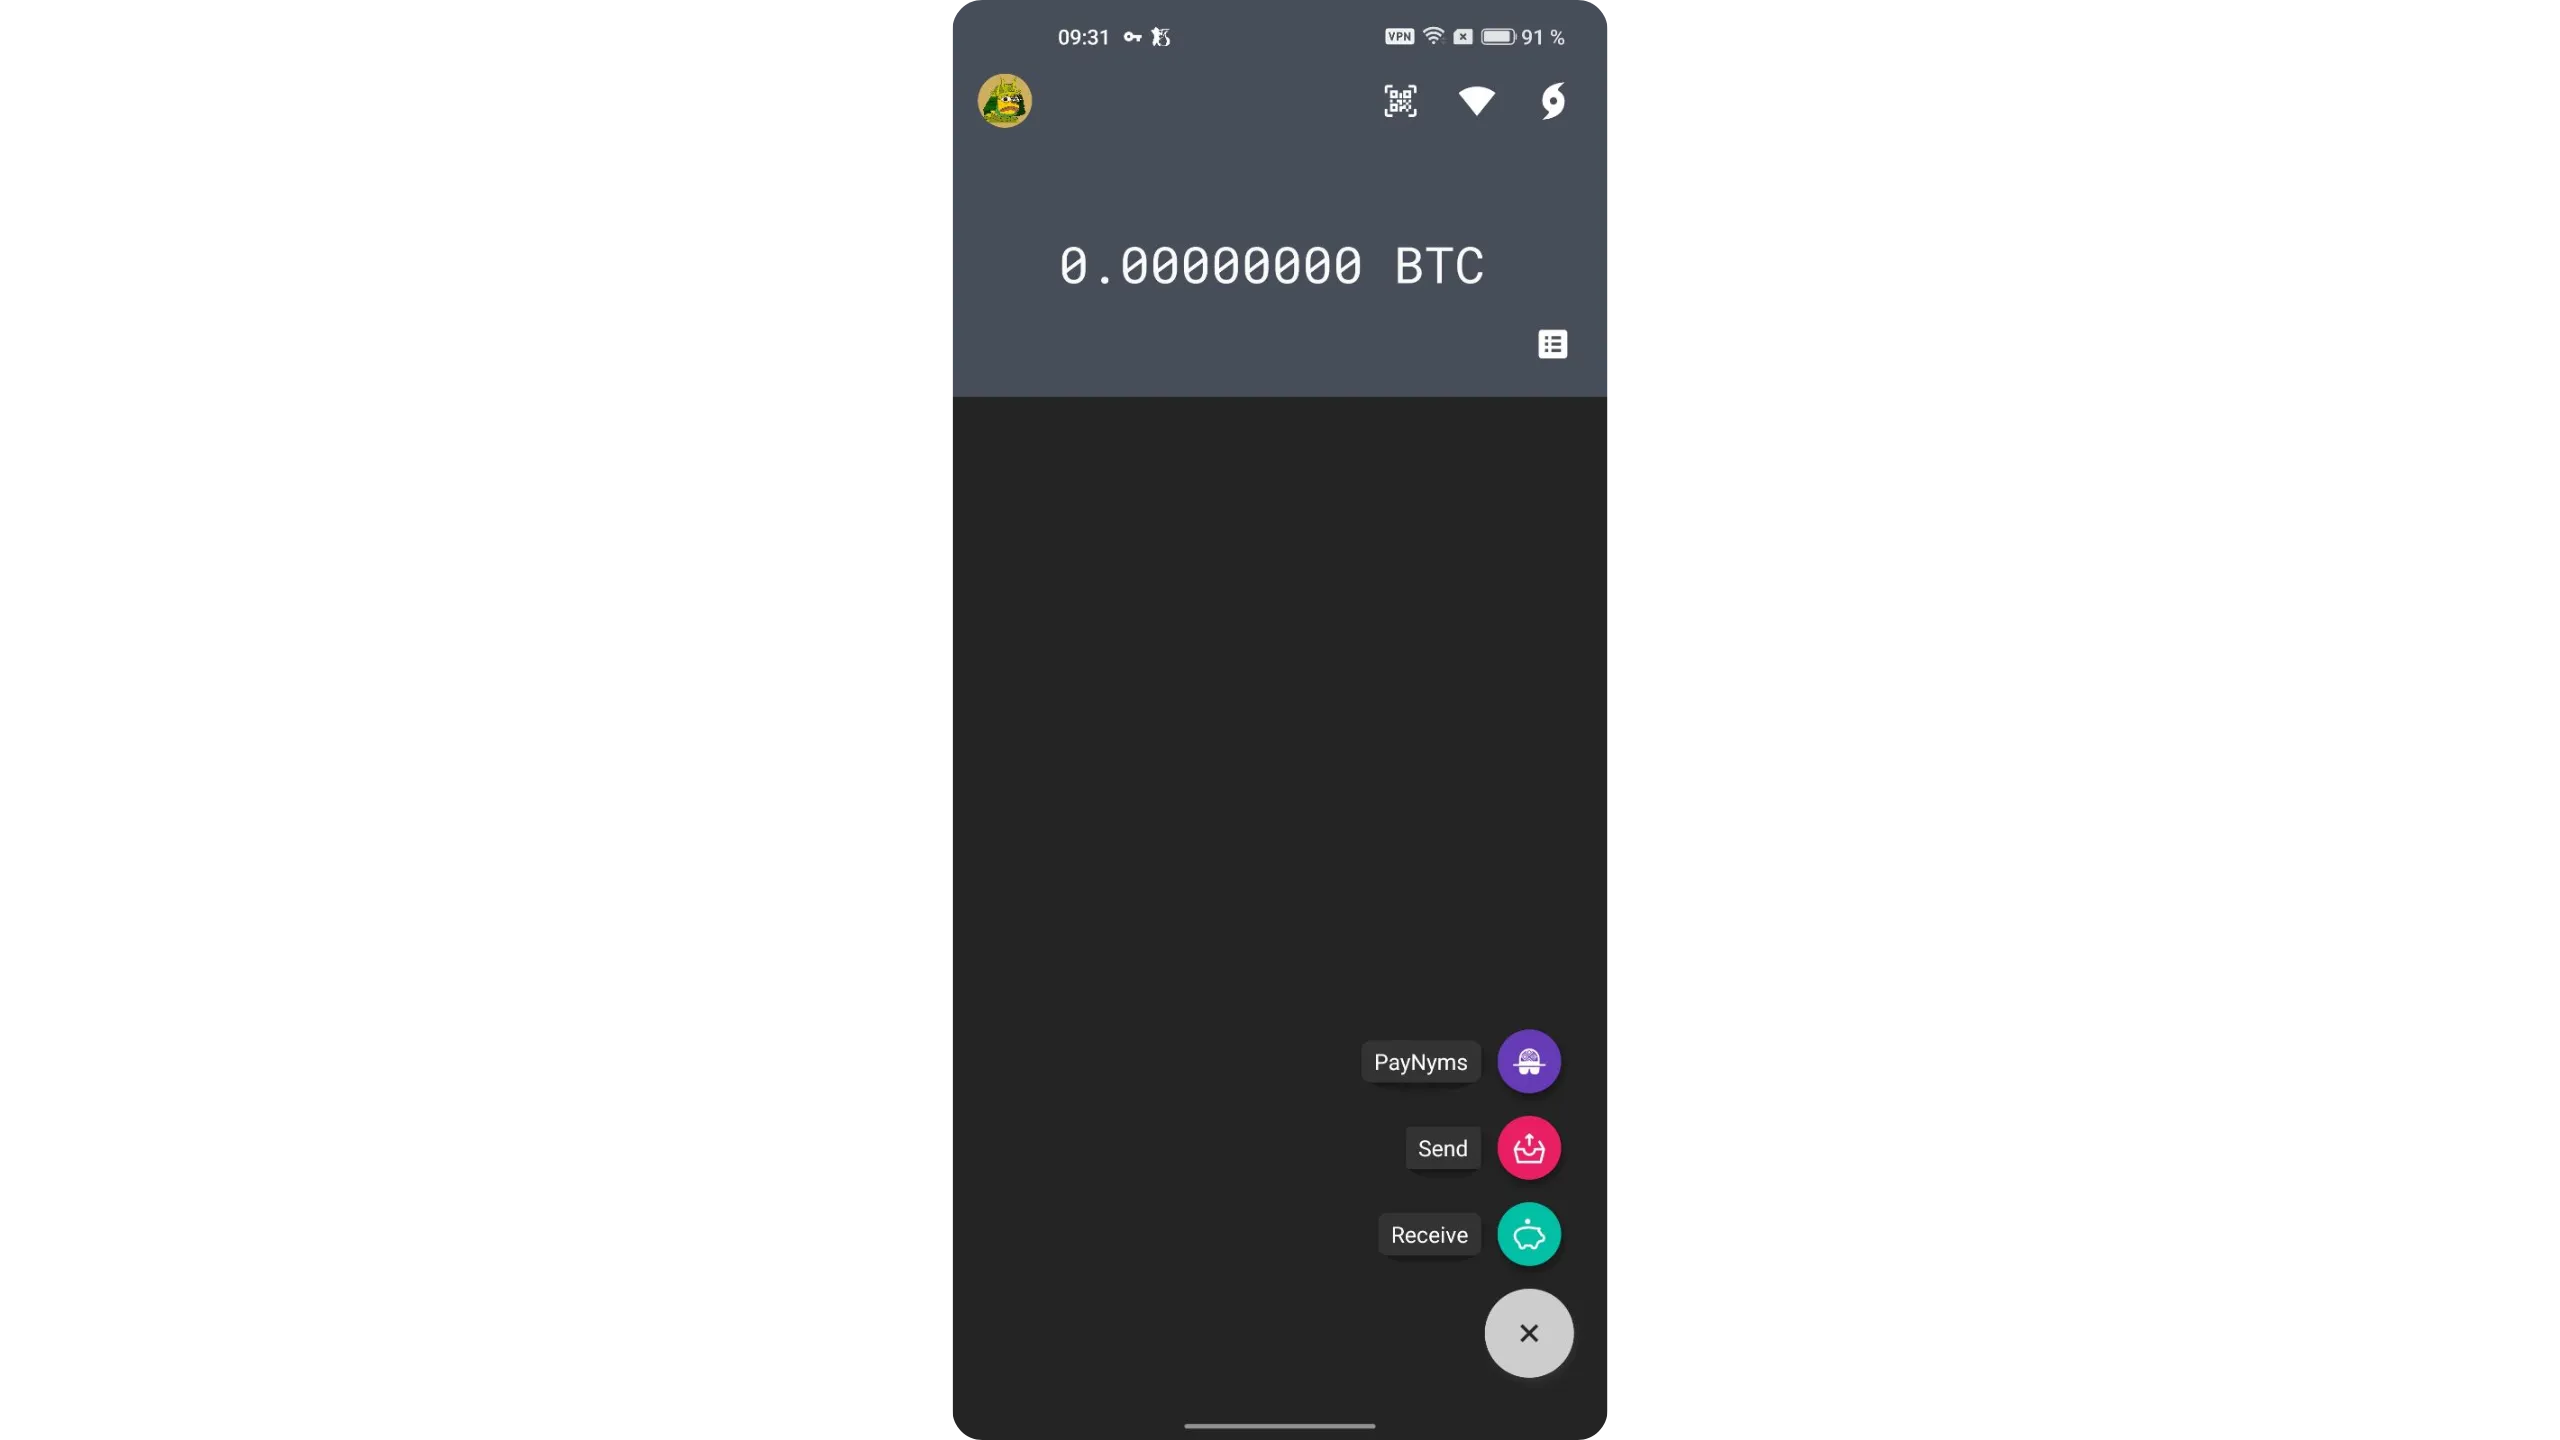
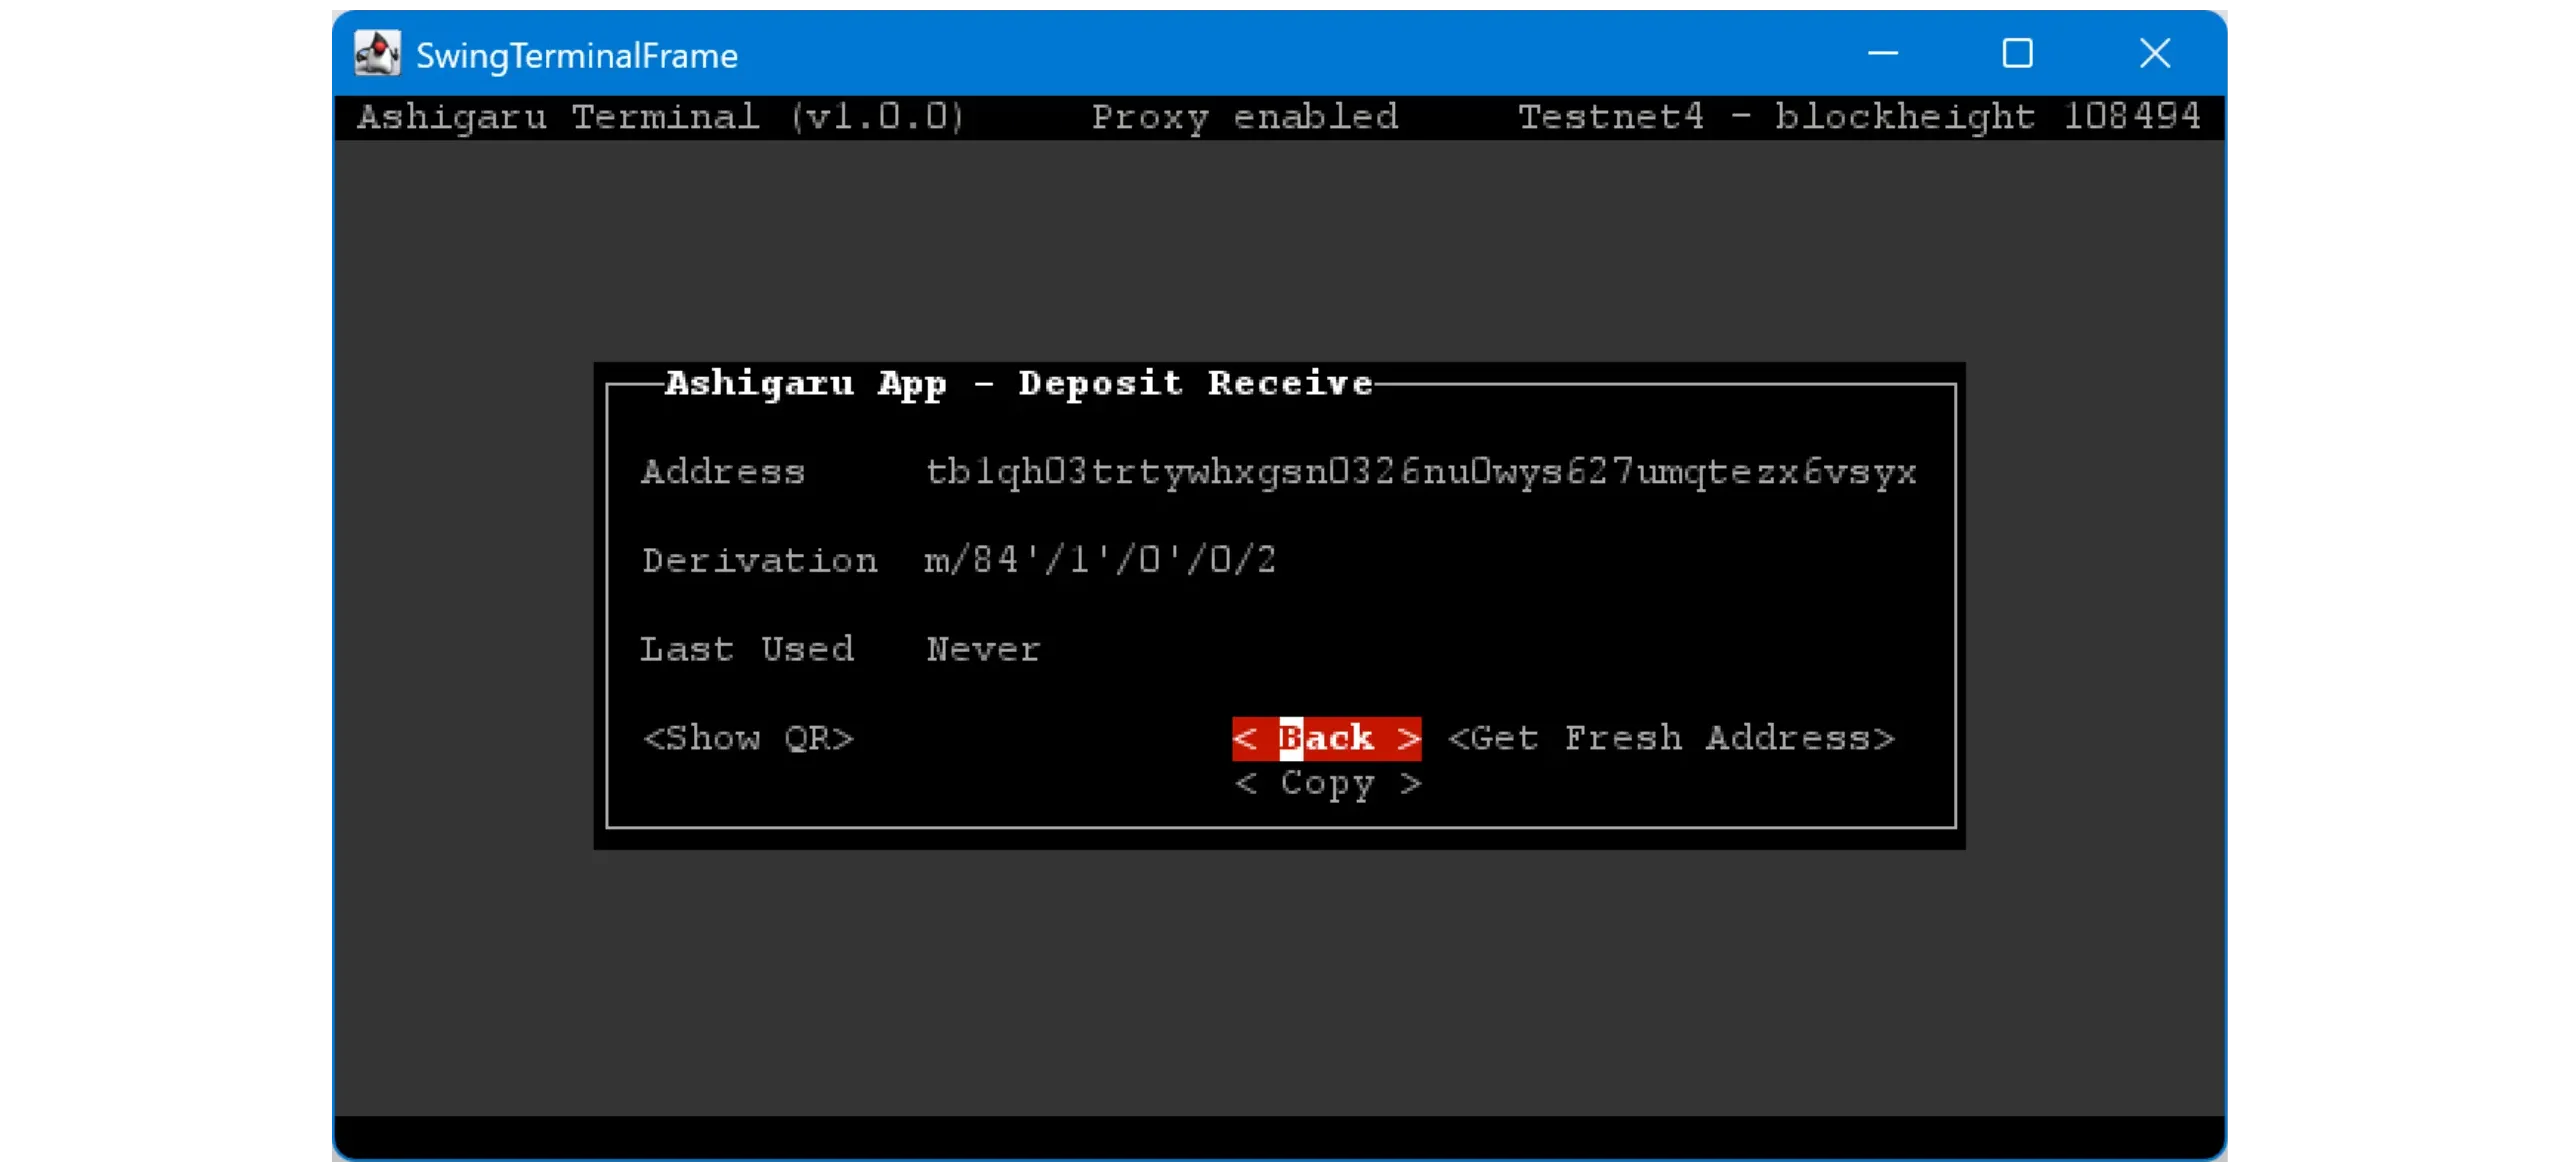
Once your wallet is ready, you can receive sats. Tap the “+” button in the bottom‑right corner, then tap the green “Receive” button.
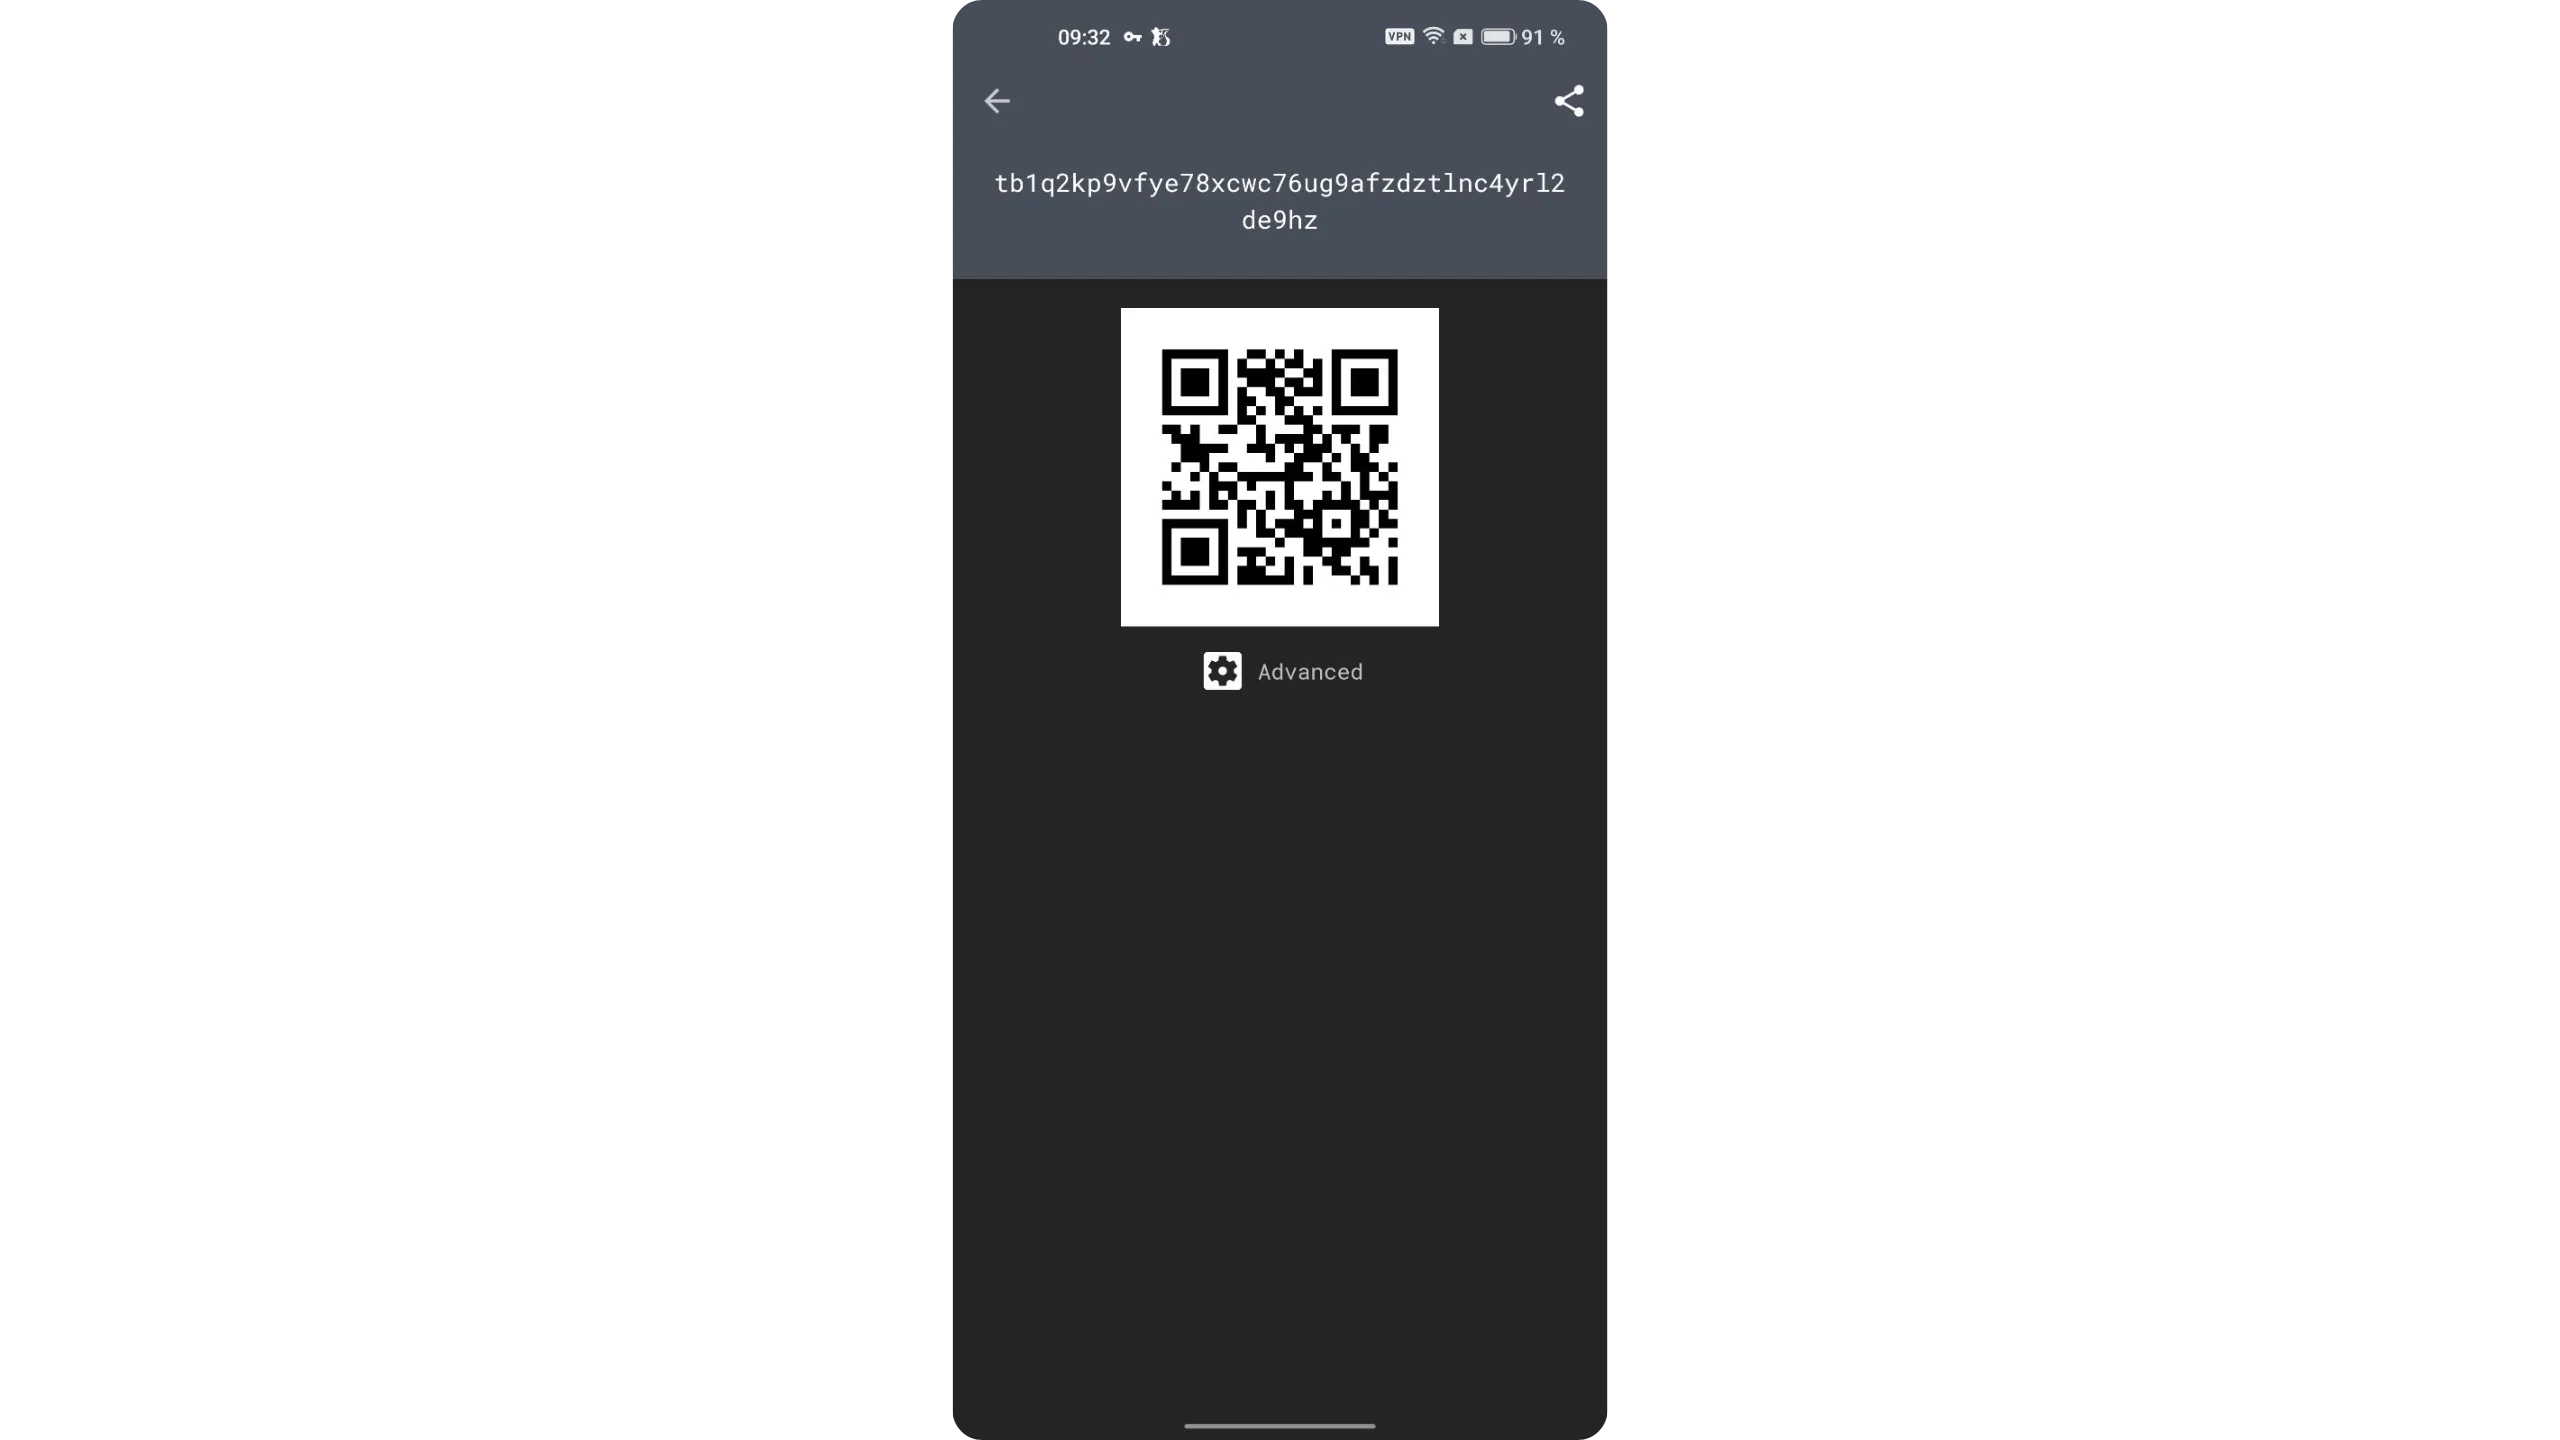
Ashigaru shows you the first unused receiving address to avoid address reuse (which is very harmful to privacy). Share this address with the individual or service sending you bitcoin.
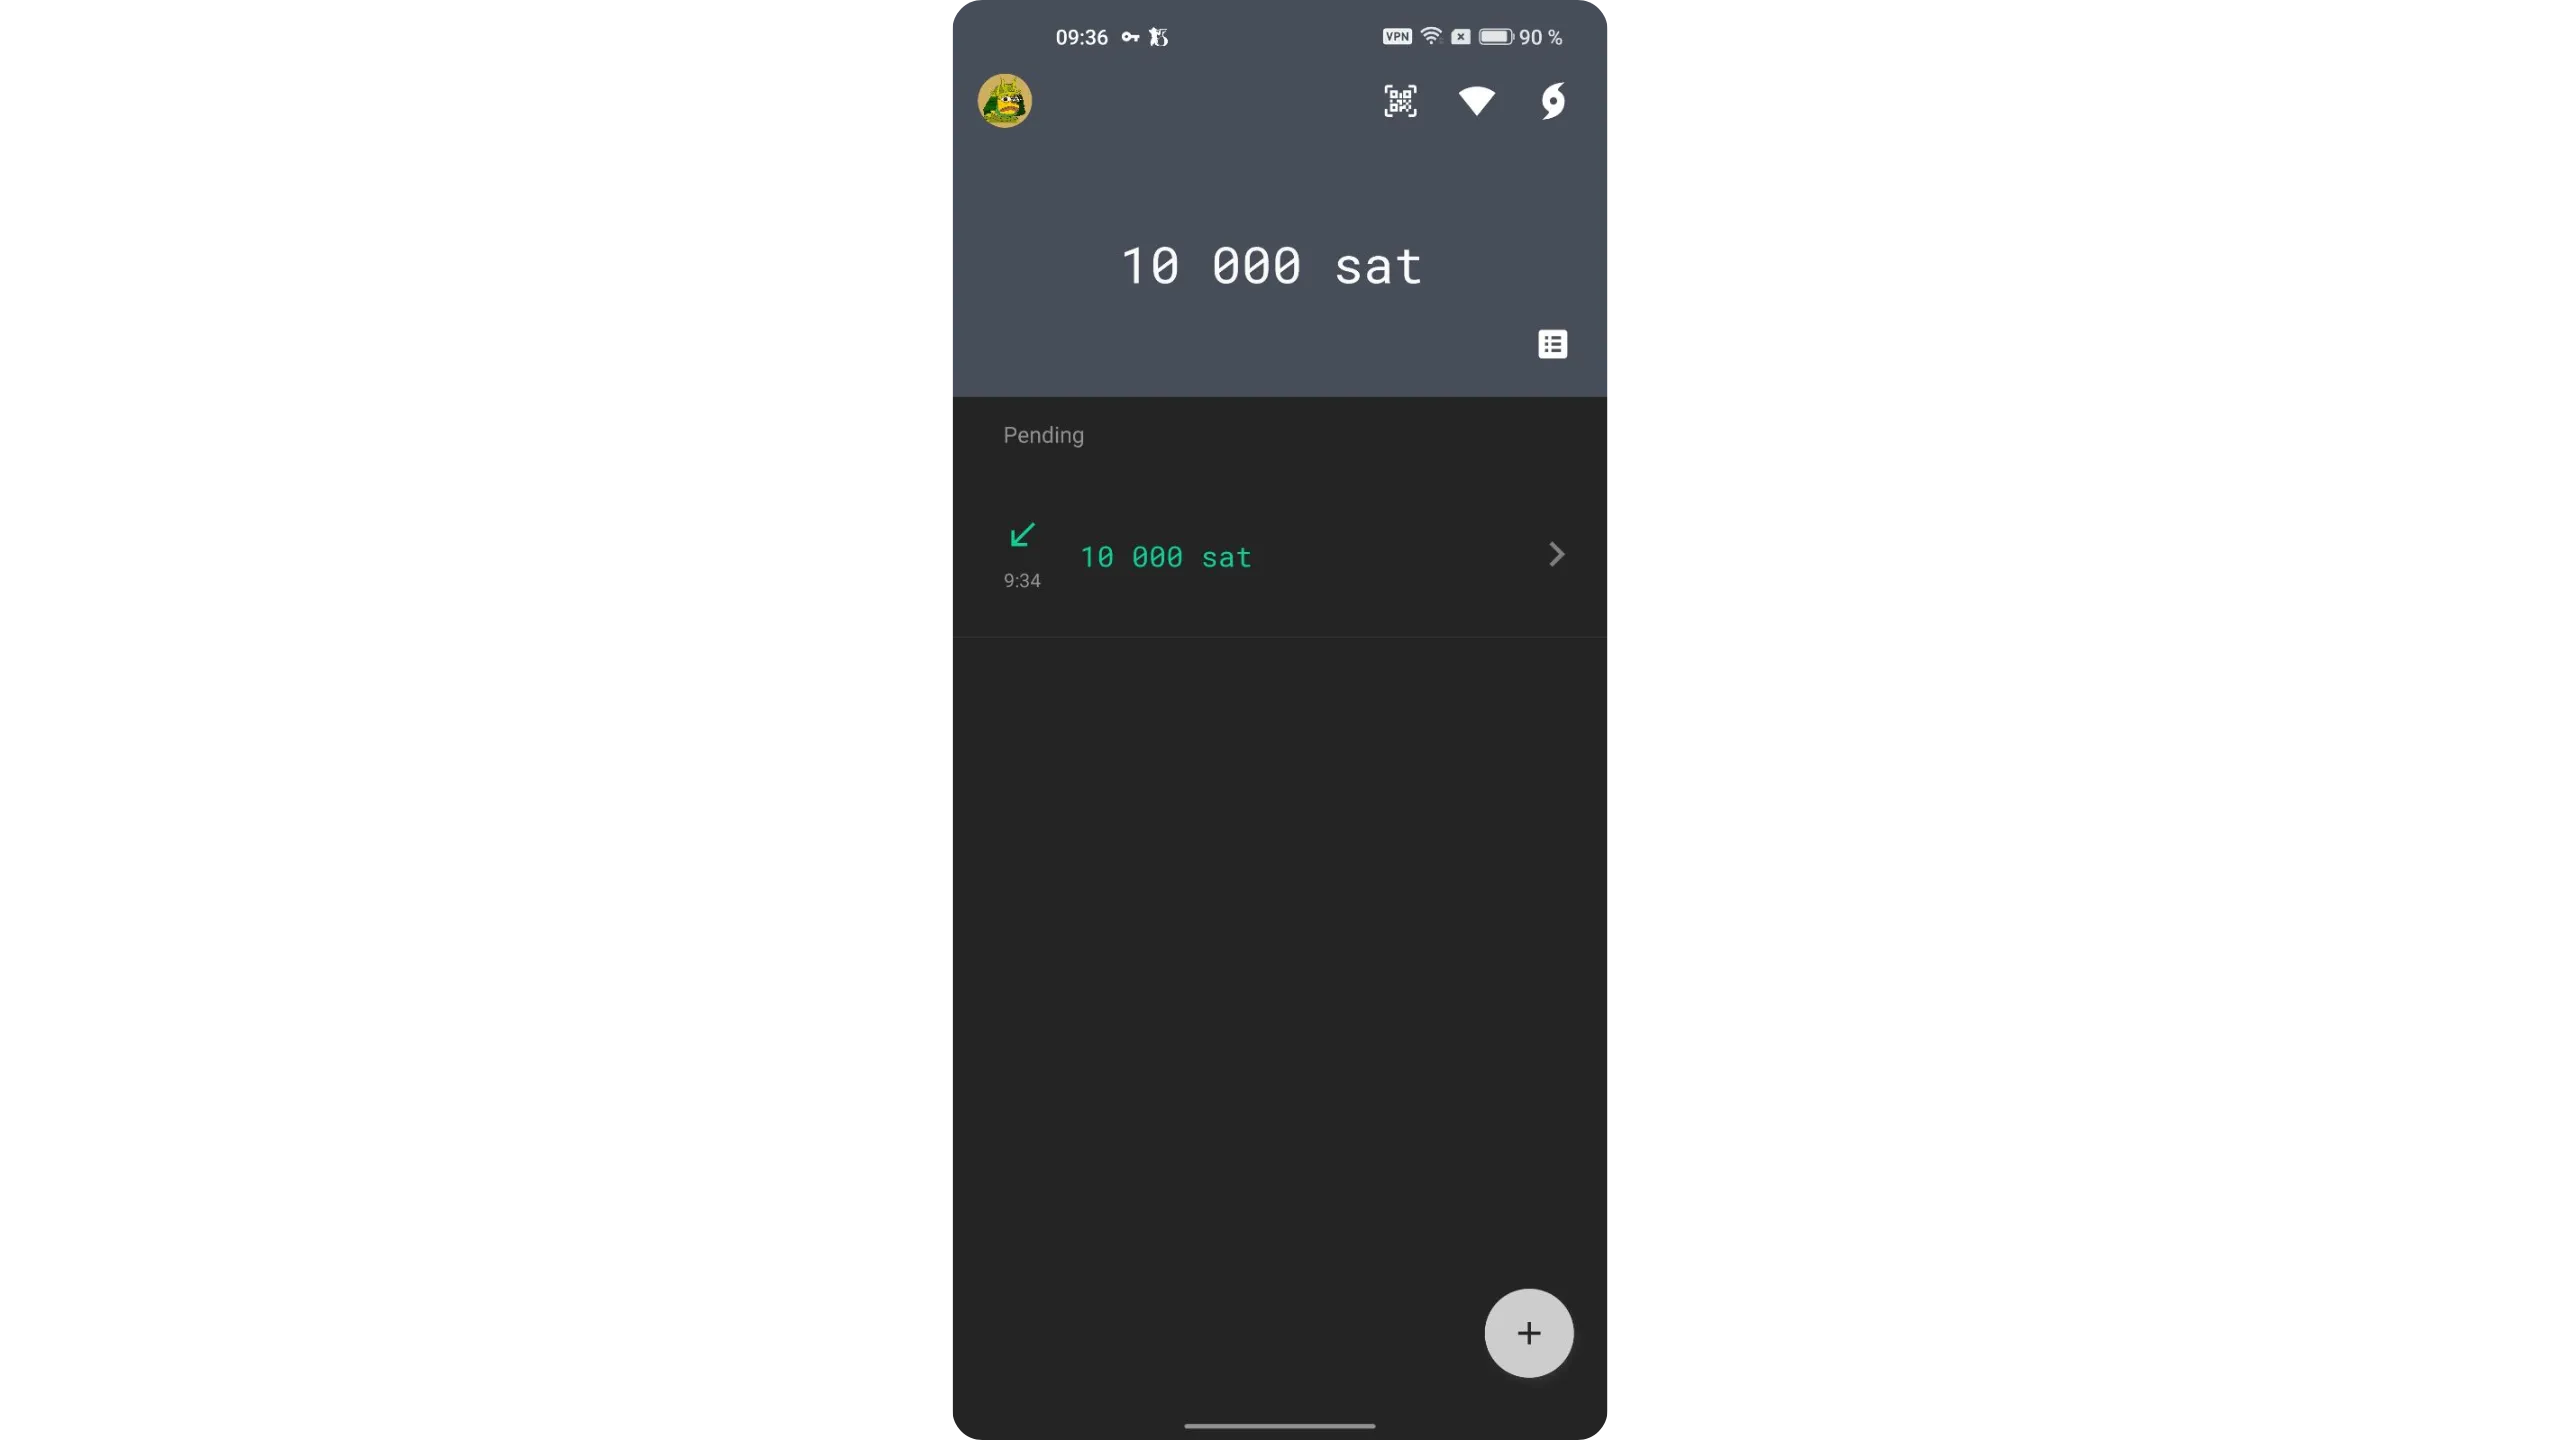
Once the transaction is broadcast, it will automatically appear on the app’s home screen.
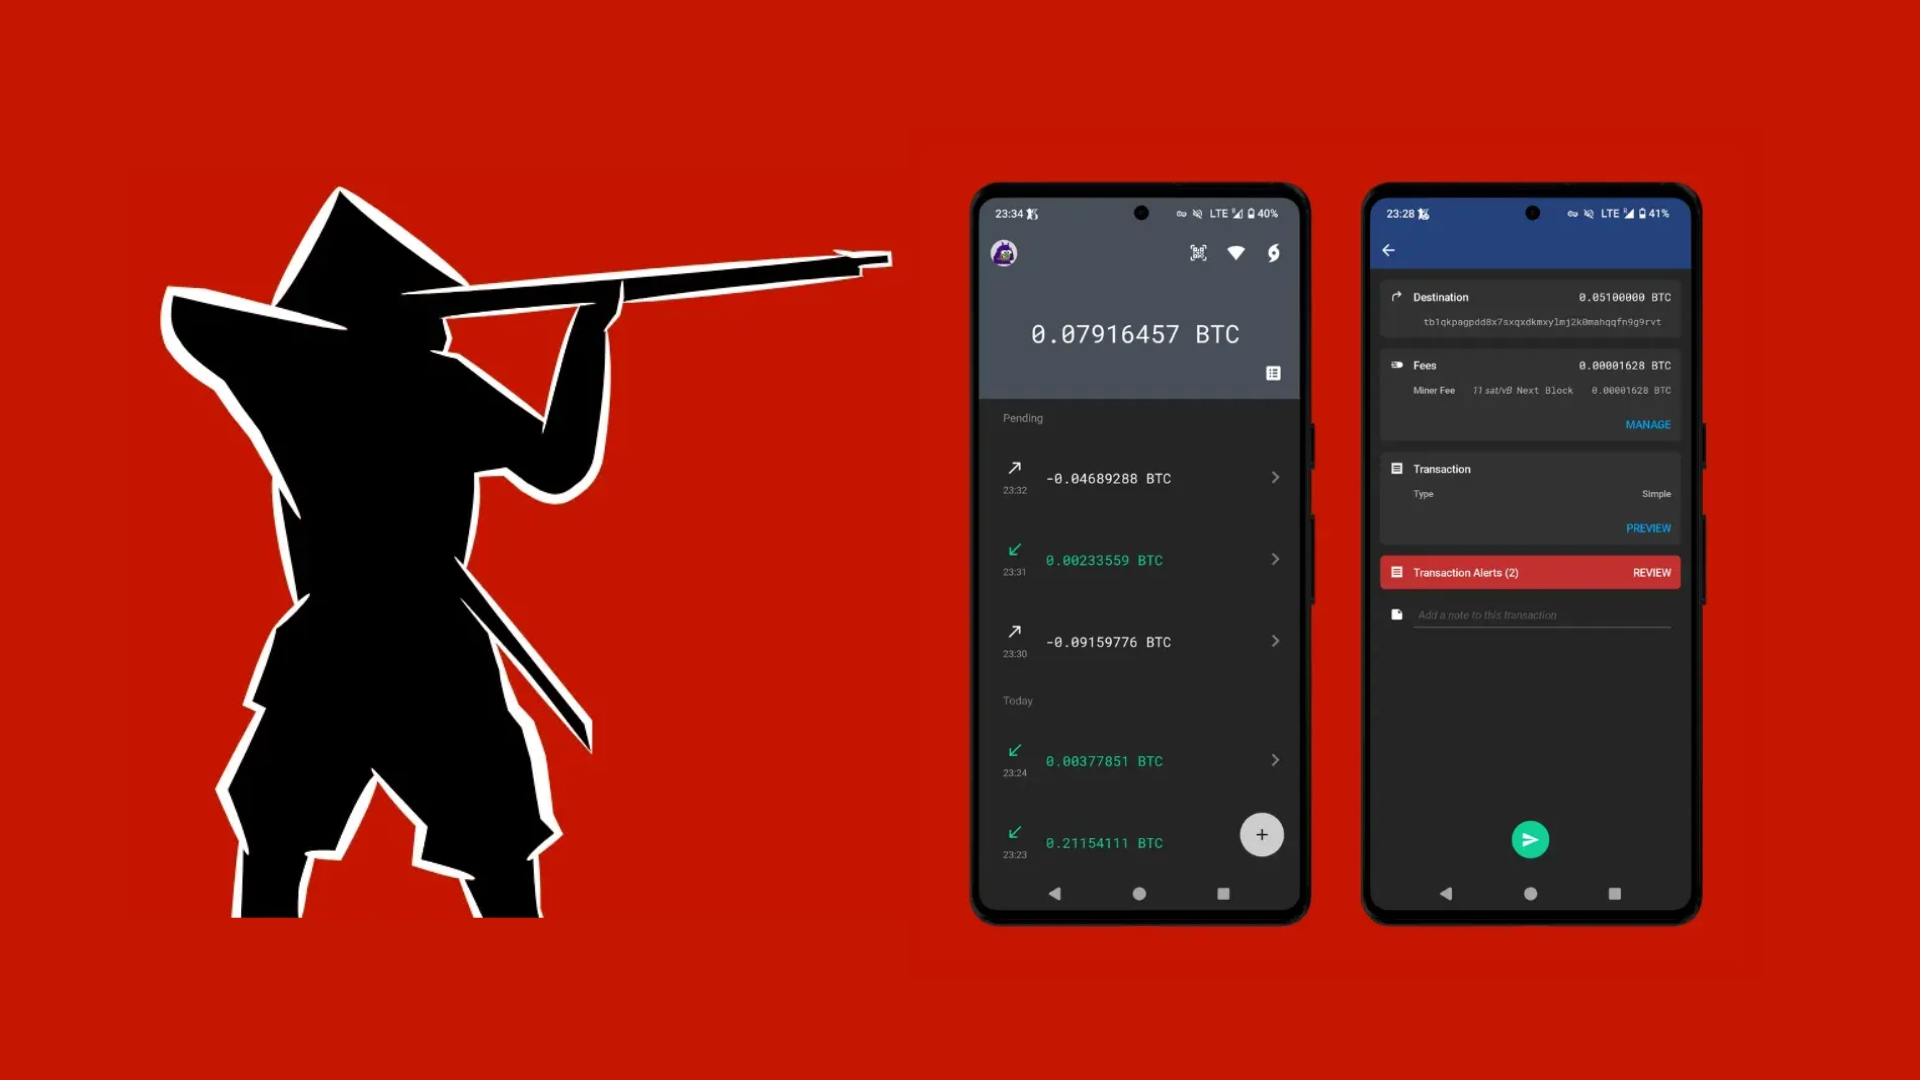
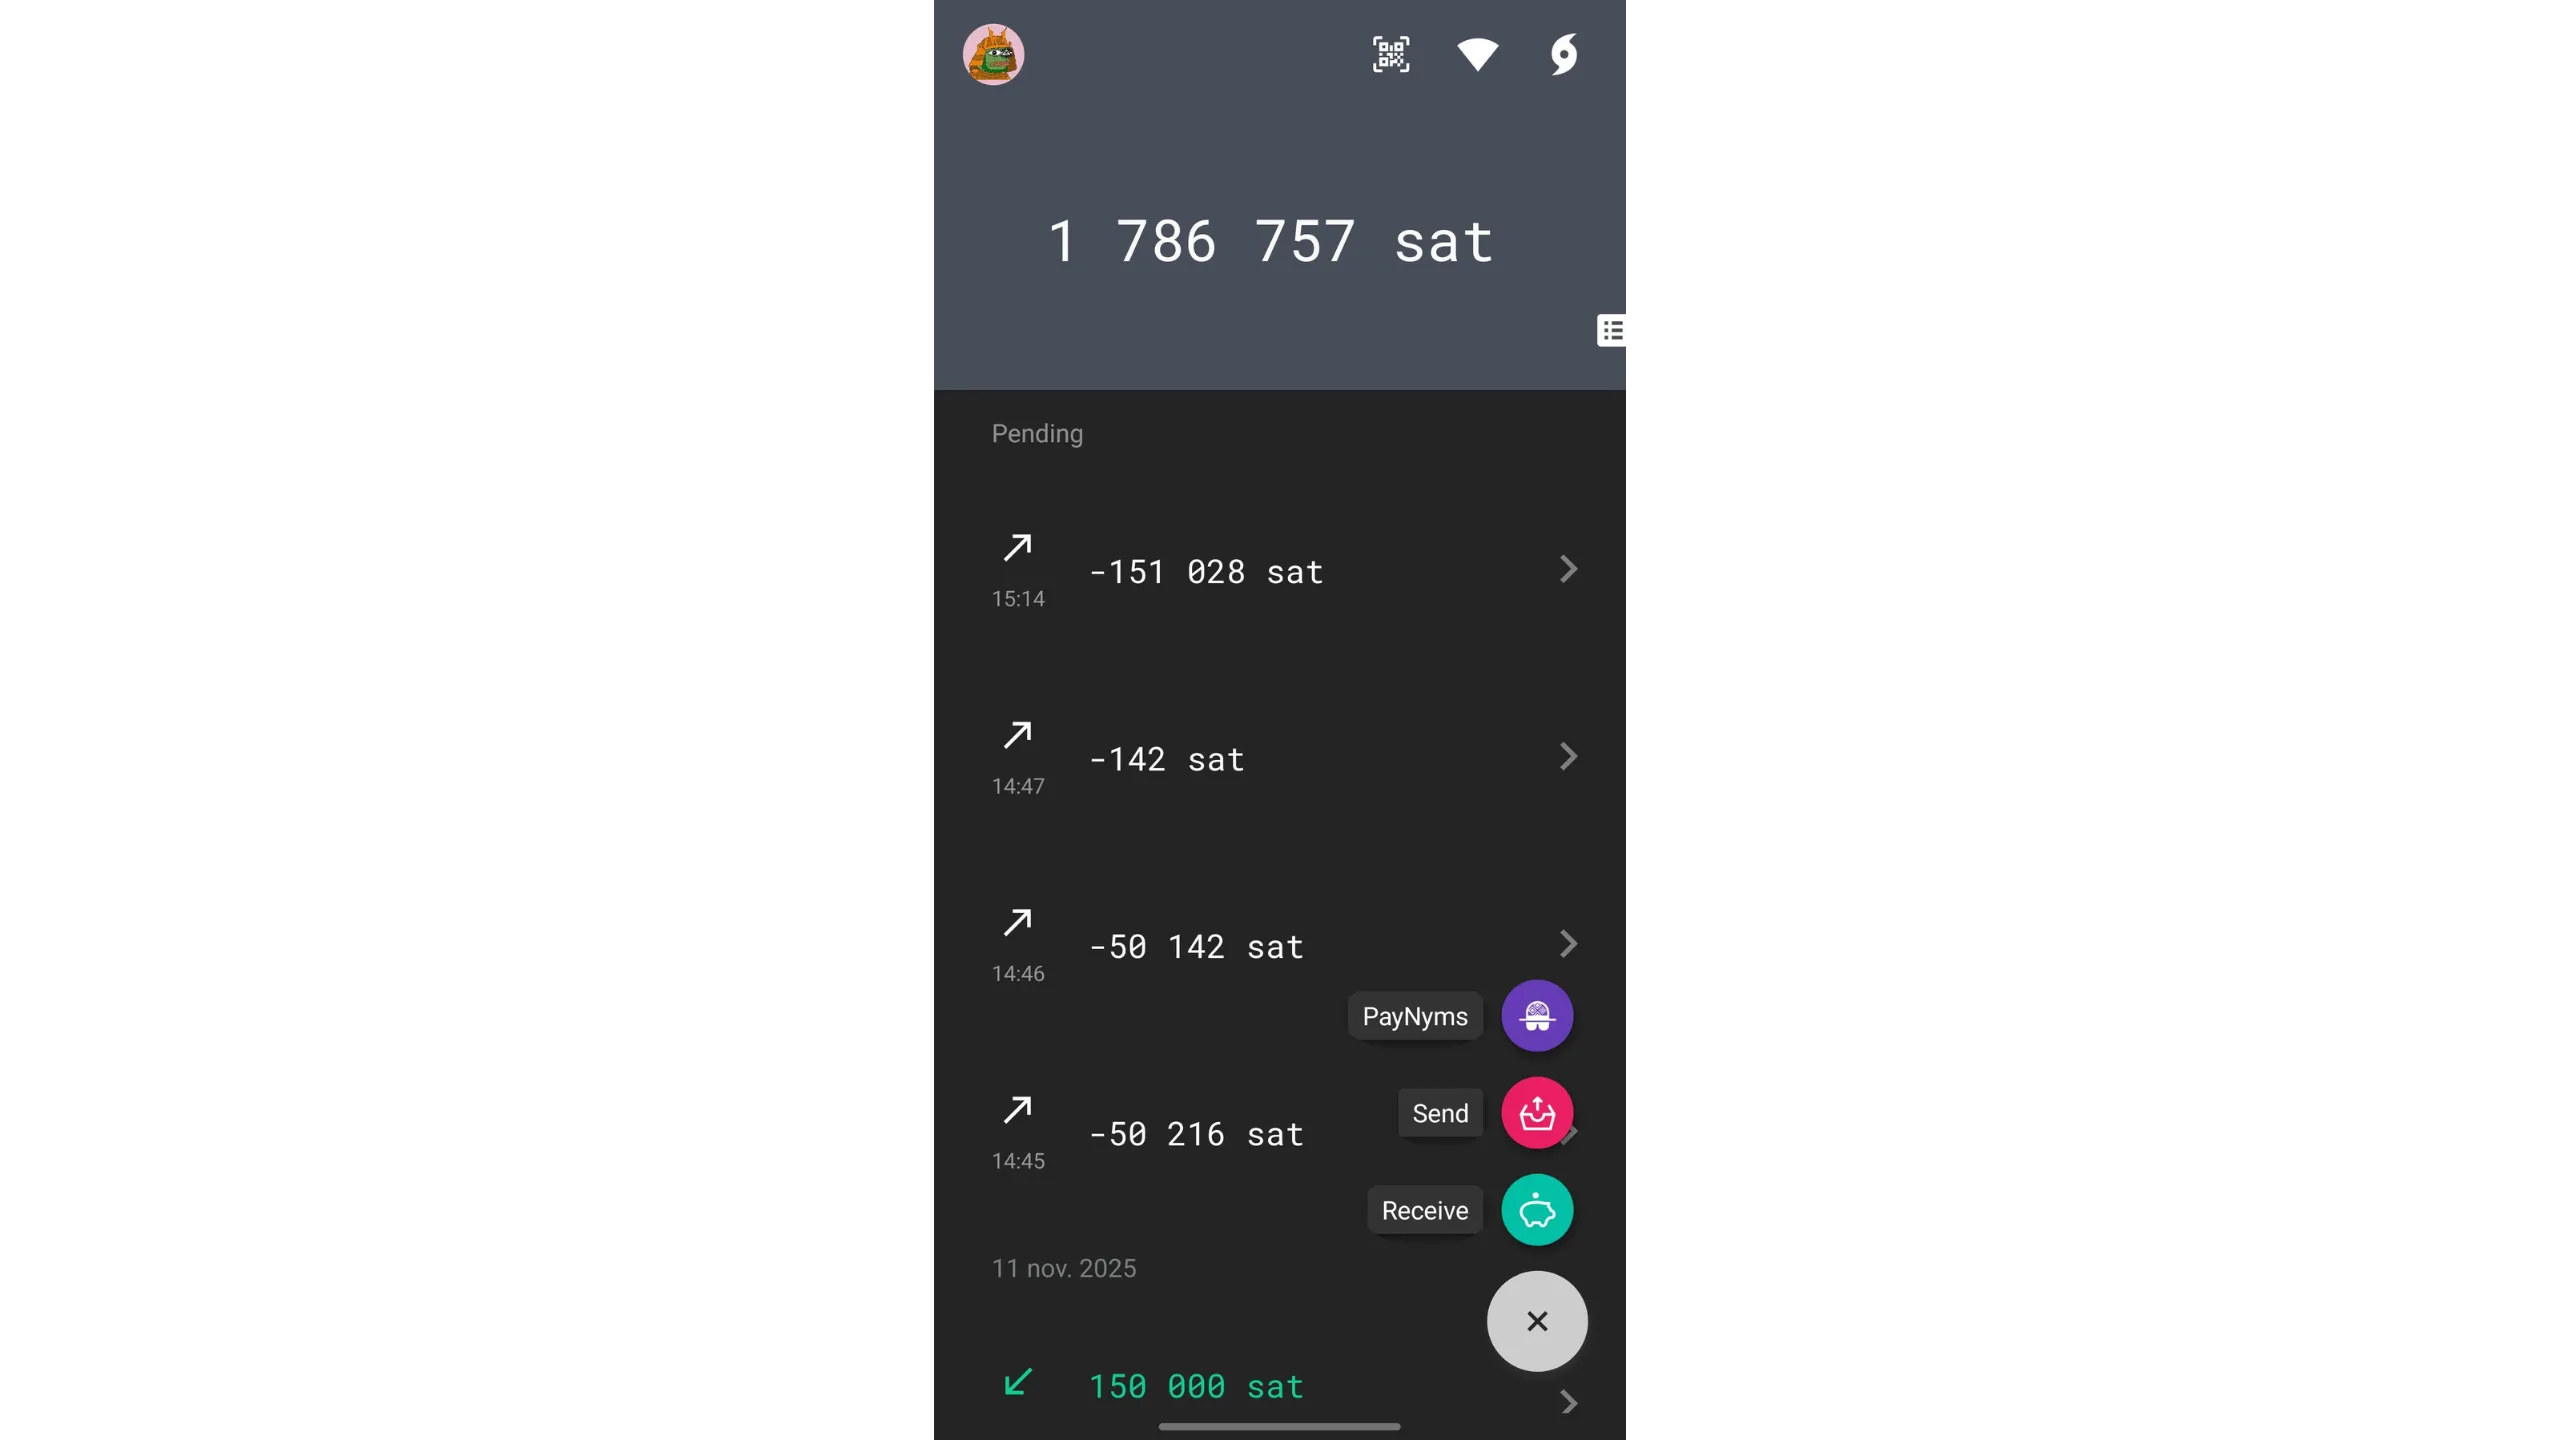
6. Send bitcoin with Ashigaru
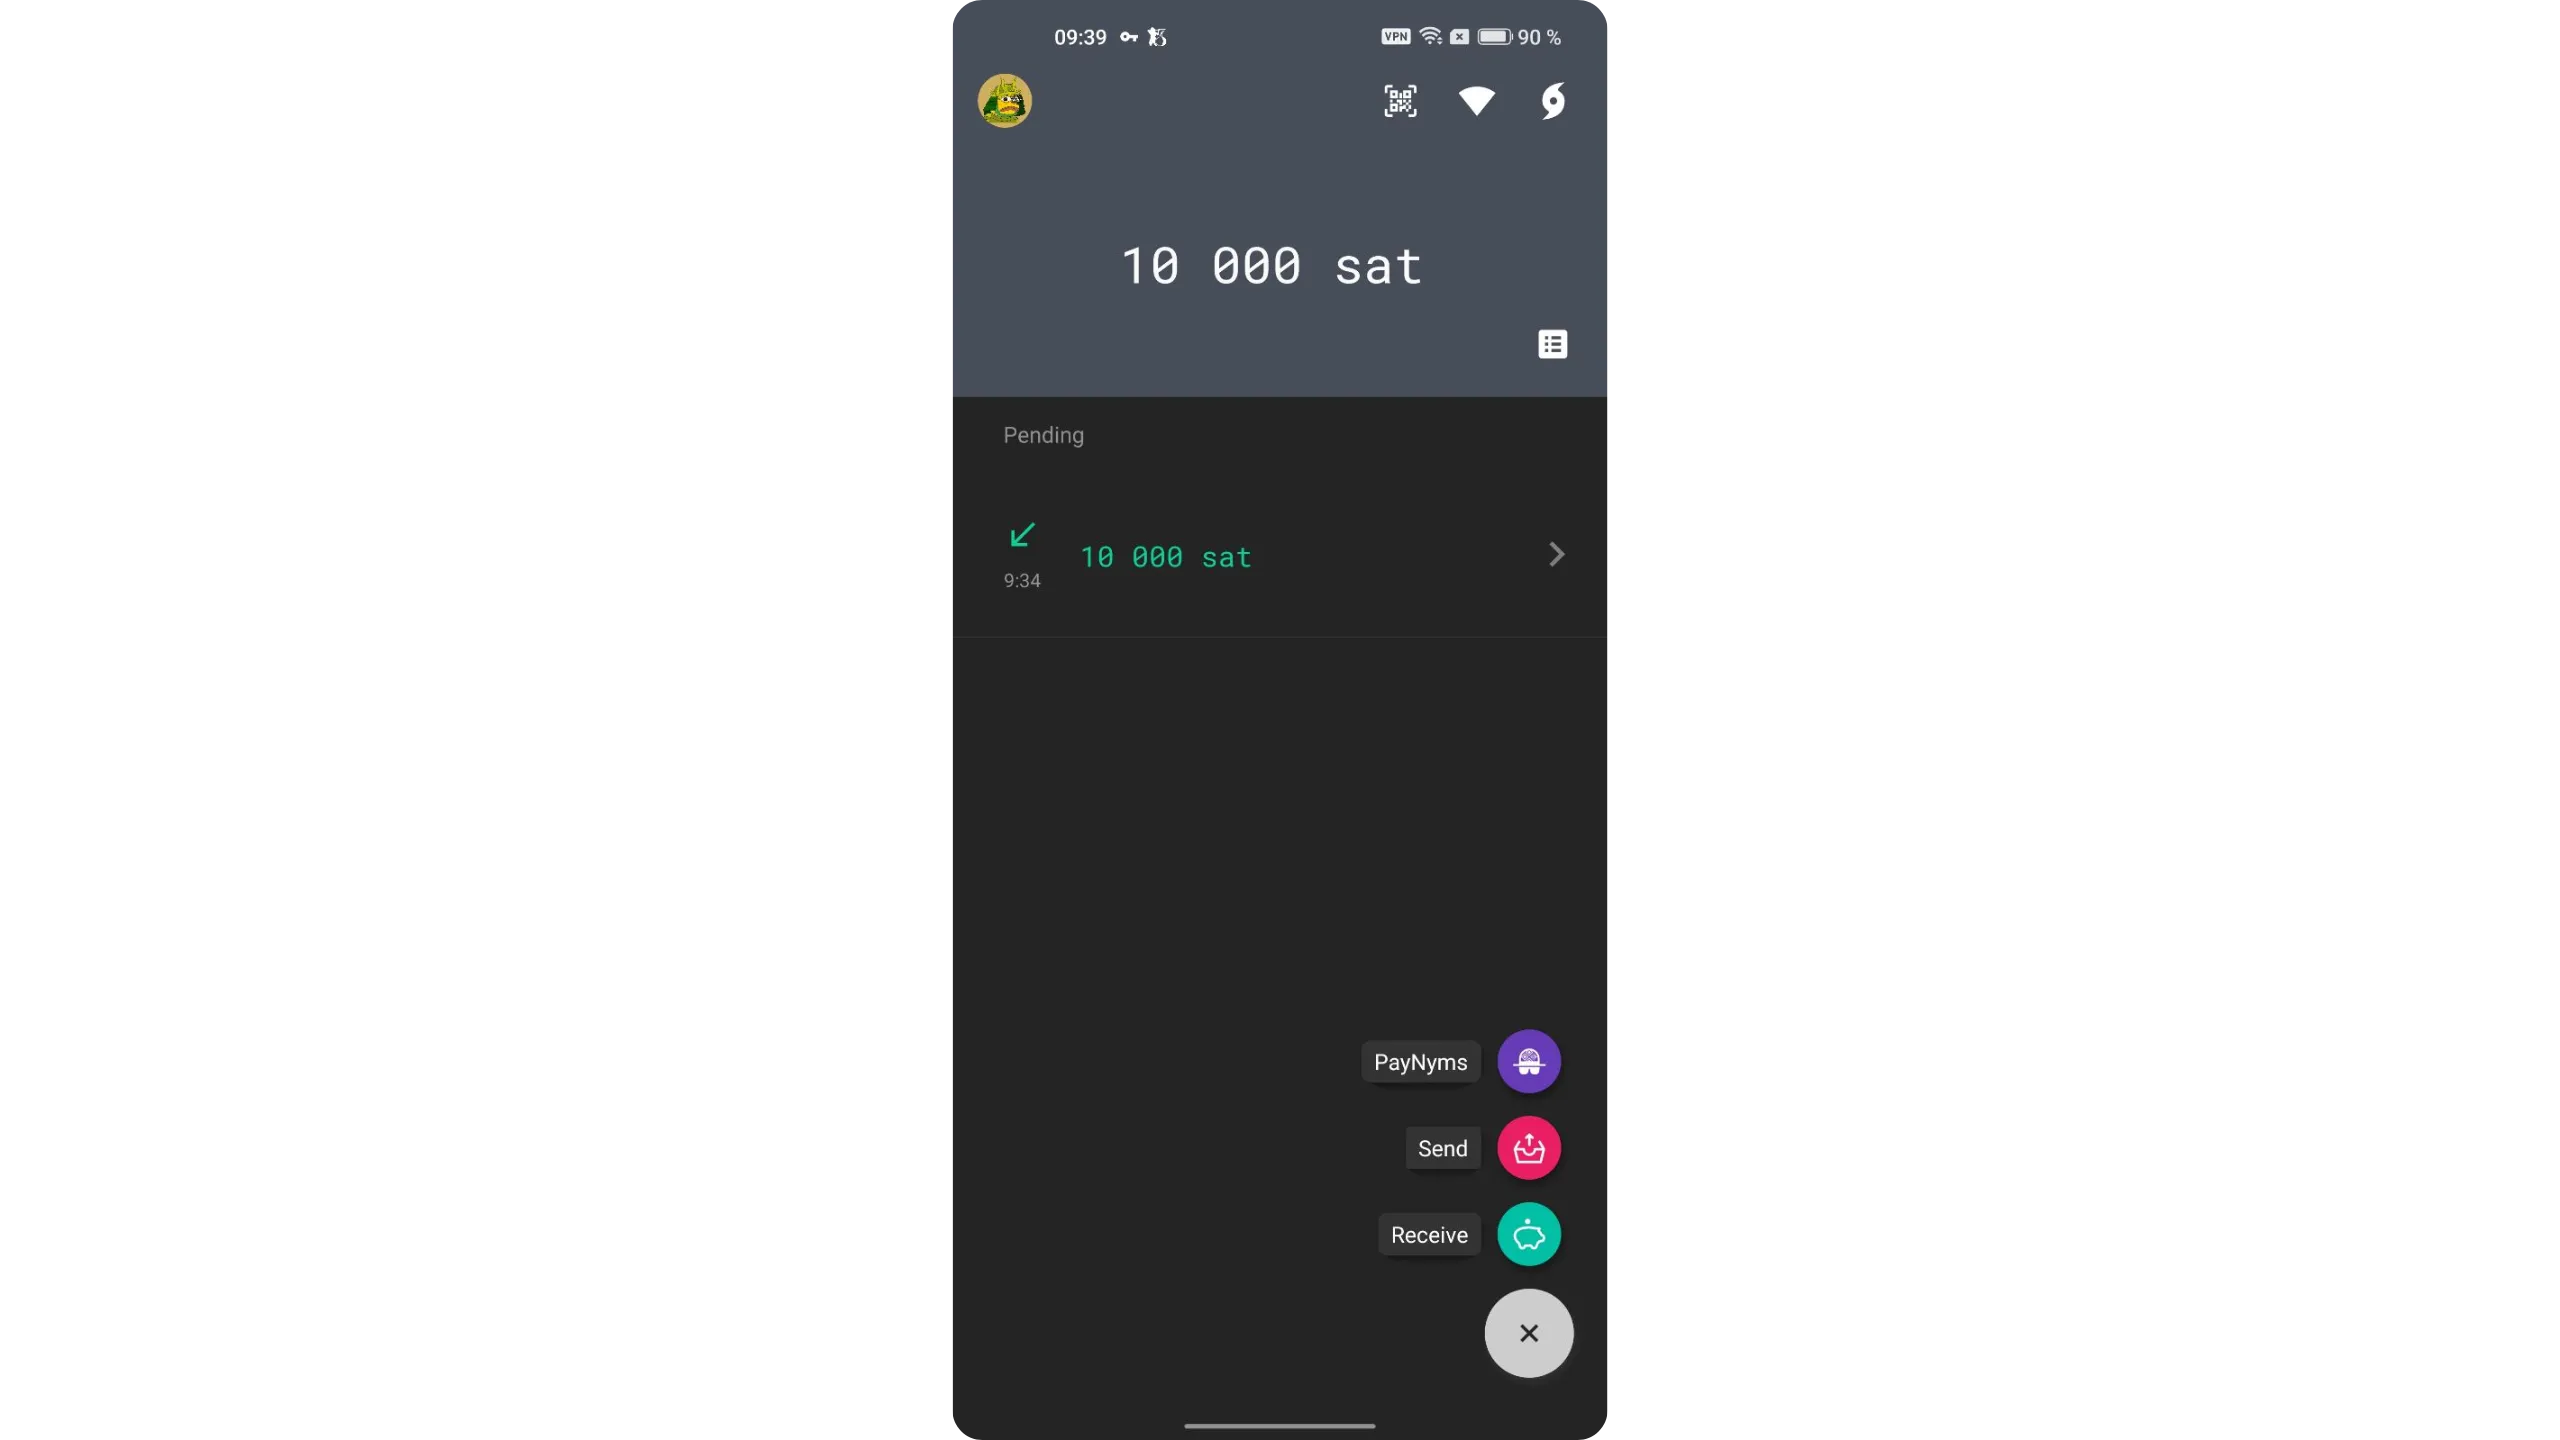
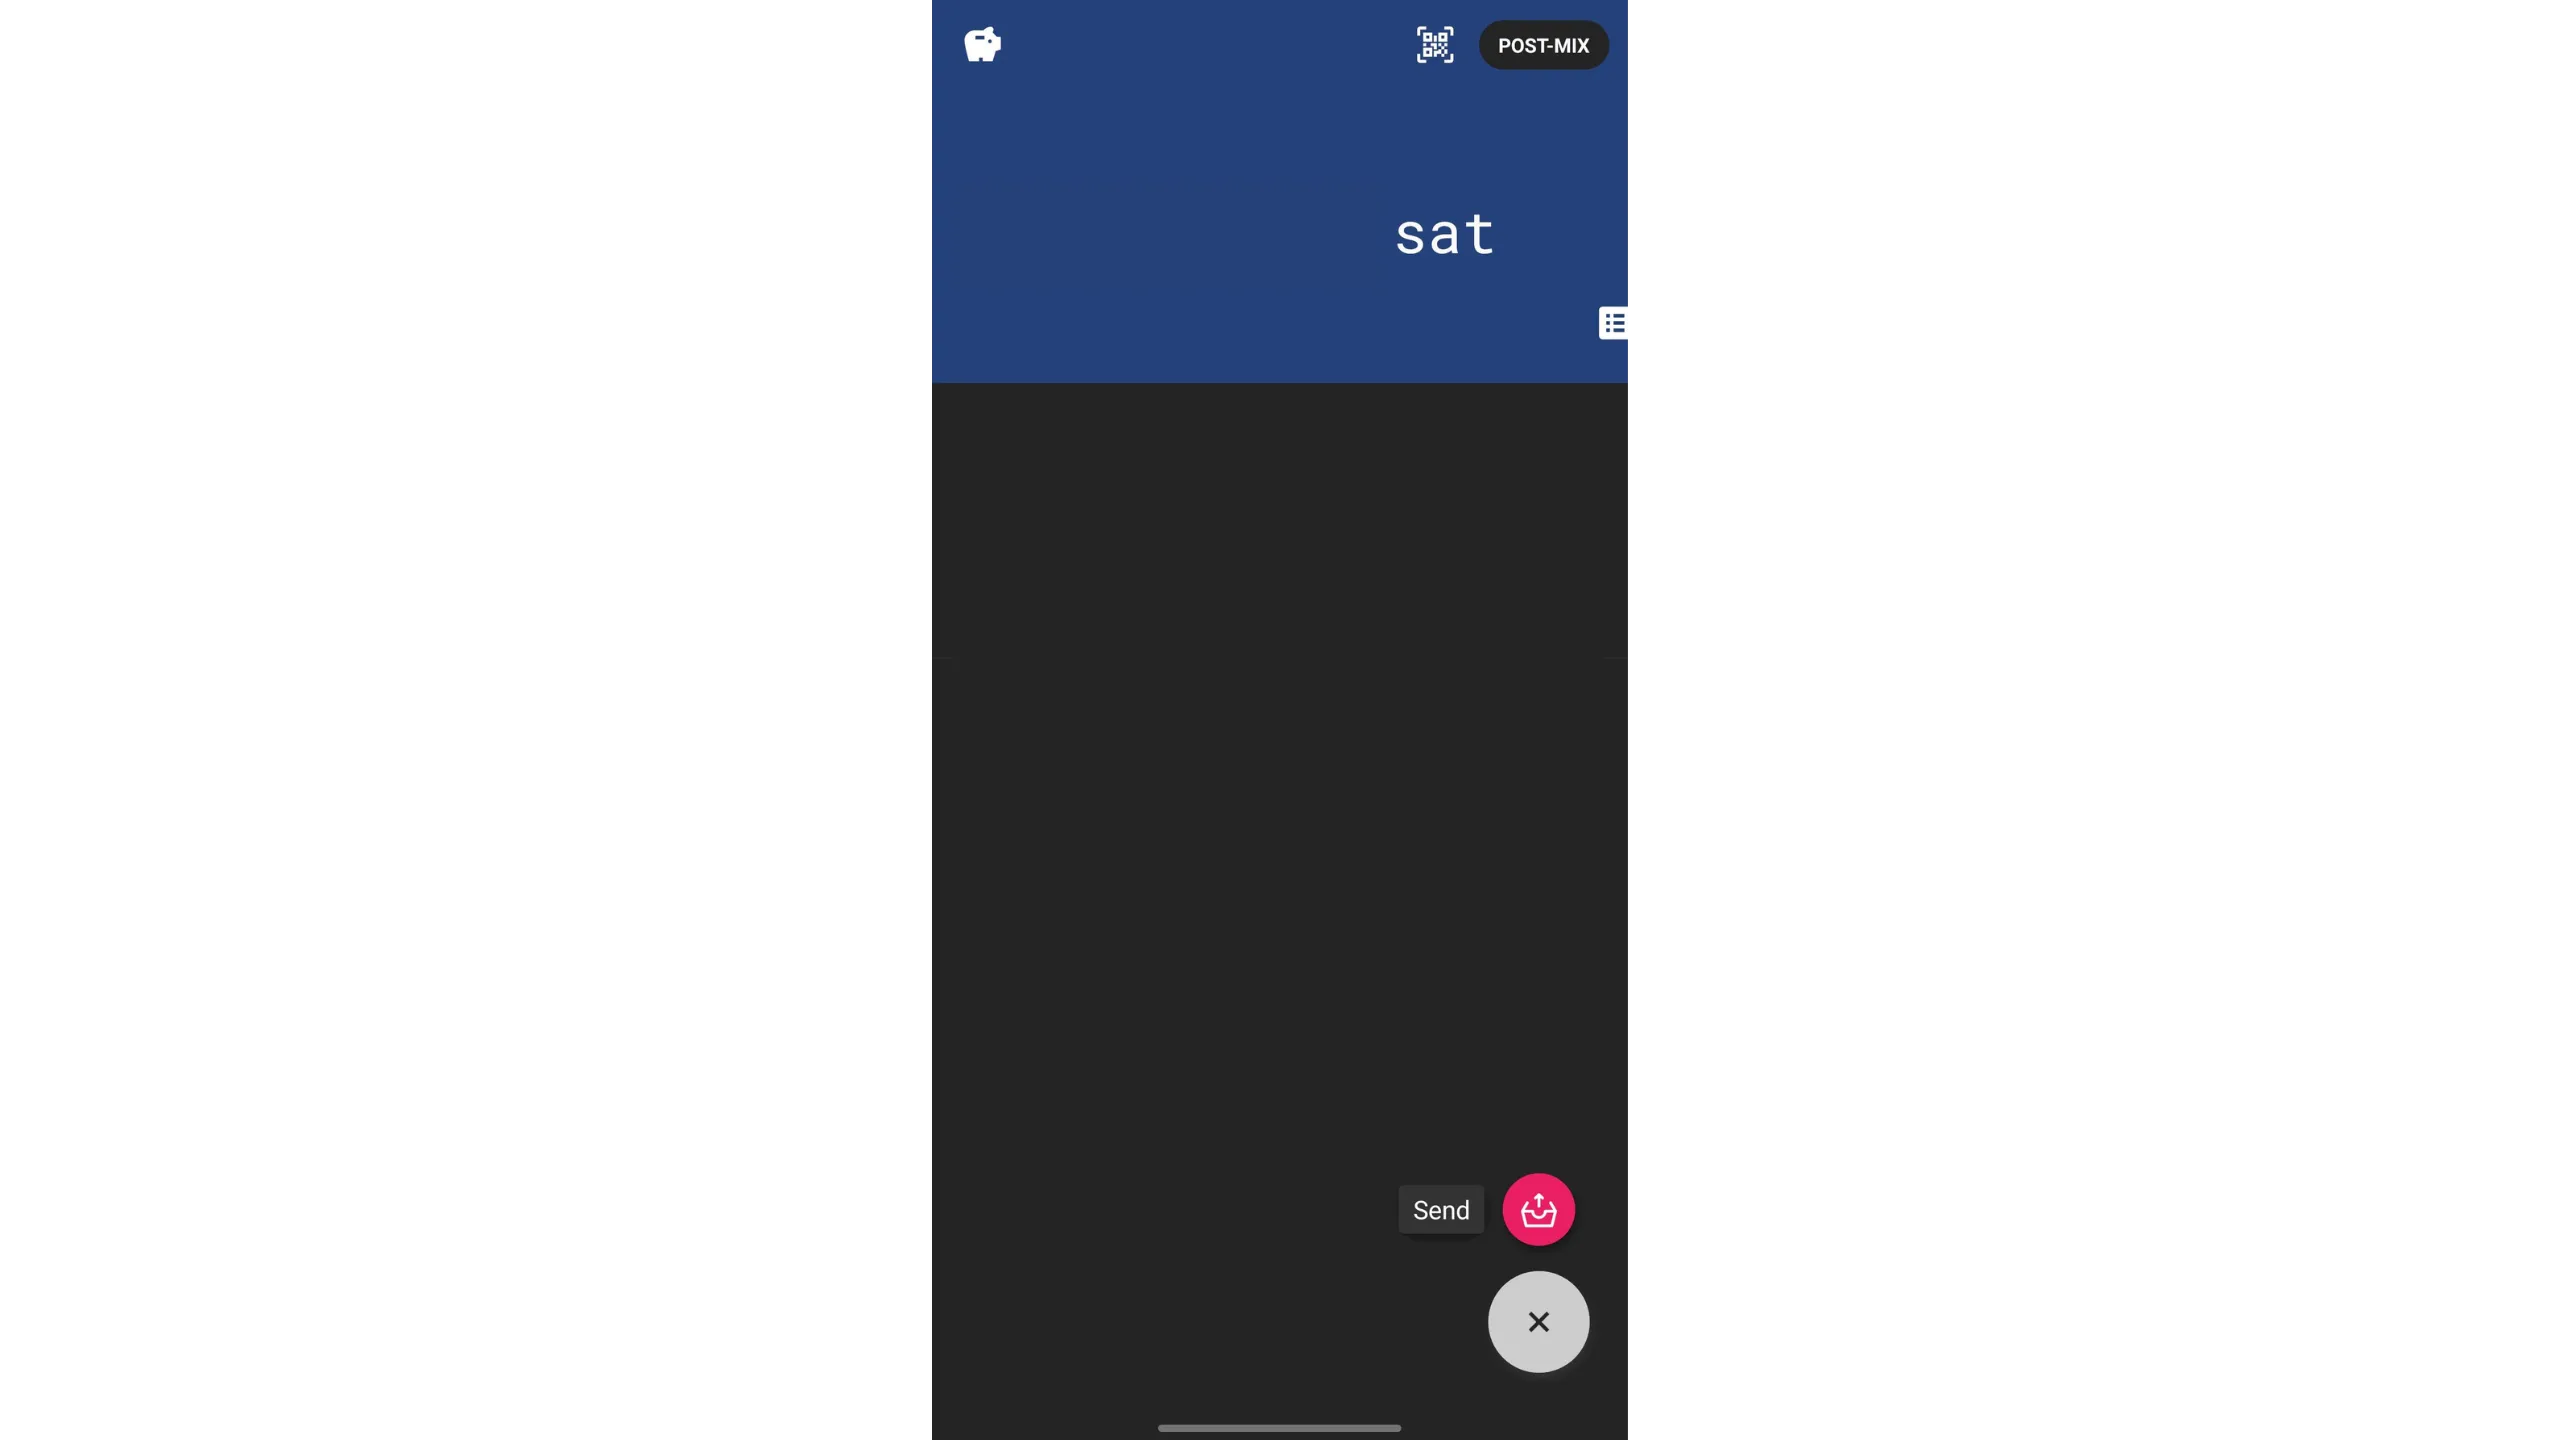
Once you have funds in Ashigaru, you can send them. Tap the “+” button at the bottom right, then select the red “Send” button.
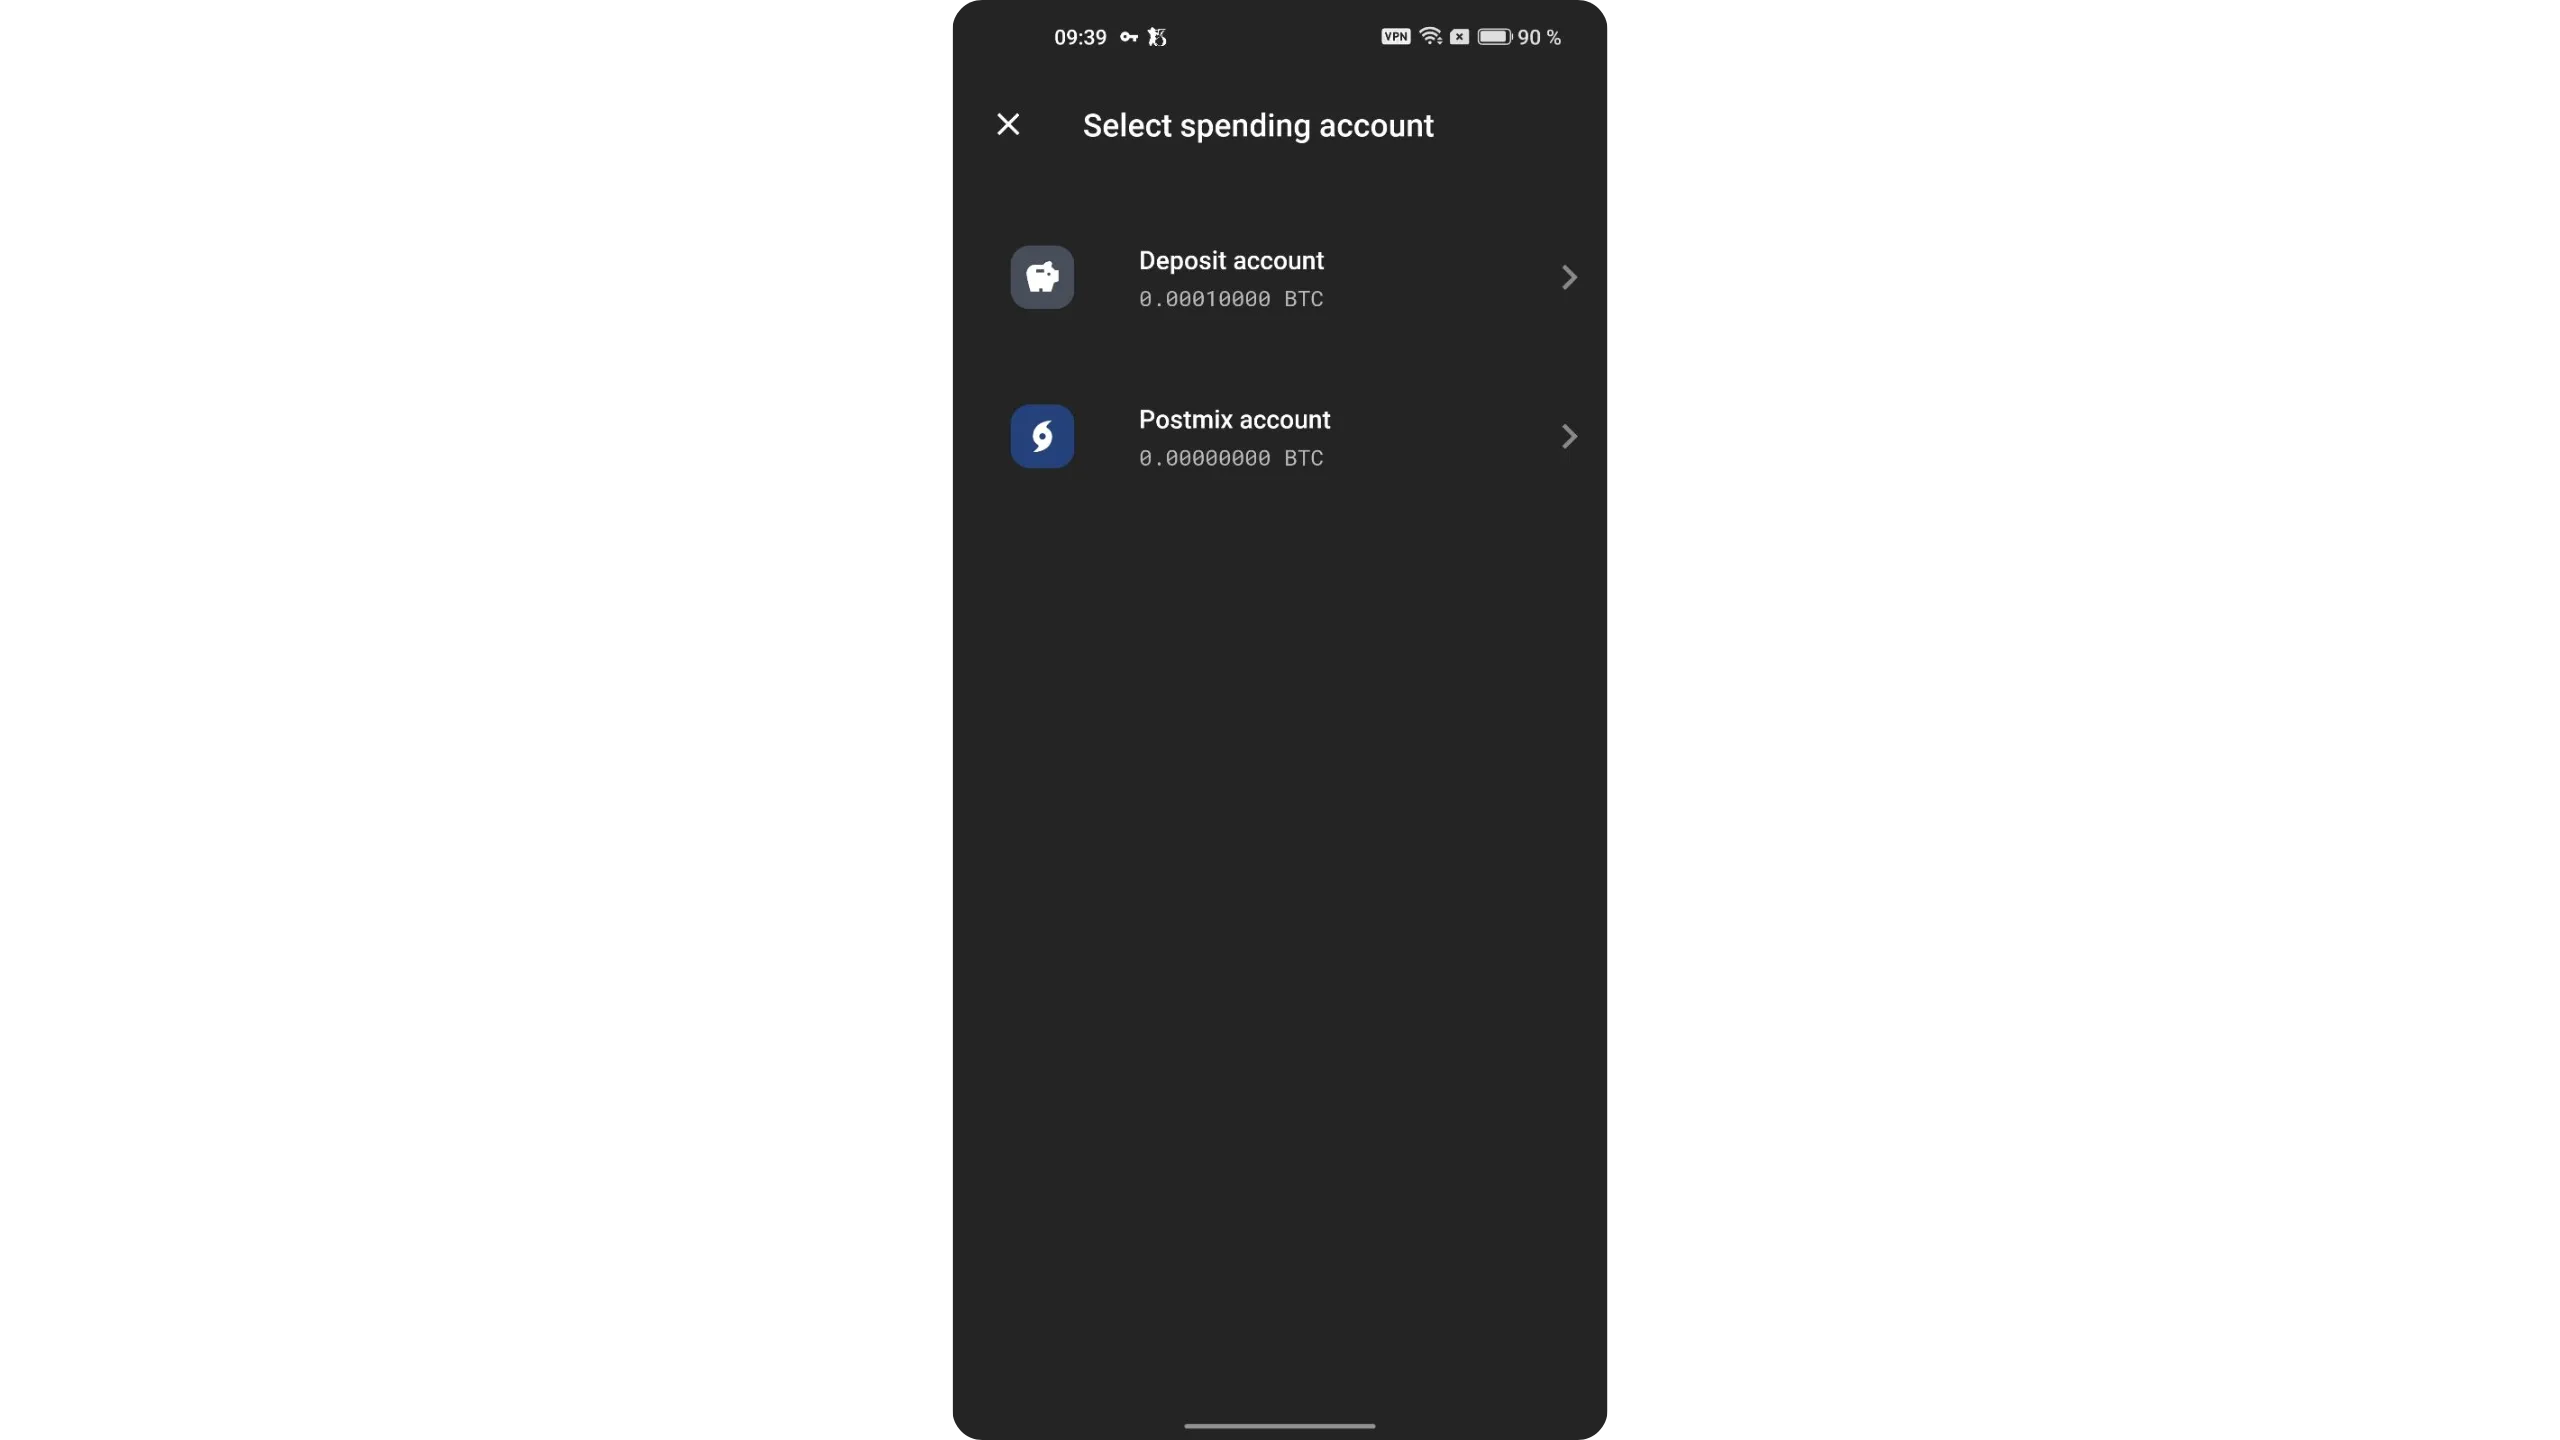
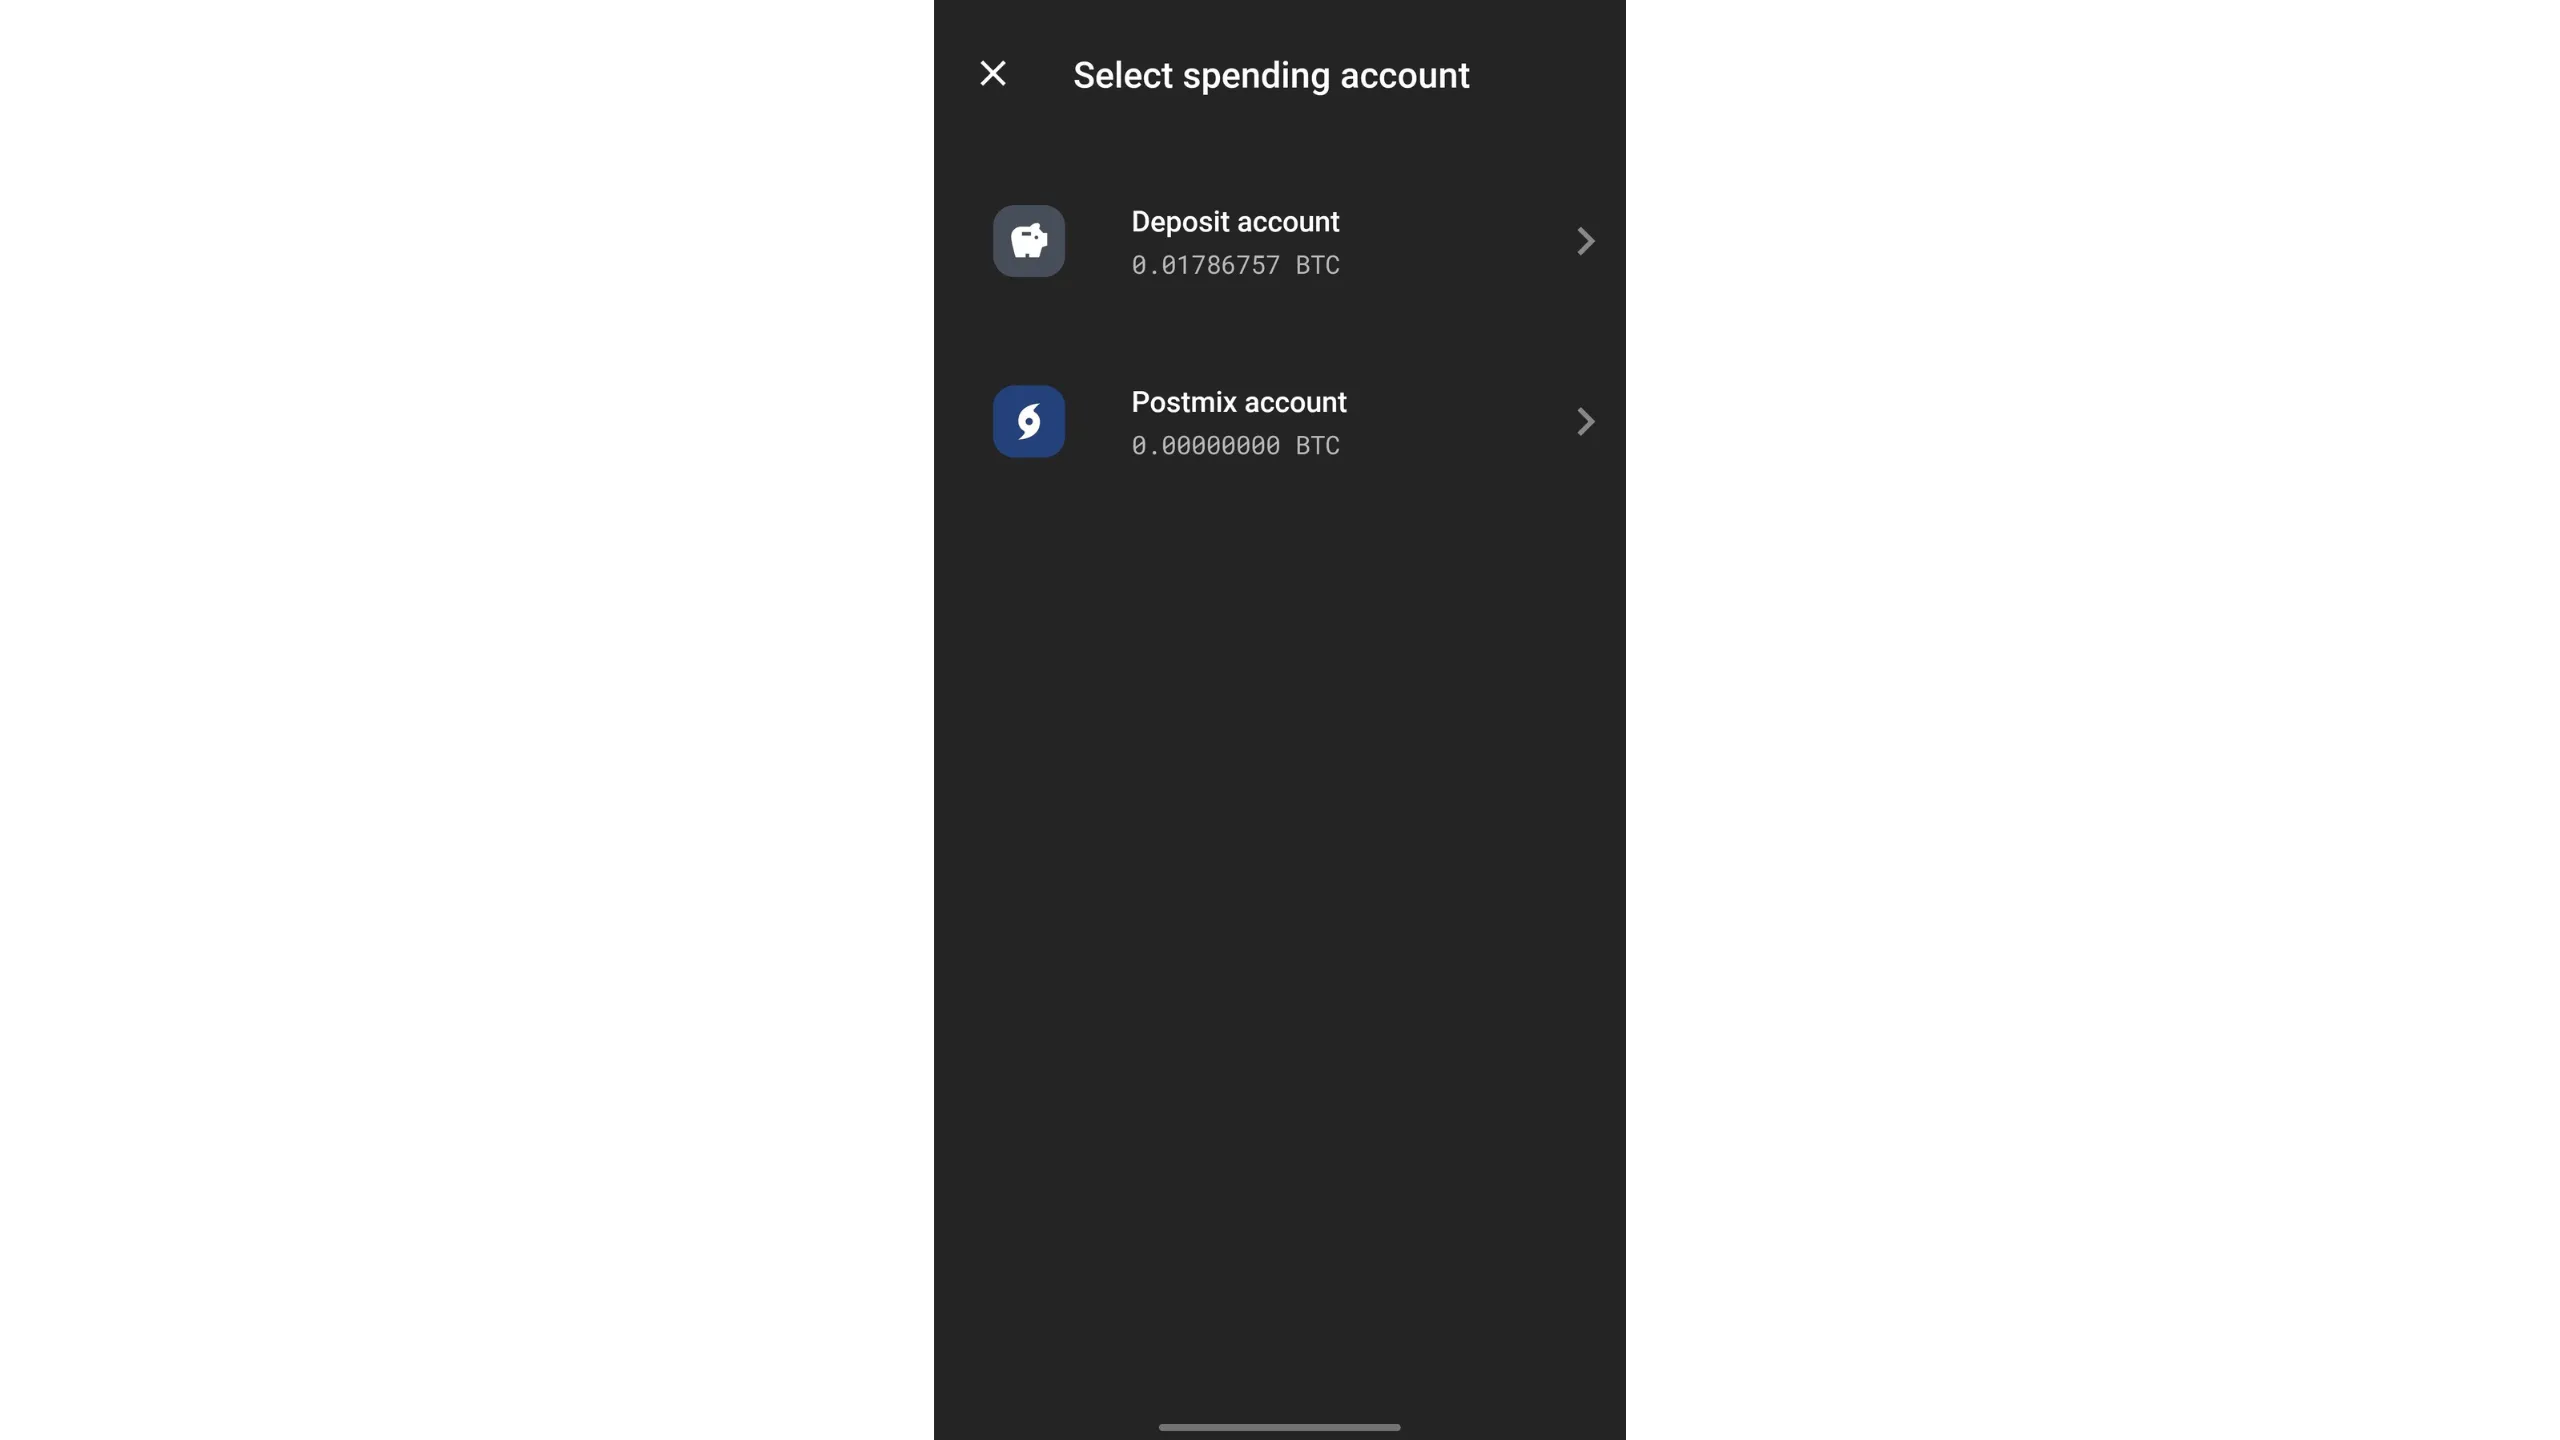
Choose the account to spend from. For now, we haven’t covered the “Postmix” account yet. We’ll return to it in the Whirlpool section. For a standard spend, send from the main deposit account.
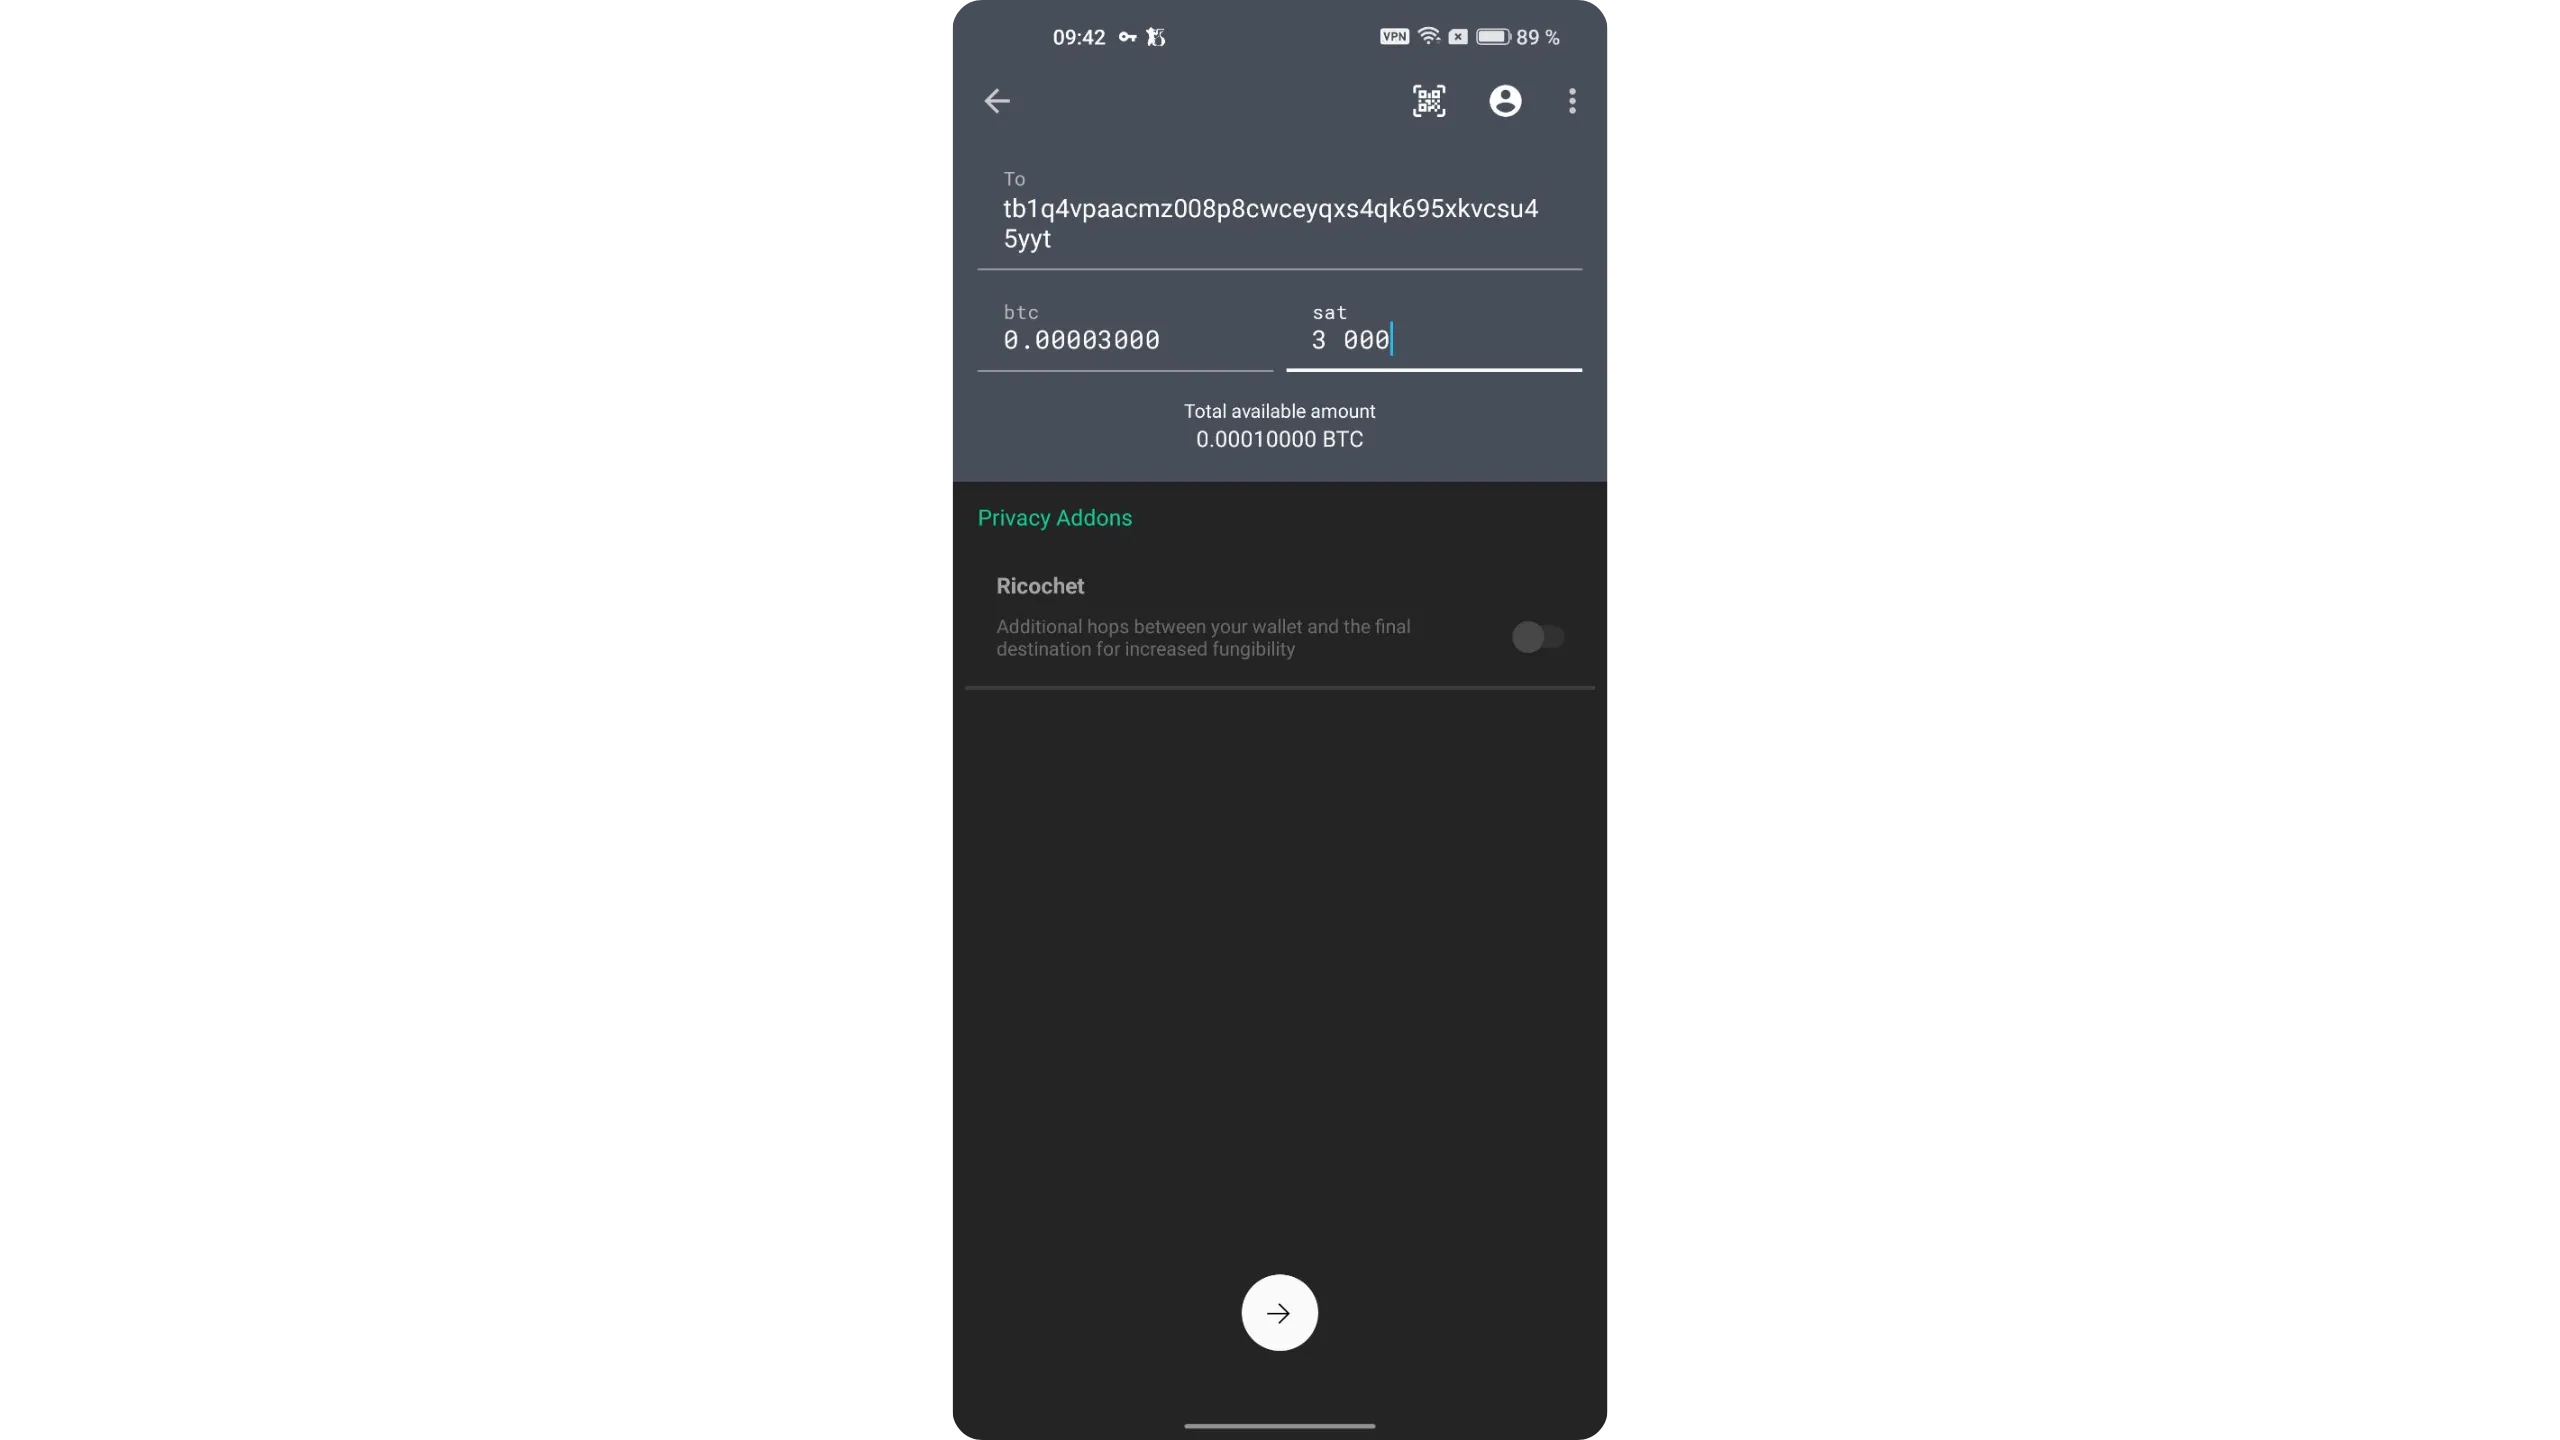
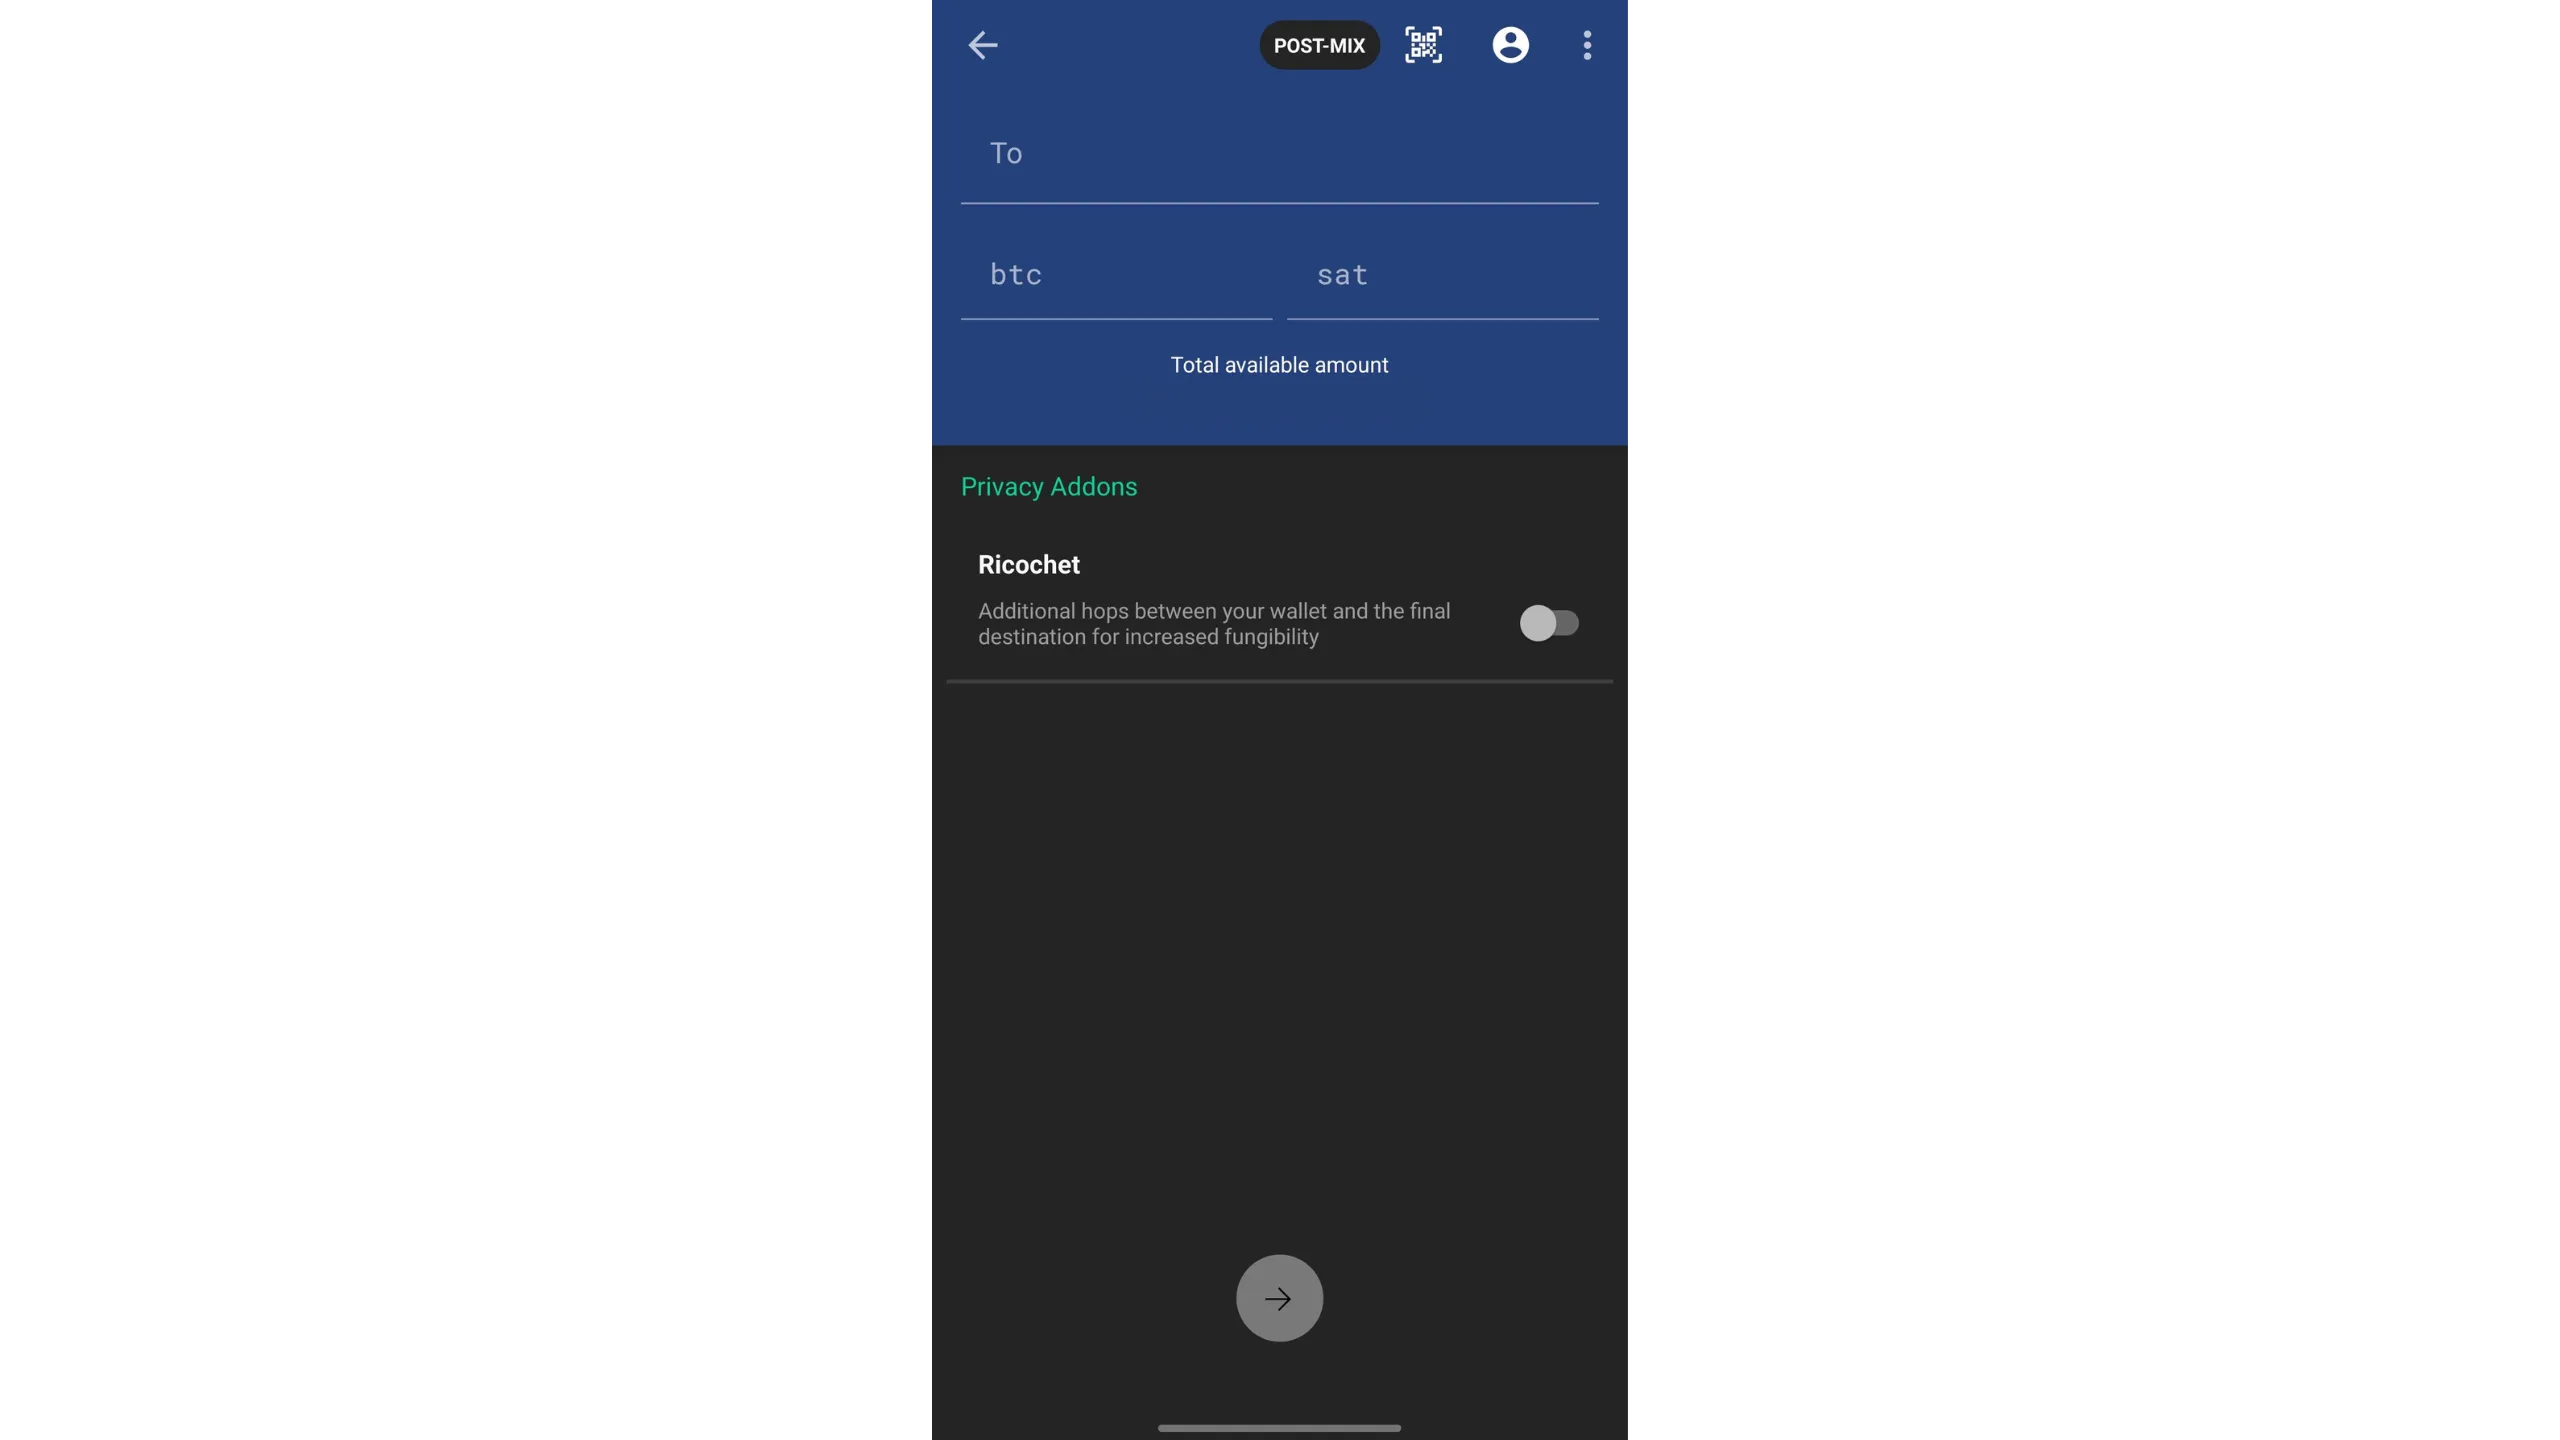
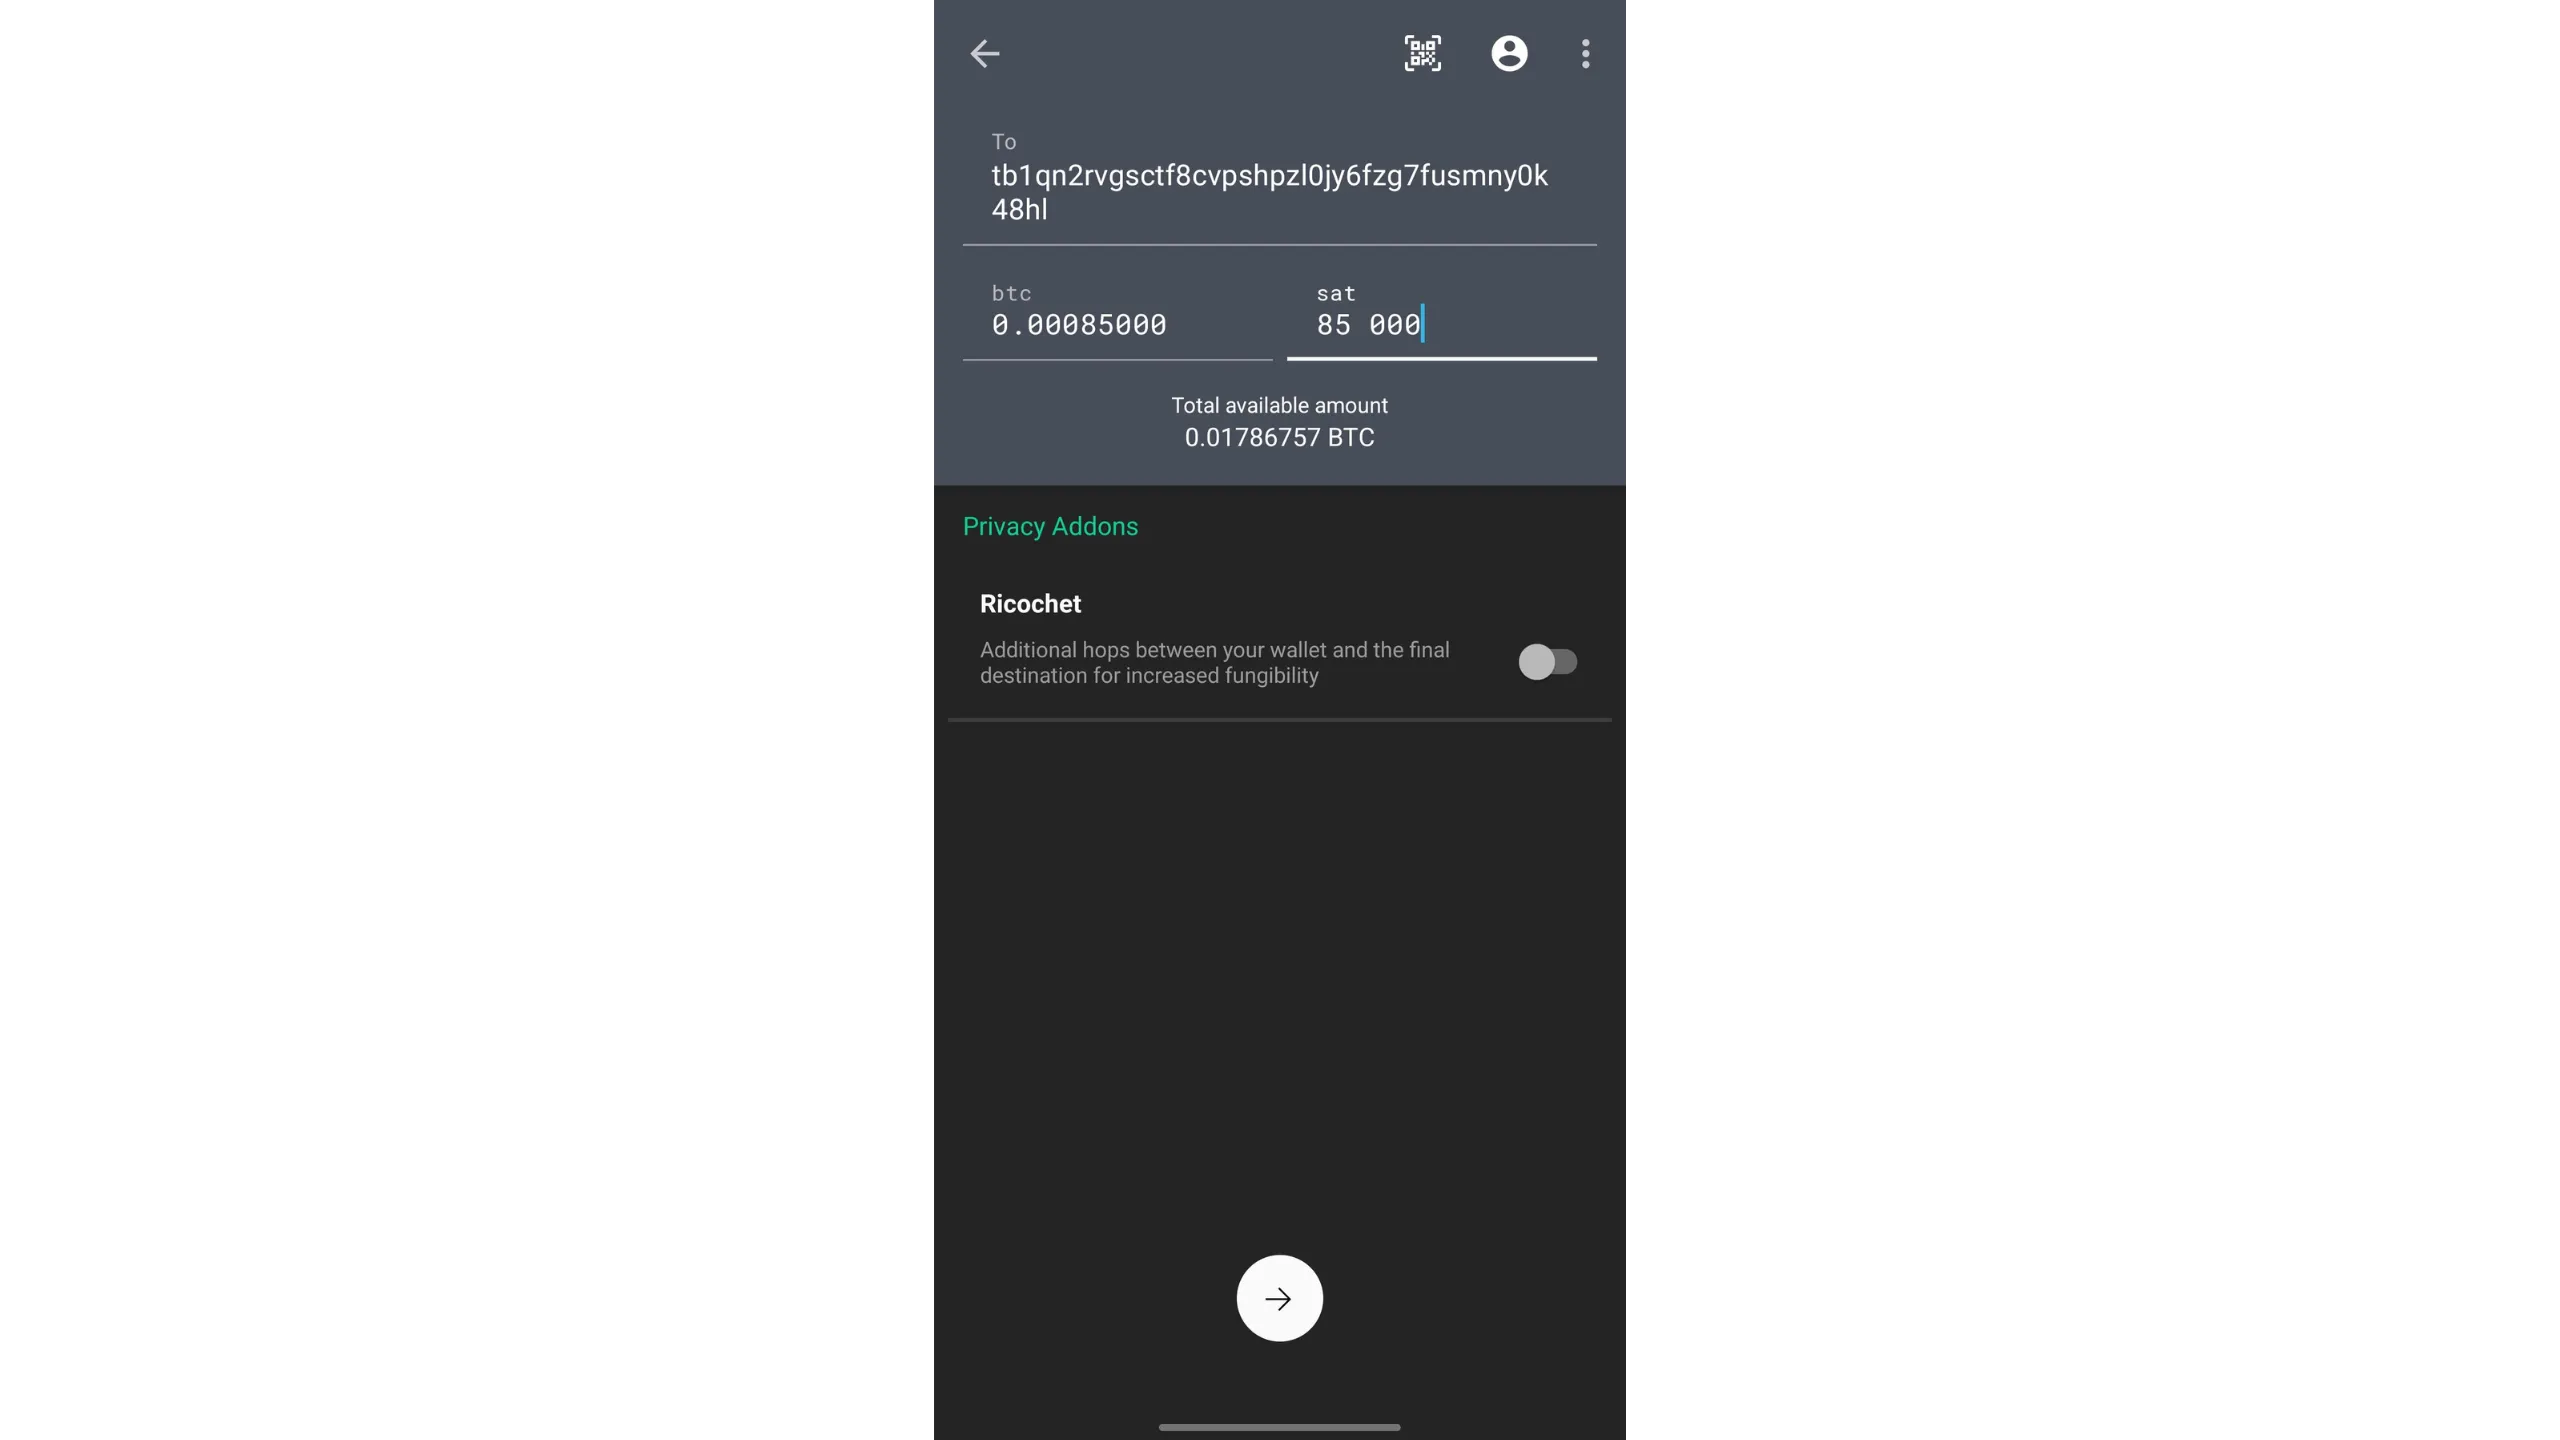
Enter the transaction details: amount to send and the recipient’s Bitcoin address.
By tapping the three dots in the top‑right, then “Show unspent outputs,” you can precisely select which UTXOs to spend to improve your privacy.
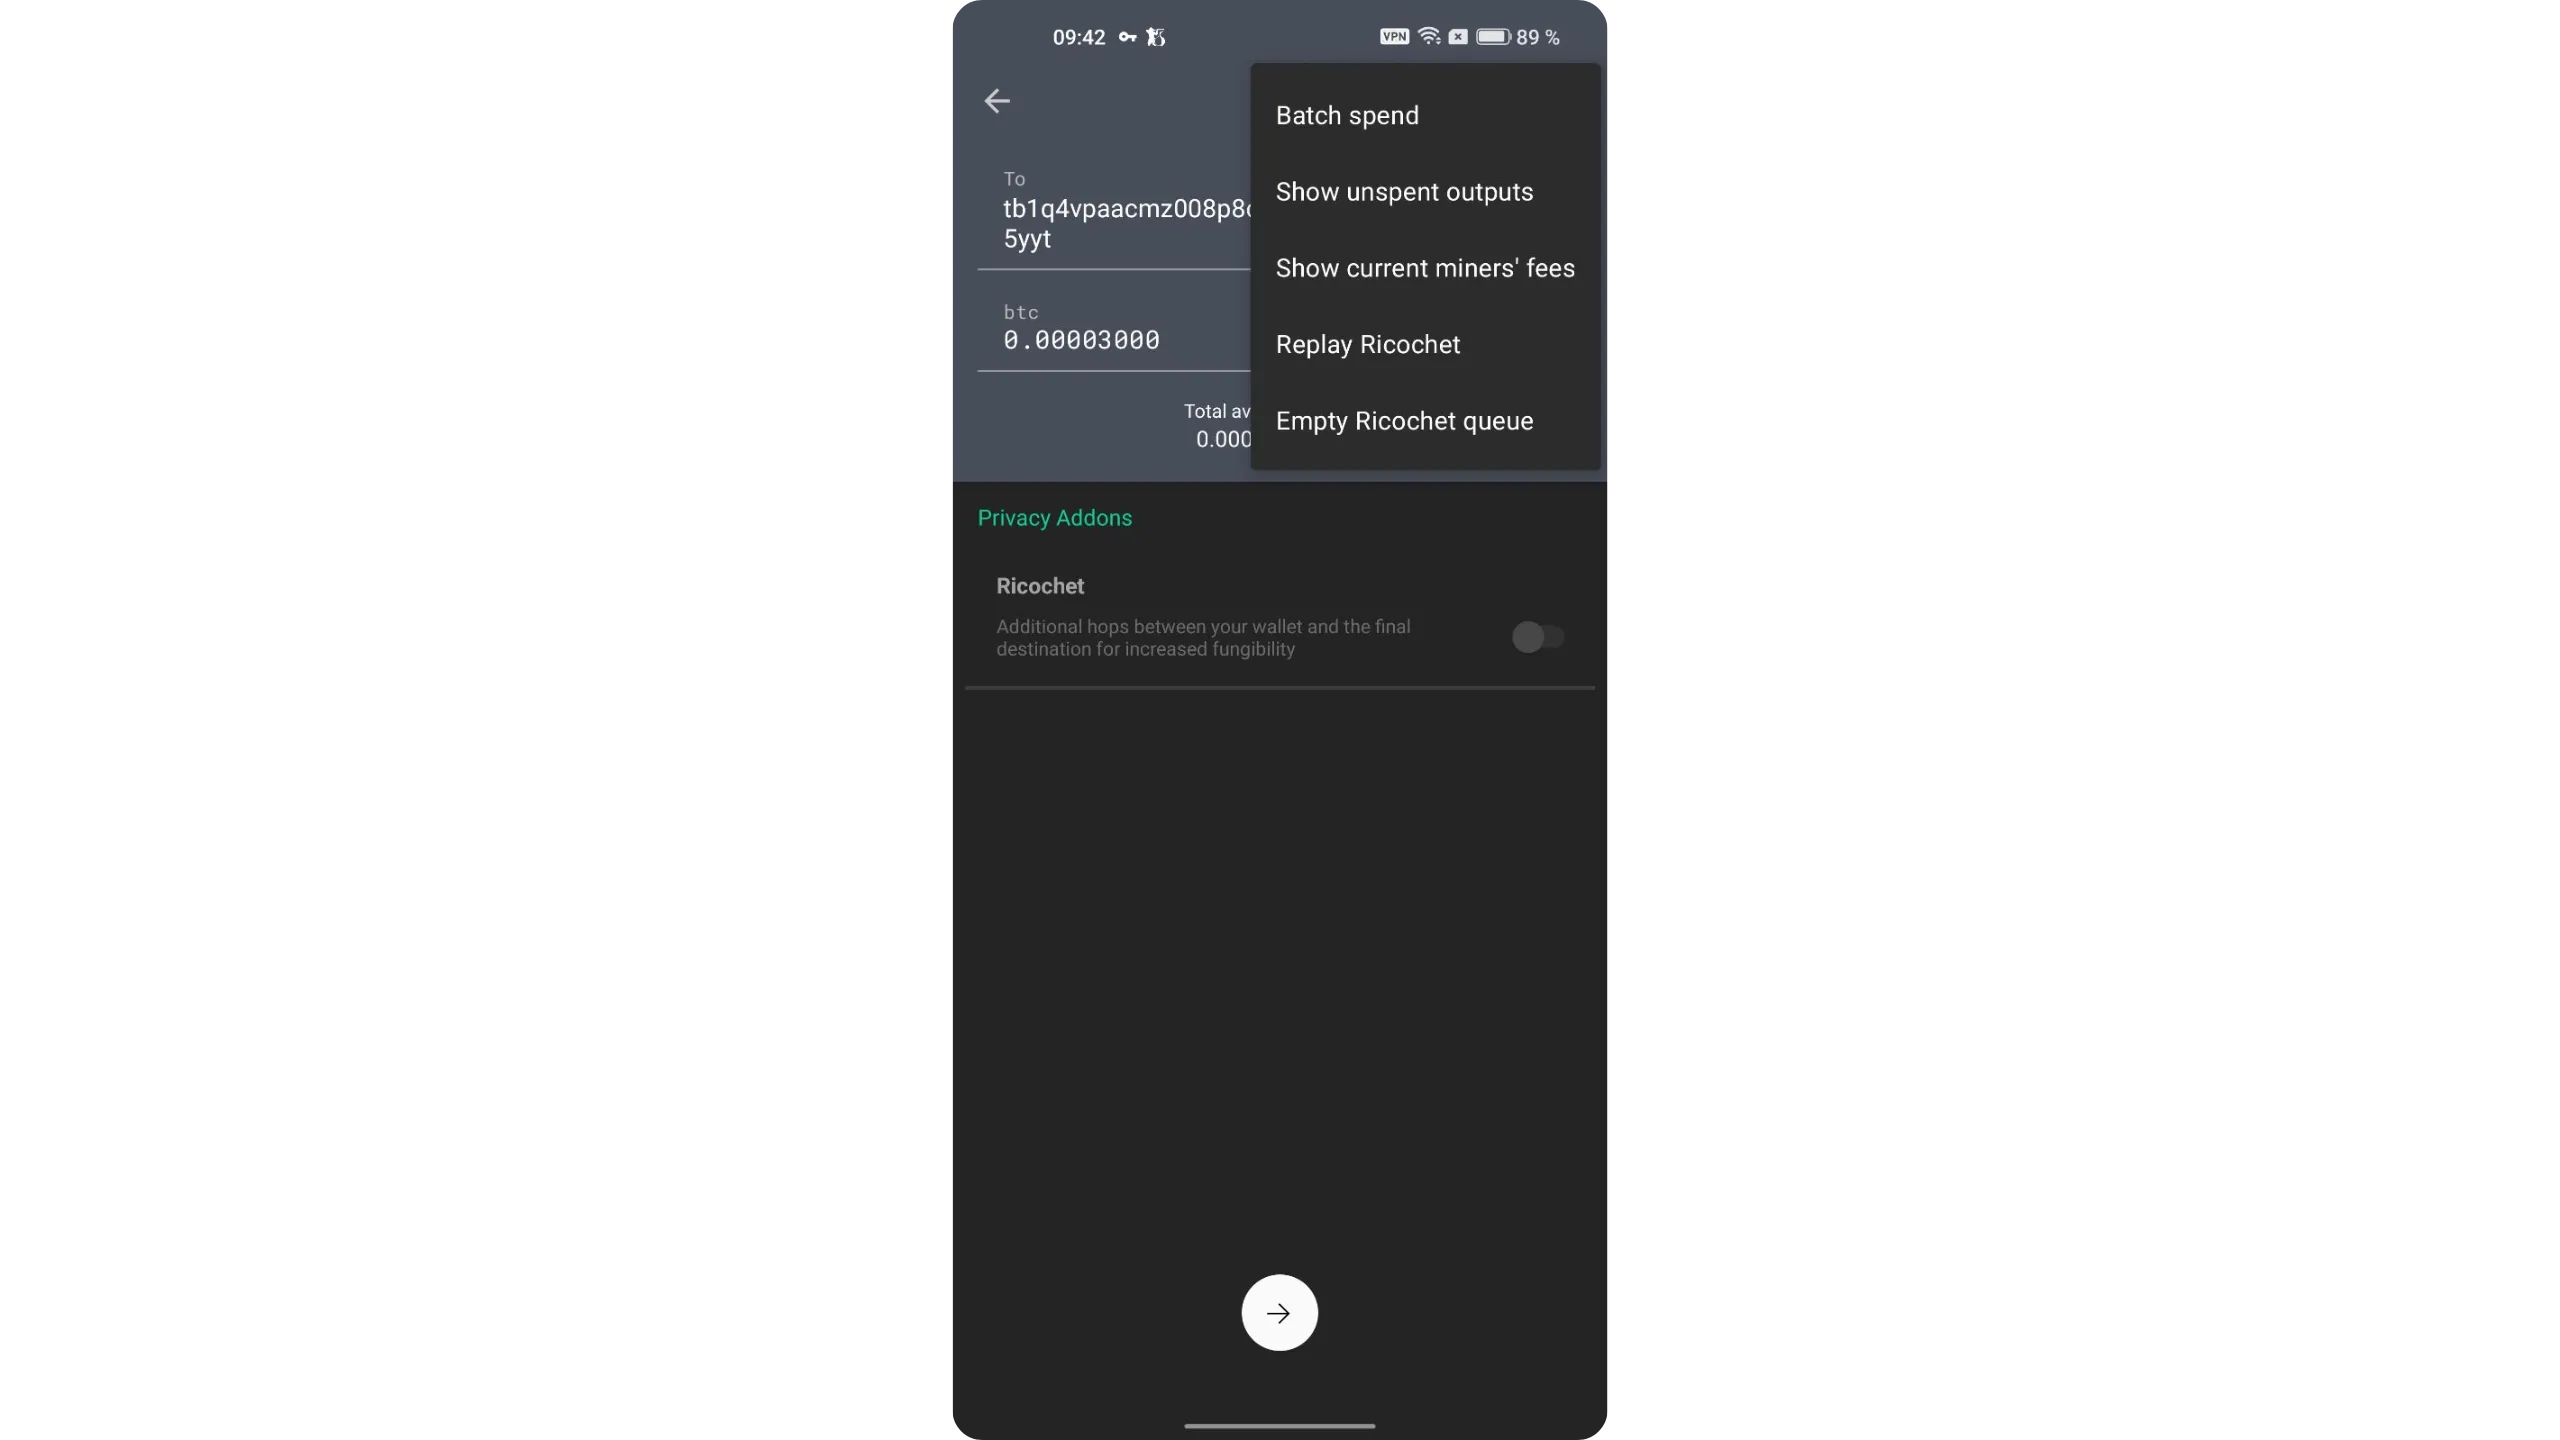
When everything is set, tap the white arrow at the bottom to continue.
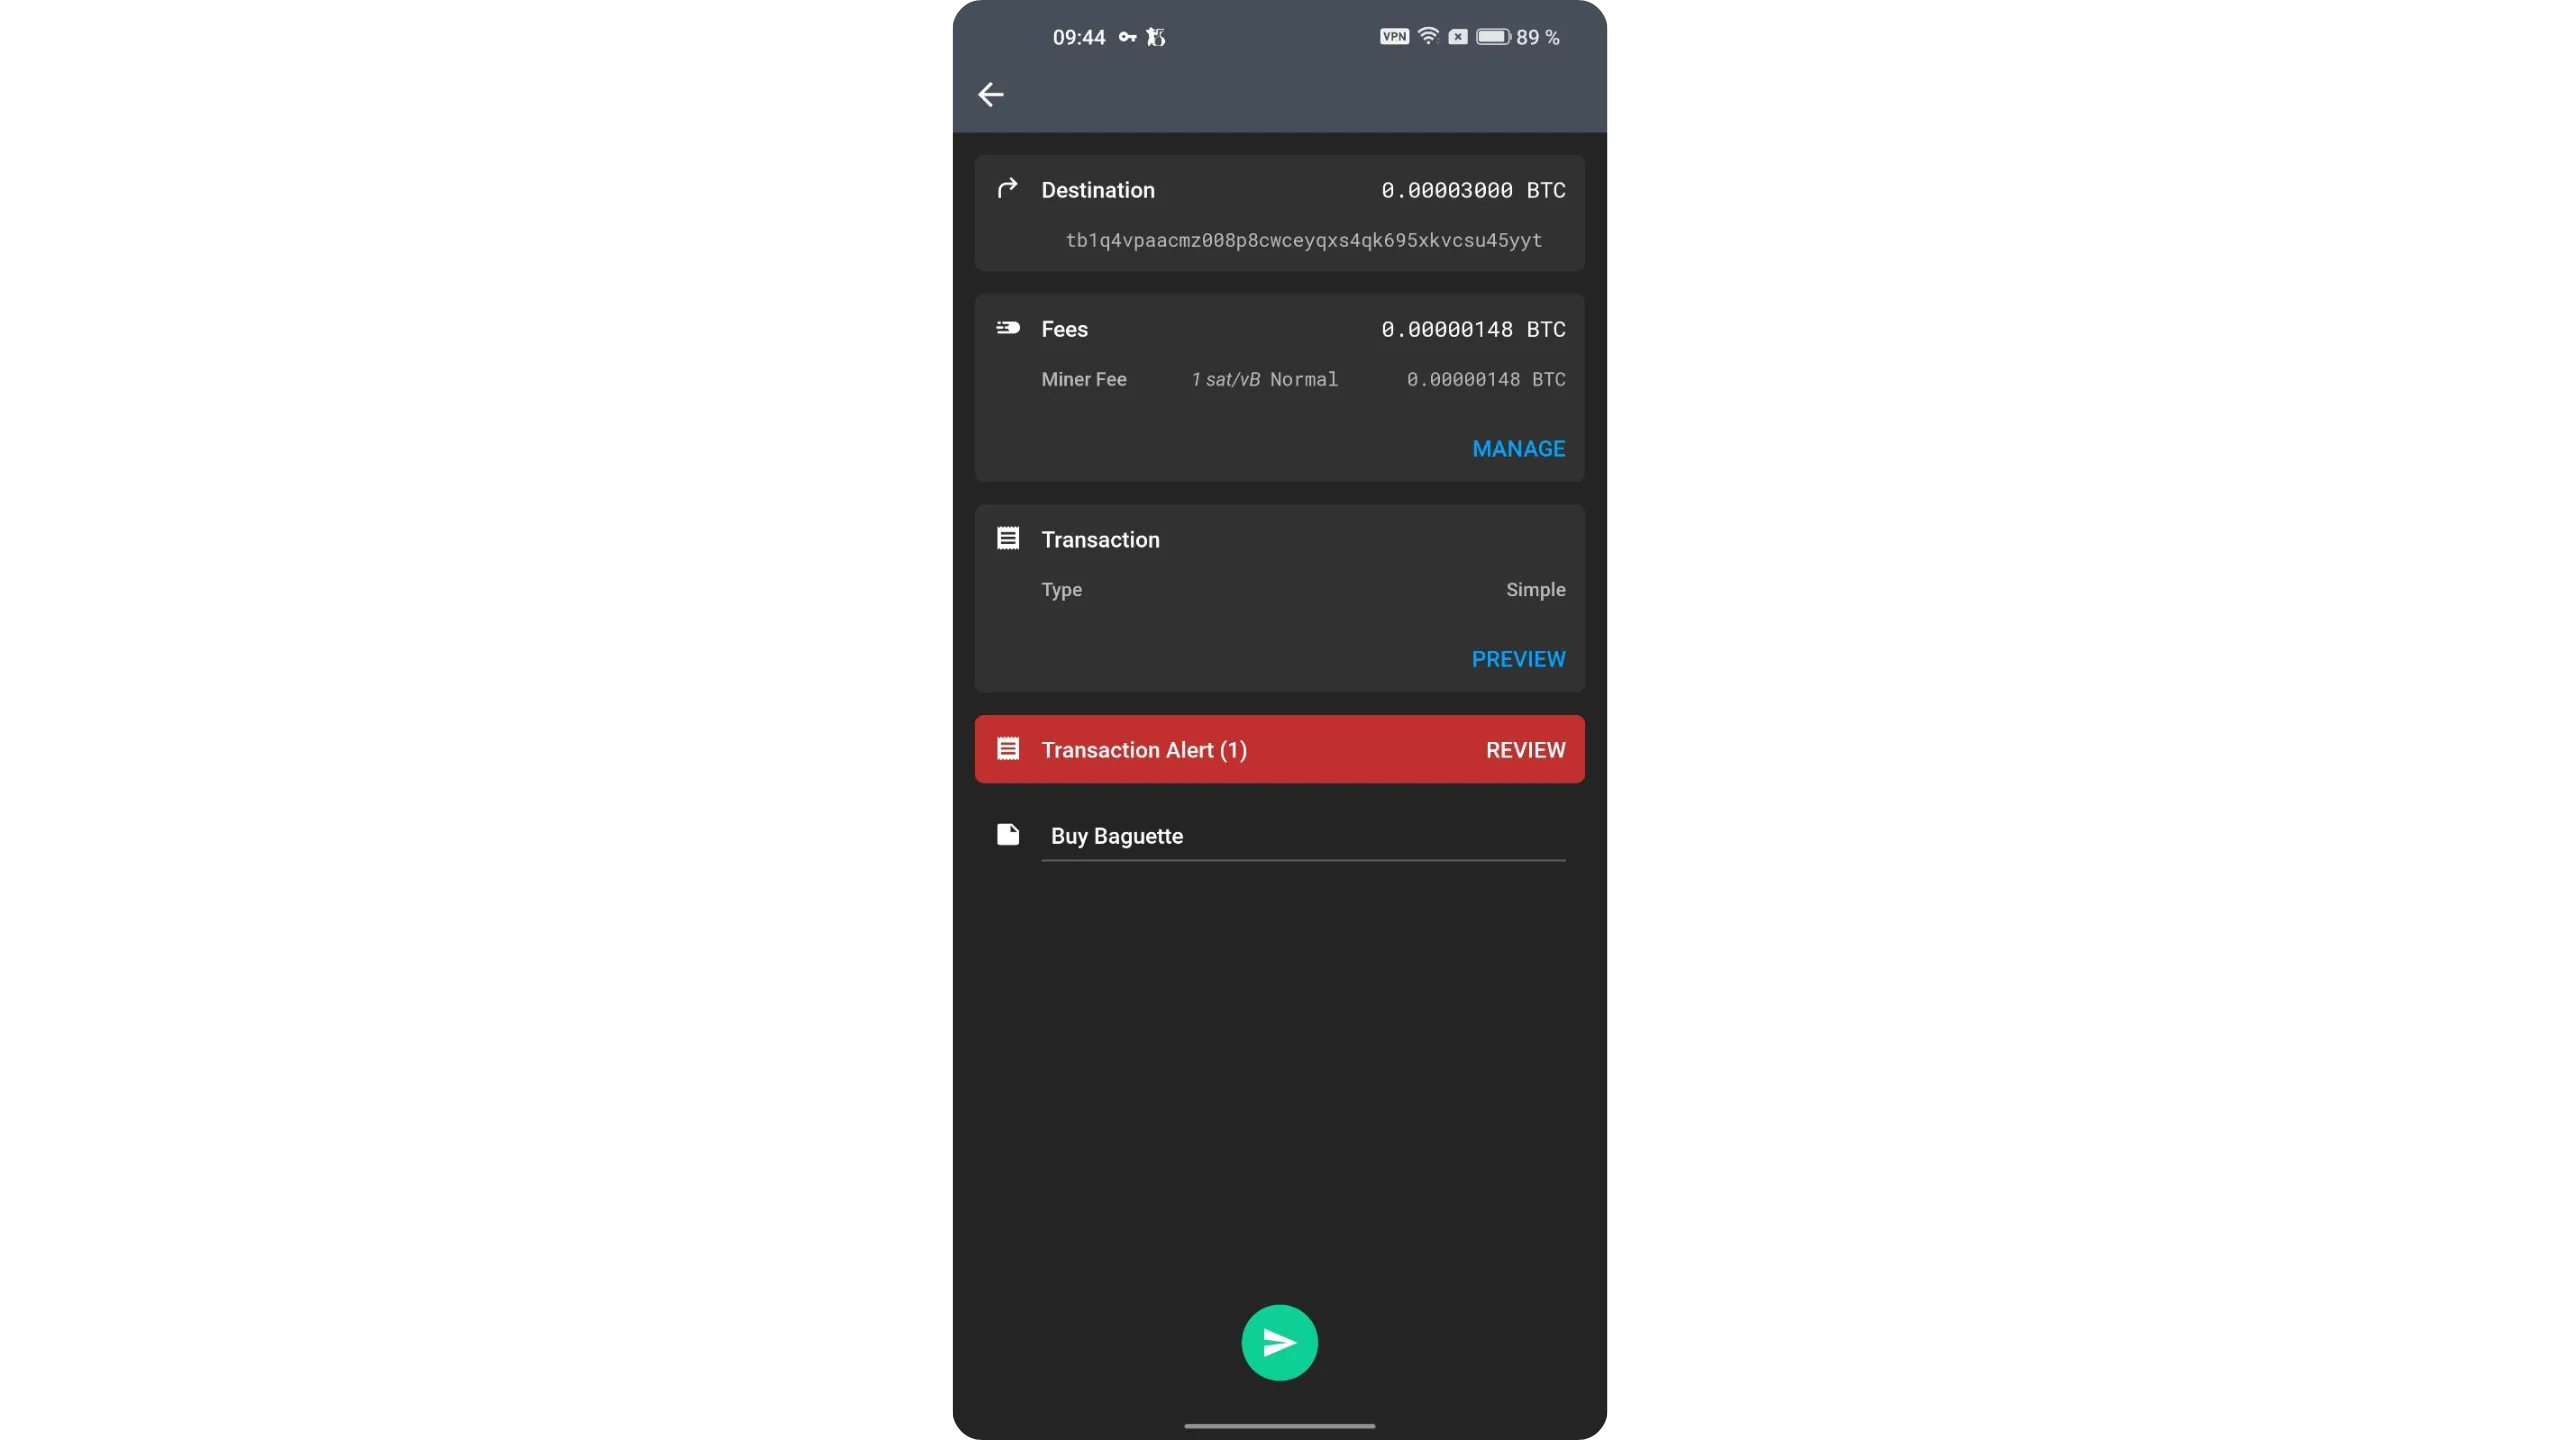
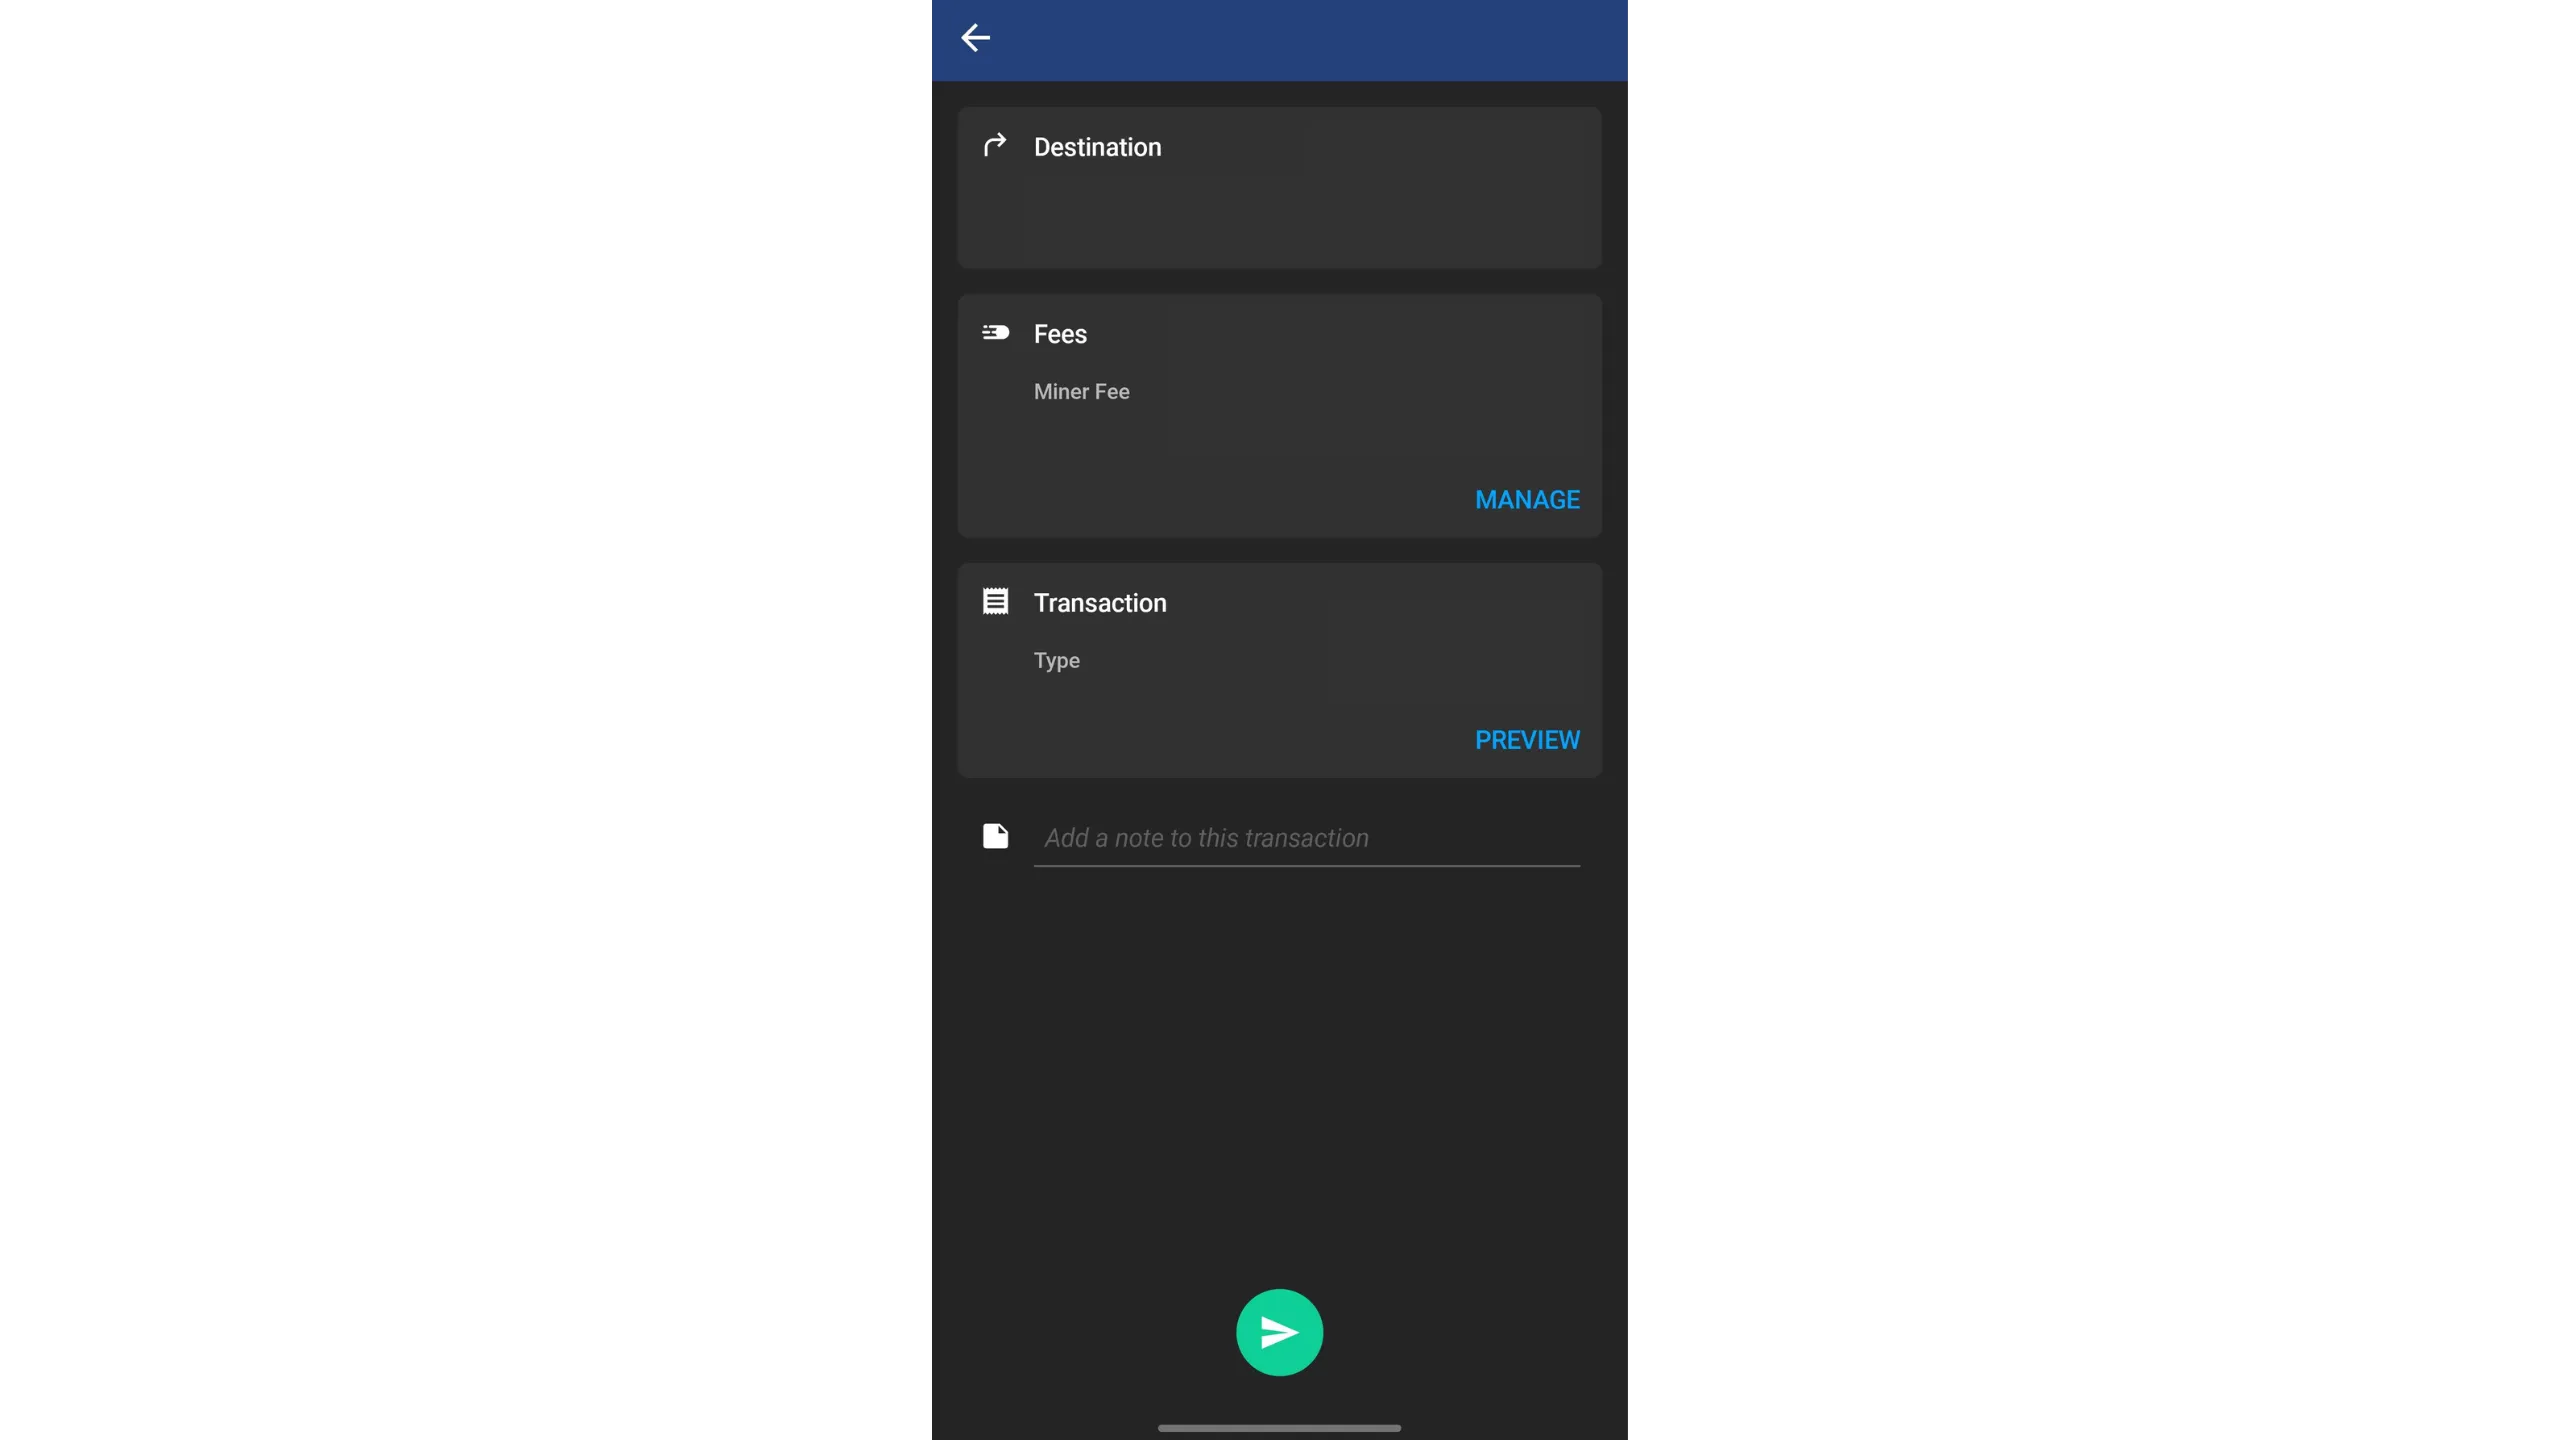
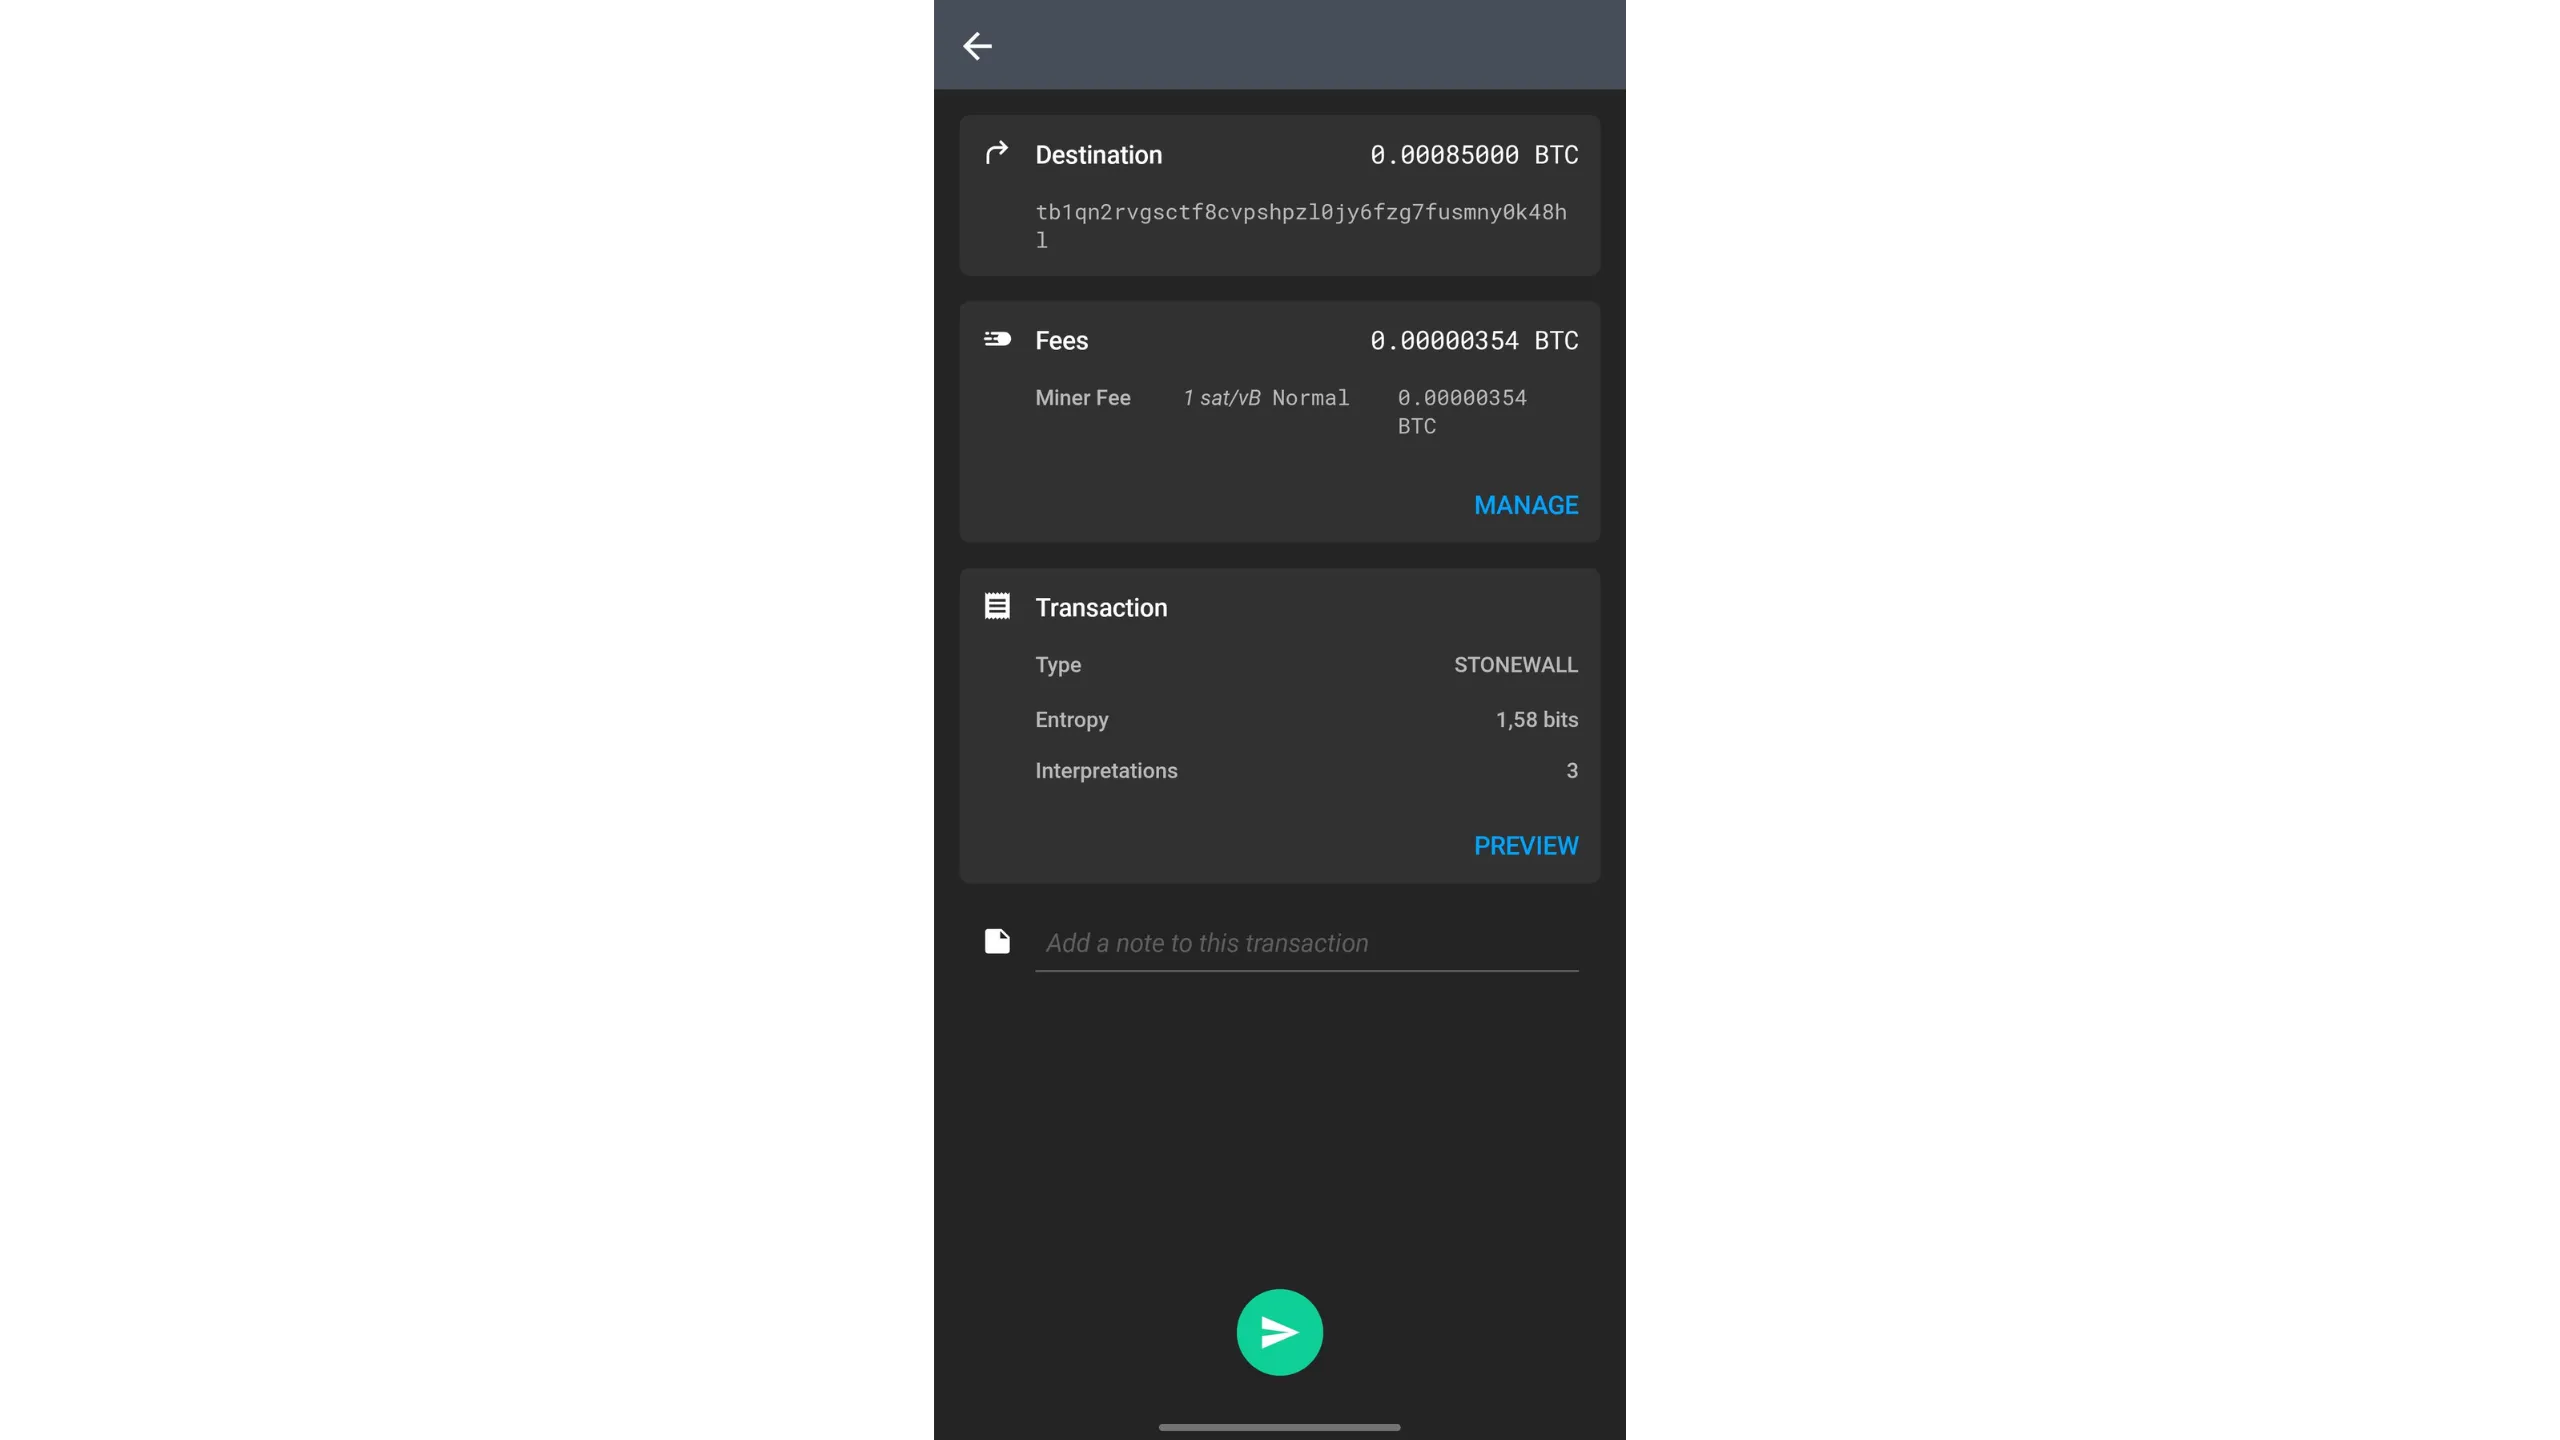
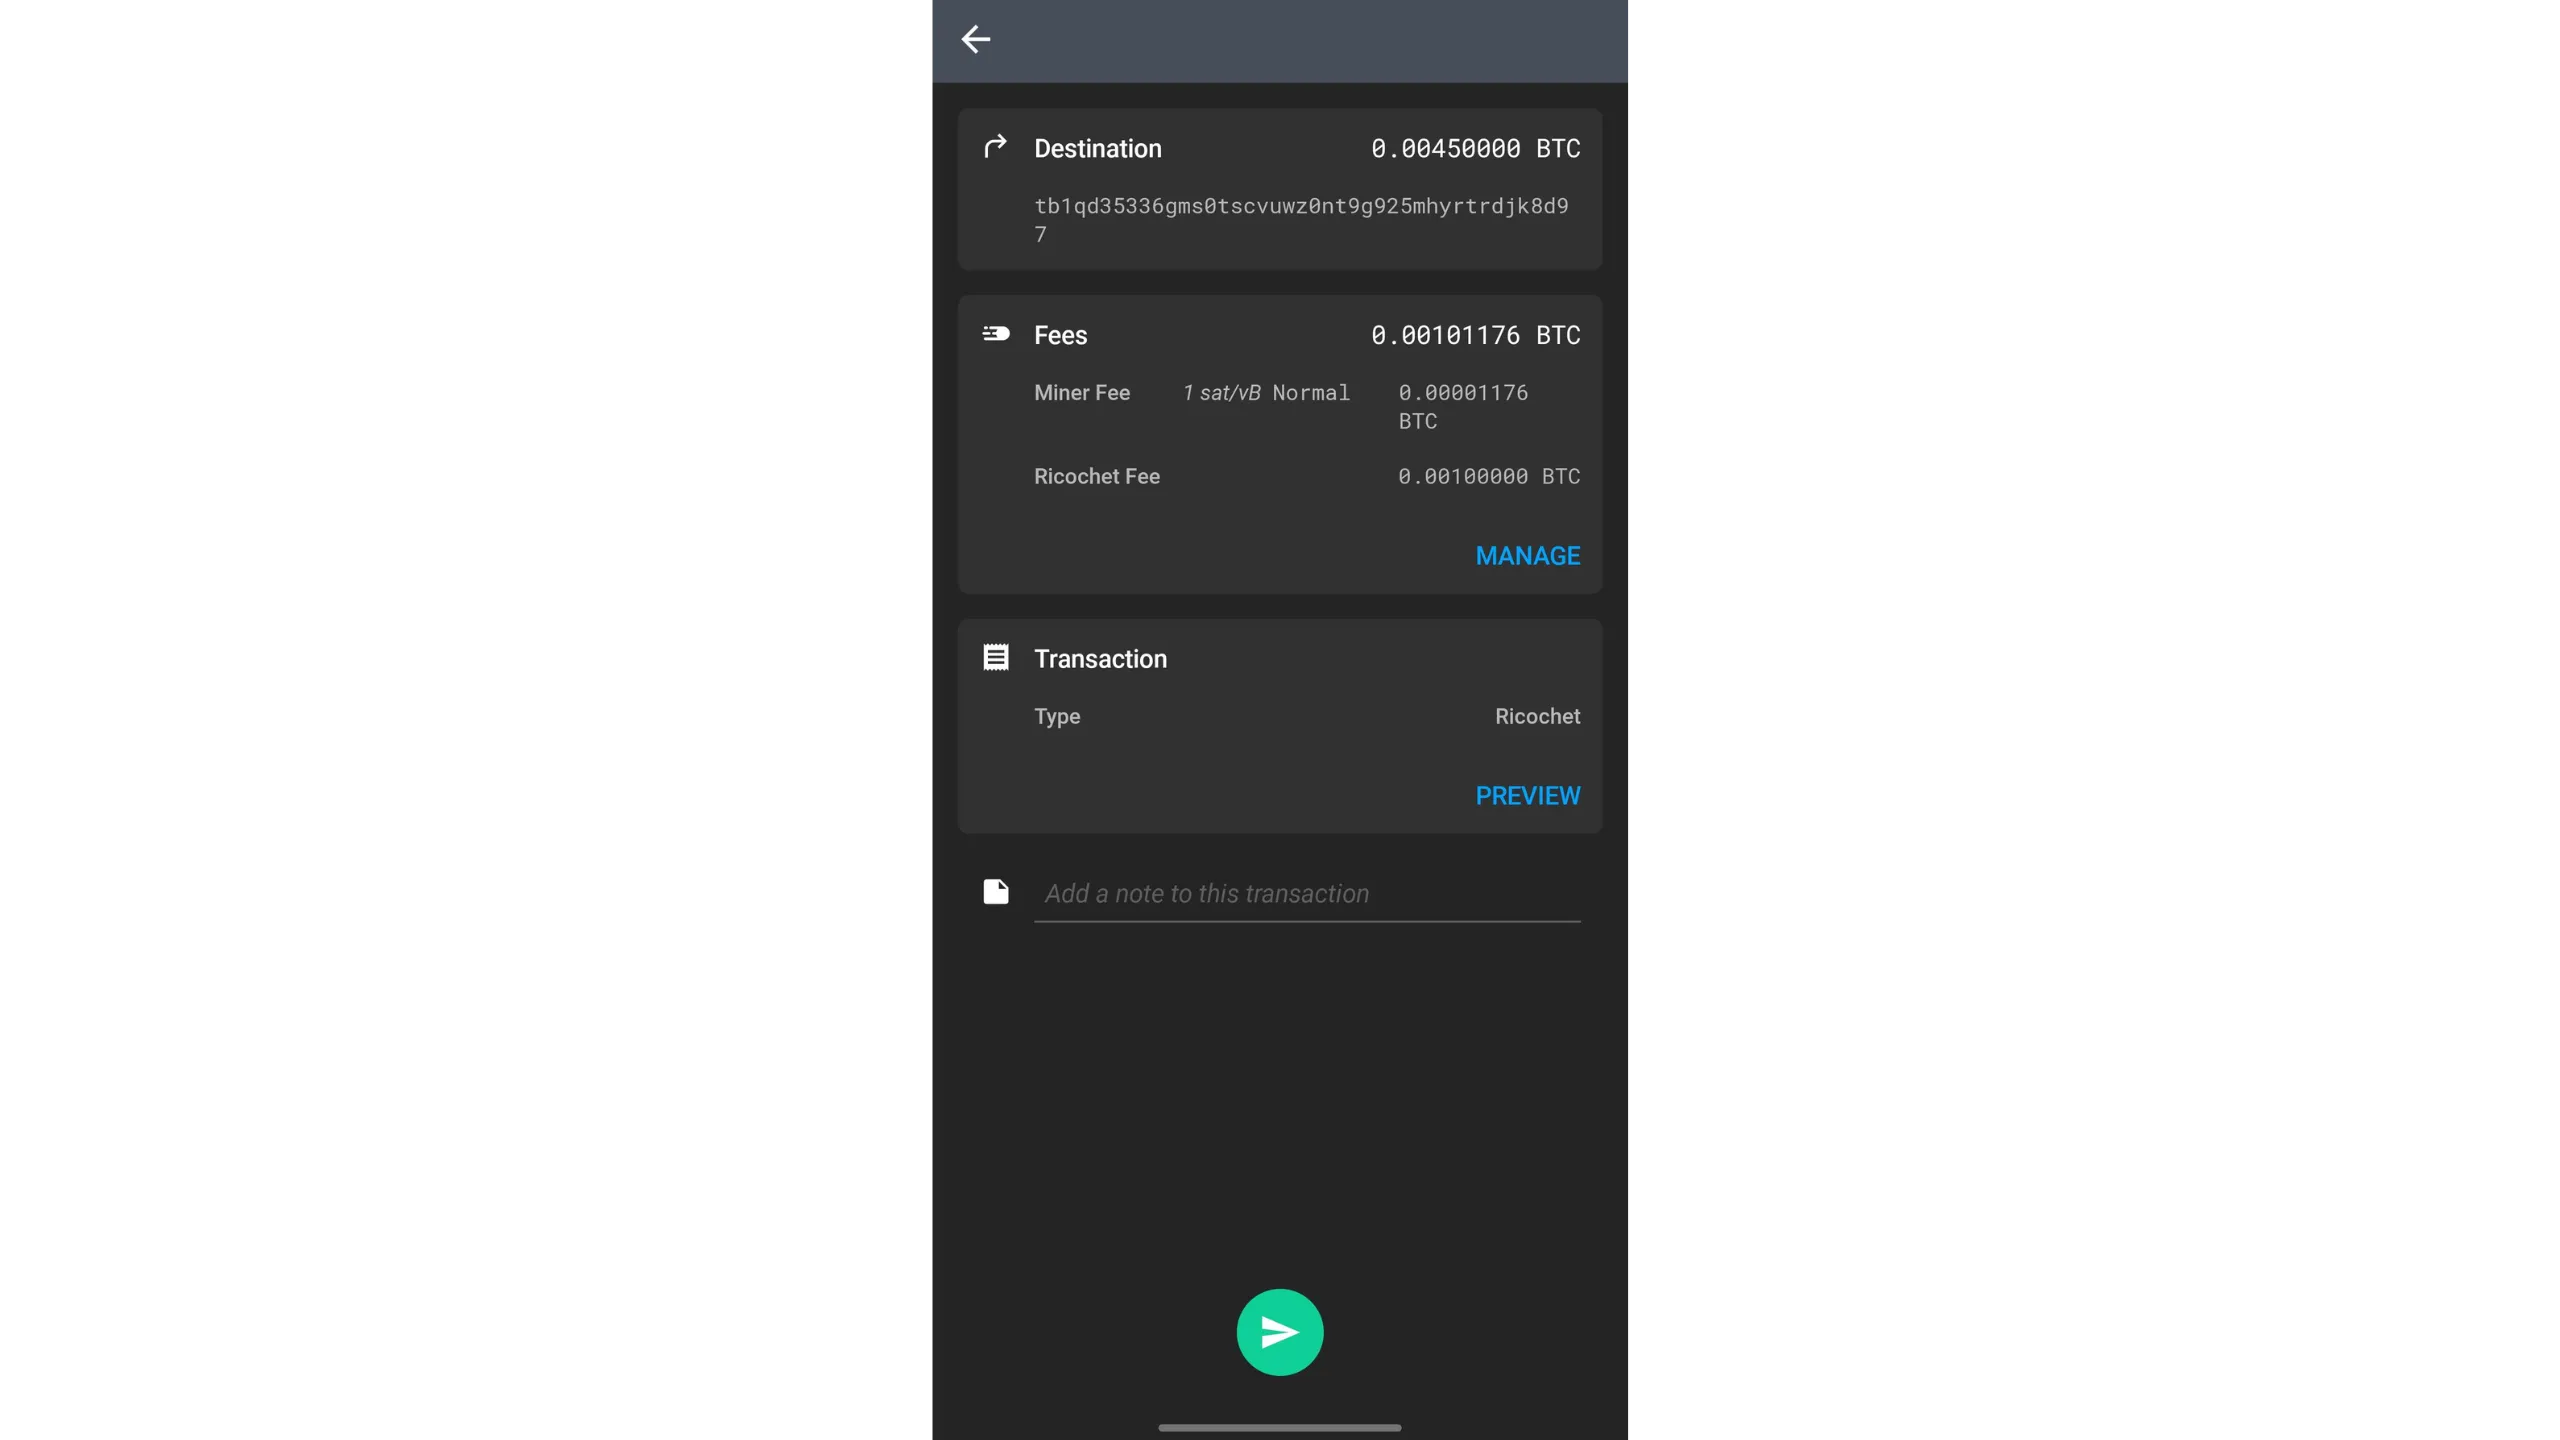
You’ll see a summary page with all transaction details:
- Destination: double‑check the recipient address and amount.
- Fees: review the fee rate automatically selected by Ashigaru; adjust via “MANAGE” if needed.
- Transaction: shows the transaction type (simple here); Ashigaru also supports other privacy‑optimized spending types covered later in this guide.
- Transaction Alert (red): flags patterns recognized by chain‑analysis heuristics that may degrade privacy. Tap to see details. For example, if your amount is a round number (e.g., “3000 sats”), it may reveal which output is the spend and which is the change.
- Label: you can add a label to remember the transaction’s purpose.
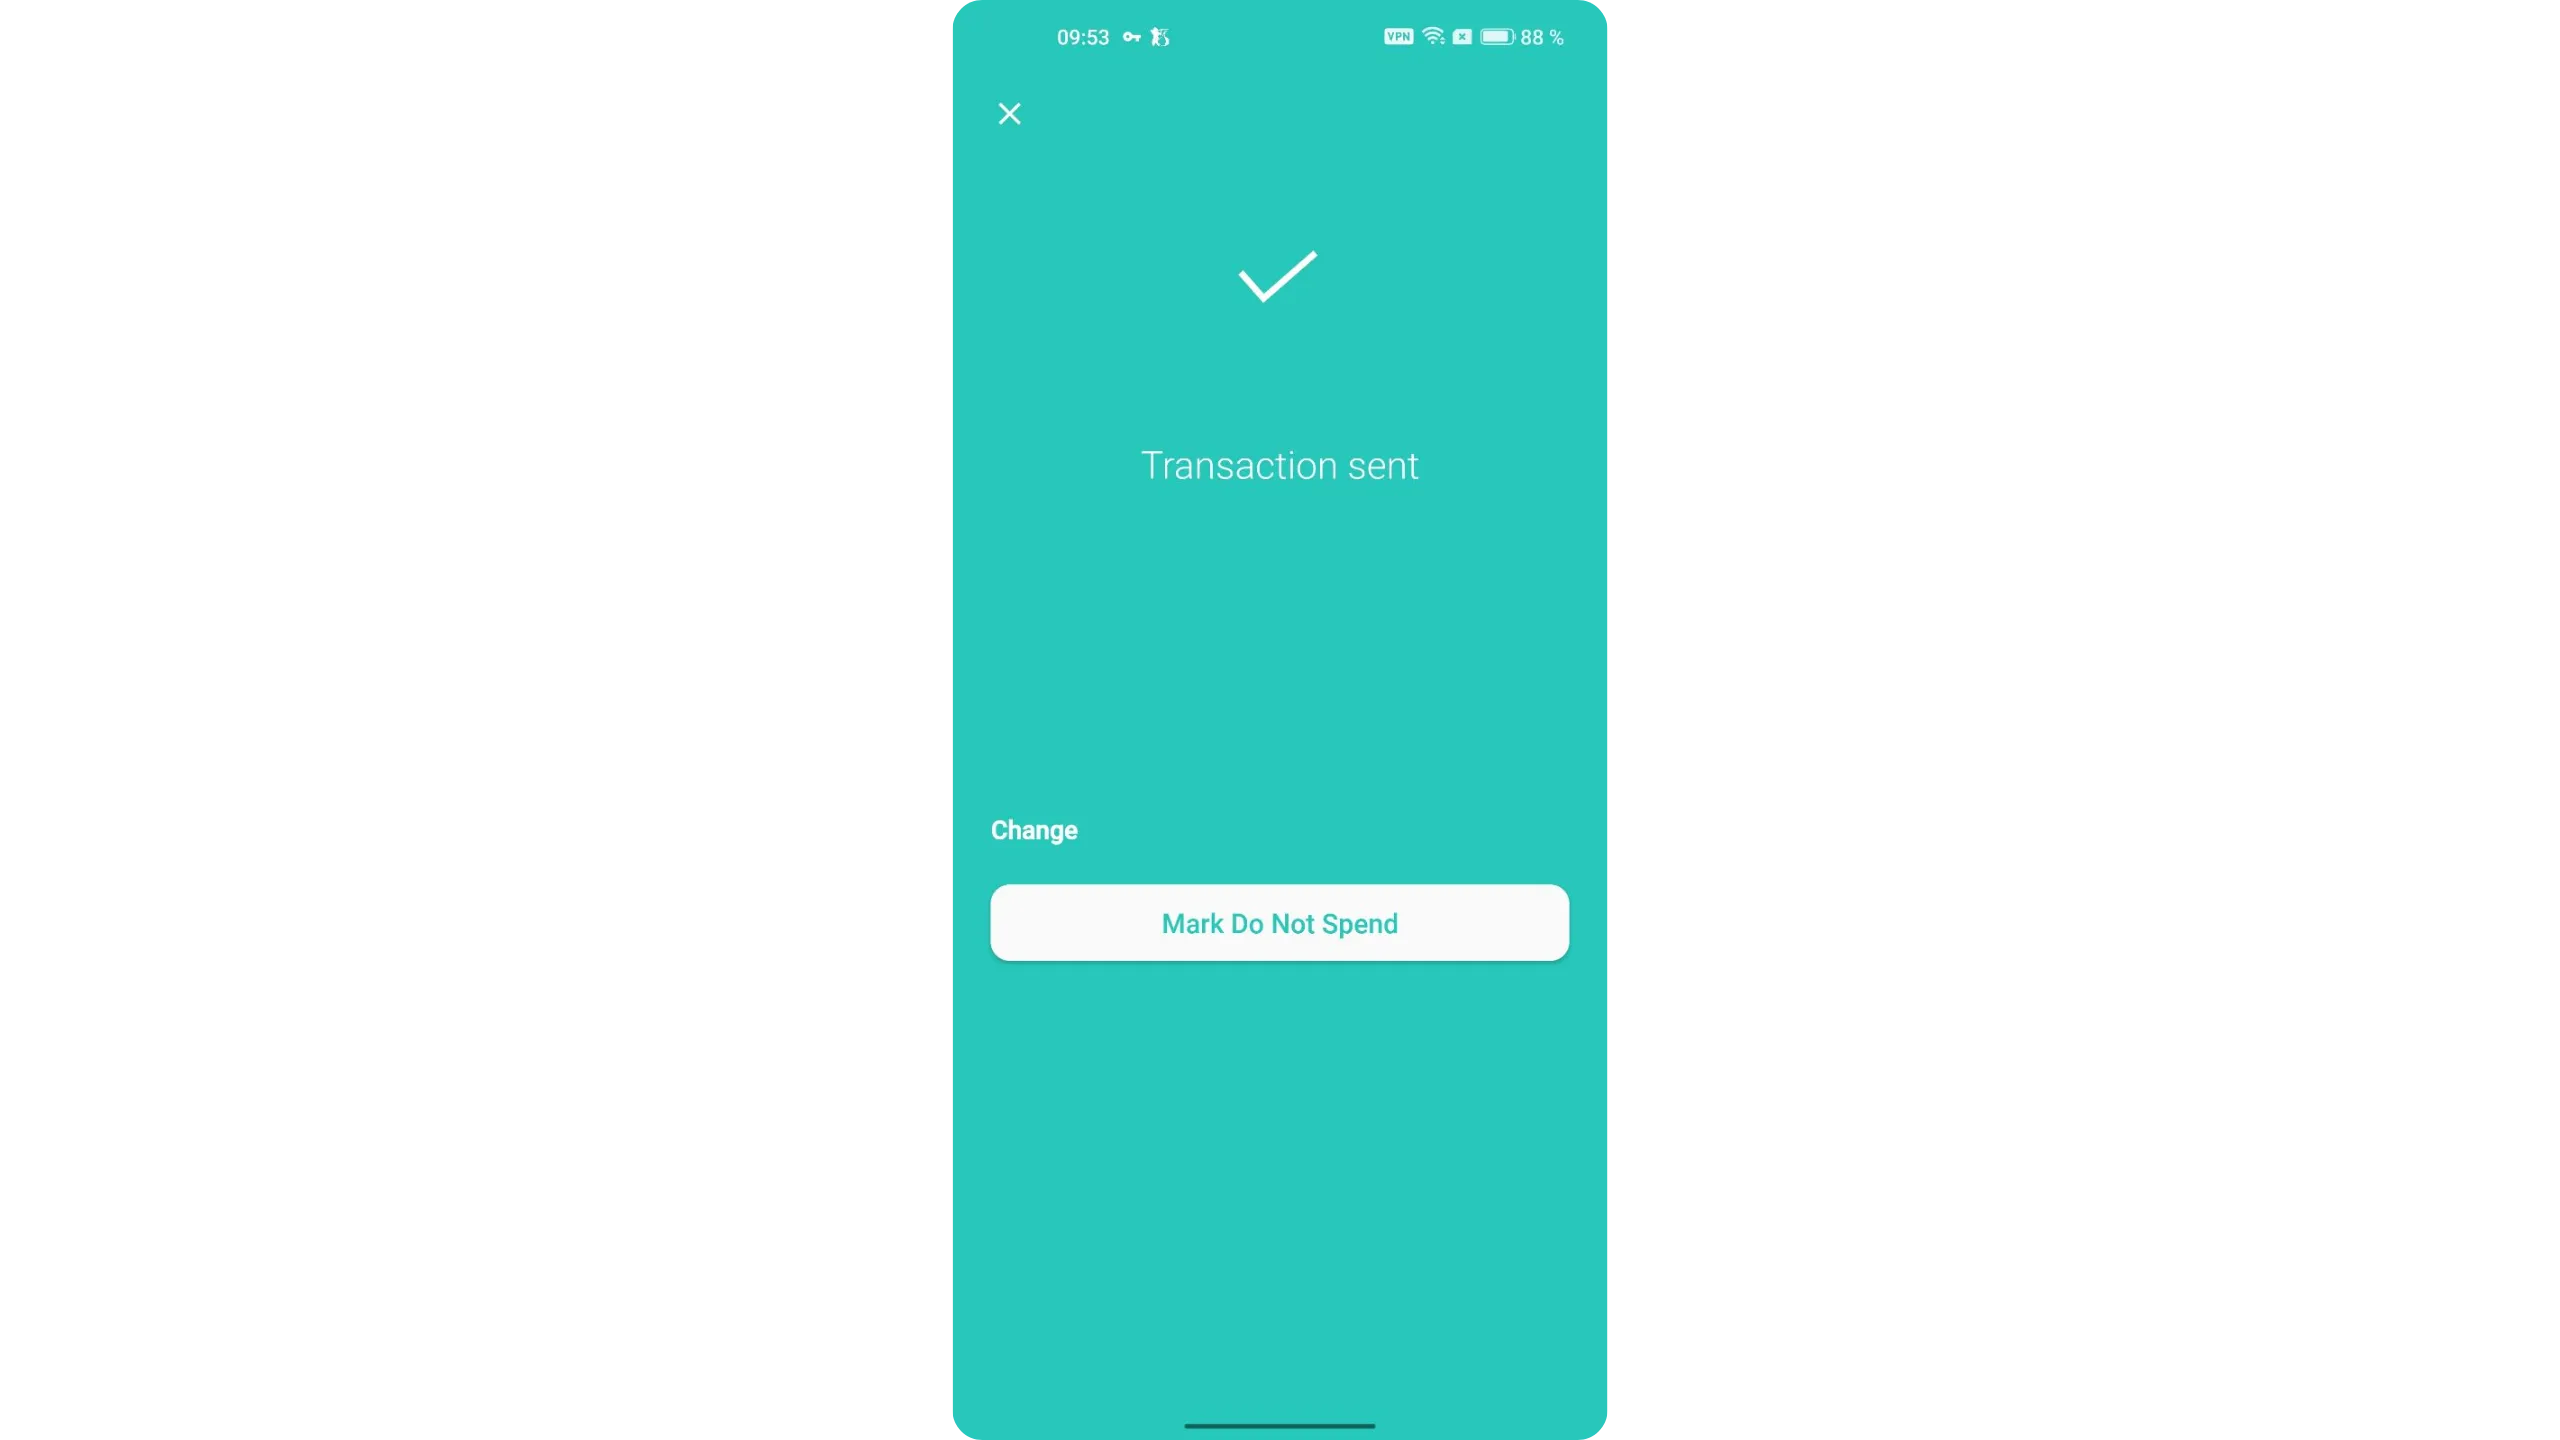
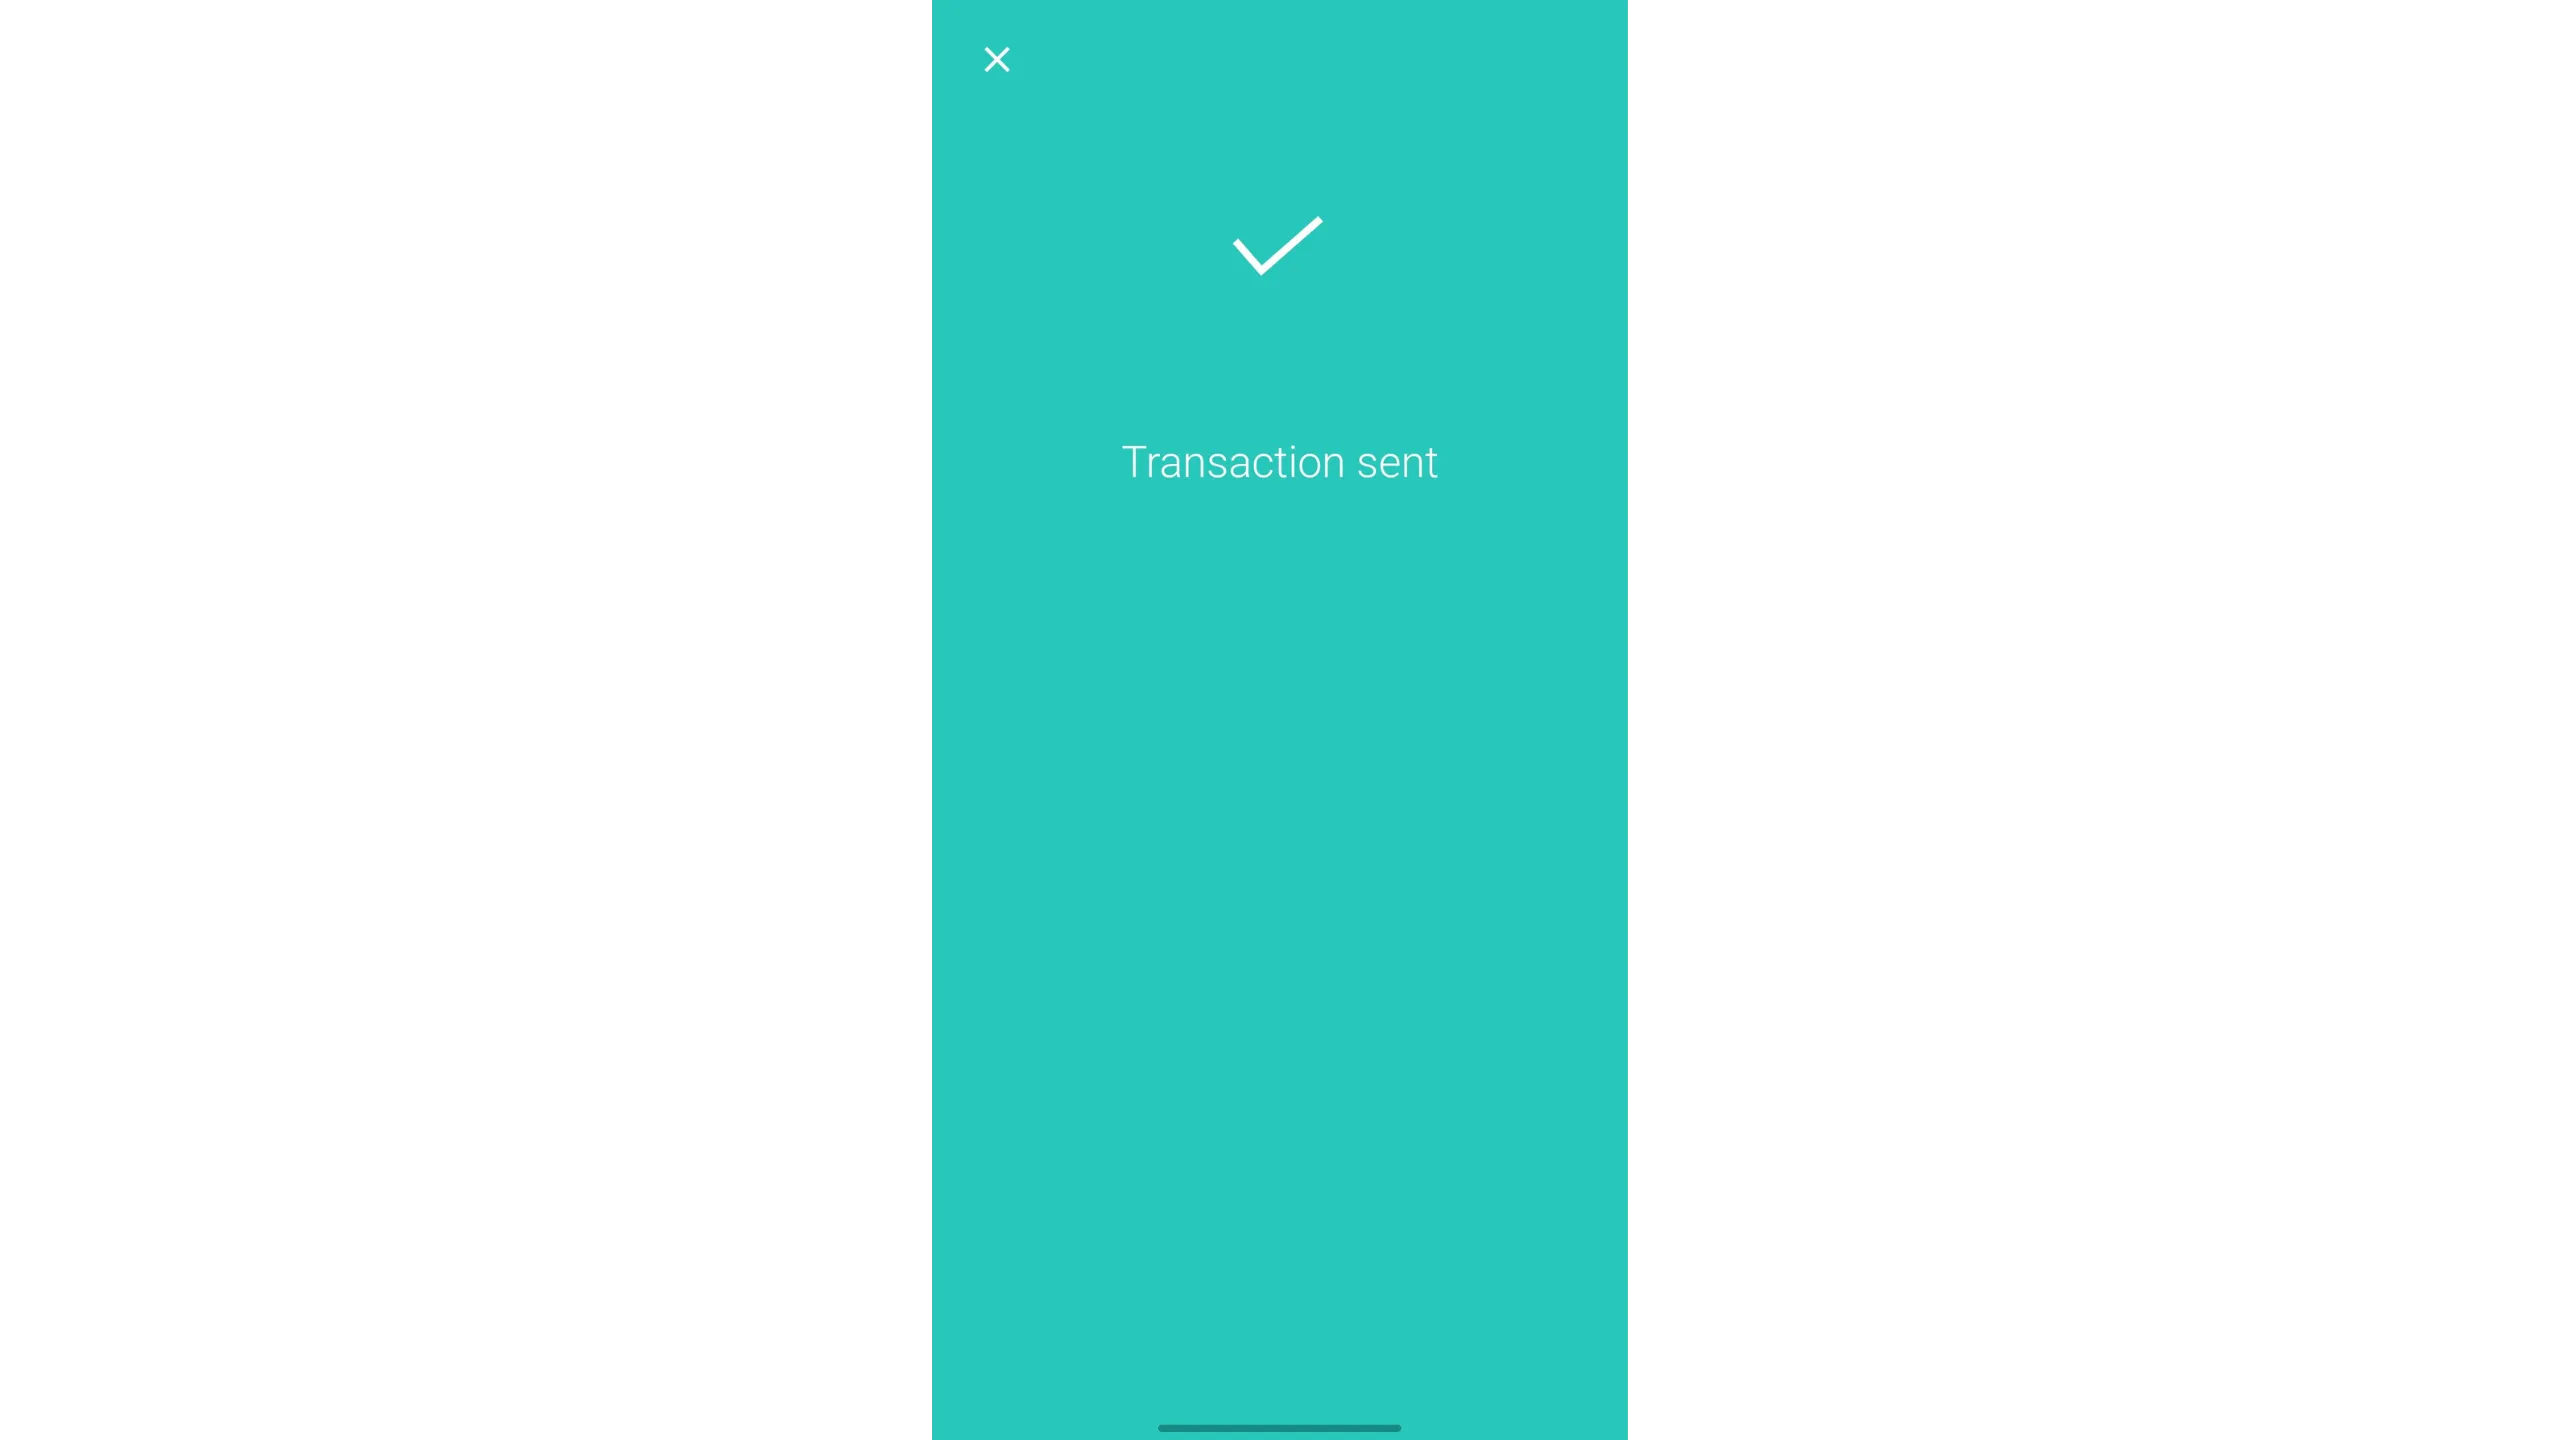
Once everything is correct, use the green arrow to send. Press and hold the arrow, then slide it to the right to confirm.
Your transaction is now broadcast on the Bitcoin network.
7. Recover your Ashigaru wallet
Ashigaru wallet recovery differs slightly from a standard Bitcoin wallet, as it inherits Samourai Wallet’s methods. If you lose access to your wallet (PIN forgotten, app uninstalled, or phone lost), you have several options to recover your funds.
If you still have access to your phone or you backed up the file, the simplest method is using the backup file “ashigaru.txt.” This file contains everything needed to restore your wallet on a new Ashigaru instance (or in Sparrow Wallet), but it is encrypted with the passphrase you set earlier. You must have both the “ashigaru.txt” file and your passphrase to use this method.
With these two items, you can, for example, restore your wallet in Sparrow Wallet.
If you don’t have the “ashigaru.txt” file, you can still access your funds using your mnemonic phrase and passphrase, like any other BIP39 wallet. It’s recommended to recover either in a new Ashigaru instance or directly in Sparrow Wallet, which simplifies retrieving Whirlpool derivation paths (if you used it). Otherwise, you can import into any BIP39‑compatible software by entering derivation paths manually.
As you’ve seen, regardless of the recovery method, the passphrase is indispensable. Make sure it is securely backed up. You can keep multiple copies depending on your security model.
The passphrase is critical for recovery. Without it, even a correct mnemonic won’t unlock your wallet.
8. Update the app
To update Ashigaru (since it was installed via .apk rather than the Play Store), you’ll need to download the new .apk for the updated version and install it manually.
Repeat the verification and installation steps described earlier. The only difference is that when you tap the .apk to start installation, your Android phone should offer “Update” and not “Install.”

This is very important: if Android shows “Install” instead of “Update,” you’re likely installing a fraudulent version. Stop immediately.
As with the initial install, carefully verify the .apk’s authenticity and integrity before proceeding.
To know when a new version is available, check the official Ashigaru site occasionally. Ashigaru is a stable, mature app inherited from Samourai Wallet, so updates are relatively less frequent than in newer projects.
Always verify signatures and hashes for each new .apk prior to updating.
9. Donate to the Ashigaru project
Ashigaru is open source. To support development, you can donate directly from the app via PayNym.
Tap your PayNym at the top‑right of the interface, then select your payment code starting with “PM…”.

Tap the “+” button at the bottom‑right.
Choose “Ashigaru Open Source Project” as the recipient.
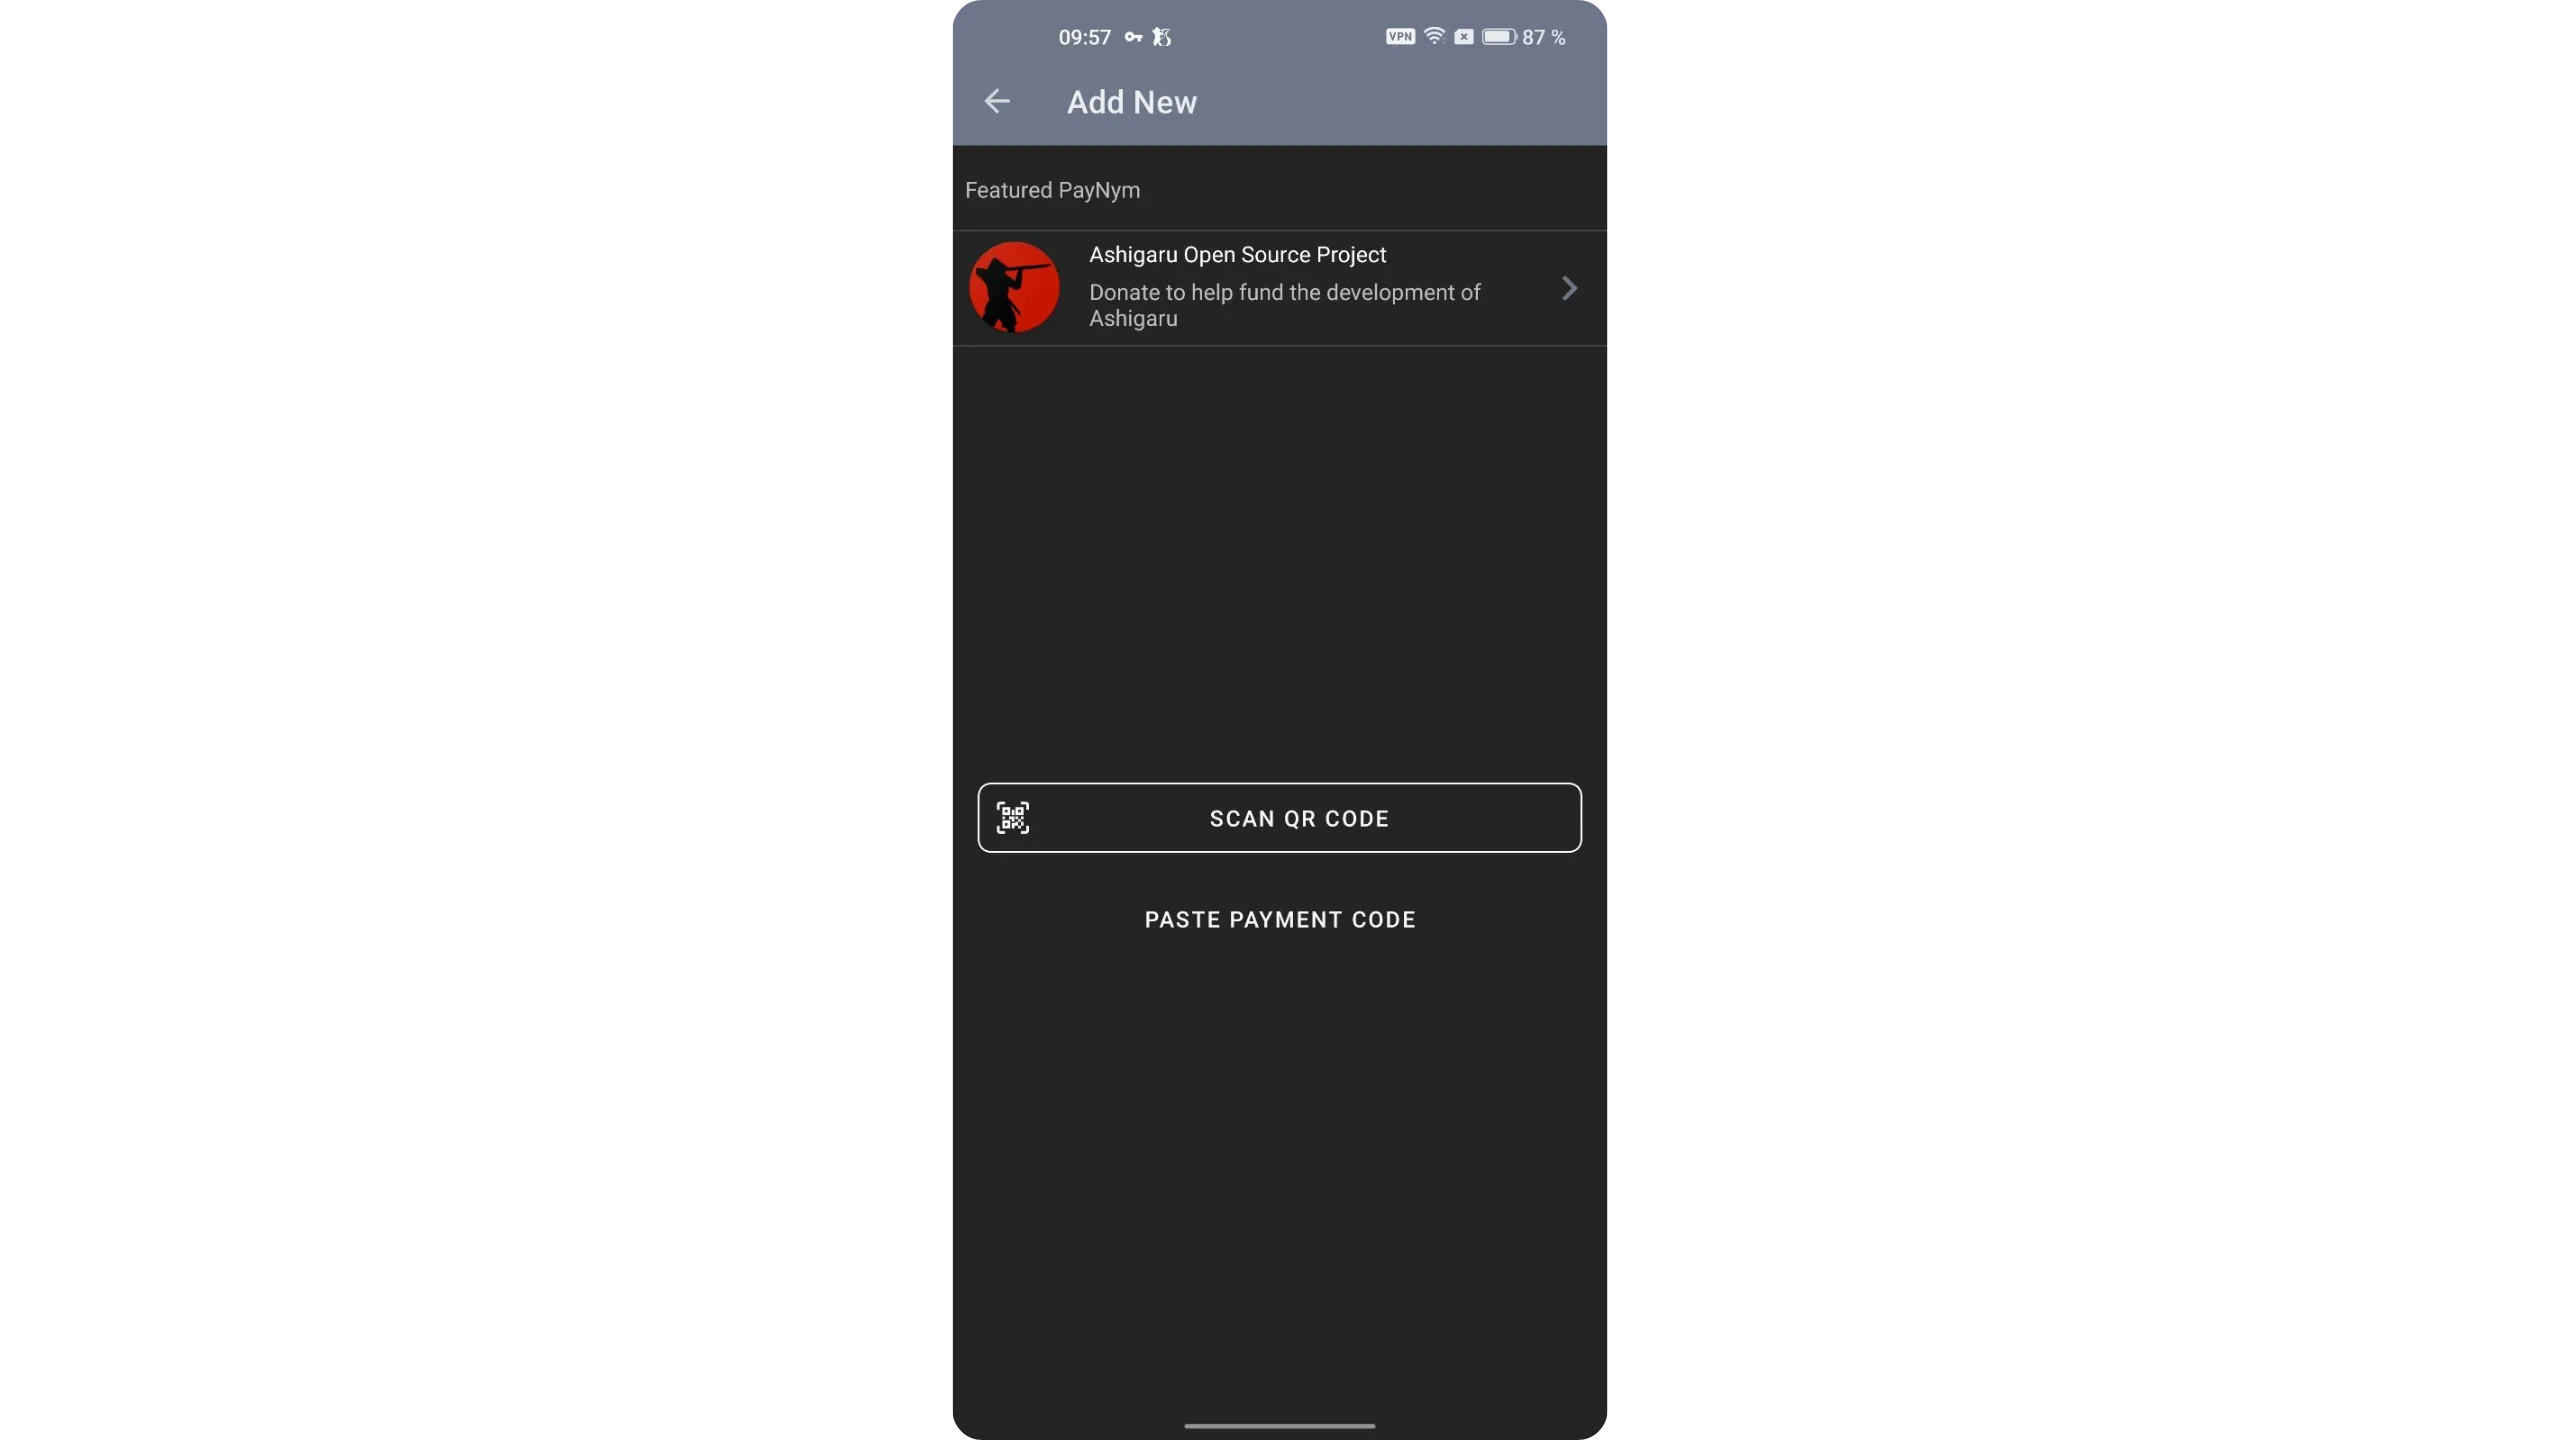
Tap “CONNECT” to establish the BIP47 (PayNym) communication channel.
Once the notification transaction confirms, you can send donations to the project by tapping the small white arrow at the top‑right of the interface.
10. Install and verify Ashigaru Terminal
Ashigaru Terminal is Ashigaru’s adaptation of Sparrow Server that implements the Whirlpool coinjoin protocol. It continues the work started by Samourai Wallet, especially around Whirlpool GUI, keeping the core principles of self‑custody and privacy preservation.
This software is a fork of Sparrow Server, modified and optimized for full integration with the Whirlpool ecosystem — the ZeroLink coinjoin protocol originally developed by the Samourai team.
Ashigaru Terminal runs in a minimalist TUI interface and can be deployed on a personal computer or a dedicated server. It lets you interact directly with Whirlpool to initiate Tx0 transactions, manage the Deposit, Premix, Postmix, and Badbank accounts, and perform automatic remixing to strengthen the privacy of your coins.
In short, Ashigaru Terminal is particularly useful if you want to perform coinjoins via Whirlpool.
Proper coinjoins improve privacy by breaking deterministic links between inputs and outputs.
To install Ashigaru Terminal, you’ll need Tor Browser because binaries are distributed only over the Tor network. If you haven’t already, install Tor Browser on your machine.
10.1. Download Ashigaru Terminal
From Tor Browser, go to the releases page of the Git repository and download the latest version for your operating system:
Onion link - http://ashicodepbnpvslzsl2bz7l2pwrjvajgumgac423pp3y2deprbnzz7id.onion/Ashigaru/Ashigaru-Terminal/releases/
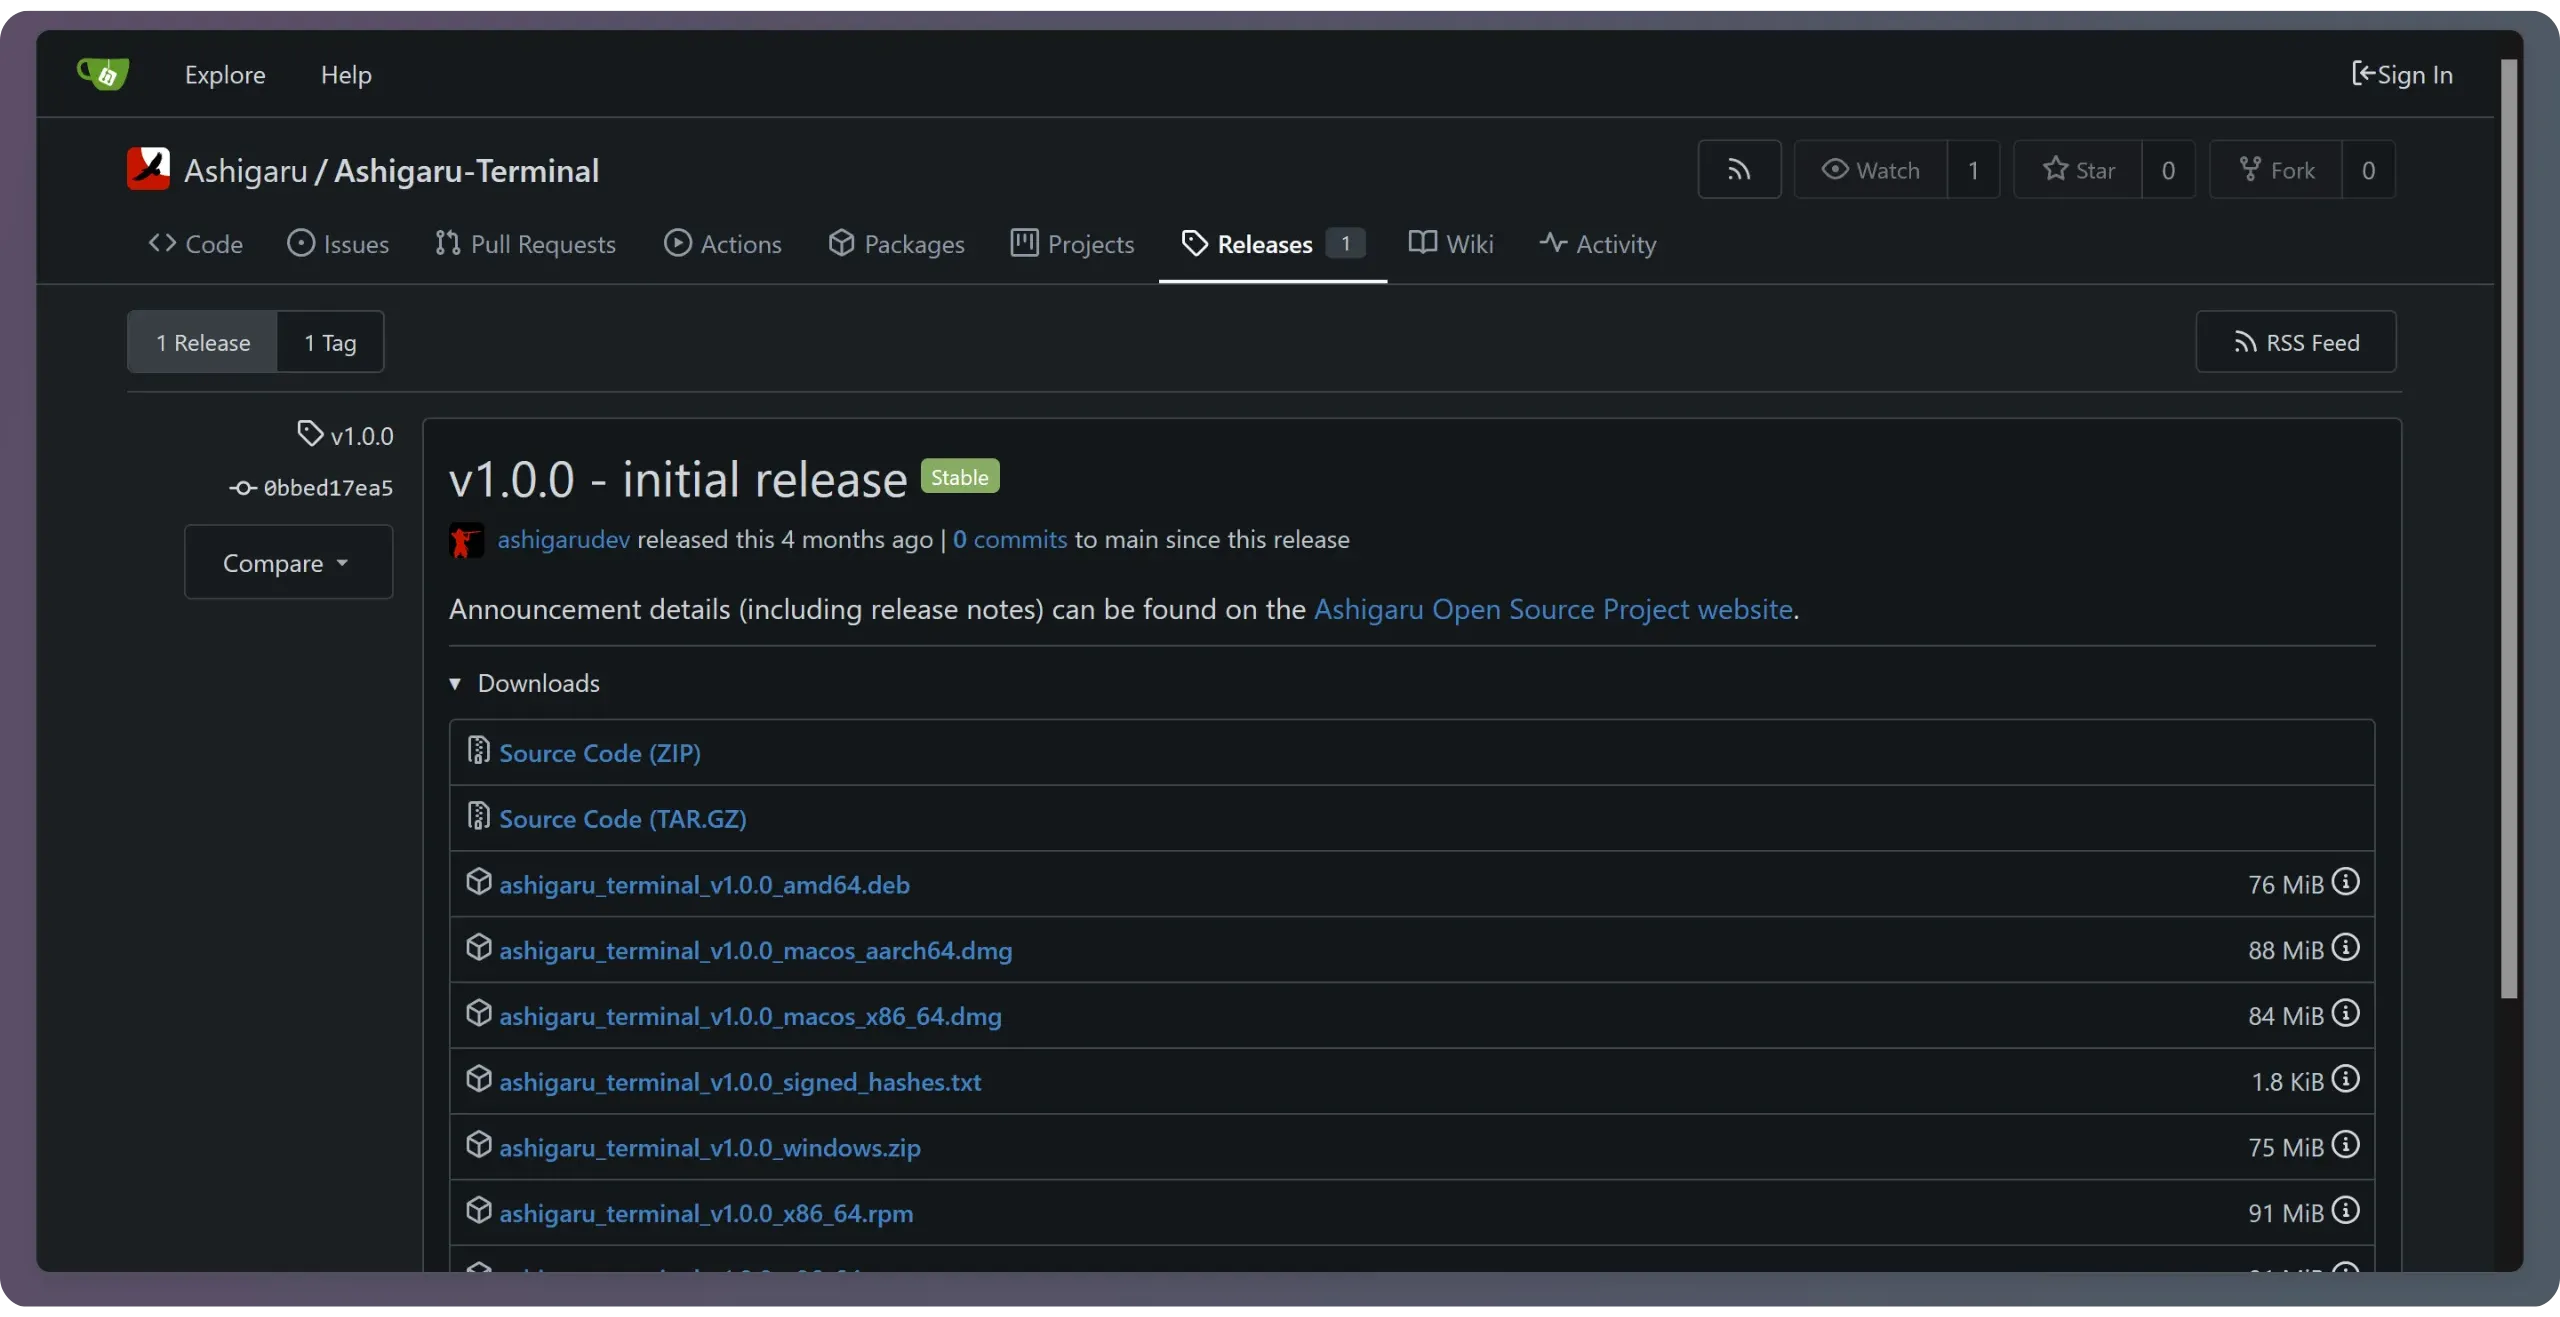
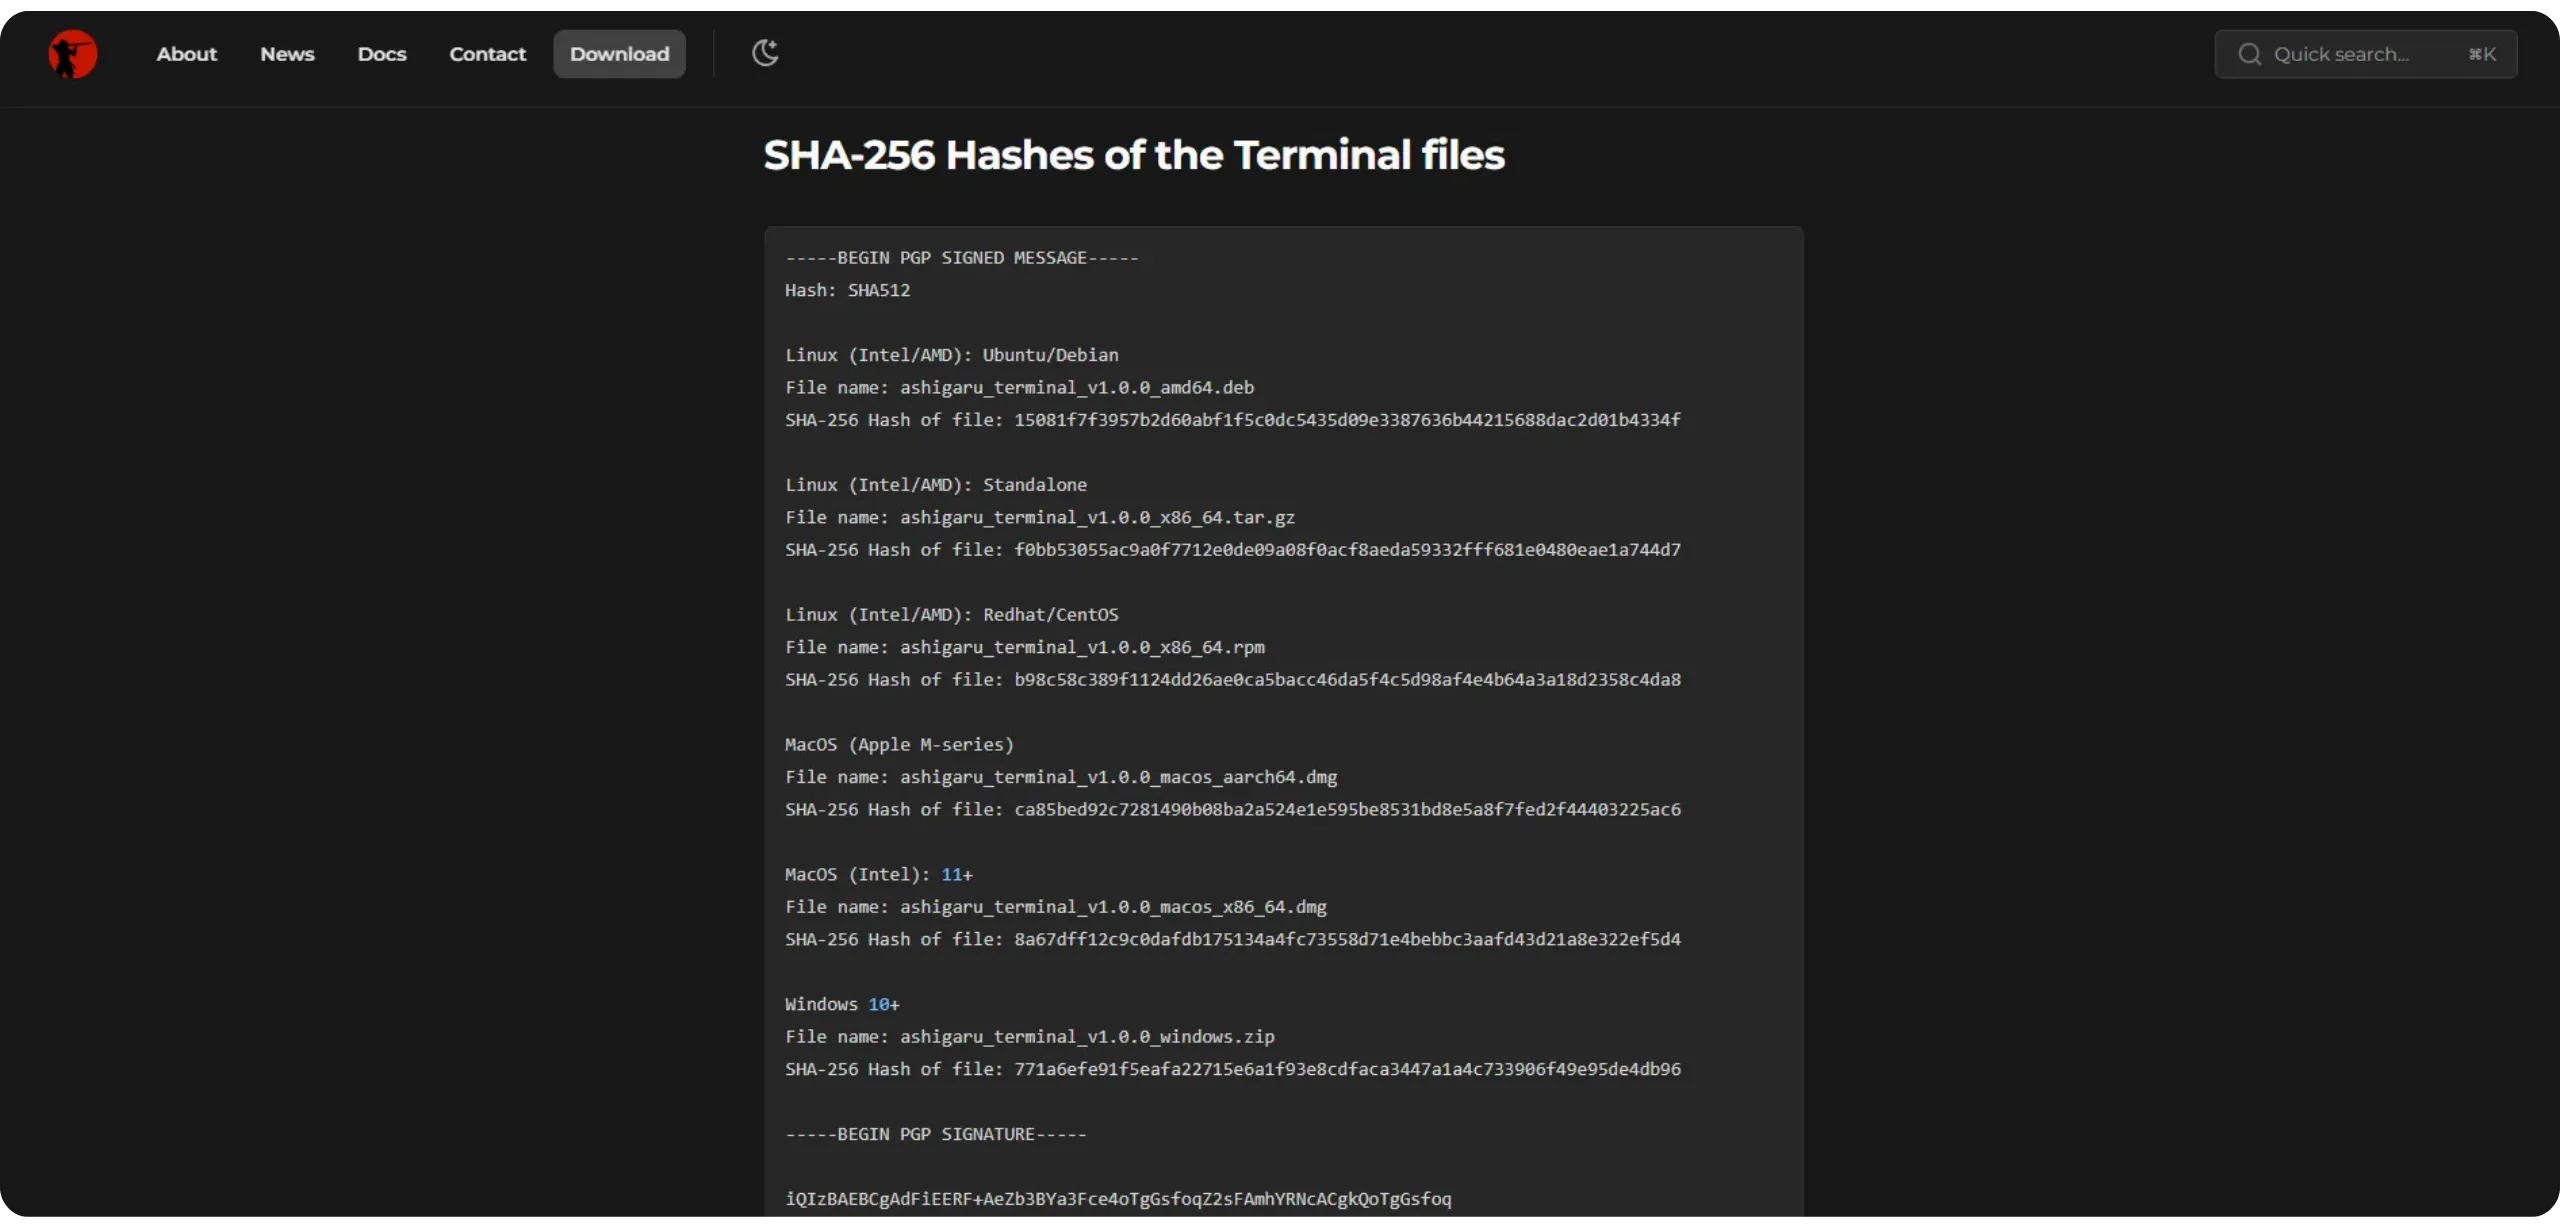
Download the two files that match your operating system:
- The binary (for example:
ashigaru_terminal_v1.0.0_amd64.debfor Debian/Ubuntu,.dmgfor macOS, or.zipfor Windows) - The signed hashes file:
ashigaru_terminal_v1.0.0_signed_hashes.txt
Always download both the binary and the signed hashes file — you’ll need the latter to verify authenticity and integrity before running anything.
10.2. Verify Ashigaru Terminal
Before running the software, verify its authenticity and integrity. This step helps you avoid installing a tampered version that could compromise your bitcoin or infect your machine.
Open a new tab and go to the Keybase verification tool. Paste the content of the .txt signed hashes file into the field, then click “Verify.”
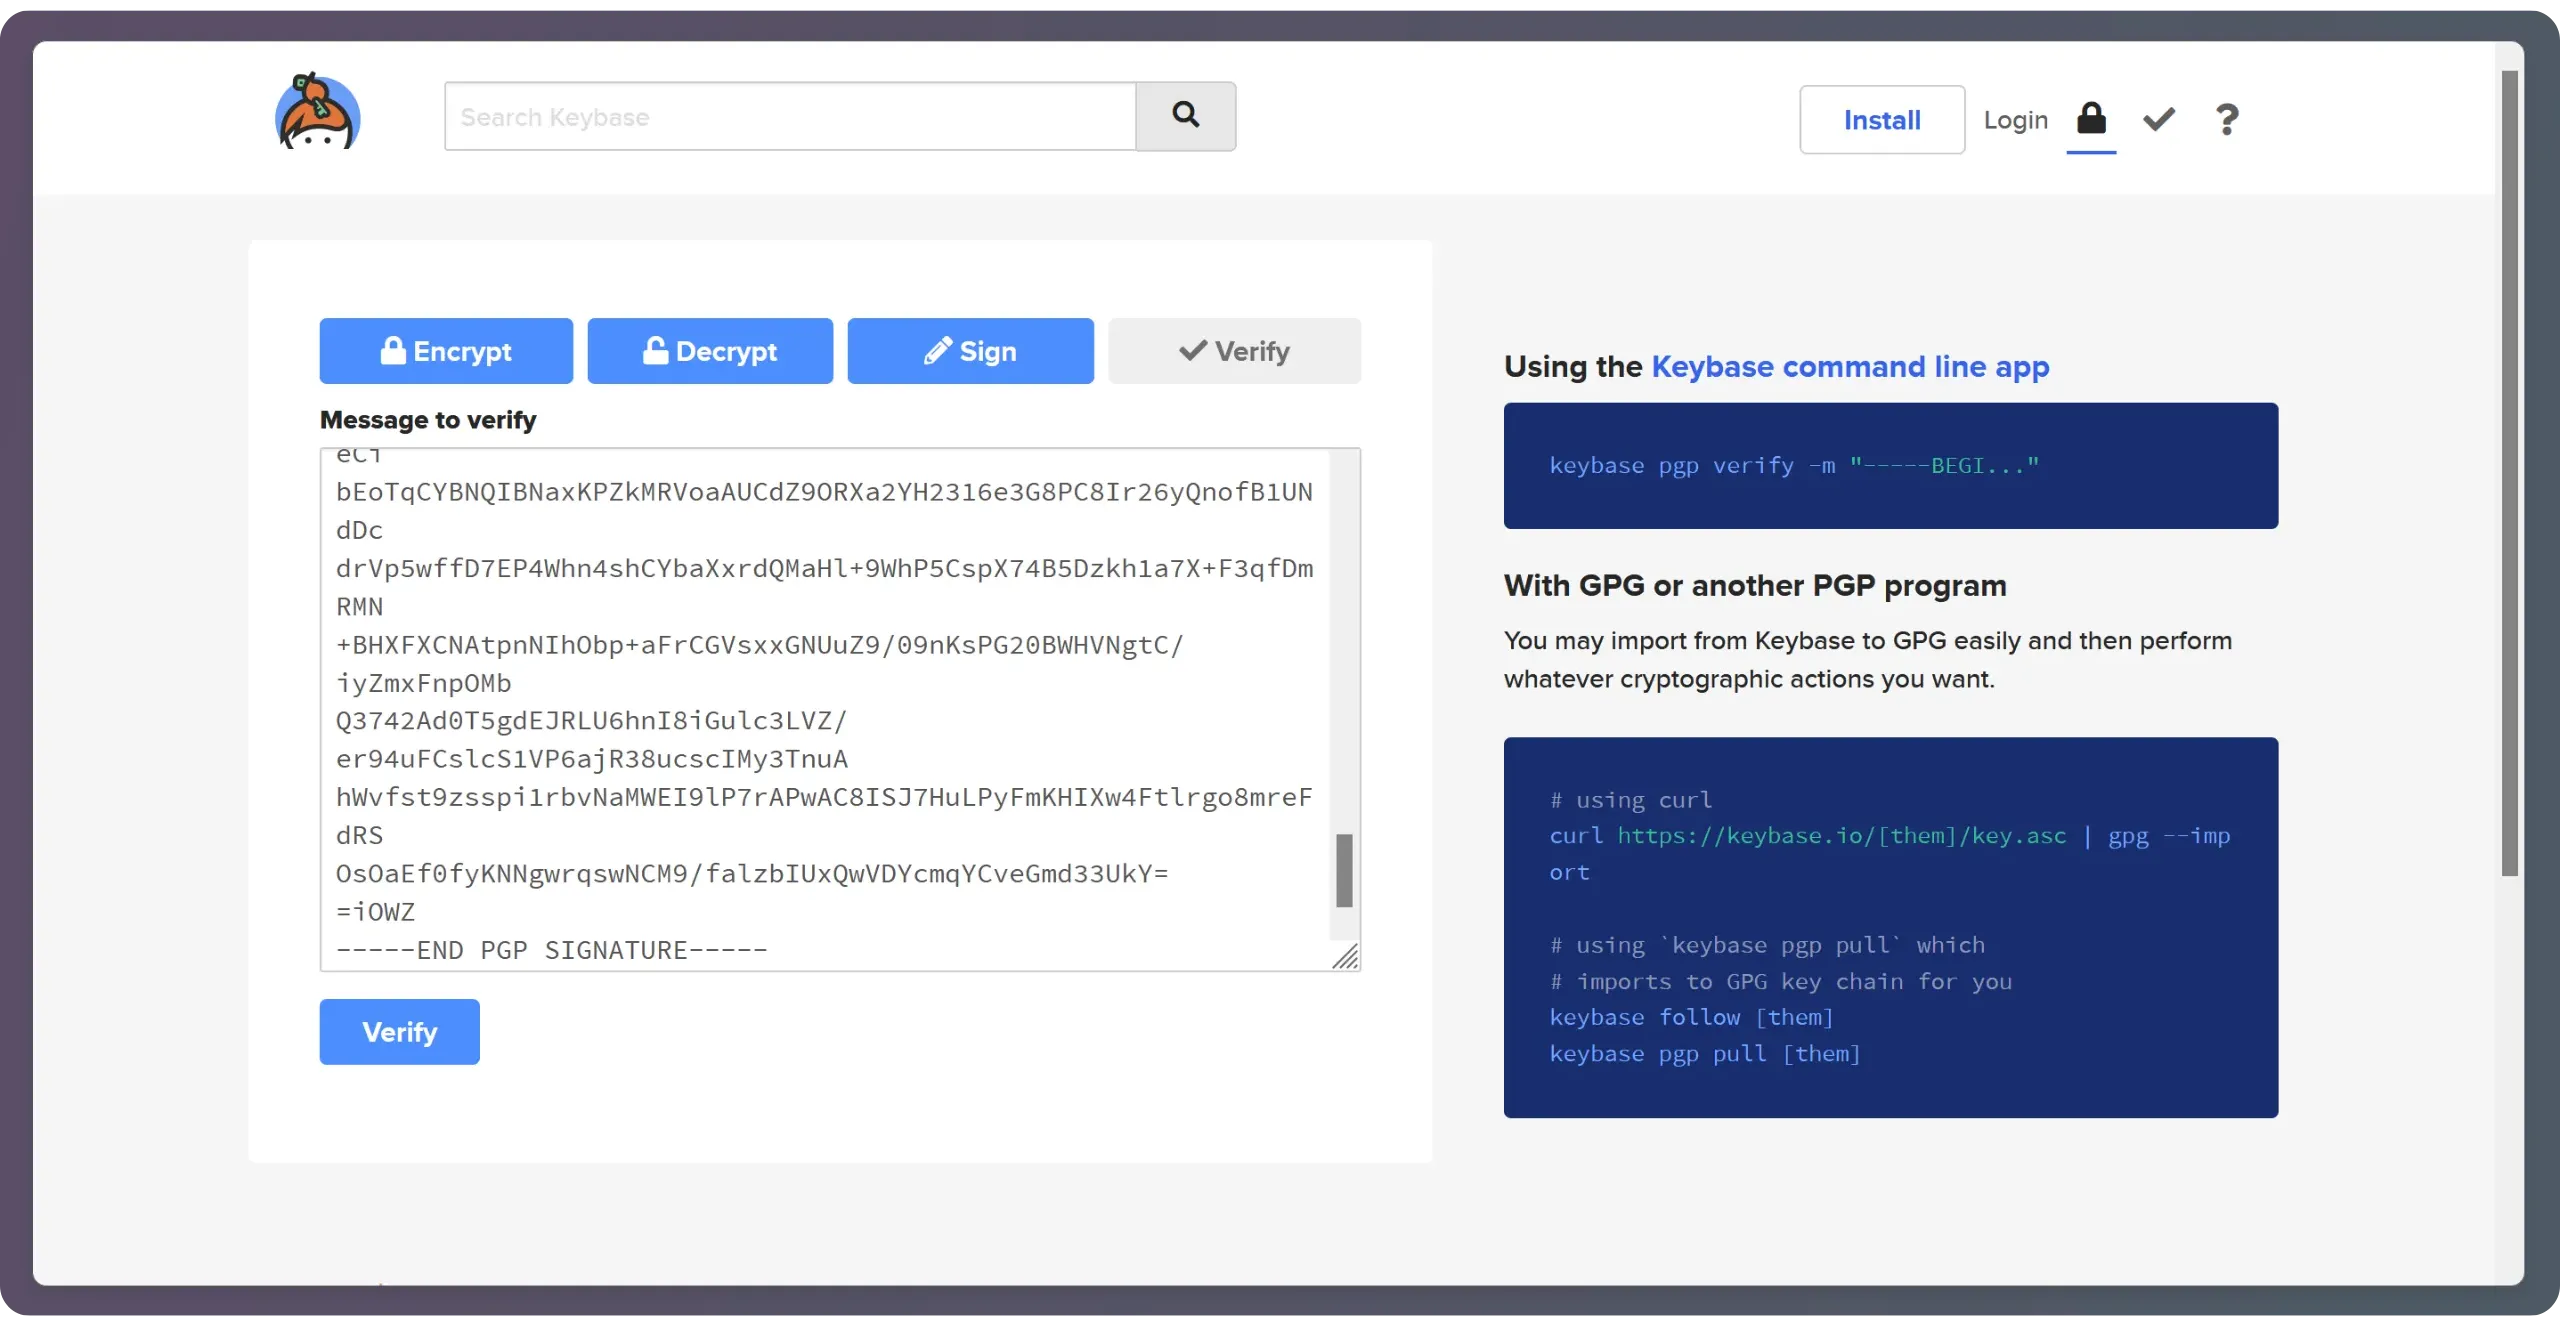
To diversify verification sources, you can also compare the message with what’s on the clearnet site ashigaru.rs under the /download section.
If the signature is valid, Keybase will confirm the file was signed by the Ashigaru developers.
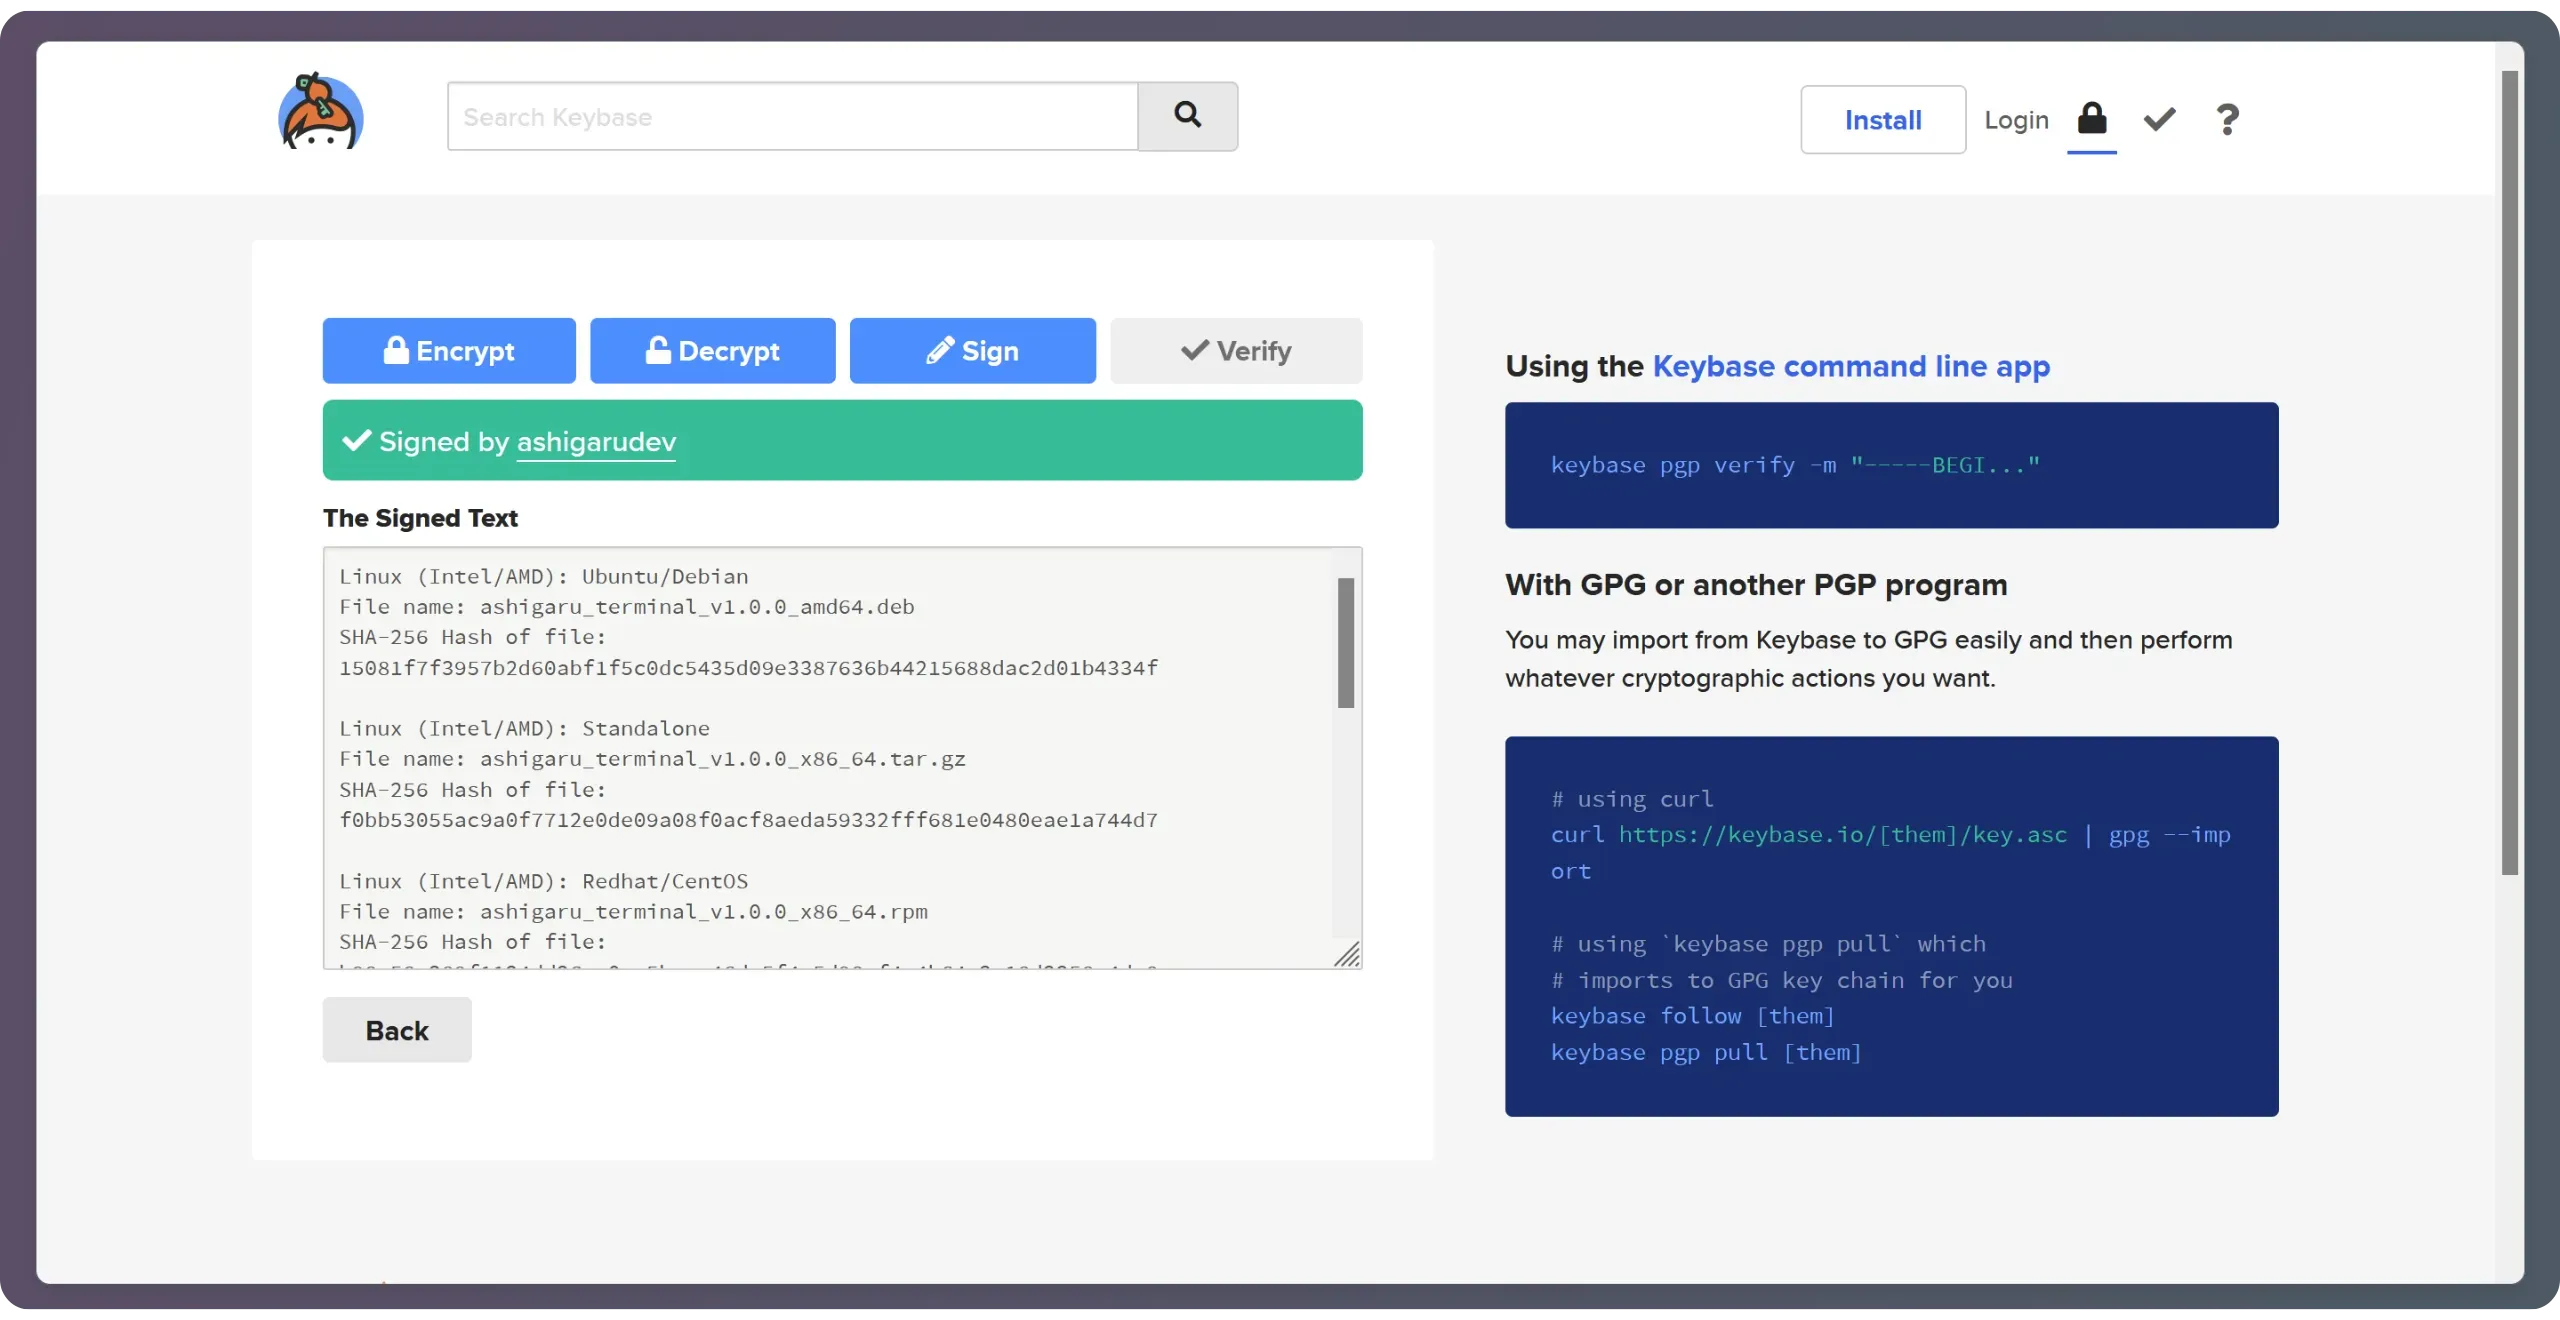
You can also click the “ashigarudev” profile shown by Keybase and ensure the key fingerprint matches exactly: A138 06B1 FA2A 676B.
If the Keybase verification fails, do not install the software. Start the process over or ask the community for help before proceeding.
Keybase gives you the authenticated hash for the app. Now verify the hash of the .deb, .zip, or .dmg you downloaded matches the Keybase-verified value. Use HASH FILE ONLINE.
- Click “BROWSE…” and select the
.deb,.zip, or.dmgyou downloaded - Choose SHA‑256 as the hashing function
- Click “CALCULATE HASH” to generate your file’s hash
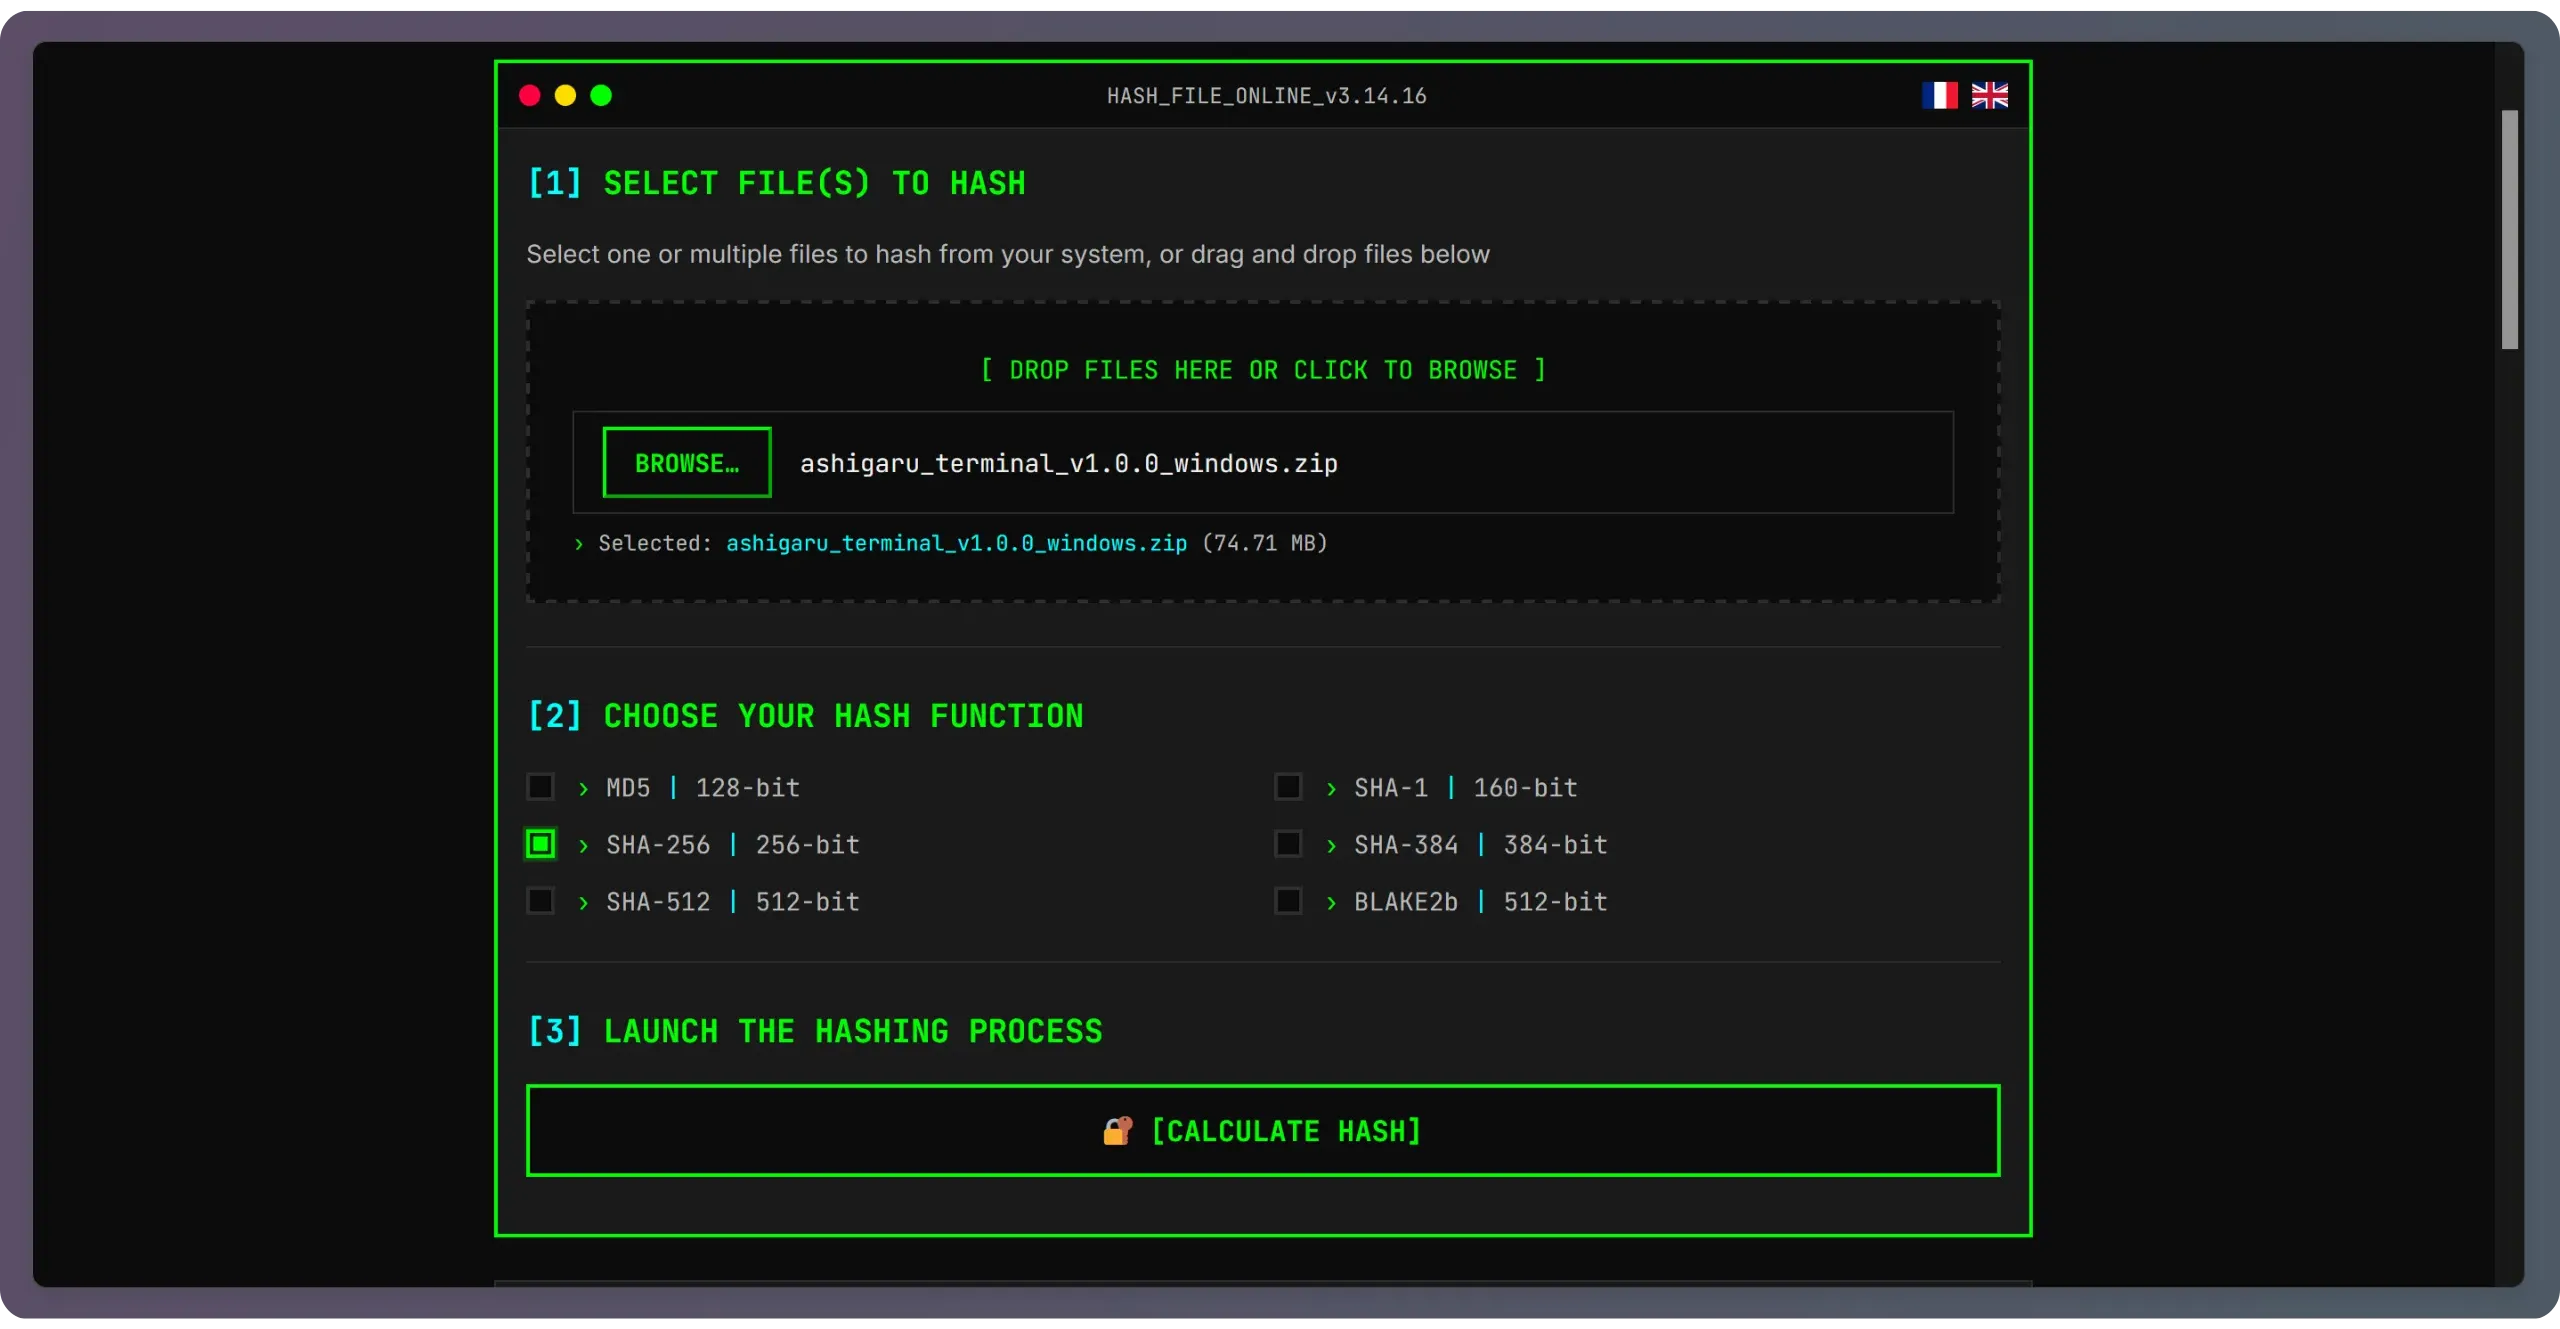
The site will display the software hash. Compare it to the one verified on Keybase. If both match perfectly, authenticity and integrity checks have succeeded. You can now install/run the software.

Never proceed if the signature or hash comparison fails — investigate the mismatch first.
10.3. Launch Ashigaru Terminal
- Debian / Ubuntu
To install:
1
2
cd ~/Downloads
sudo apt install ./ashigaru_terminal_v1.0.0_amd64.deb
Adjust the filename to match the version you downloaded.
Then verify the installation:
1
/opt/ashigaru-terminal/bin/Ashigaru-terminal --version
Prints the installed version to confirm the binary is available.
Launch the software:
1
/opt/ashigaru-terminal/bin/Ashigaru-terminal
Starts the TUI app in your terminal.
- Windows
Right‑click the .zip file you downloaded and verified, then select “Extract All…” to unpack it.
Once extraction is complete, double‑click Ashigaru-terminal.exe to launch the app.

On macOS, open the downloaded
.dmgand follow the standard app installation process. Gatekeeper may require you to allow running apps from this developer.
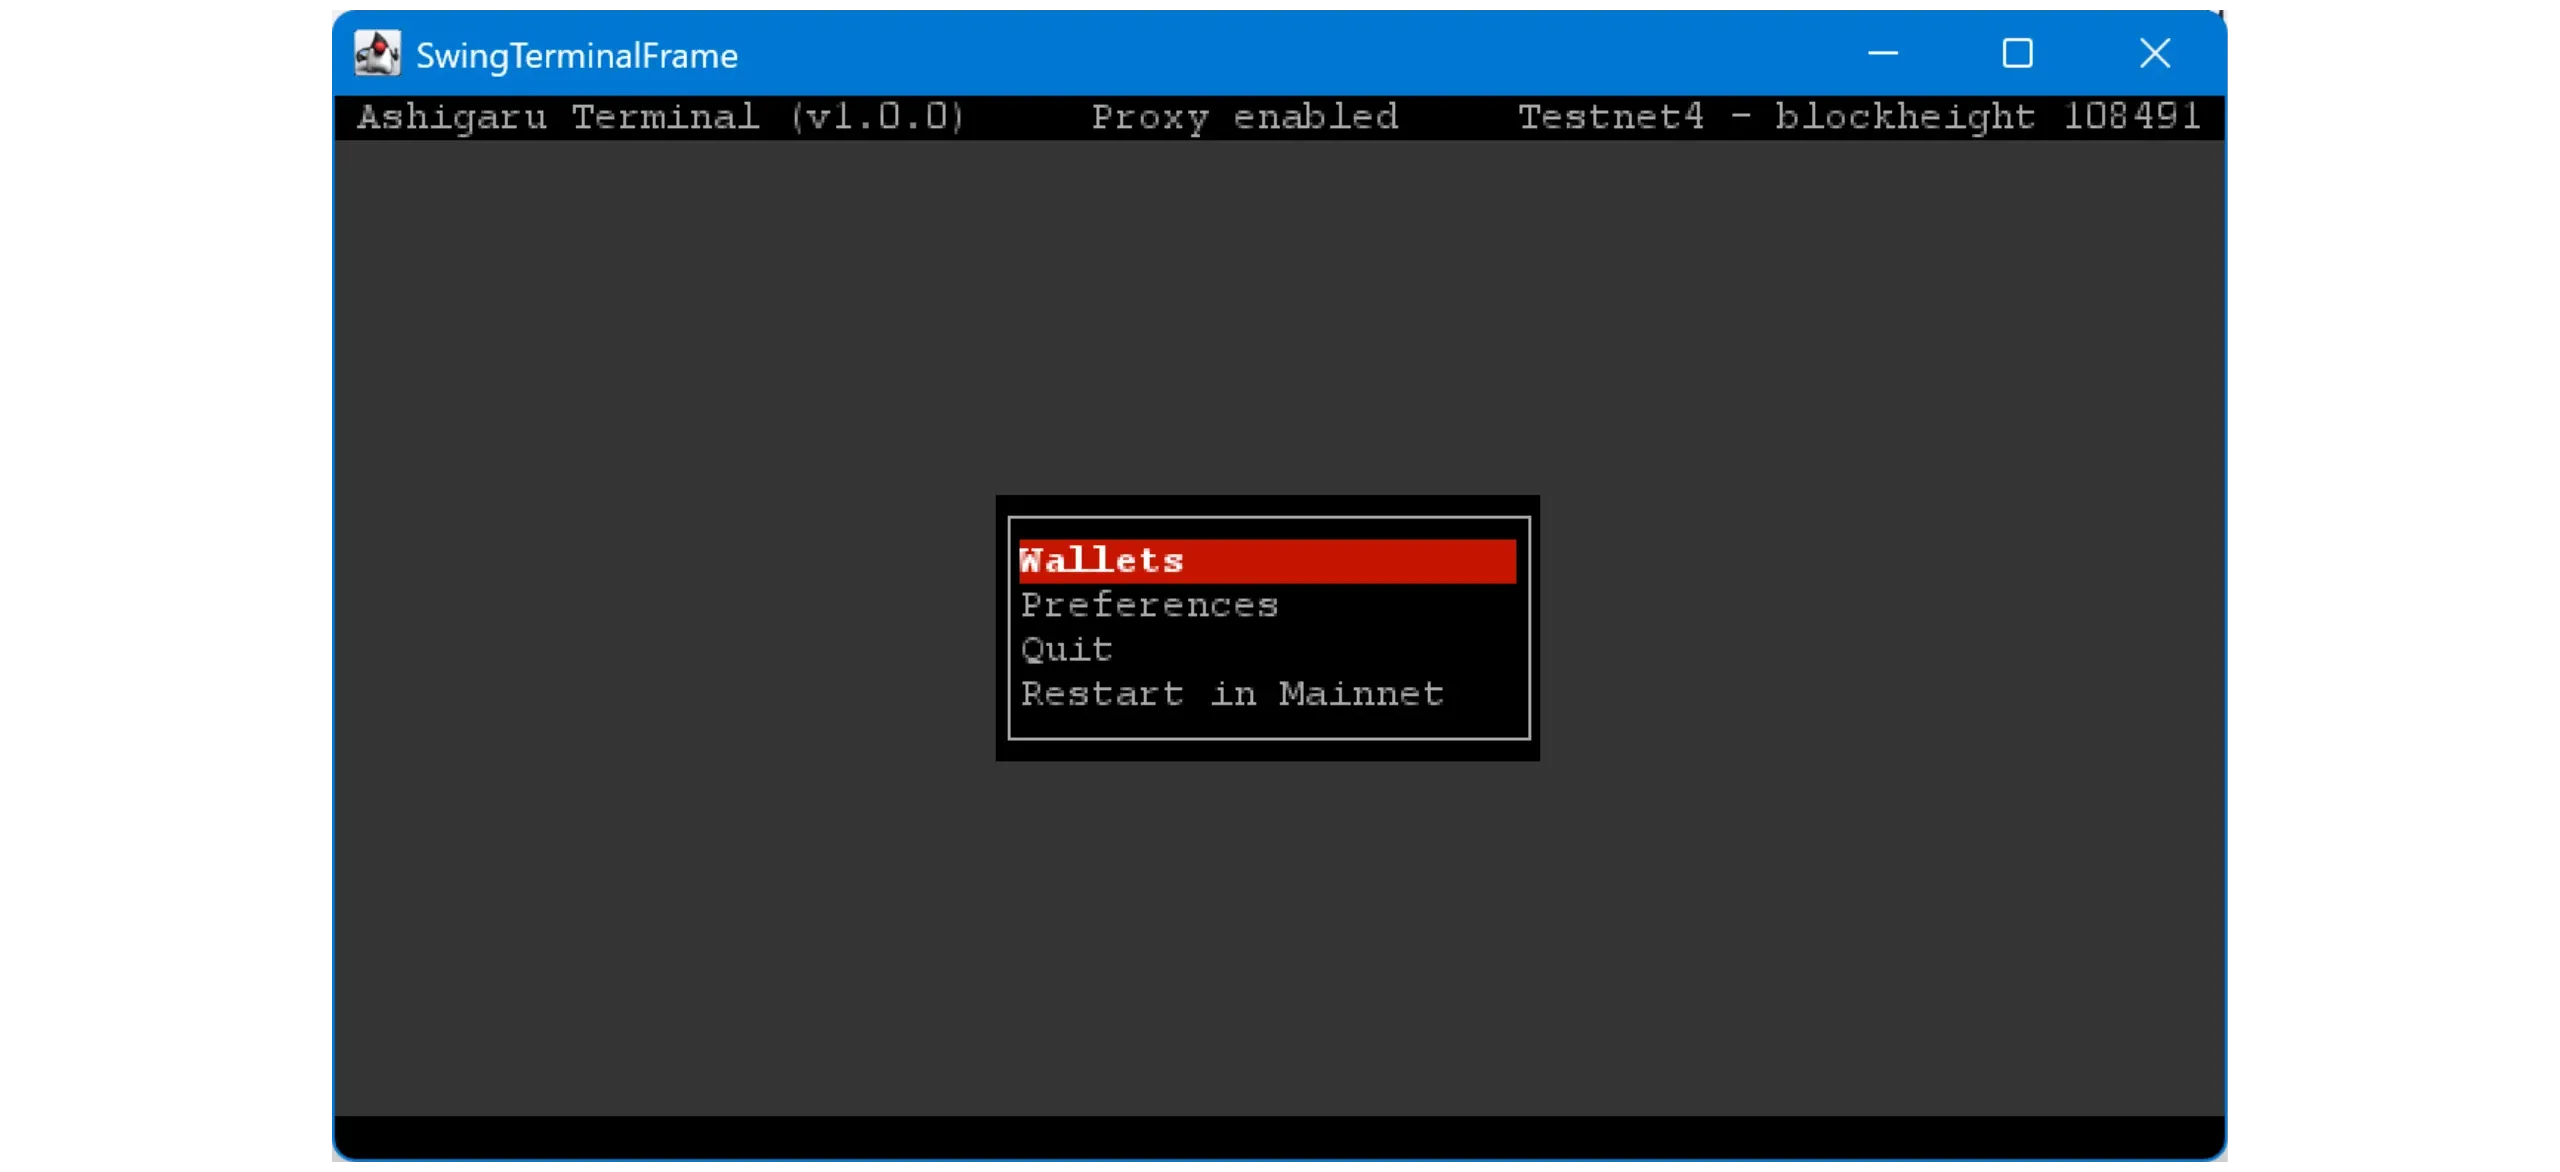
11. Get familiar with Ashigaru Terminal
Ashigaru Terminal uses a TUI (Text‑based User Interface), meaning a minimalist interface that runs directly in the terminal. You interact using menus and keyboard shortcuts without a traditional GUI.
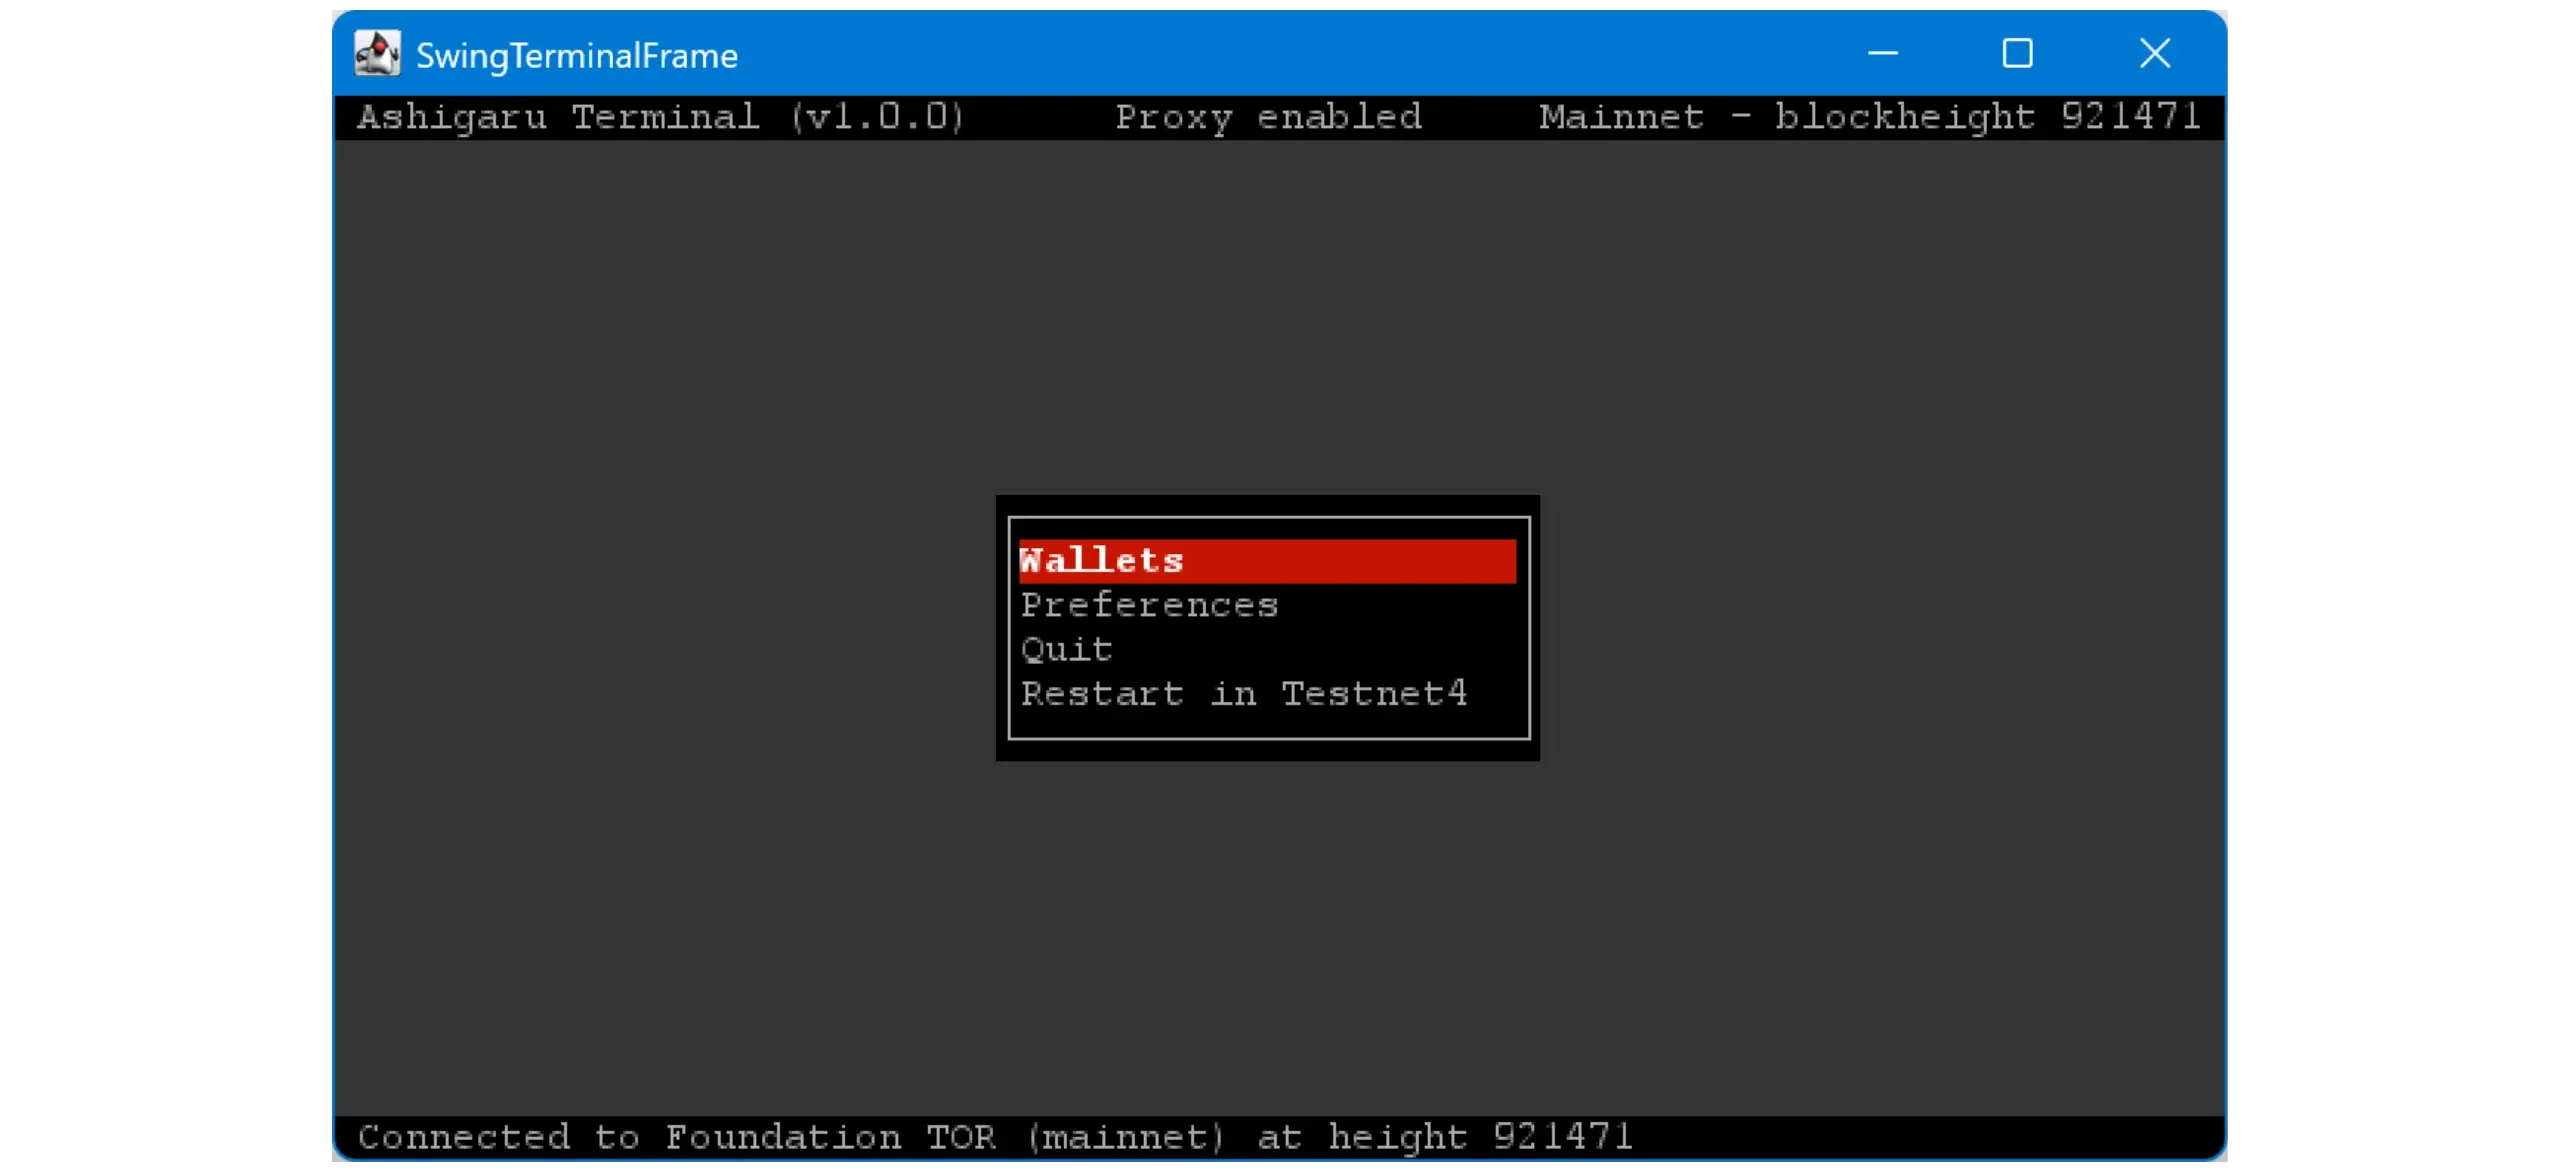
Navigation is straightforward: use your keyboard’s arrow keys to move through menus, and press Enter to confirm or perform actions.
12. Connect your node to Ashigaru Terminal
By default, Ashigaru Terminal connects to a public Electrum server. This has obvious privacy and sovereignty drawbacks. Configure it to connect directly to your own Electrum server.
Open Preferences > Server.
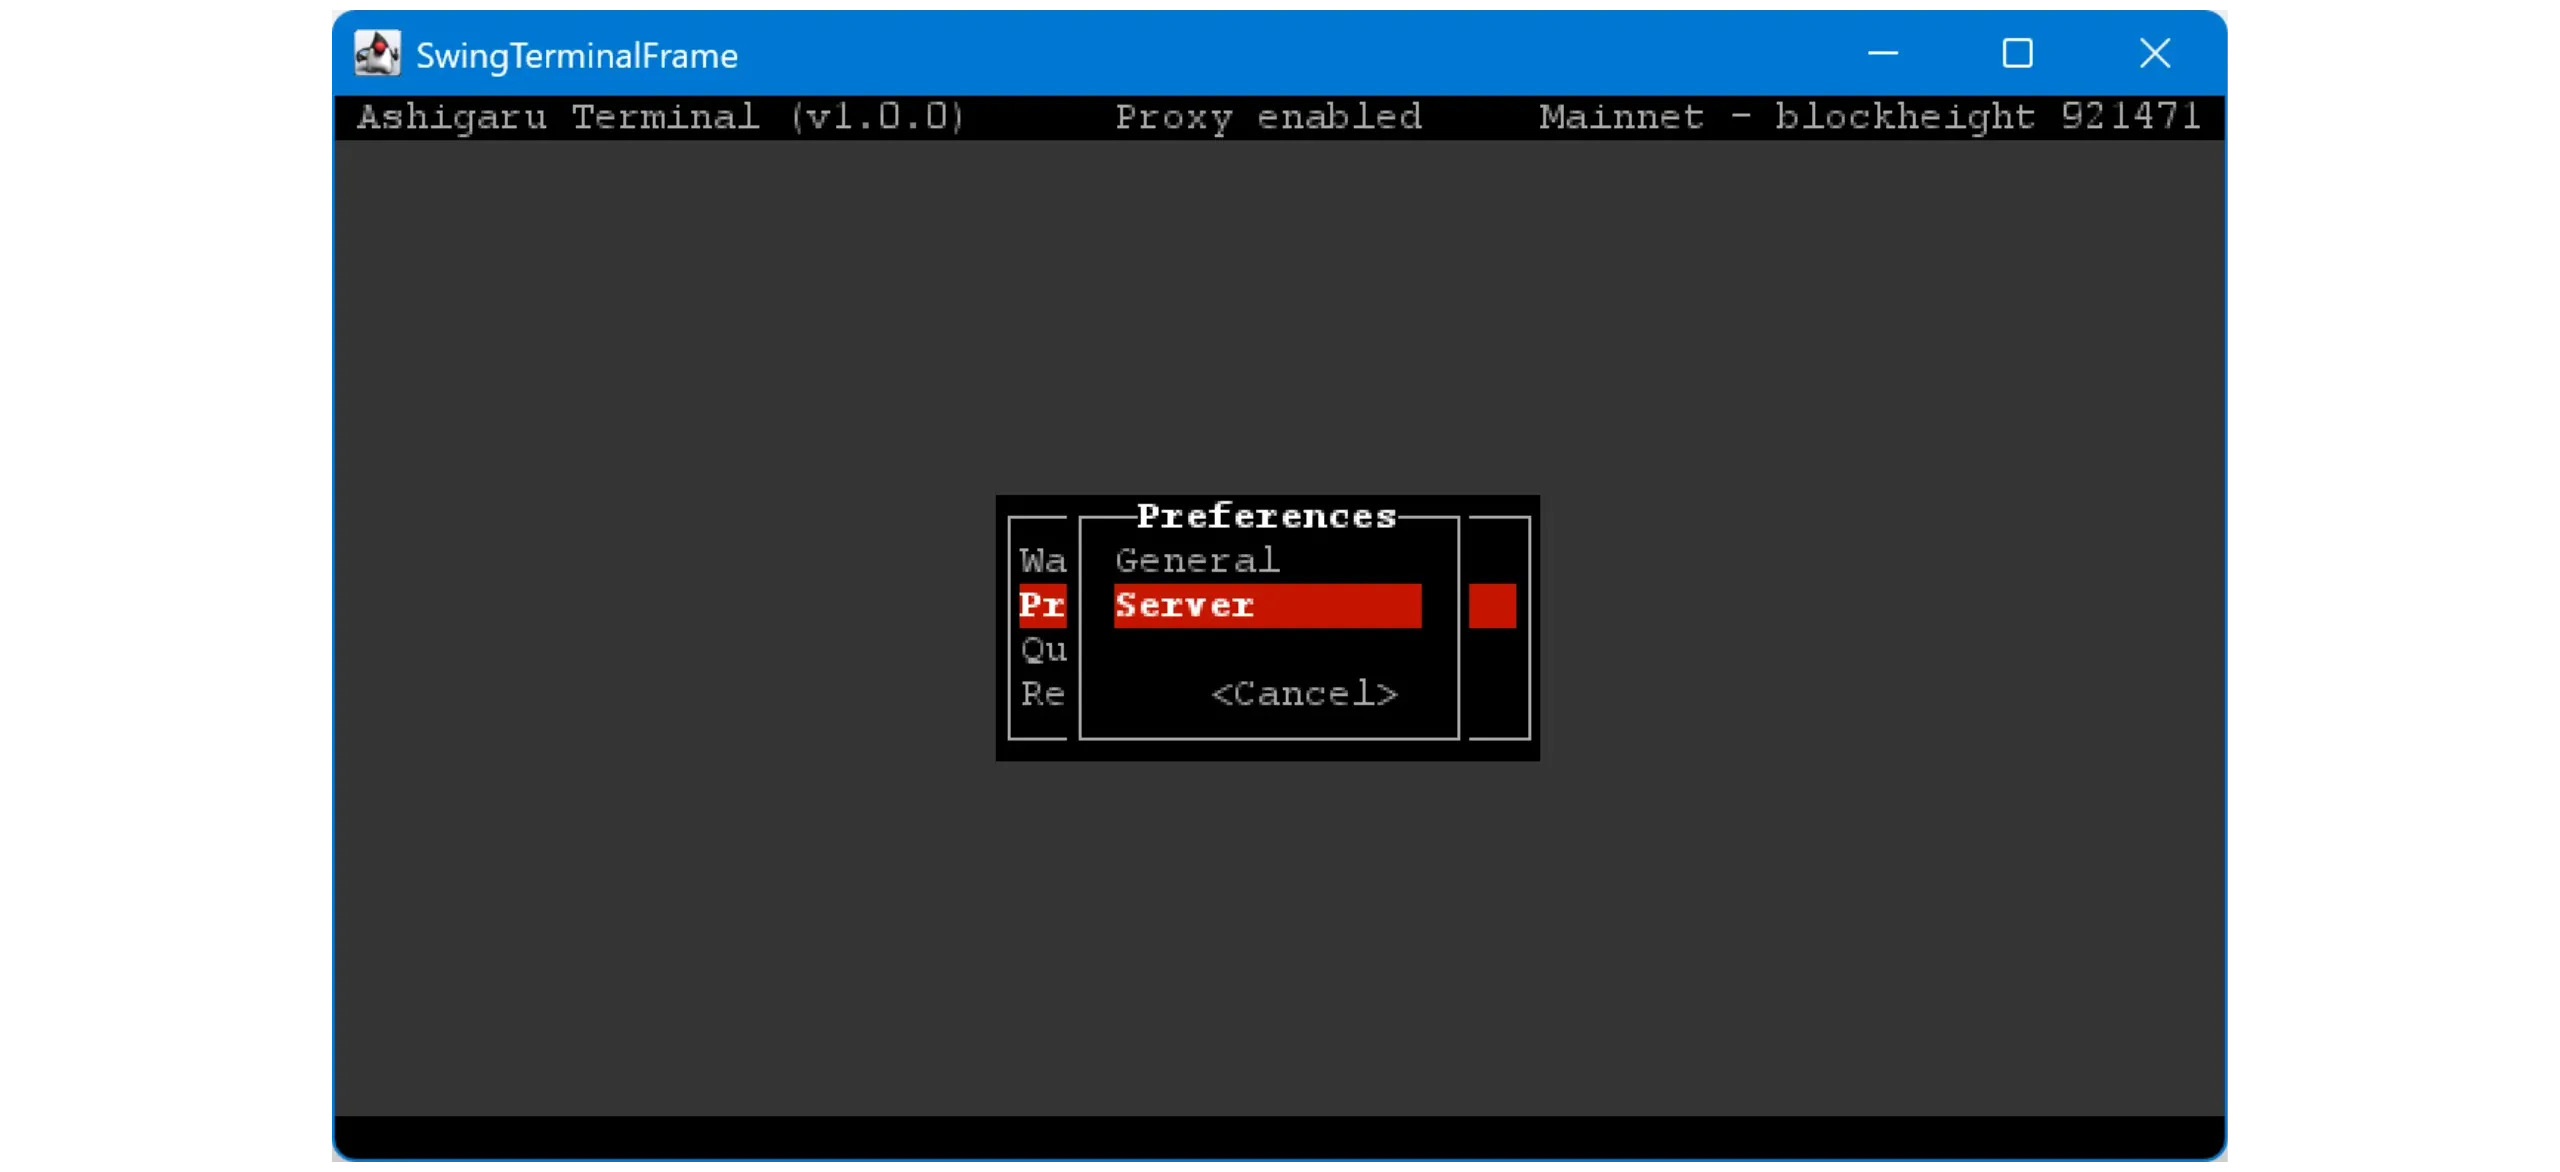
Click < Edit >.
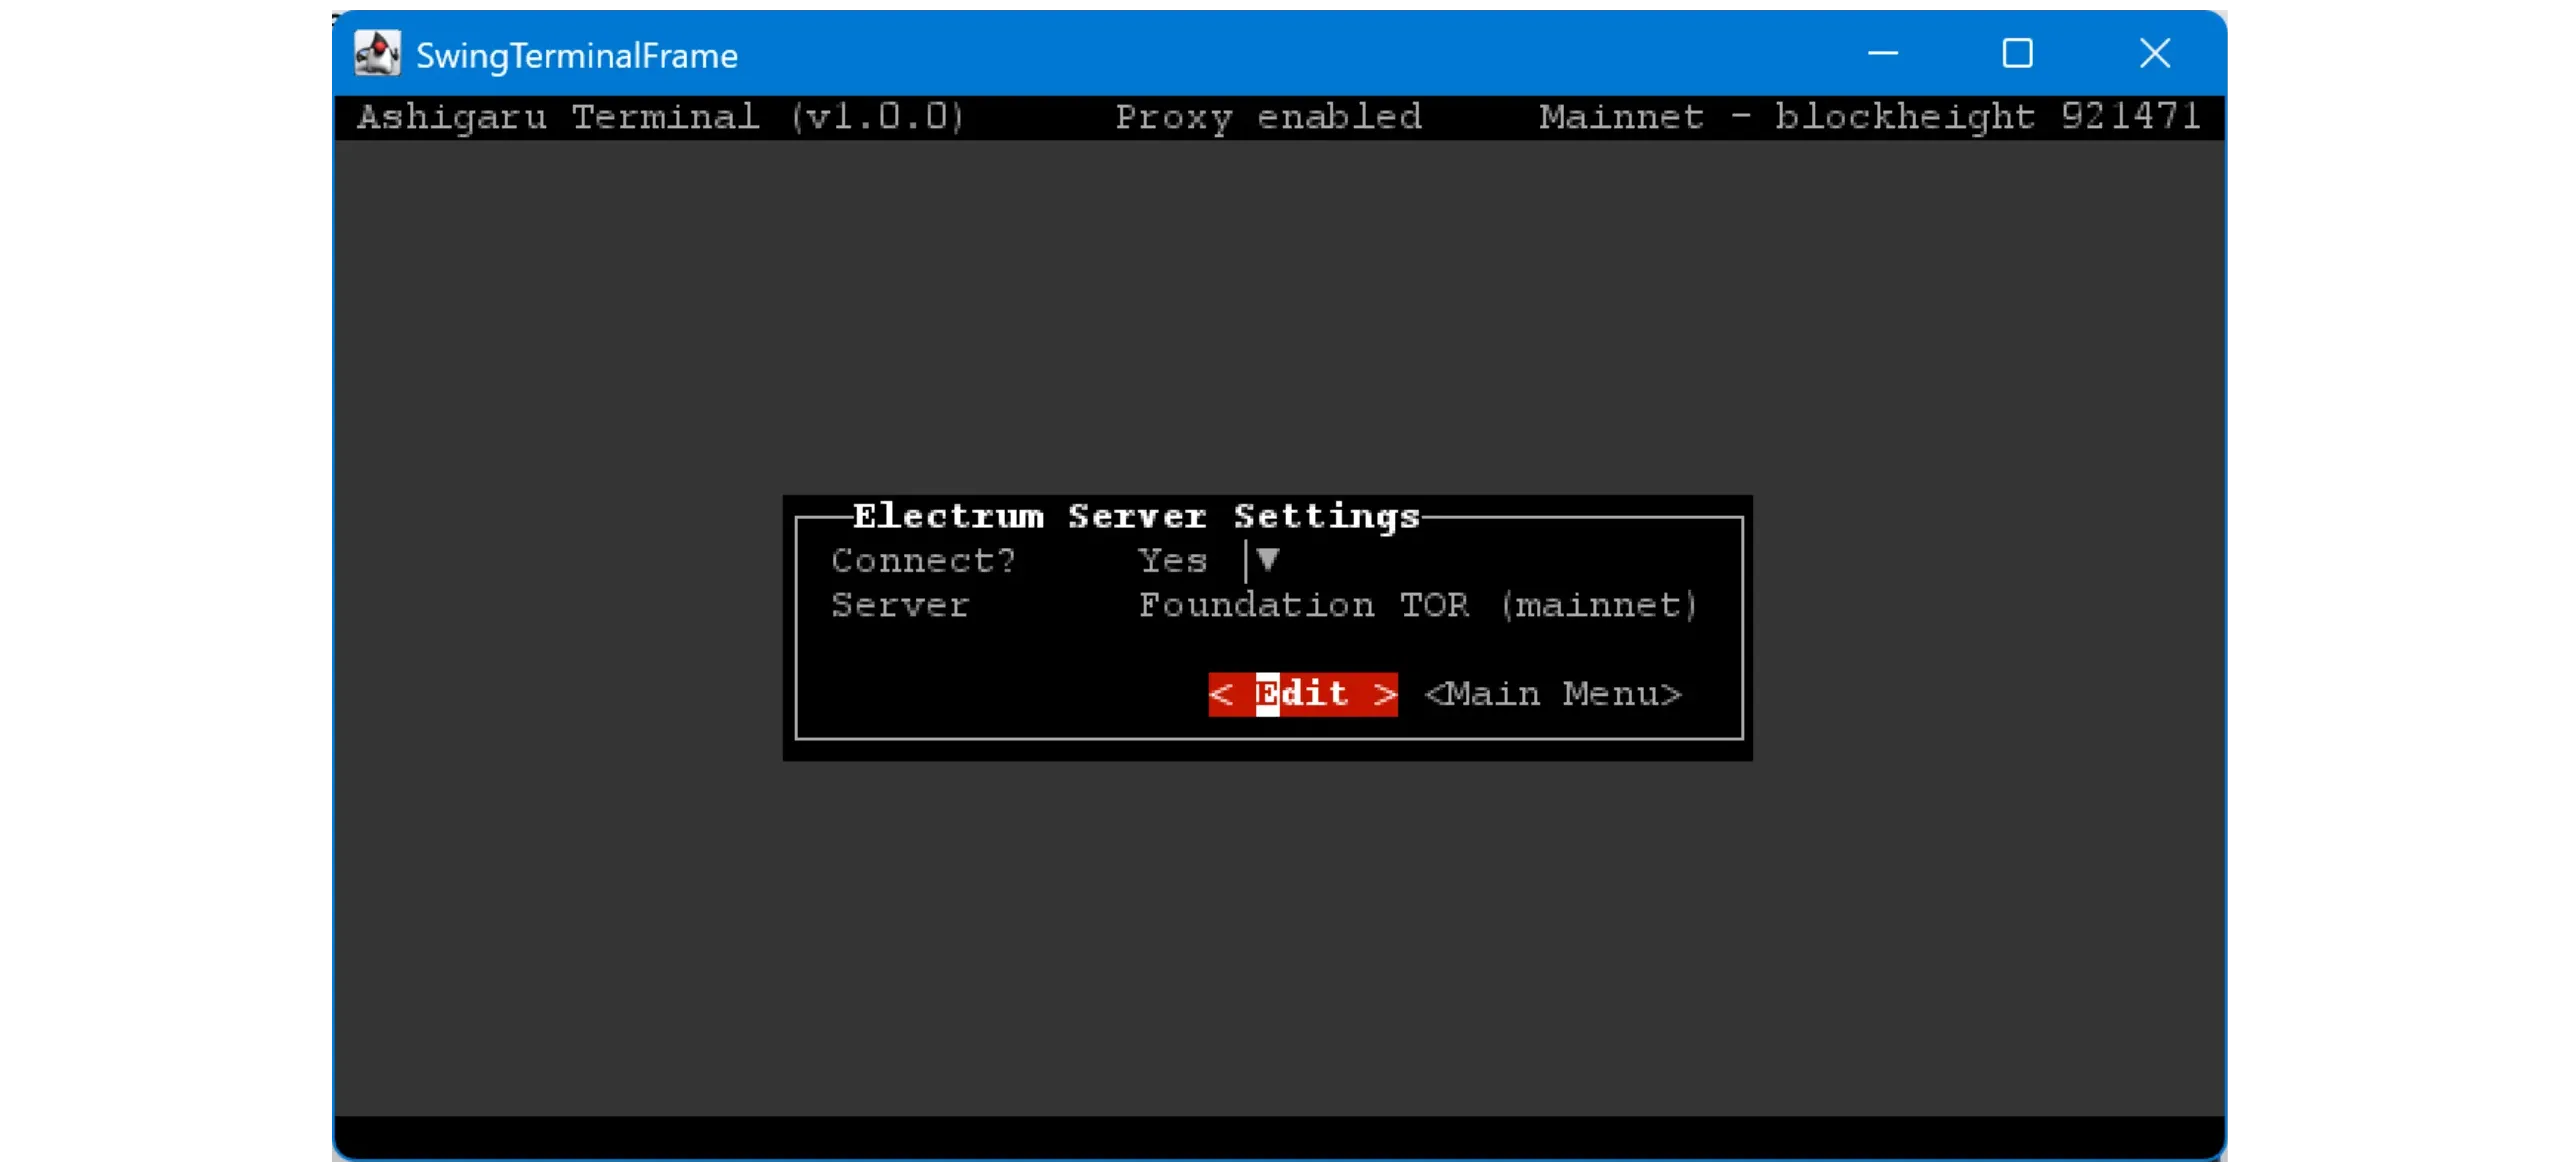
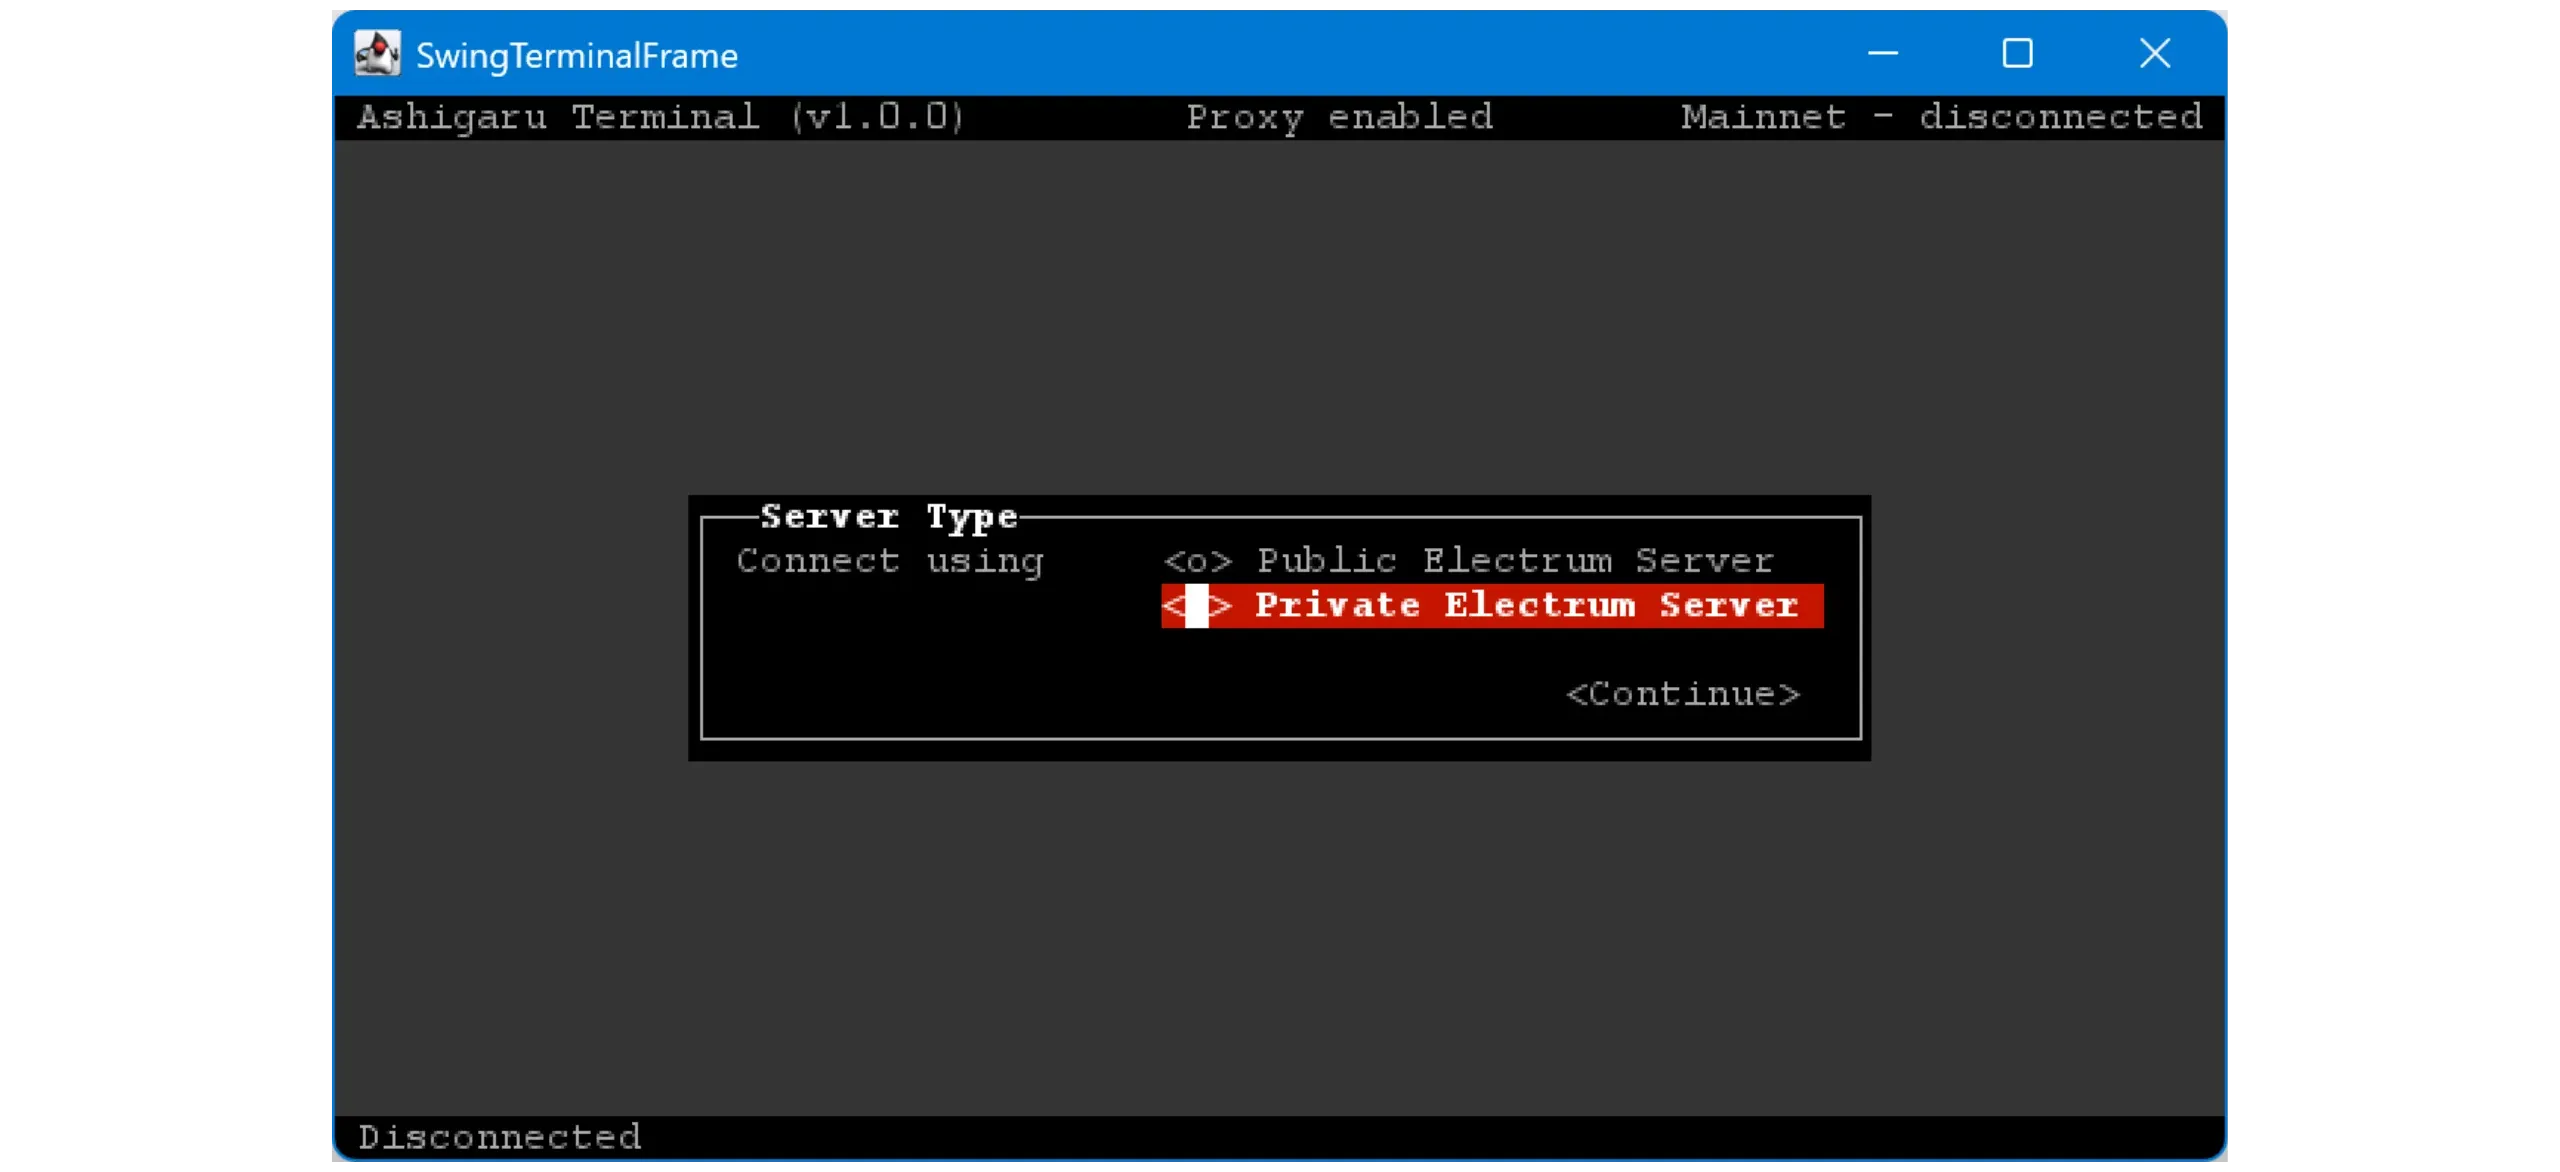
Select Private Electrum Server, then click < Continue >.
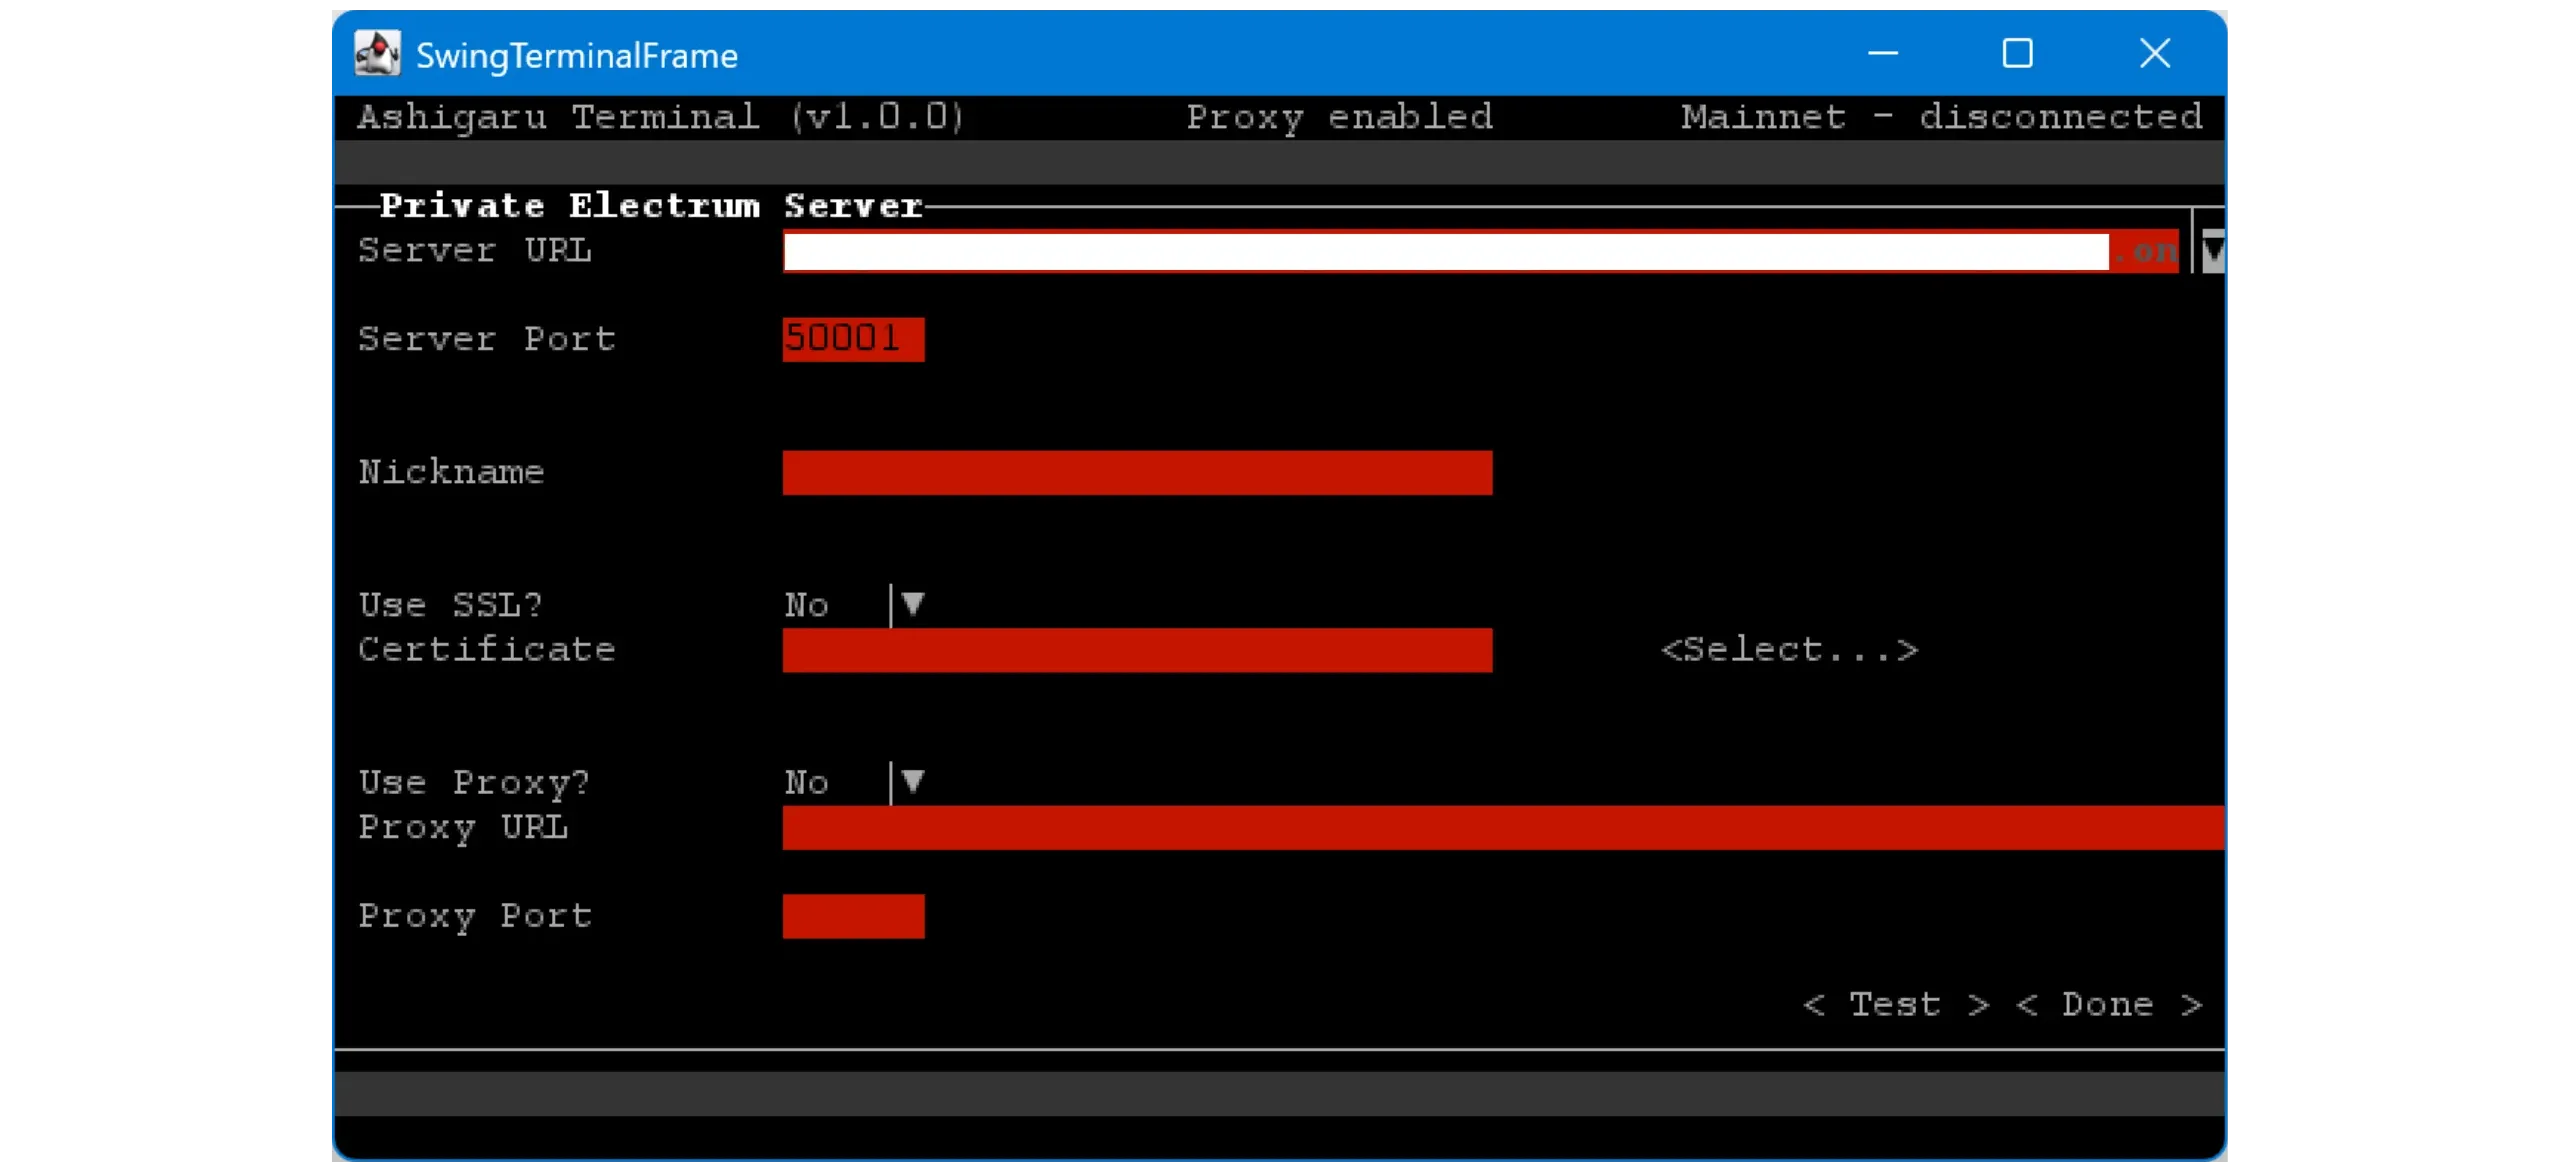
Enter your server’s URL and port. You can enter a Tor .onion address. Click < Test > to check the connection.
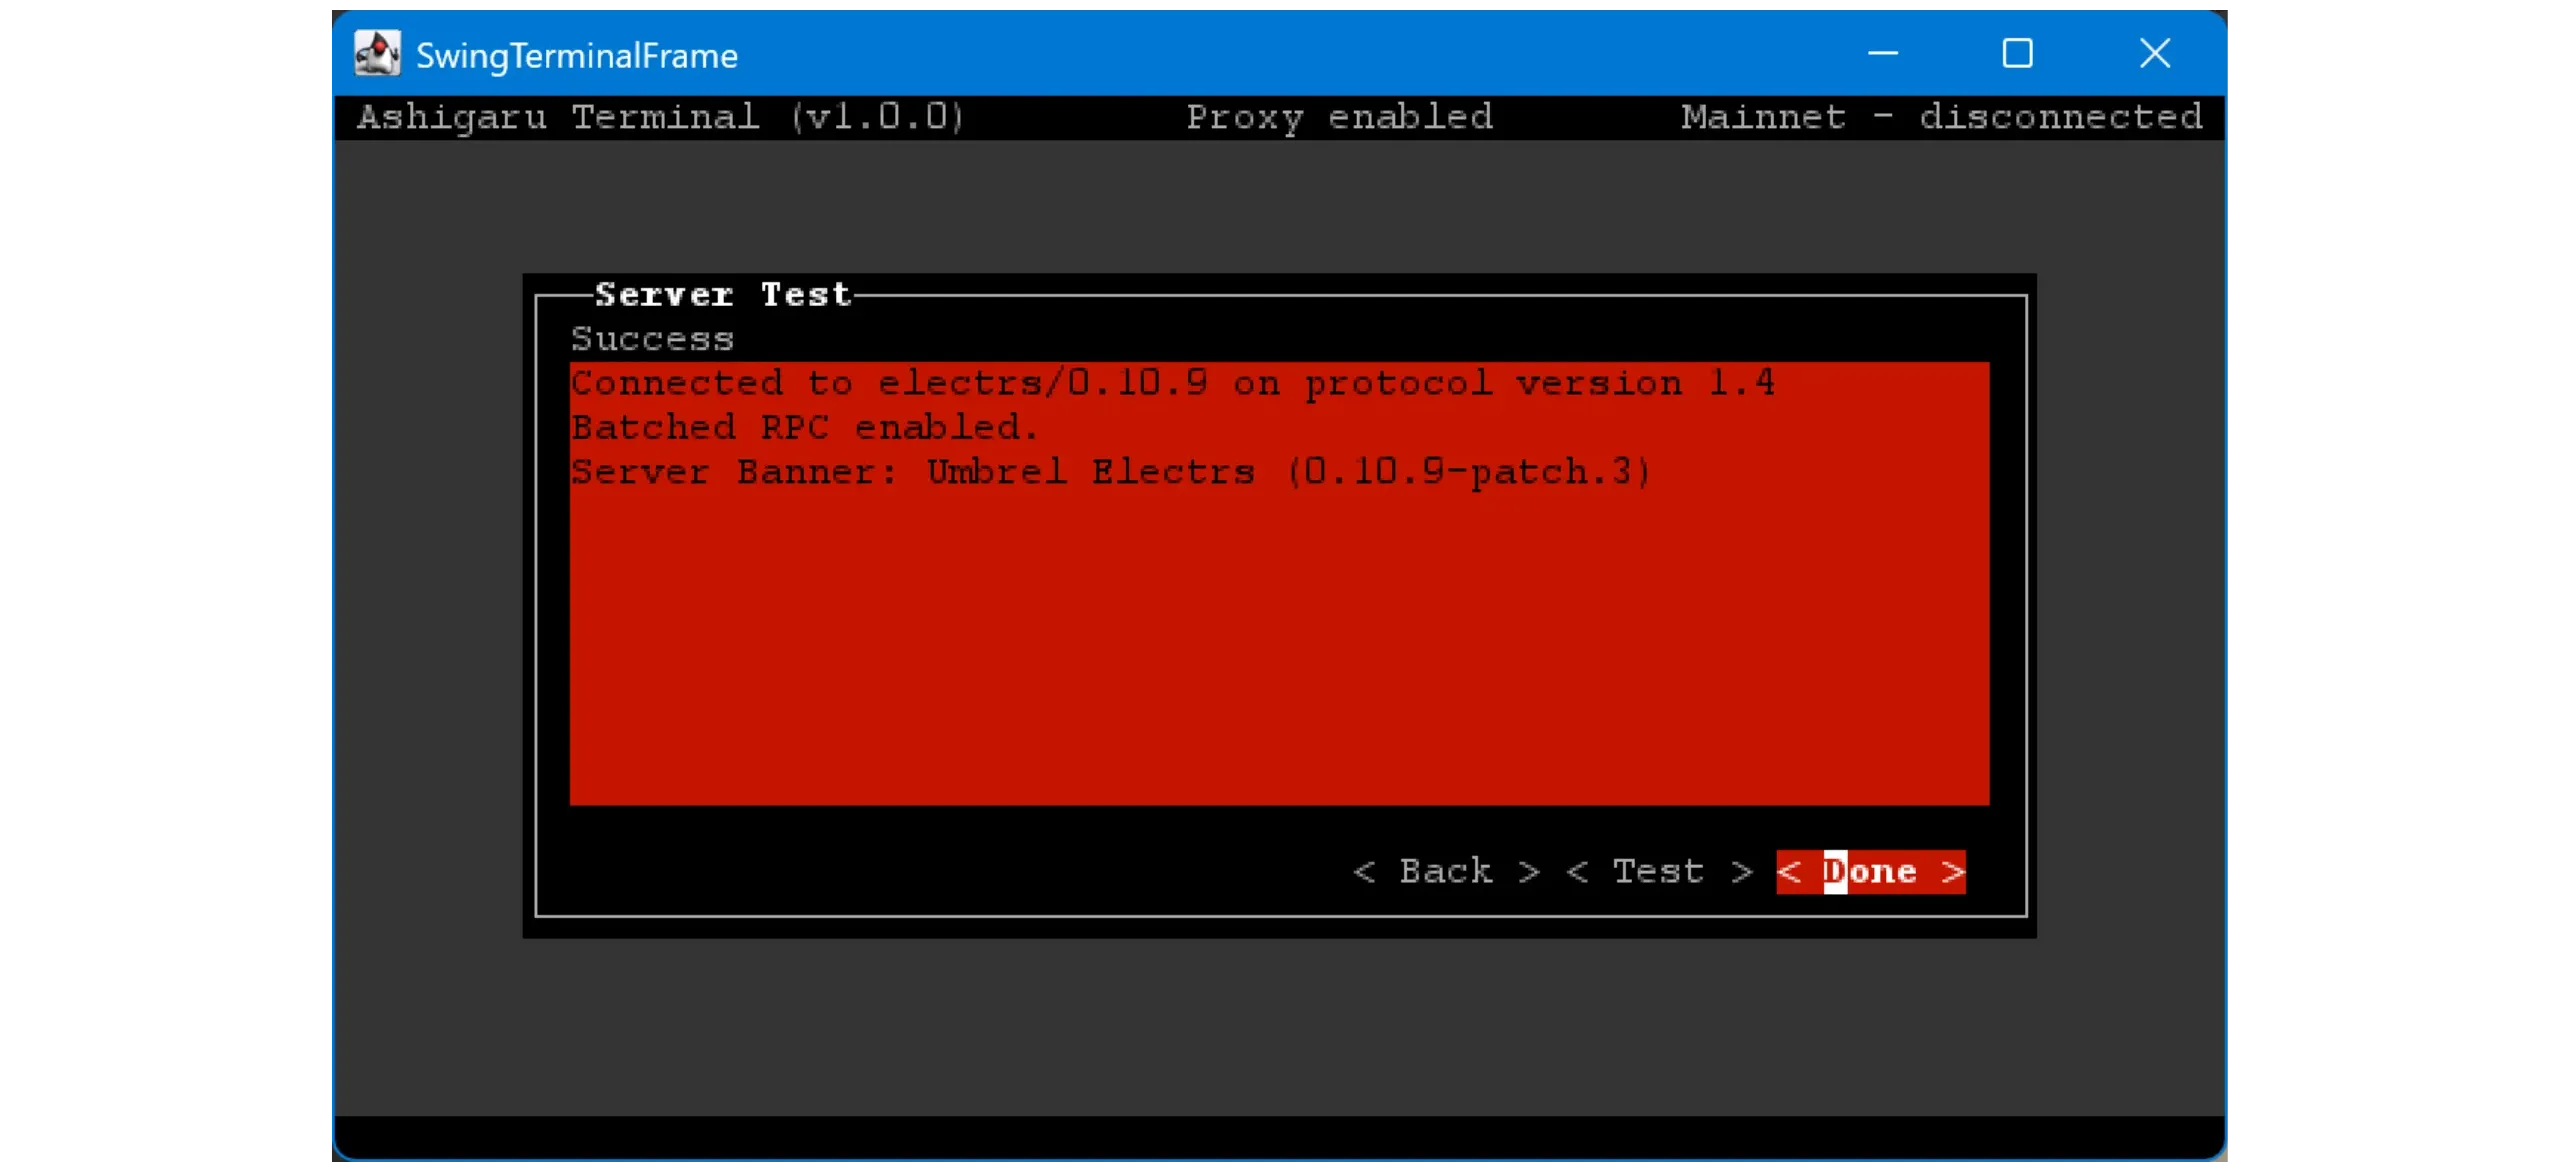
If the connection works, you’ll see Success and your server’s details.
For best privacy, use your own Electrum server (onion if remote). Public servers can see and correlate wallet queries.
To learn more about Dojo and how to install it, I have written the following dedicated guides:
How to Run a Bitcoin Node (Advanced)
Note: For this tutorial, the author disconnects from their node because they’re on testnet. Operation is the same on mainnet.
13. Create a wallet in Ashigaru Terminal
With the software configured, add a Bitcoin wallet.
You have two choices:
- Create a brand‑new wallet to use exclusively with Ashigaru Terminal. You’ll need this app running whenever you want to interact with the wallet.
- Import your existing Ashigaru (mobile) wallet into Ashigaru Terminal. This slightly reduces security (one wallet across two environments), but it lets Ashigaru Terminal run continuously to mix coins while you spend from the mobile app.
In this tutorial, we’ll use the second option. If you prefer creating a new wallet, the procedure is identical — the only difference is you’ll back up the new mnemonic and BIP39 passphrase during creation.
Note: Ashigaru Terminal does not allow you to spend your bitcoins directly. You can either synchronize the same wallet on Ashigaru Terminal and the Ashigaru app, or on Sparrow Wallet.
If you don’t yet have a wallet in the Ashigaru app, follow the setup steps earlier in this guide.
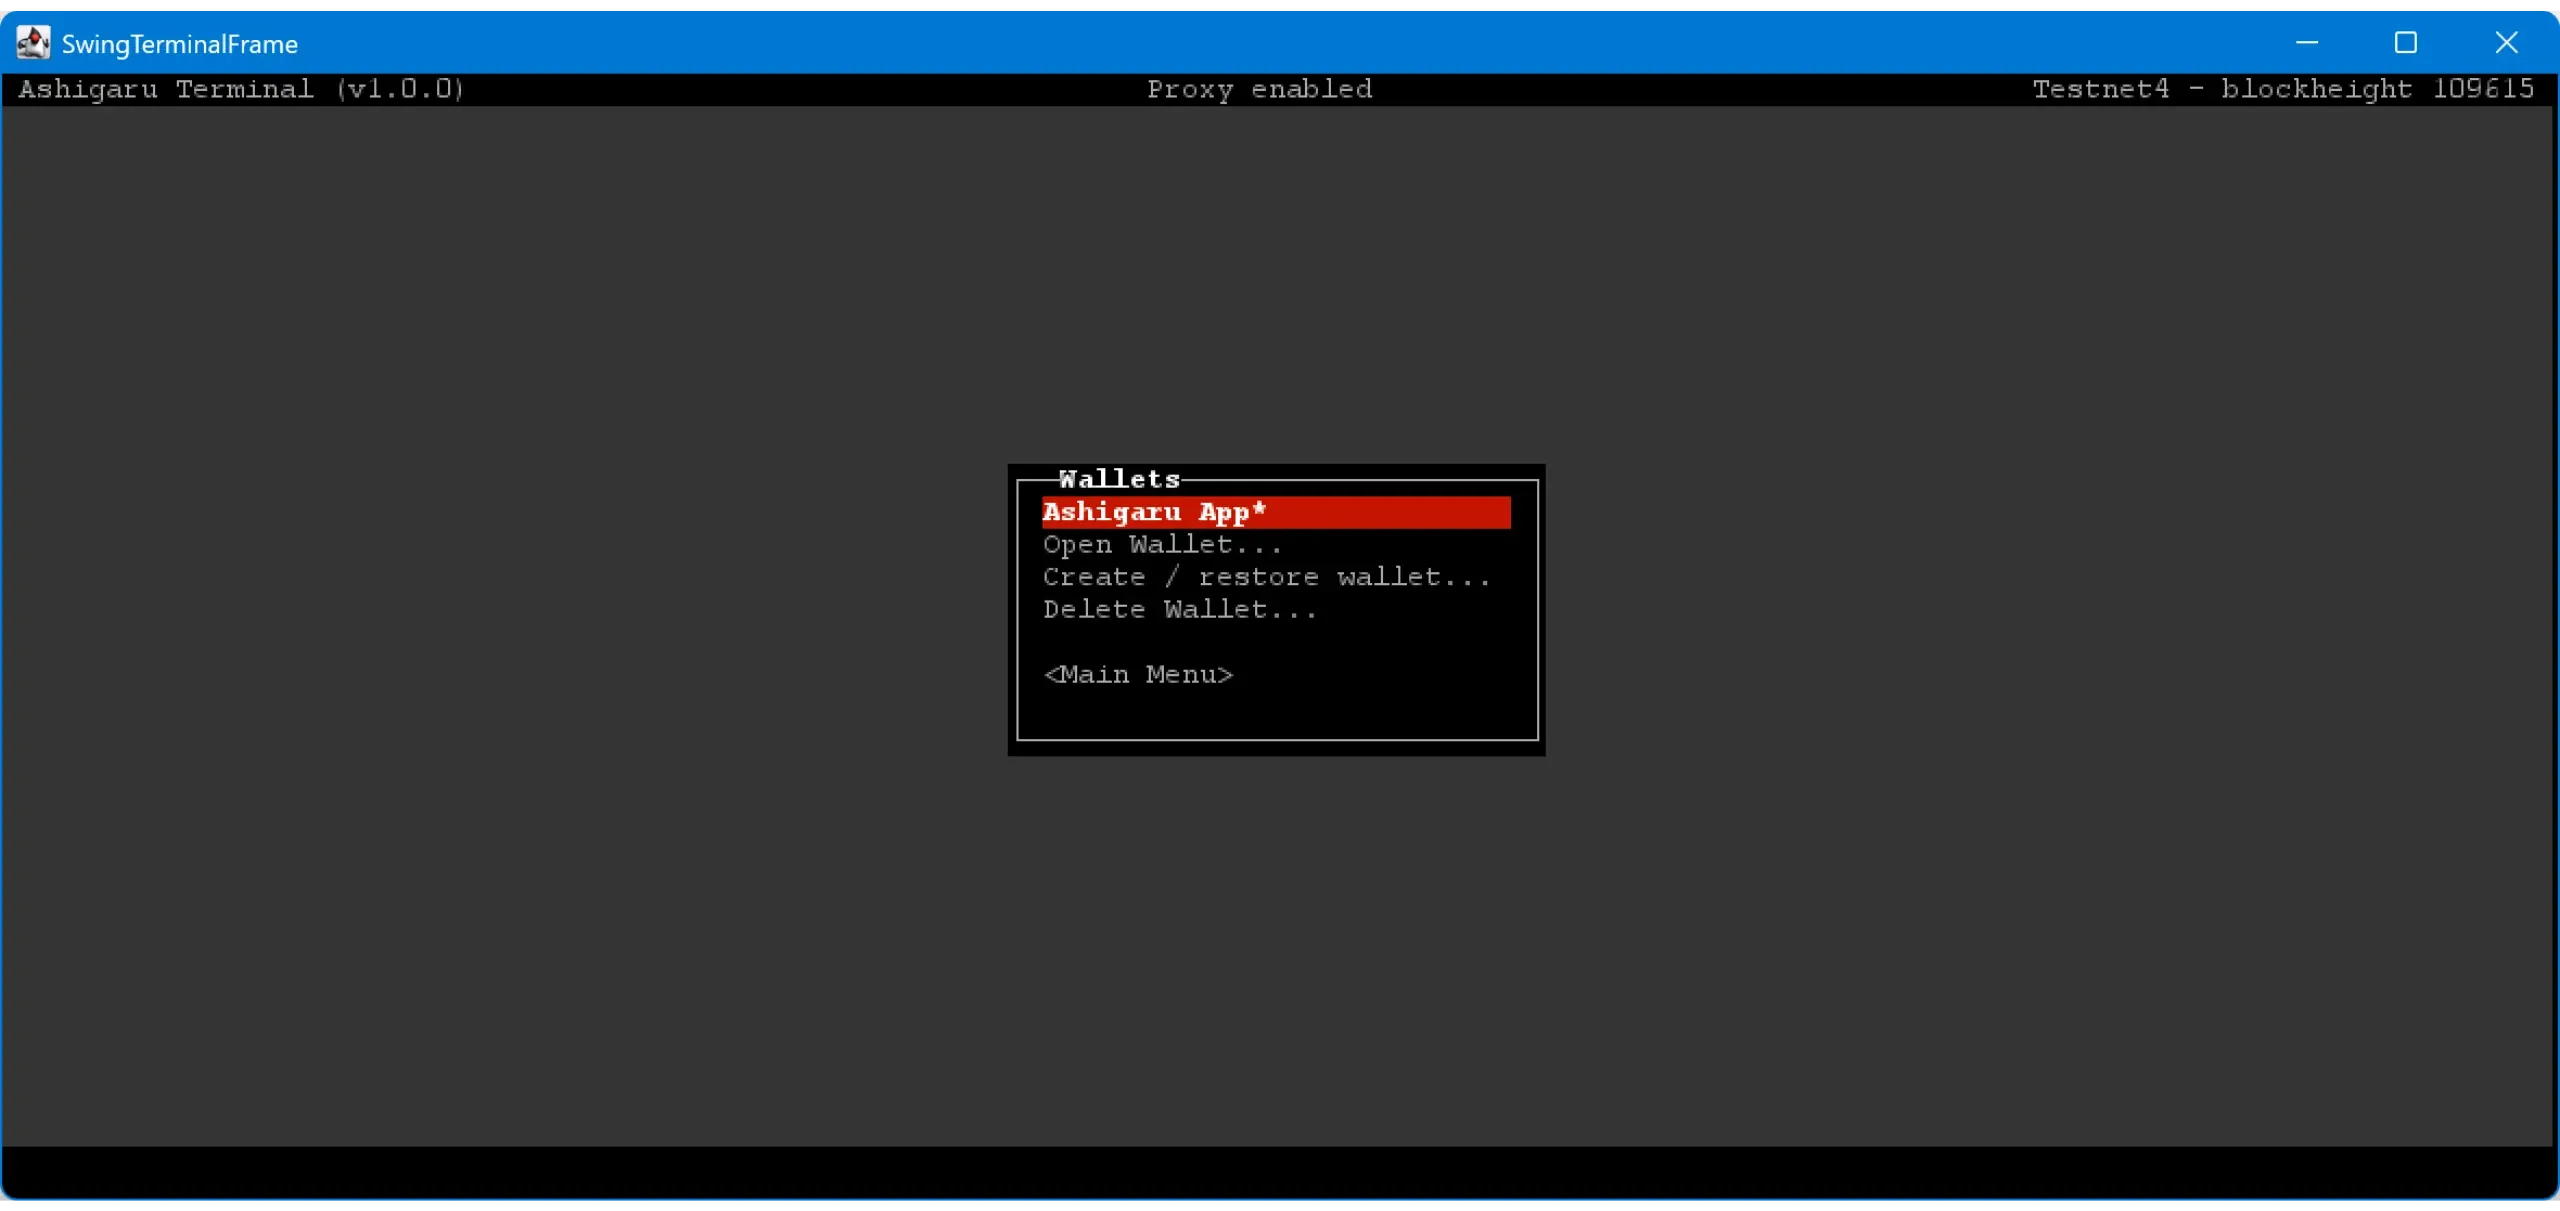
Go to Wallets.
Select Create / restore wallet.... Use Open Wallet... later to reopen a wallet already saved in Ashigaru Terminal.
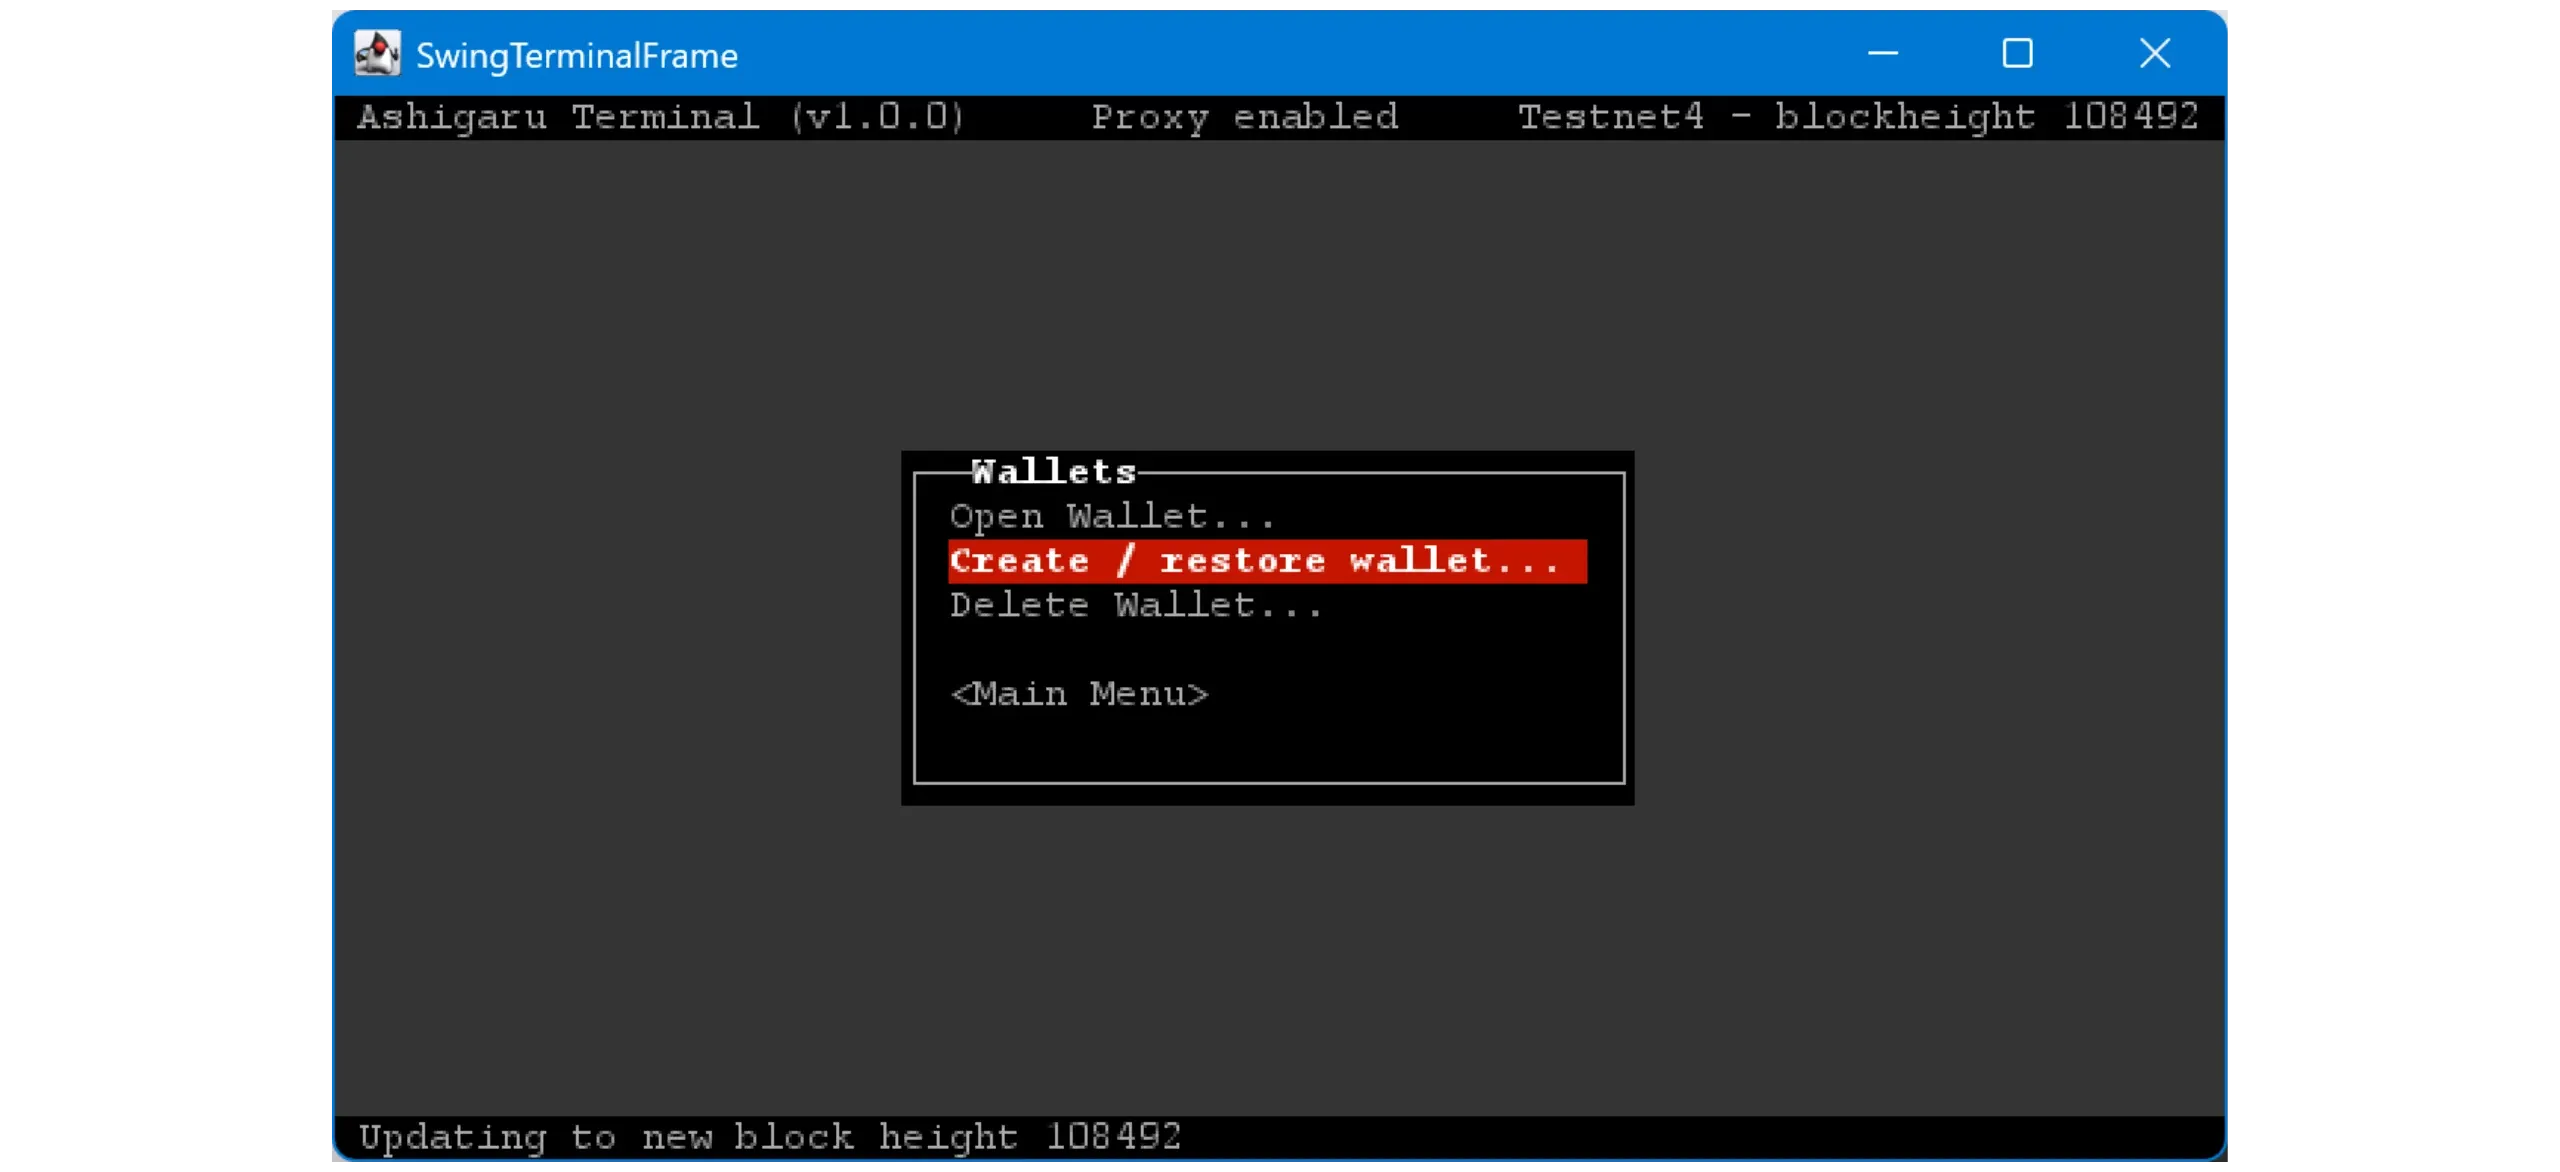
Give your wallet a name.

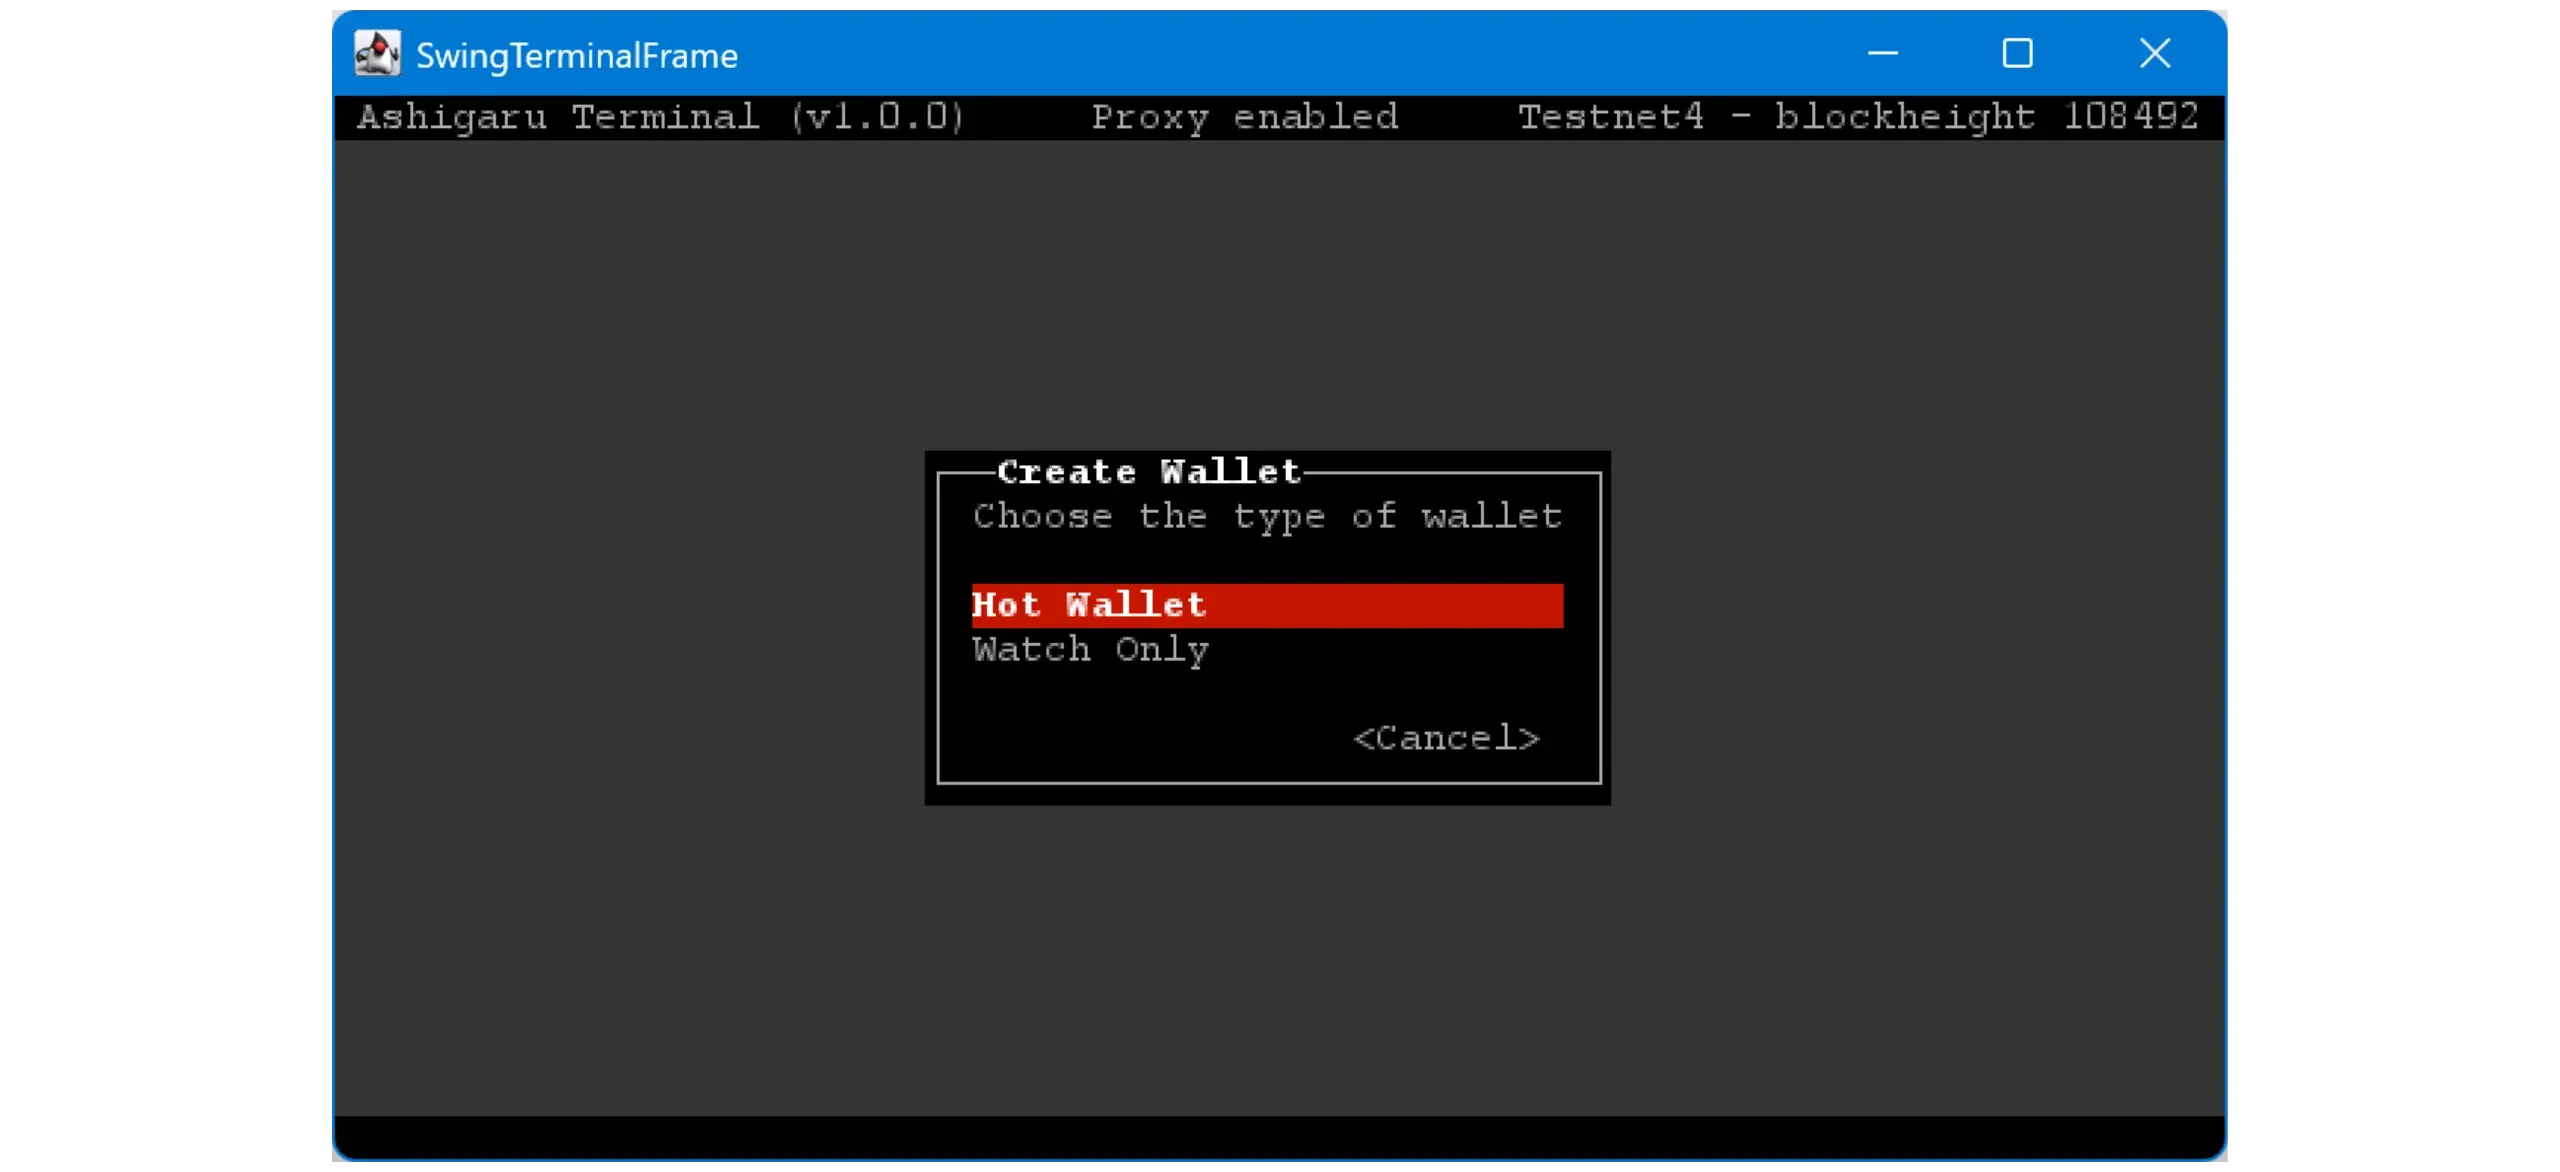
Choose Hot Wallet as the wallet type.
Note: Watch‑only lets you save a hardware wallet xpub for later use with Mix to. A watch‑only wallet cannot participate in coinjoins. “Mix to” is not covered in this guide.
Now the flow differs based on your choice:
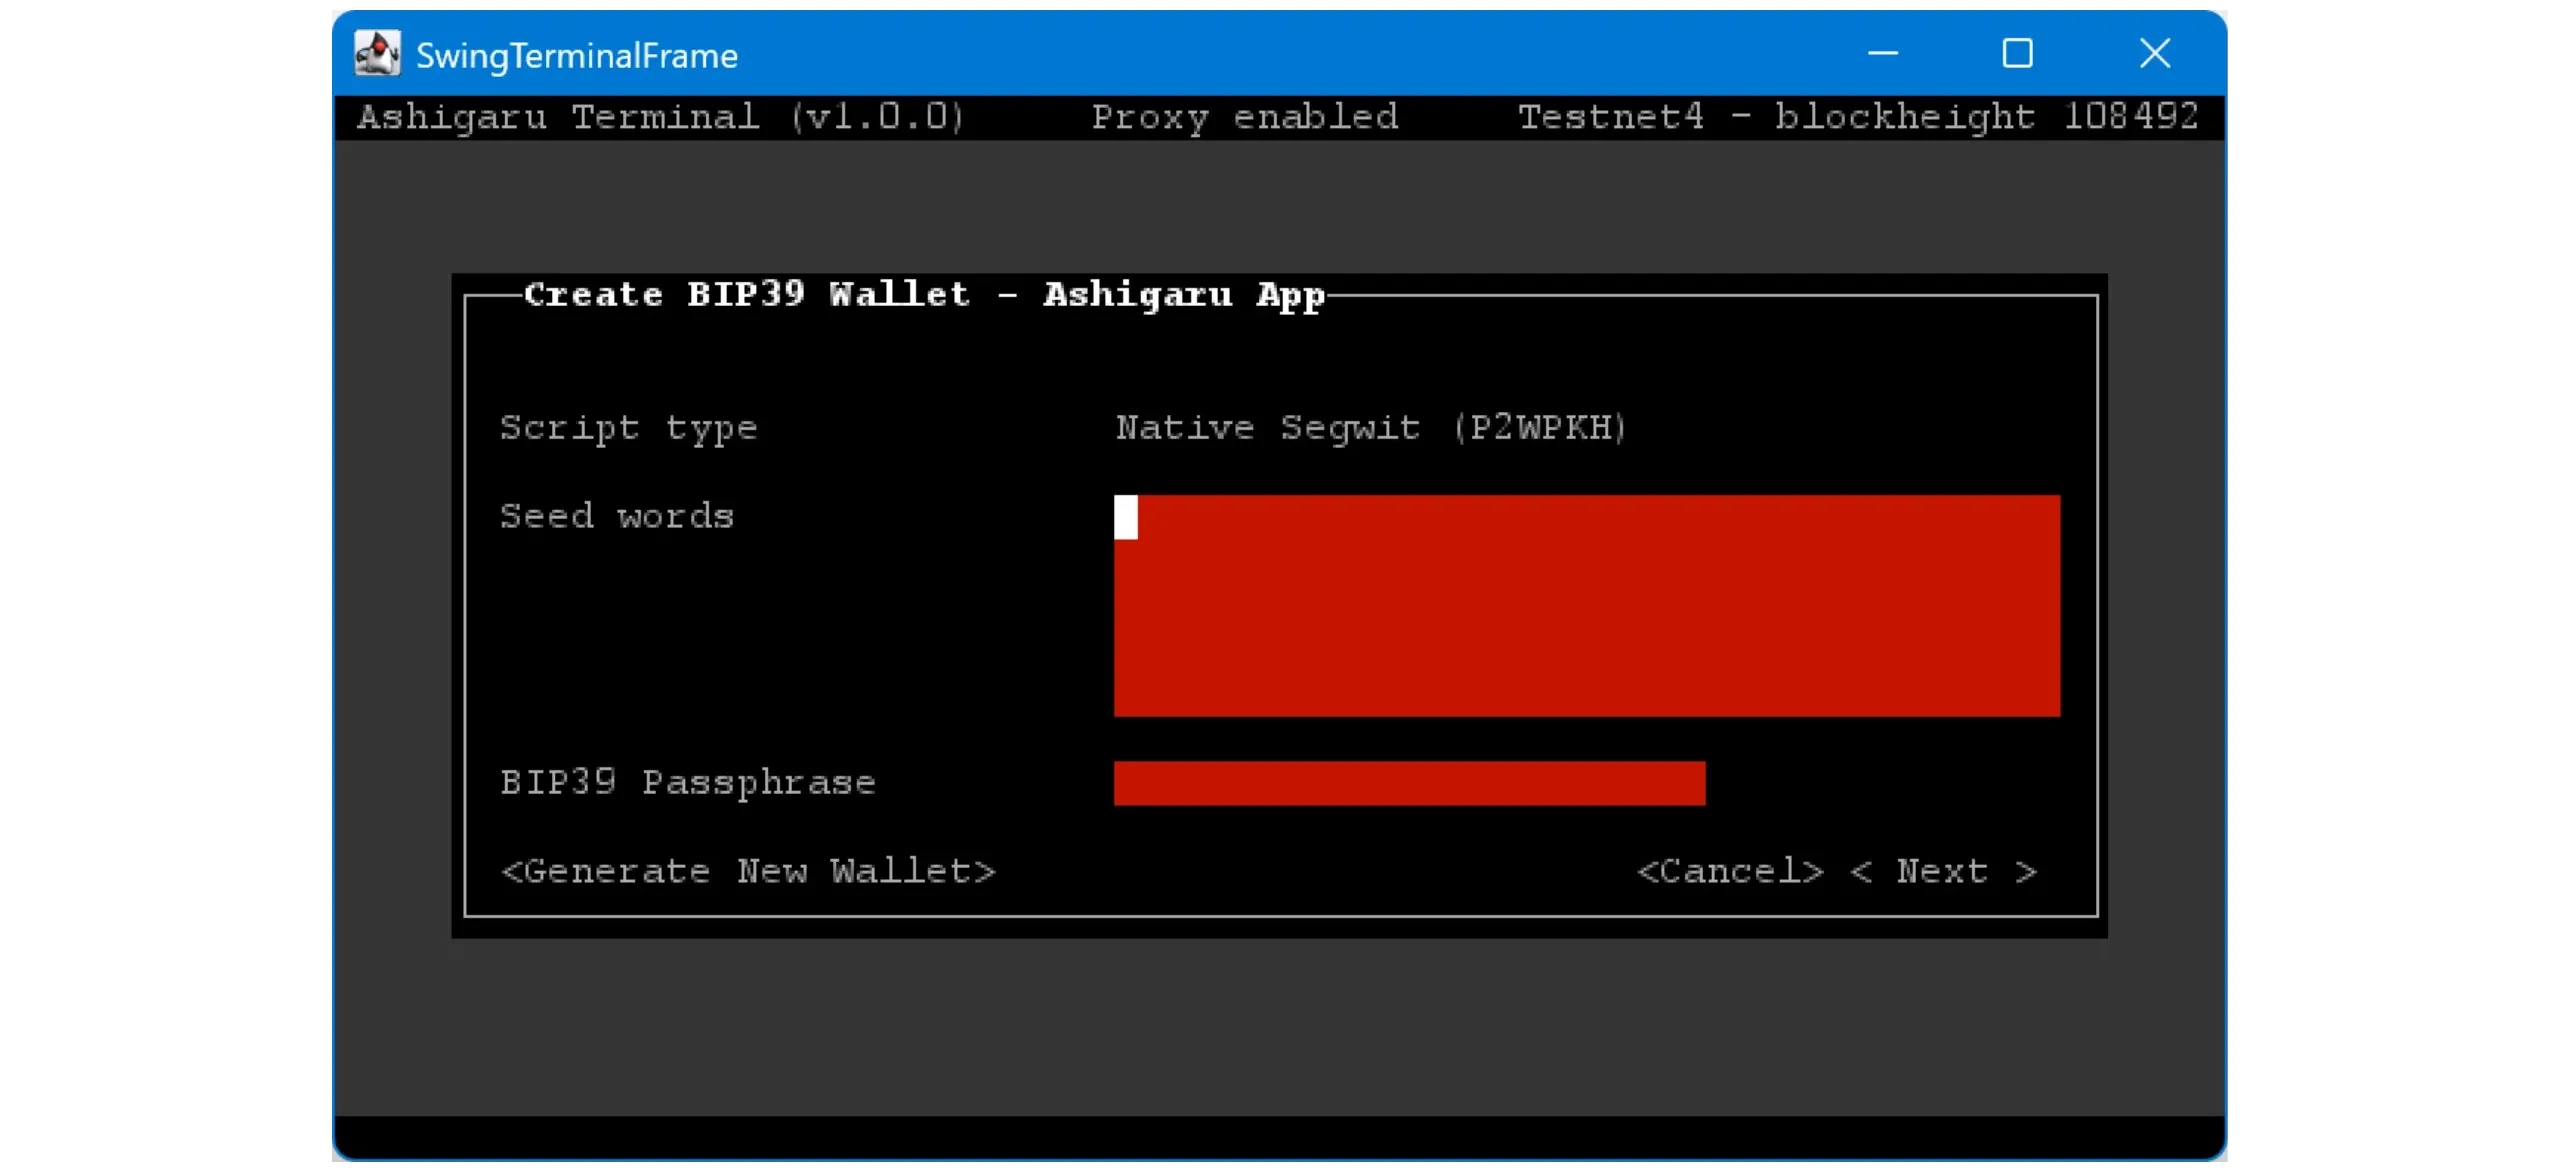
- To create a new wallet from scratch, click
< Generate New Wallet >, set a BIP39 passphrase, and carefully back up the mnemonic and passphrase on physical media. - To use the same wallet as your Ashigaru Mobile app, enter your 12‑word mnemonic and your BIP39 passphrase exactly: lowercase words, in order, separated by a single space, with no extra characters.
Click < Next > when done.
Note: If < Next > is disabled, your mnemonic is invalid. Double‑check for typos or incorrect words.
You’ll then set a password. This unlocks your wallet in Ashigaru Terminal and protects it from unauthorized physical access. It is not part of key derivation. In other words, even without this password, anyone with your mnemonic and passphrase can restore your wallet and access your funds.
Choose a long, random password. Store a copy safely — ideally on physical media or in a secure password manager.
Click < OK > when finished.
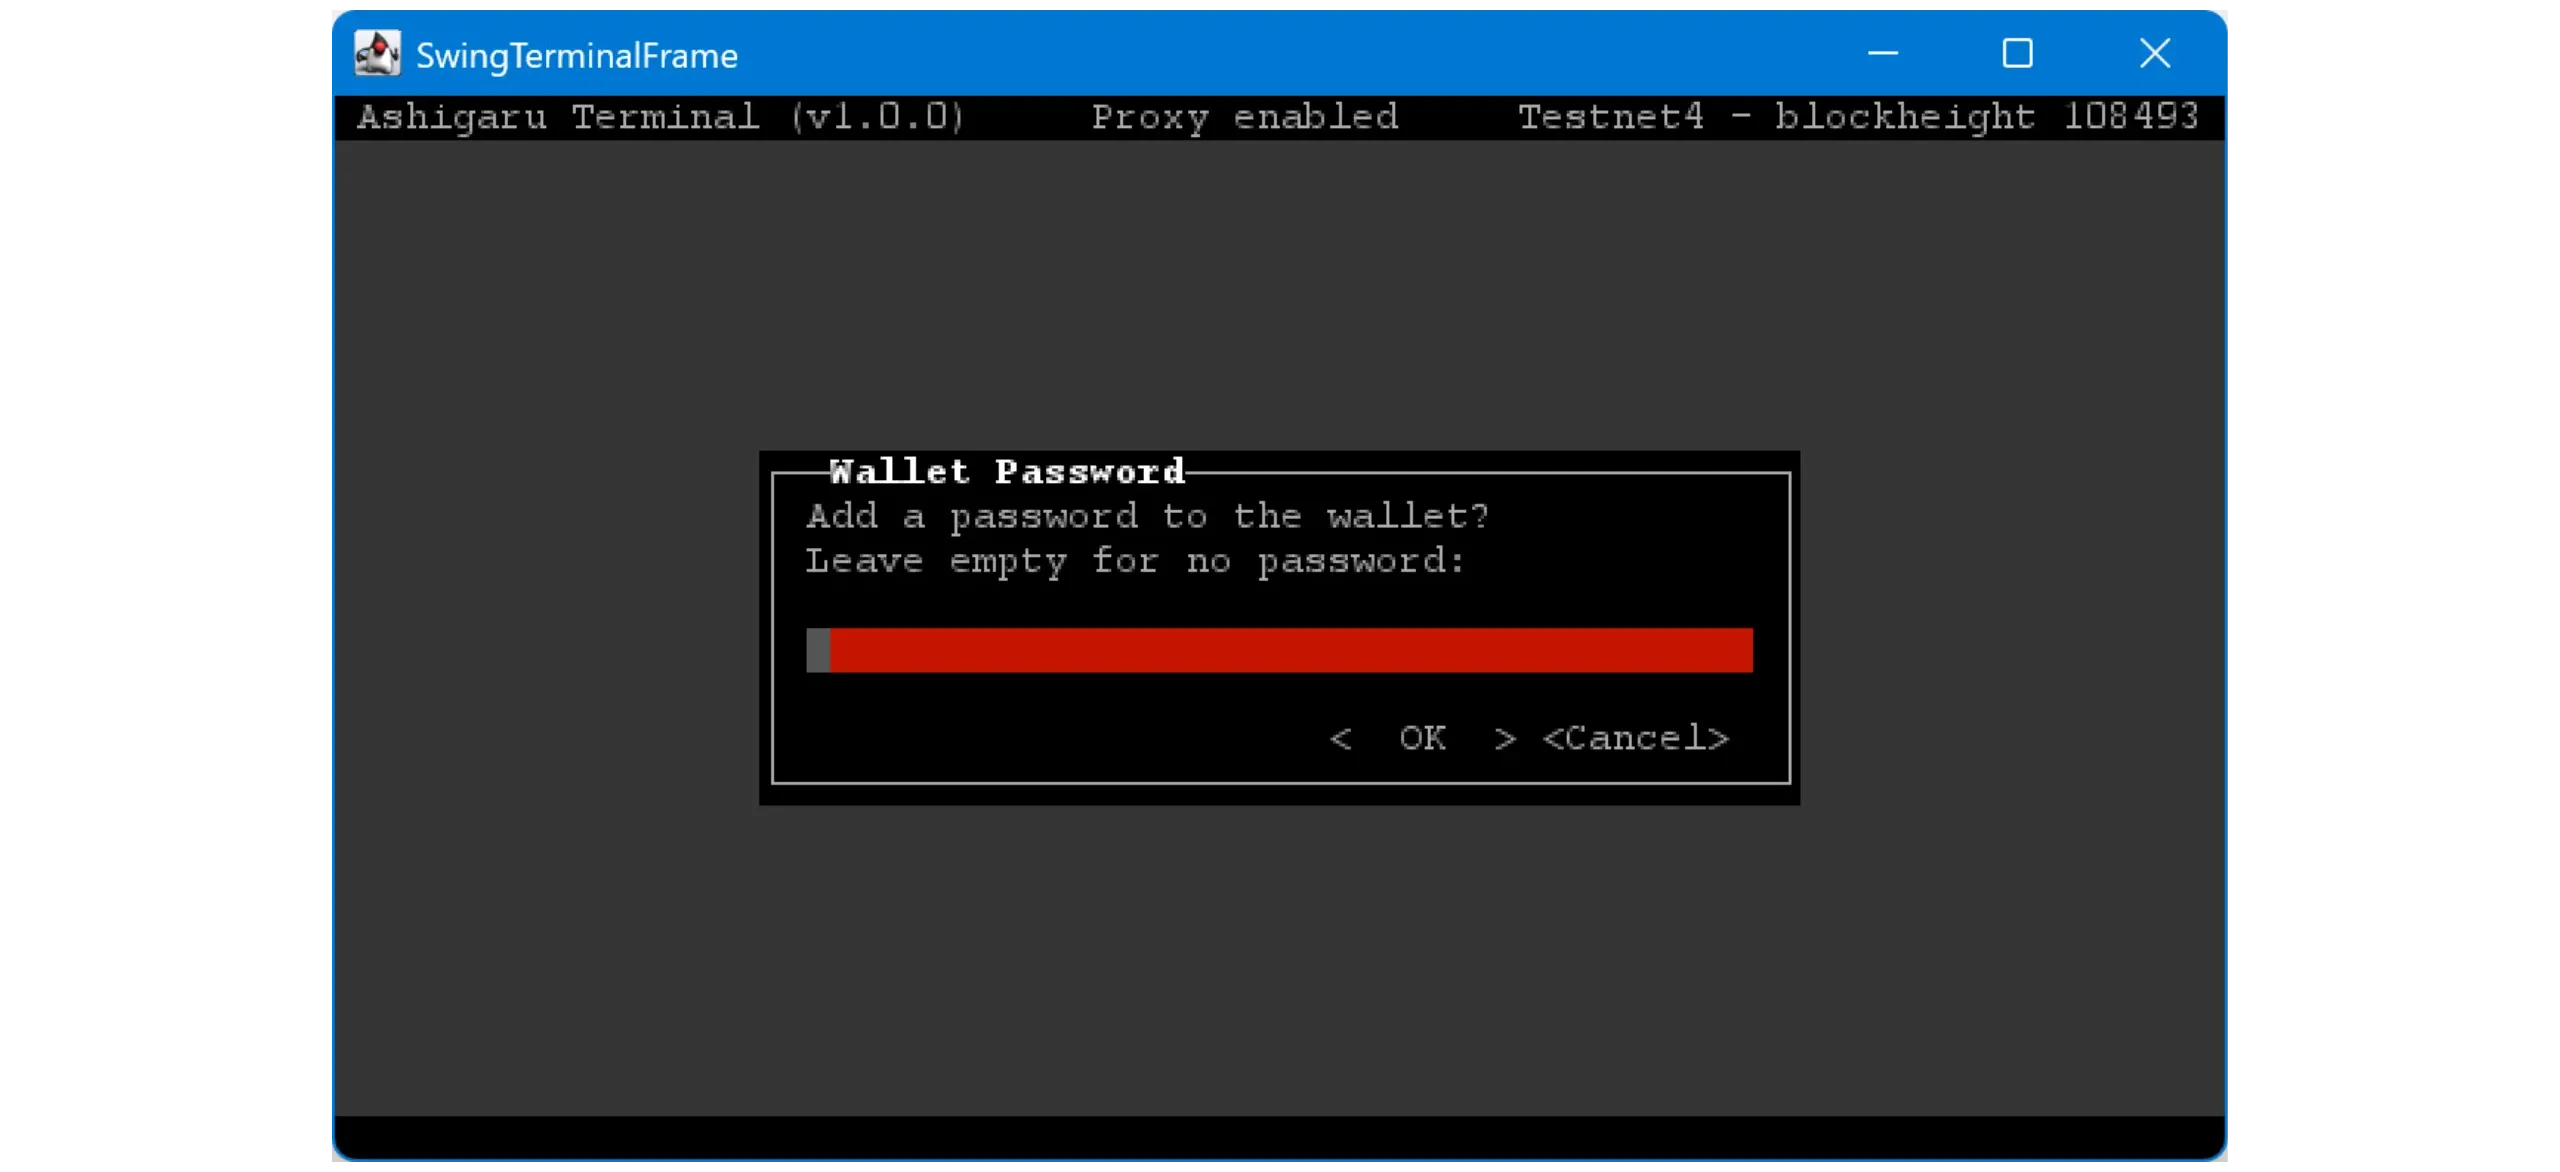
Mnemonic + passphrase = full access. Treat the Terminal password as a local lock; it does not replace seed security.
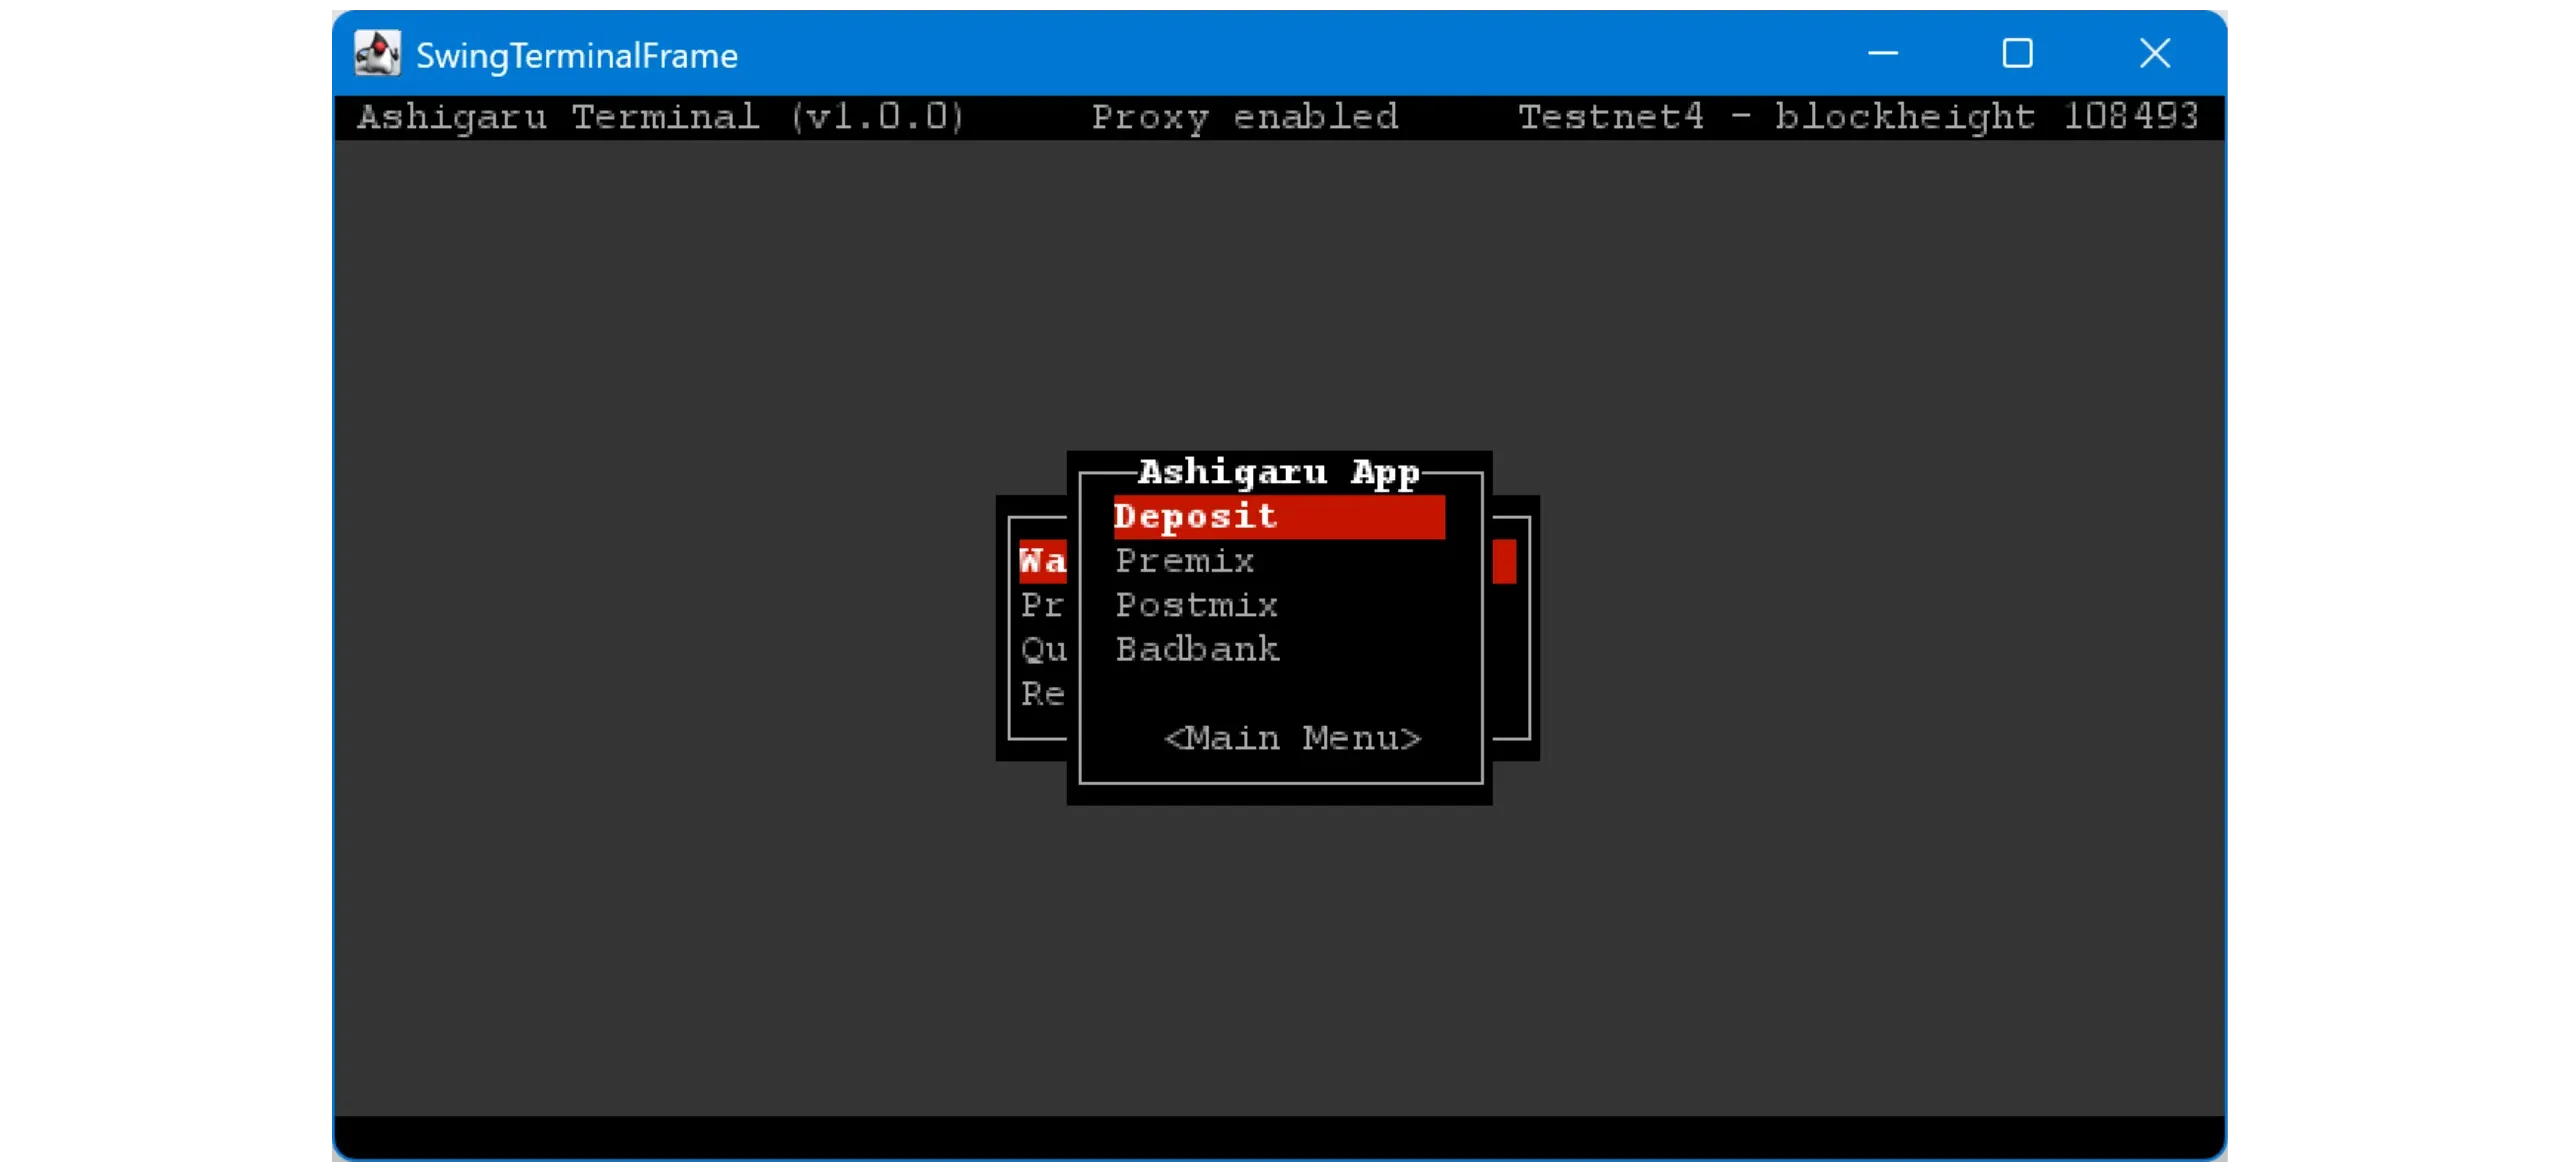
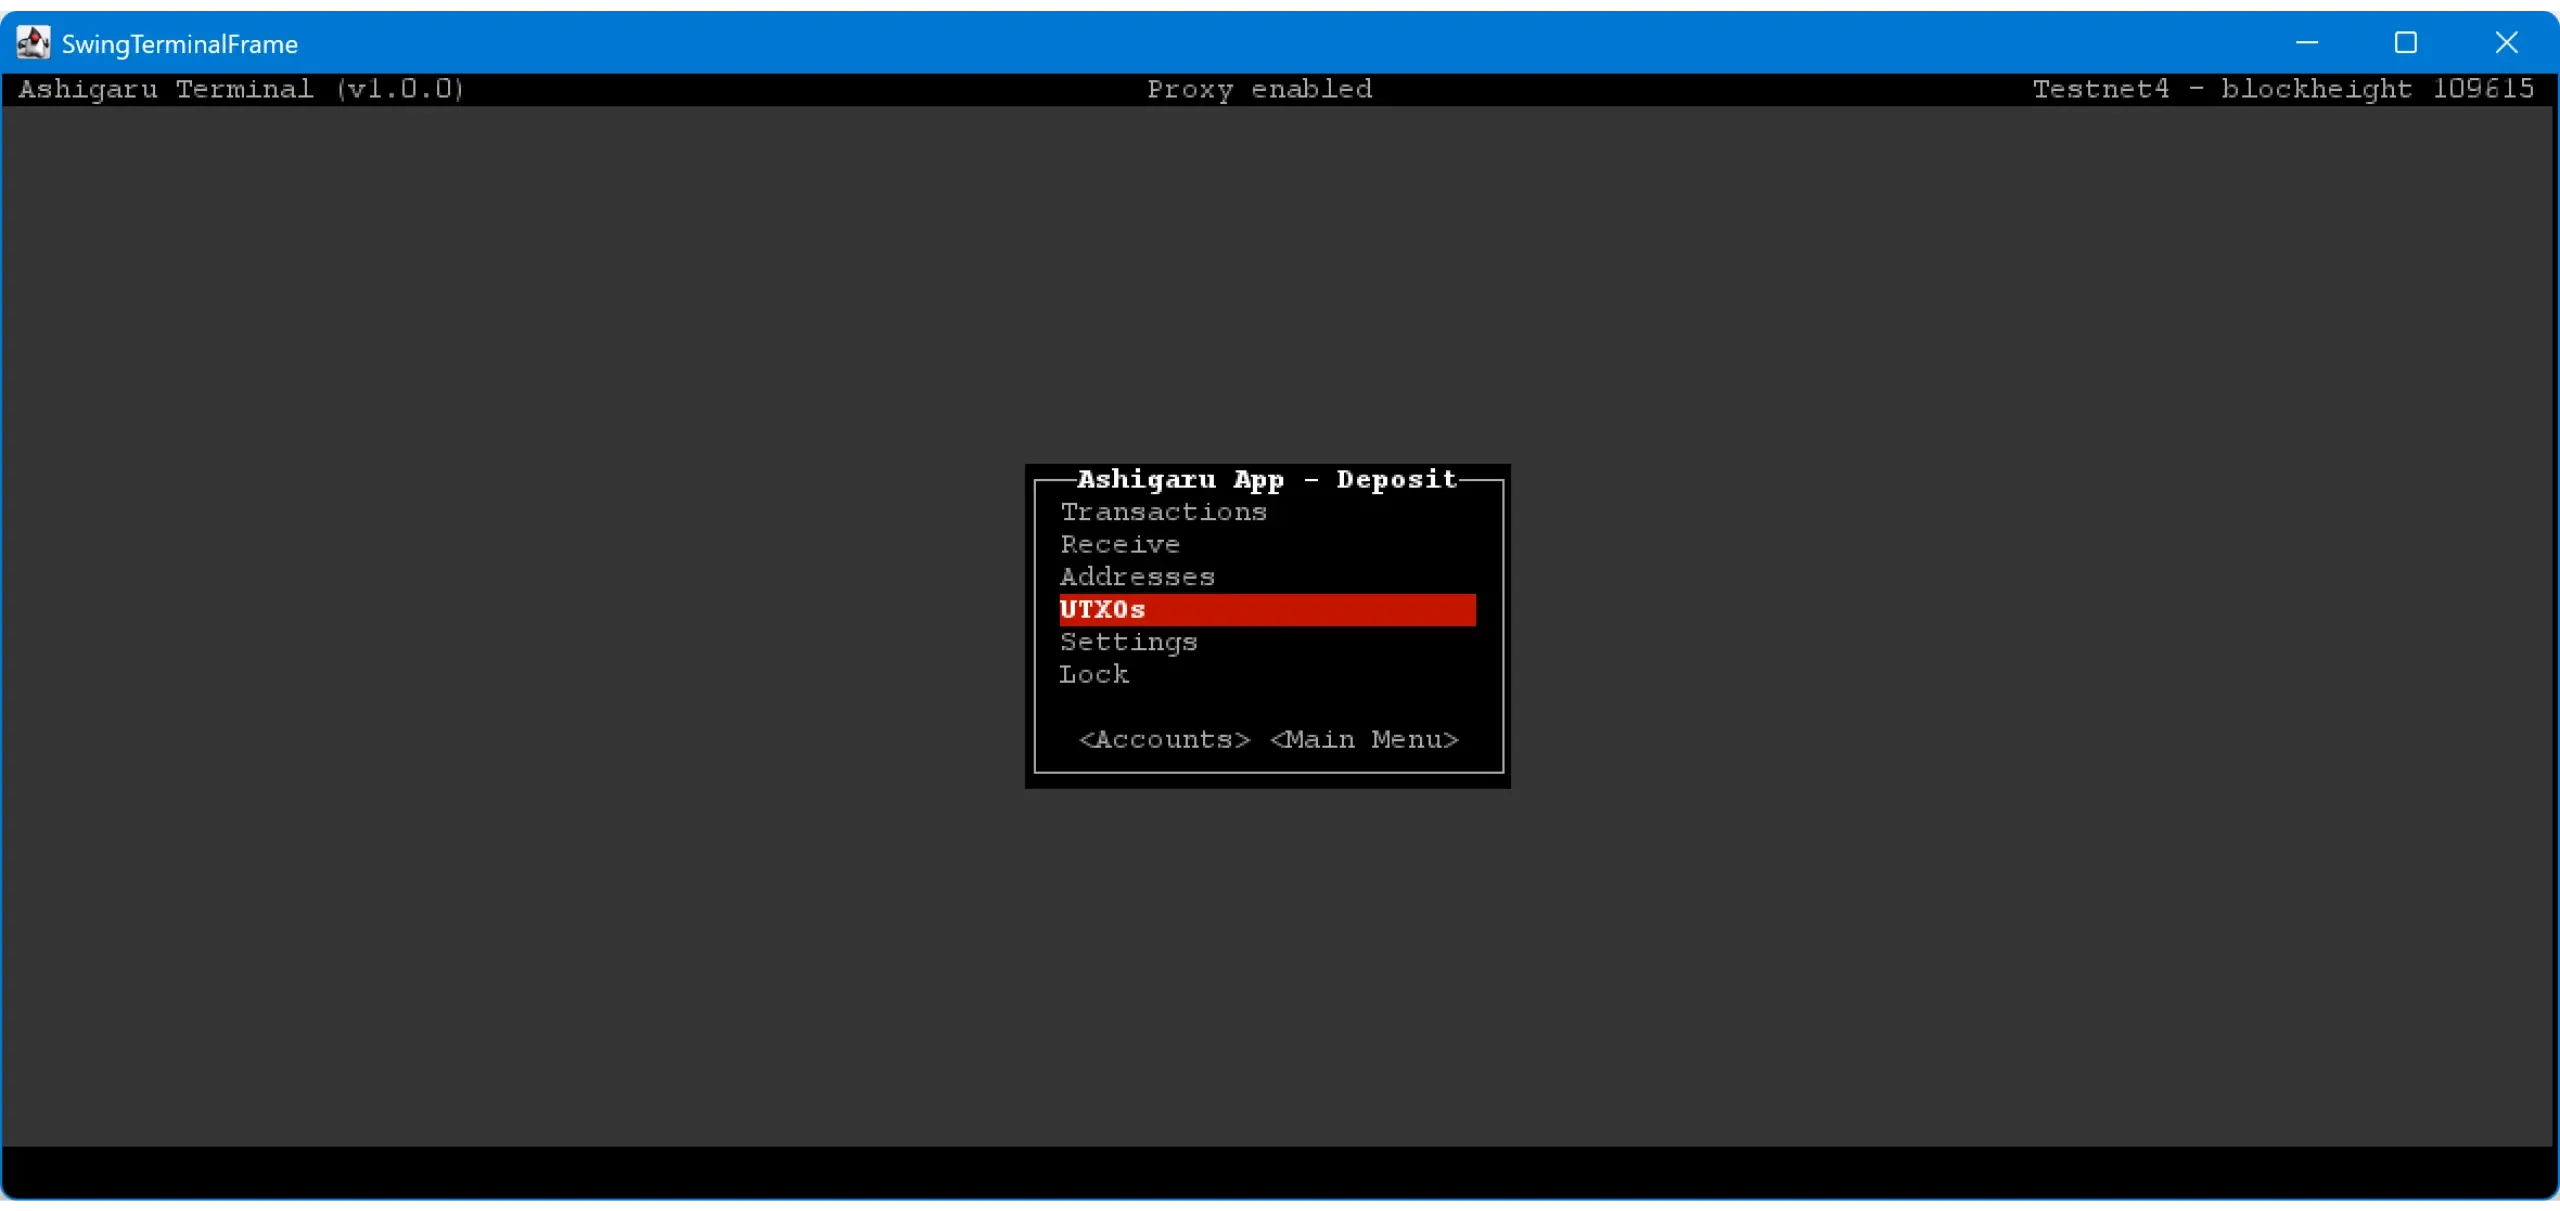
14. Use the wallet in Ashigaru Terminal
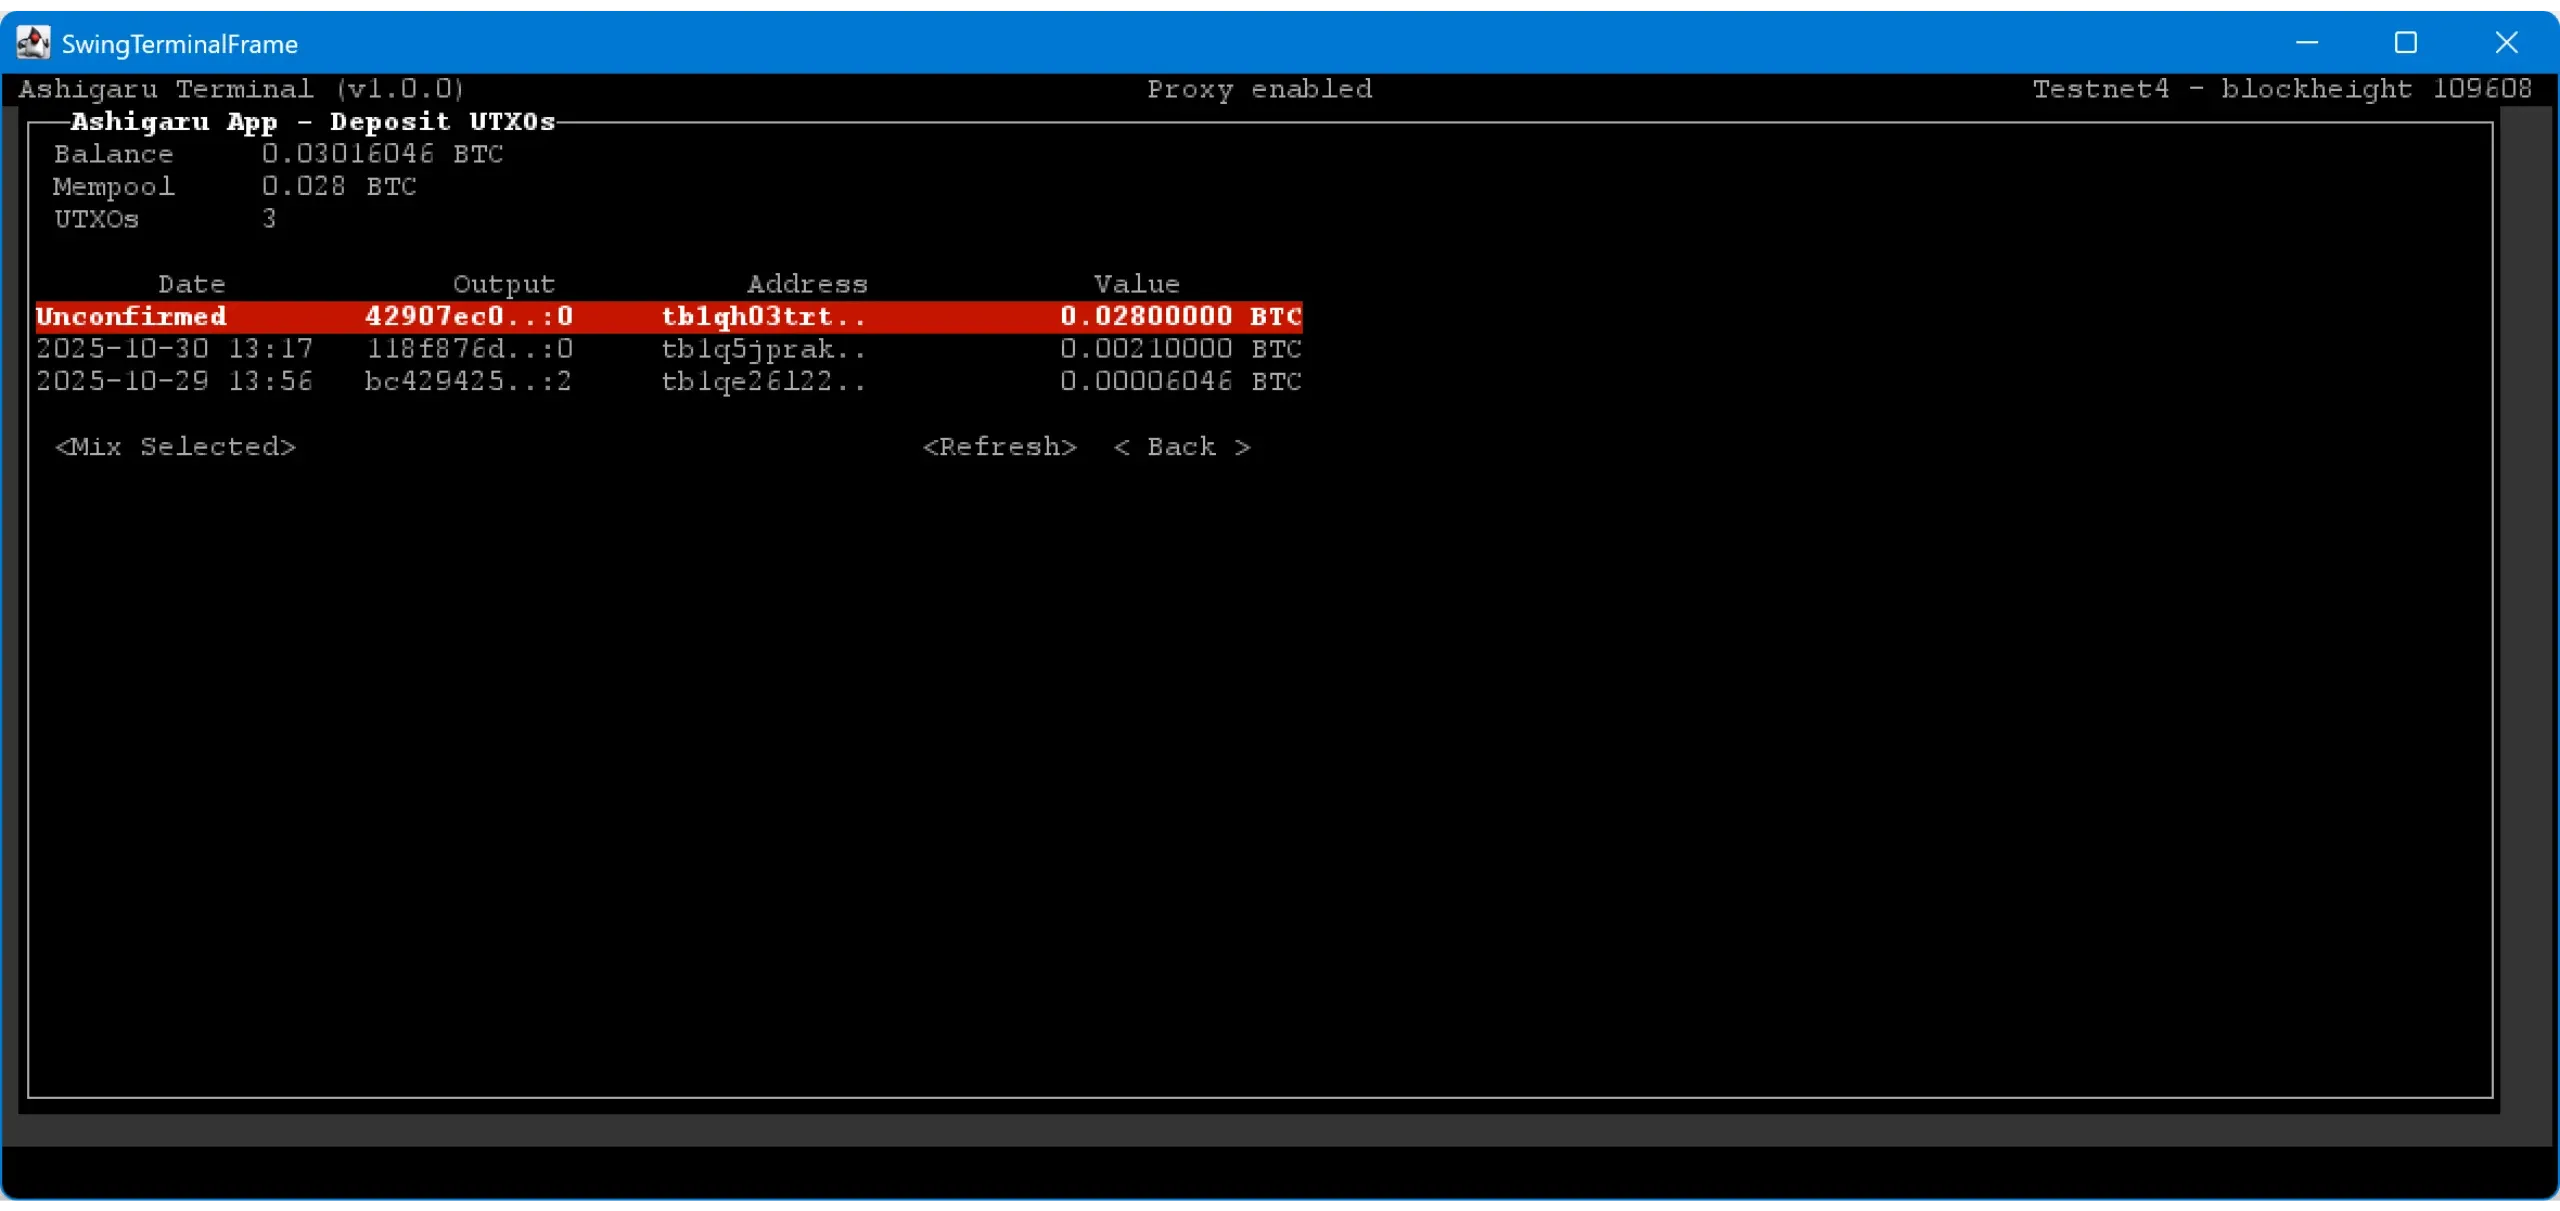
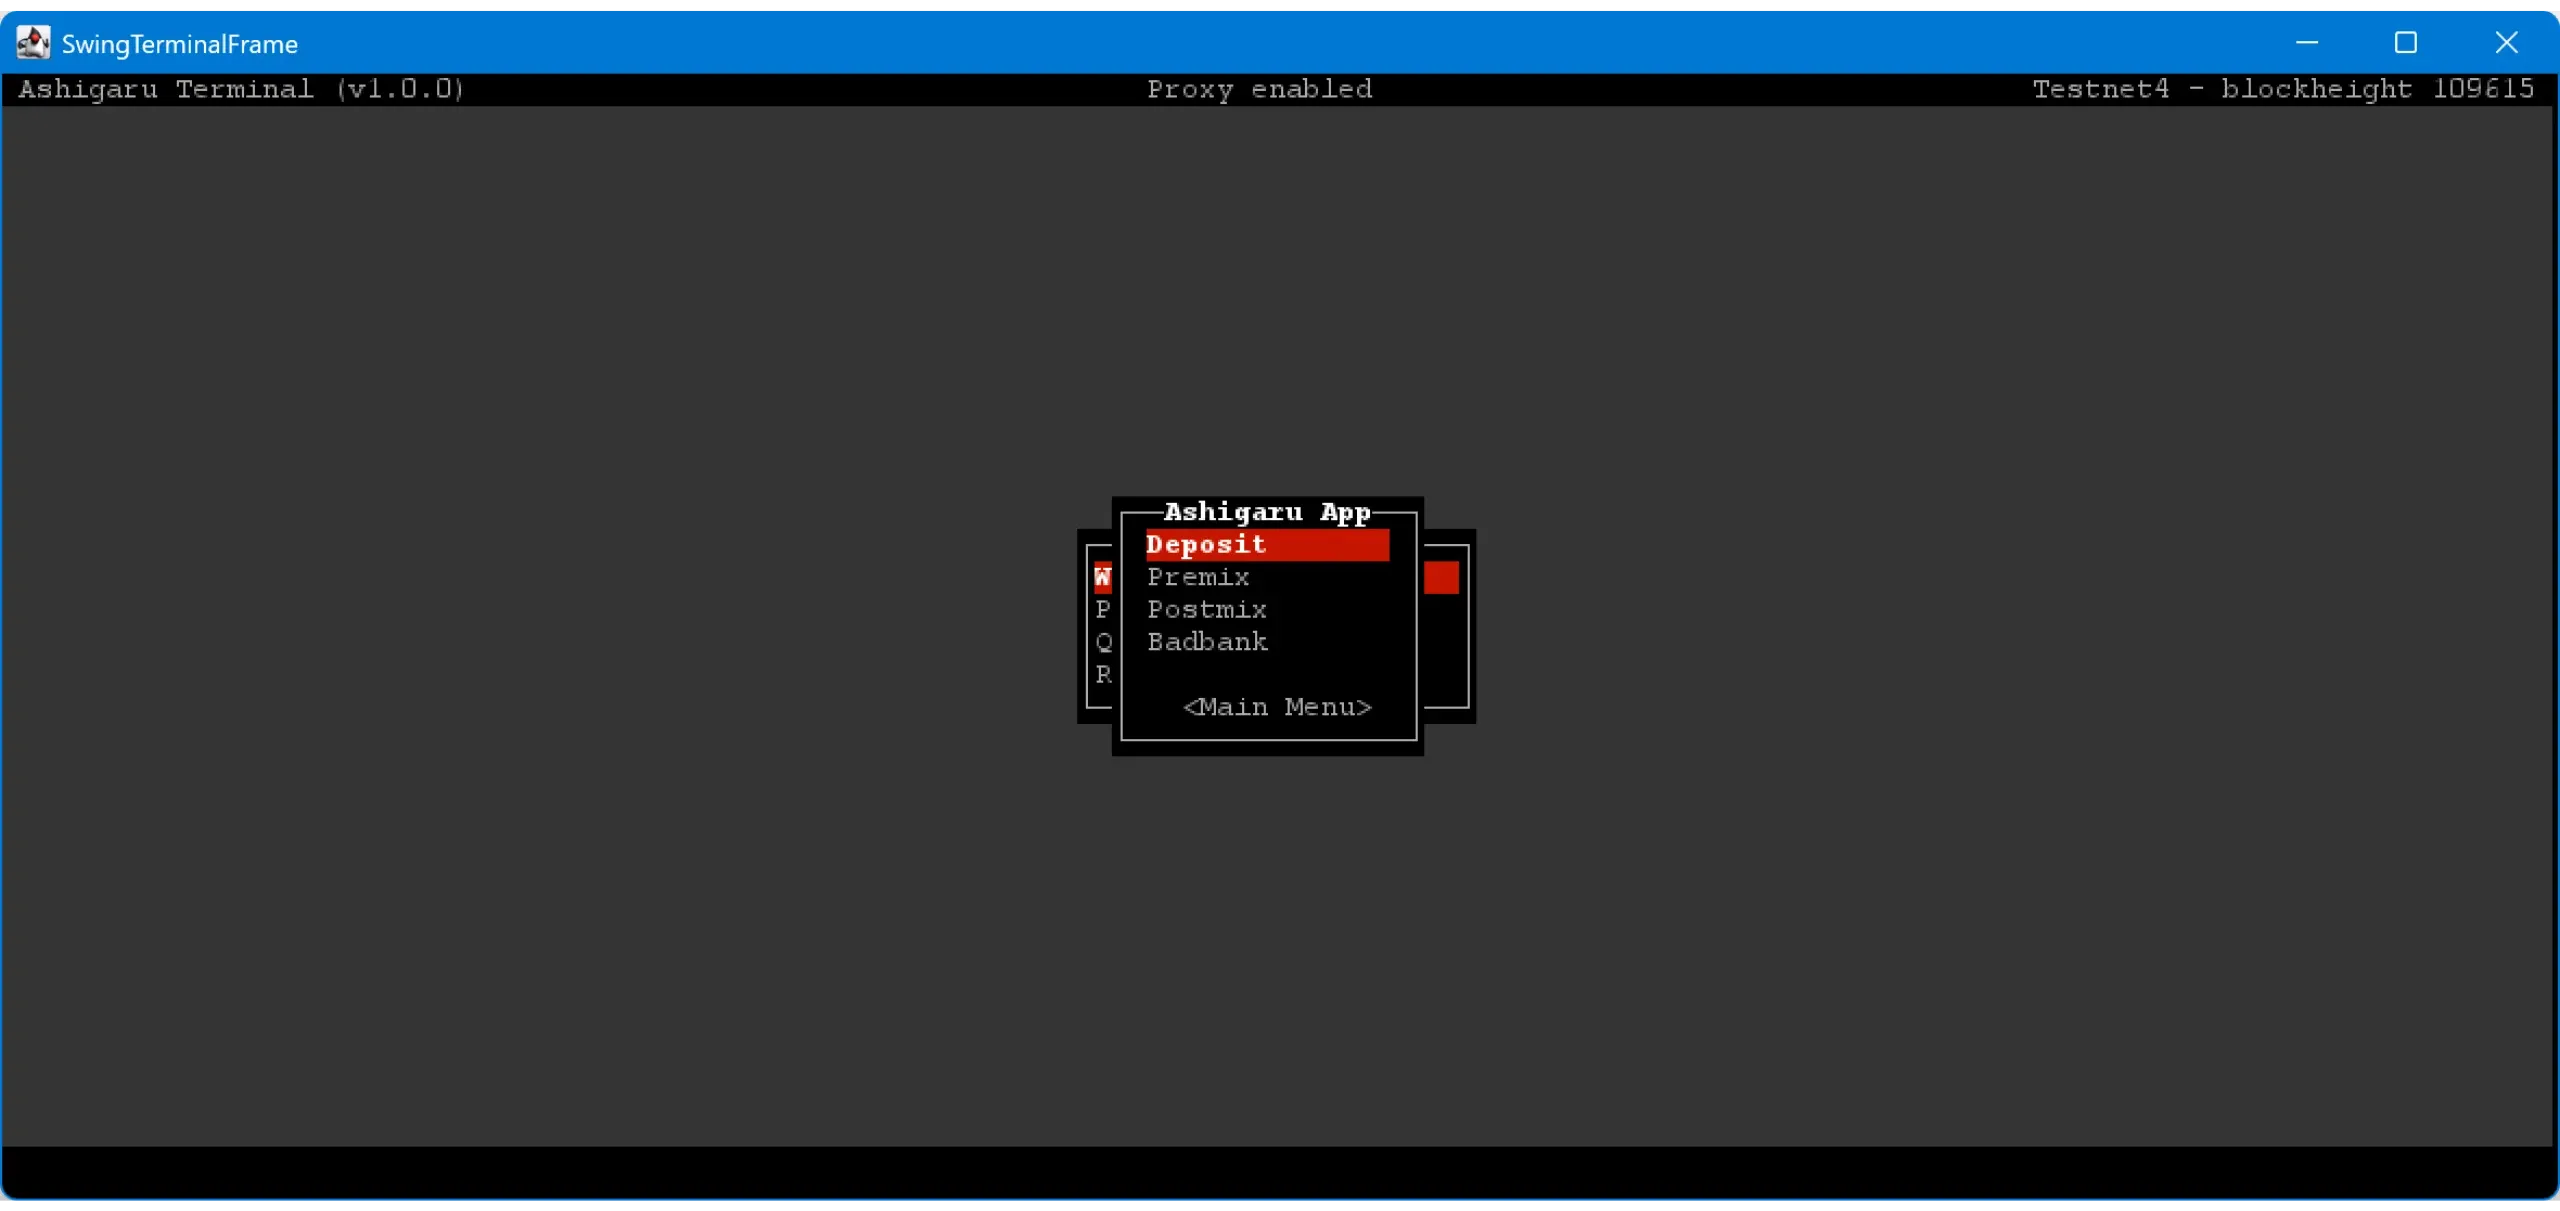
Choose which account to view. Since we haven’t started mixing yet, open the Deposit account.
Operation is similar to Sparrow (Ashigaru Terminal is a fork of Sparrow Server), so you’ll see familiar menus:
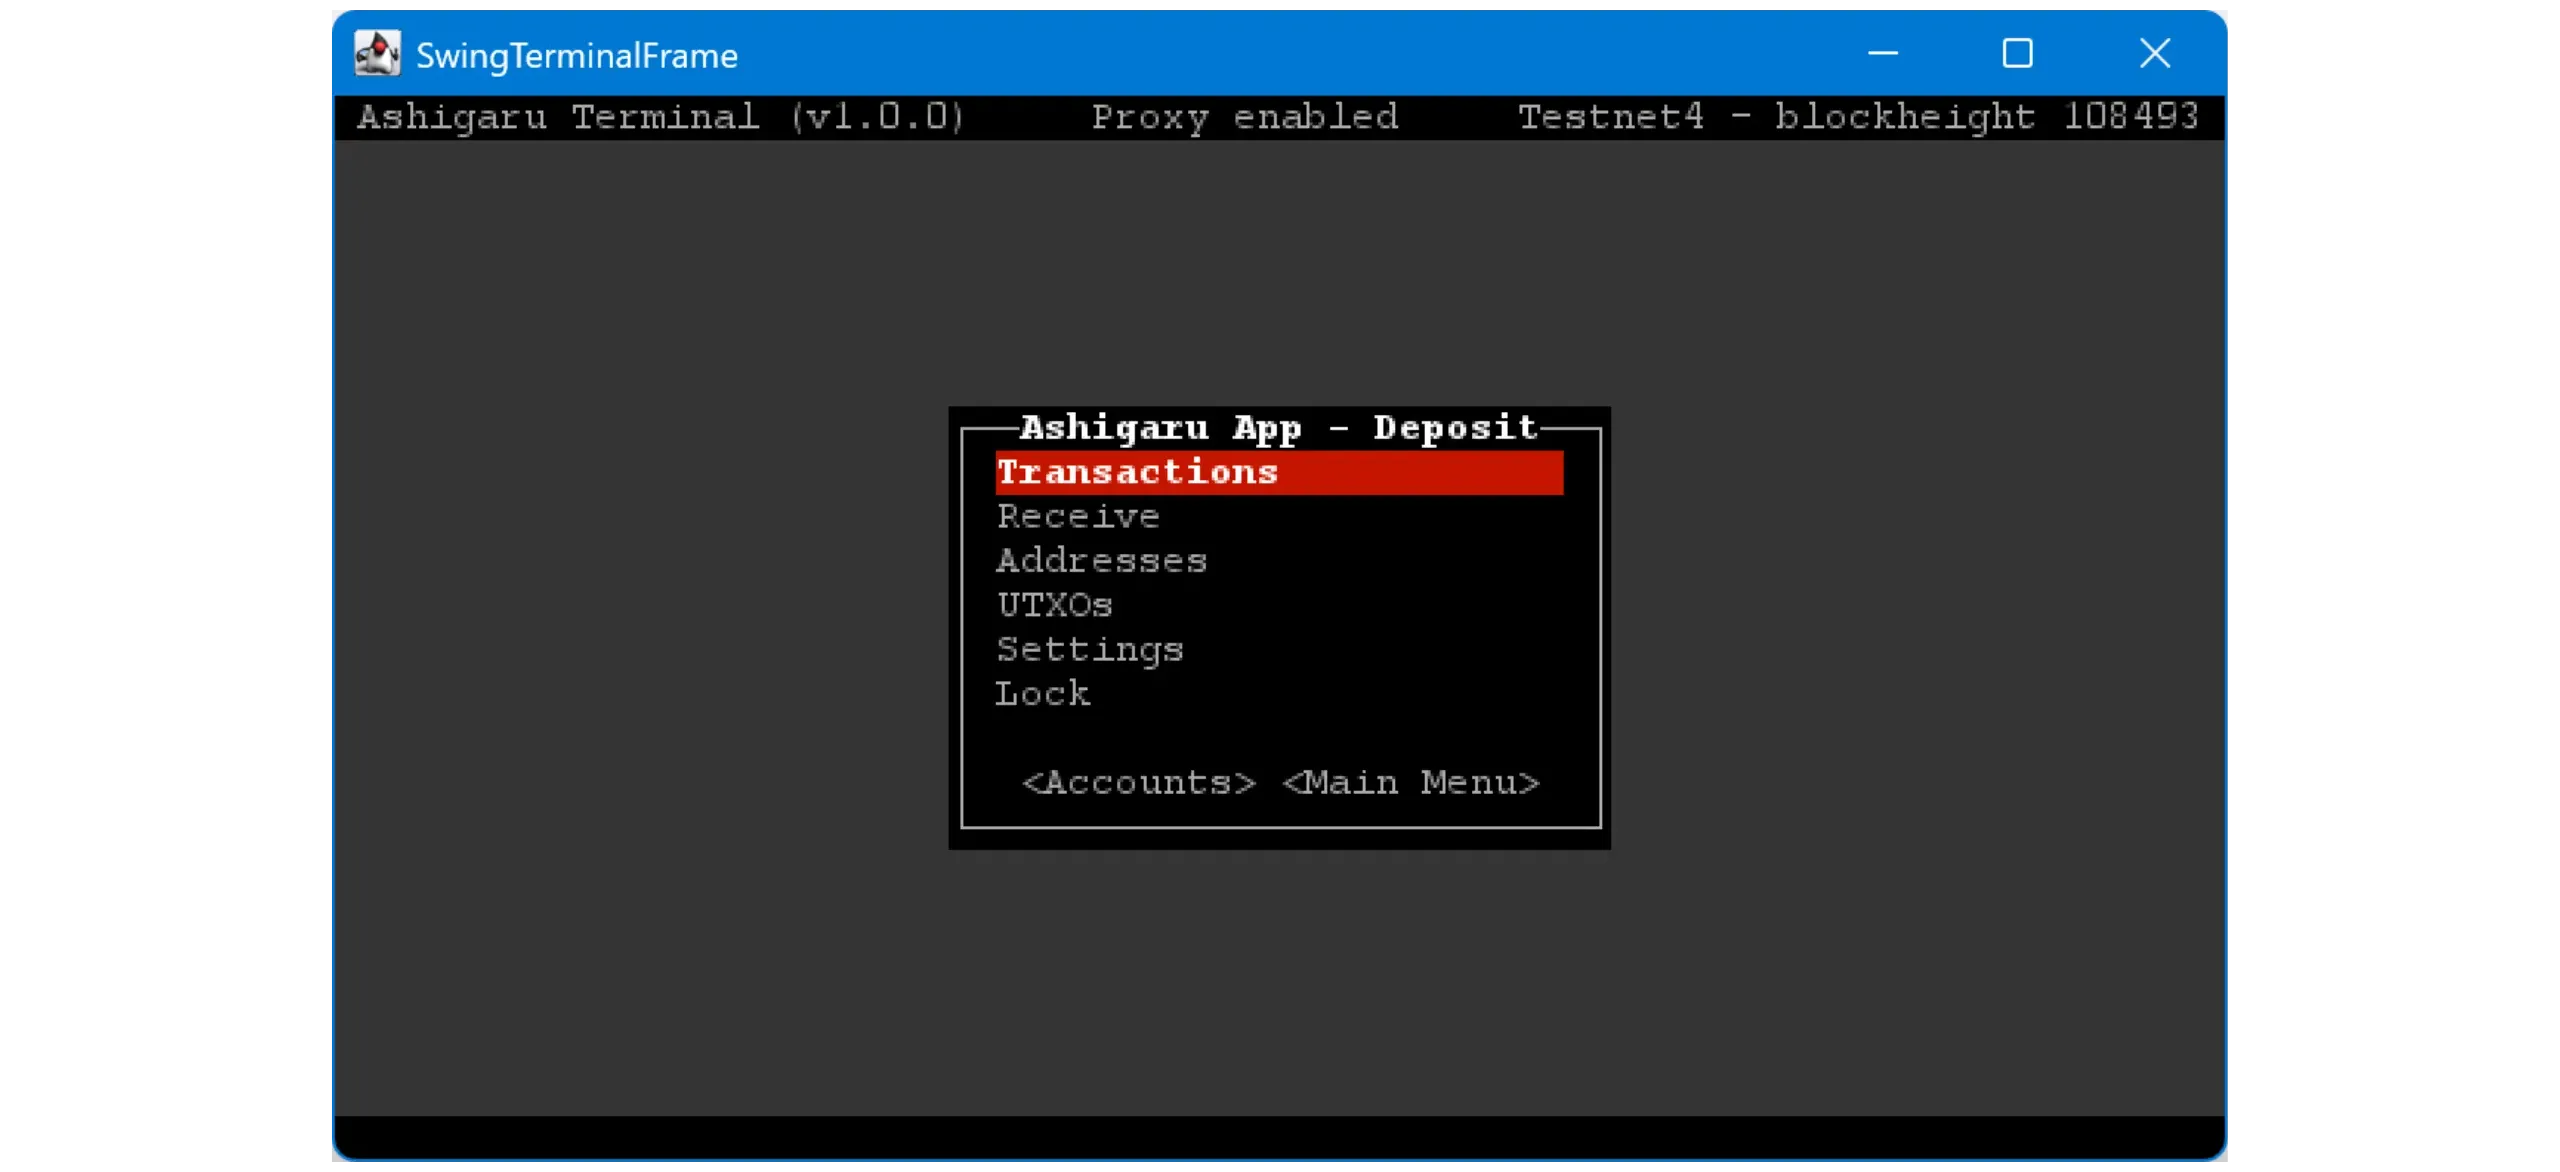
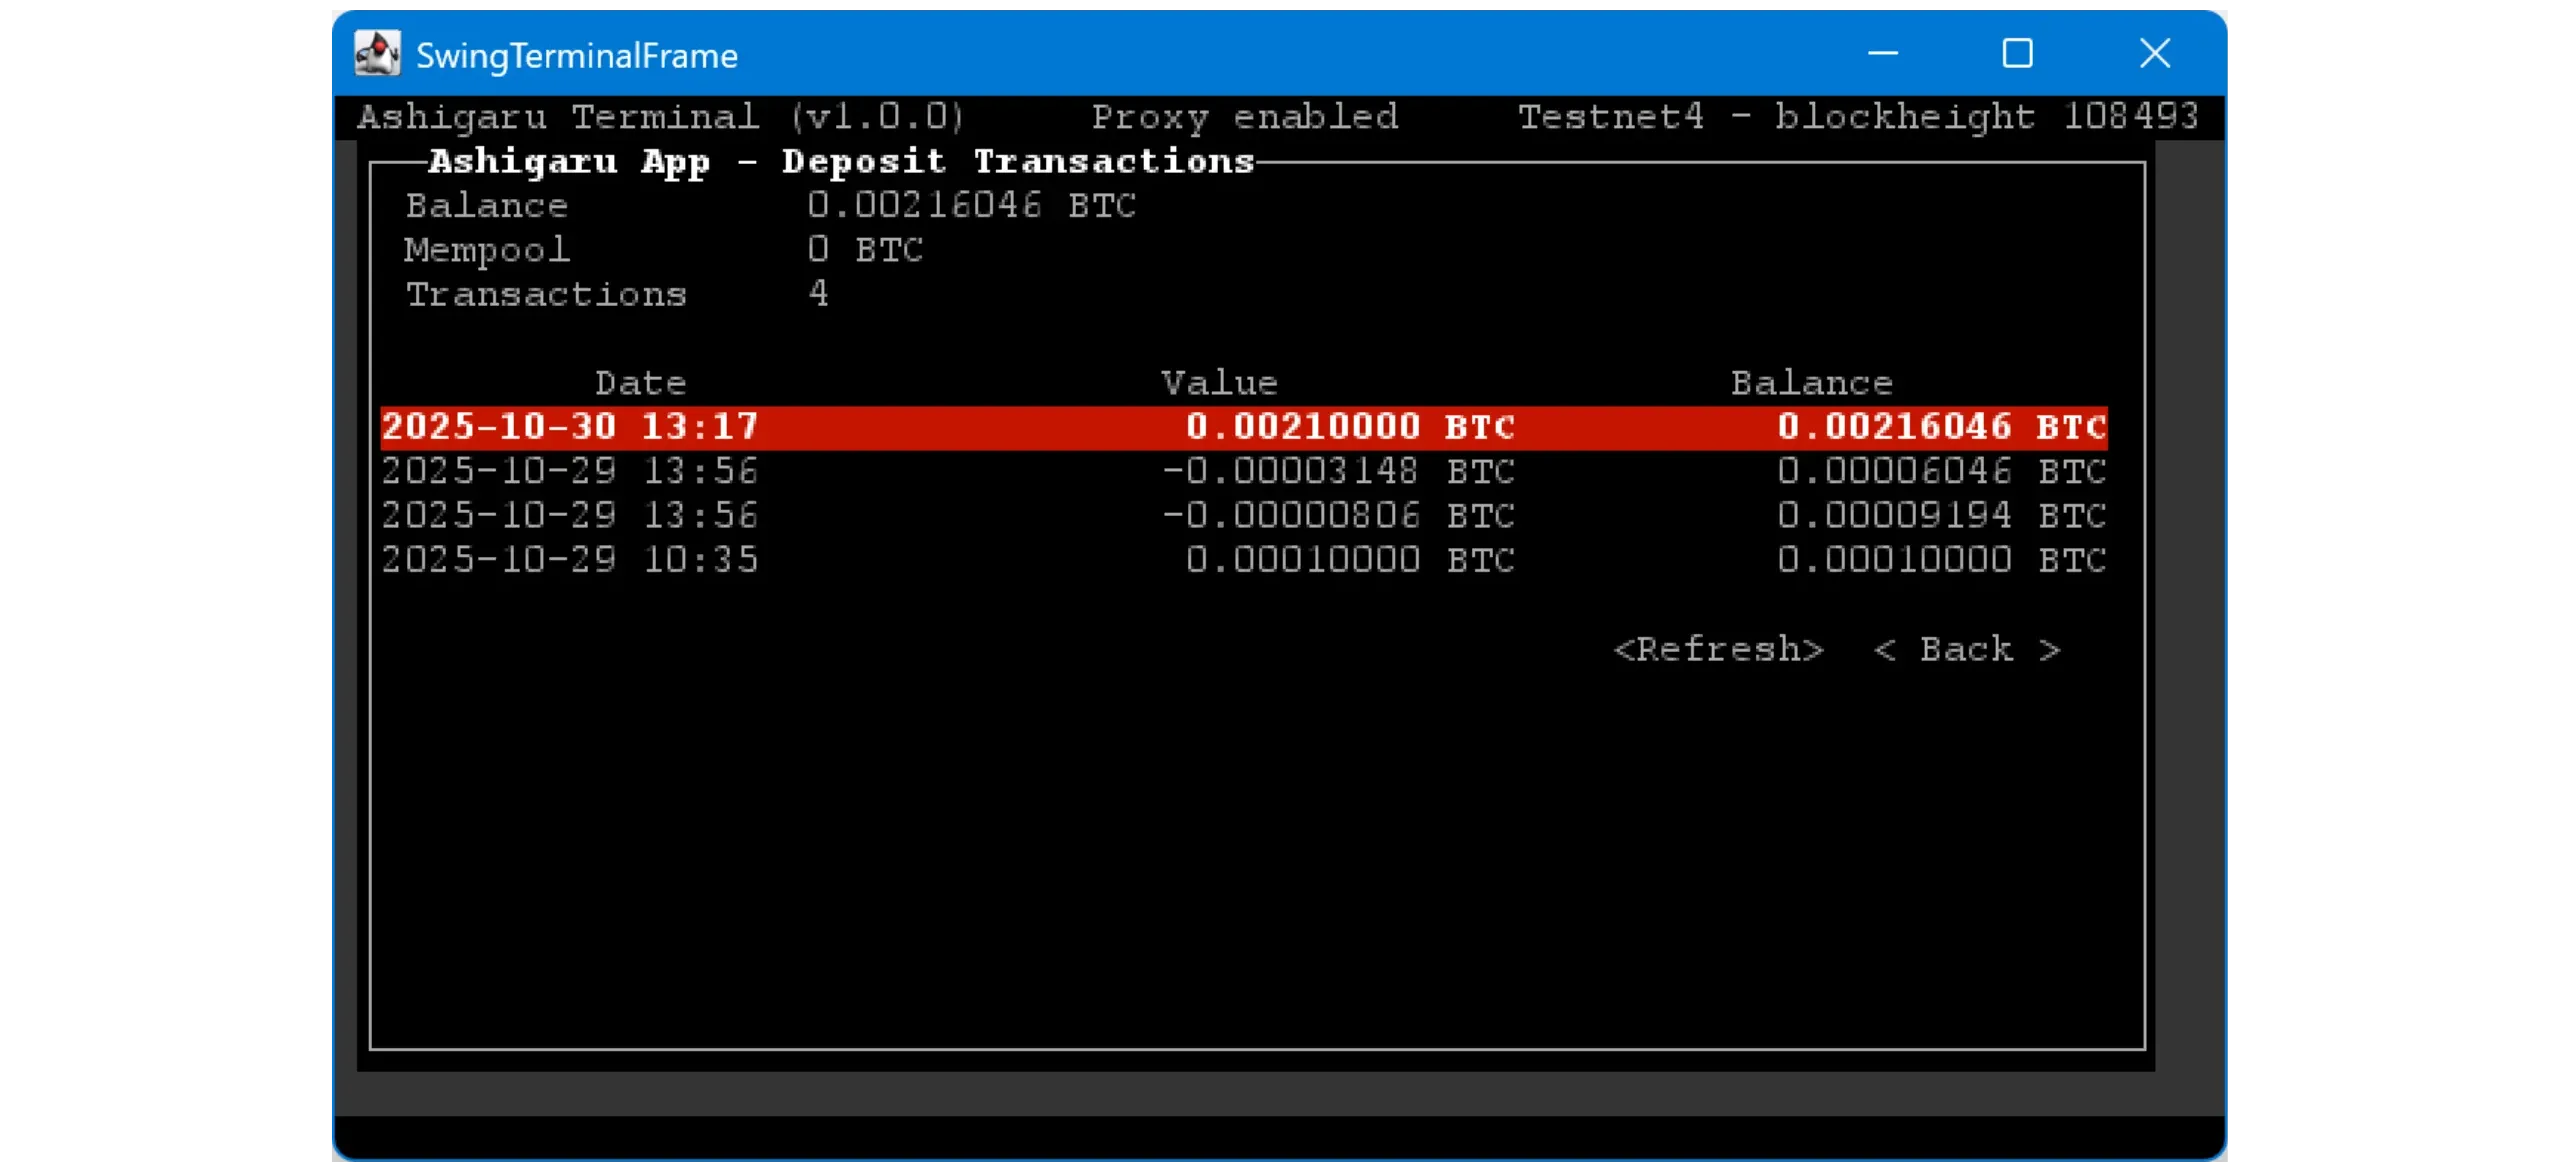
Transactions: view transaction history for this account. In this example, some appear already because they were made with the Ashigaru Mobile app using the same wallet.
Receive: generate a fresh receiving address to fund the deposit account.
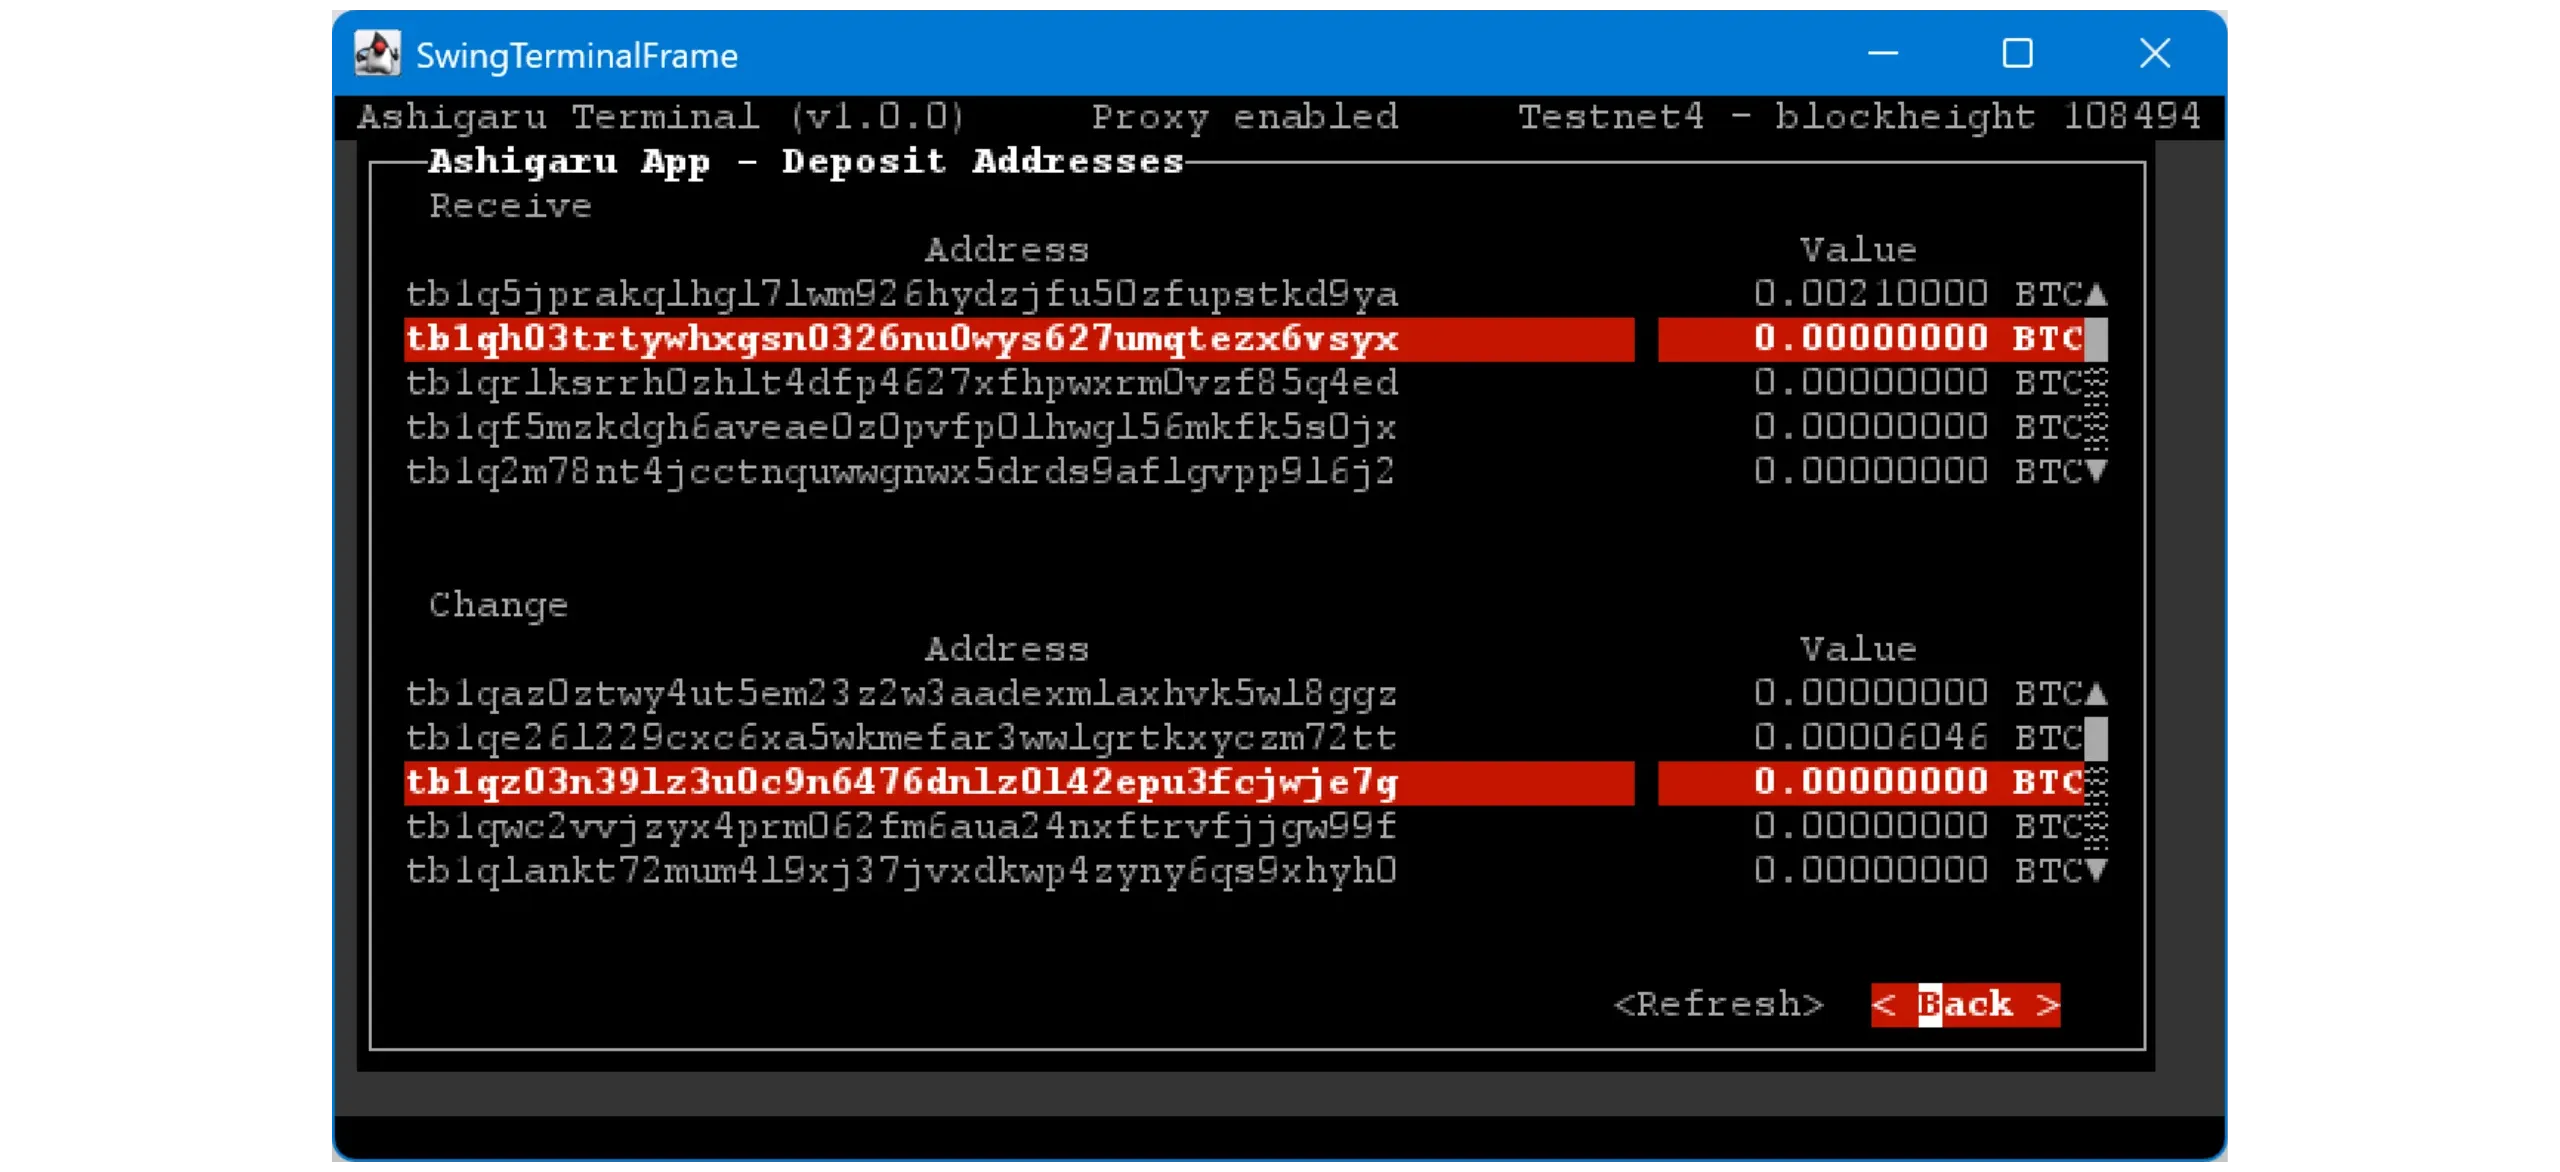
Addresses: list all addresses in this account (internal and external chains).
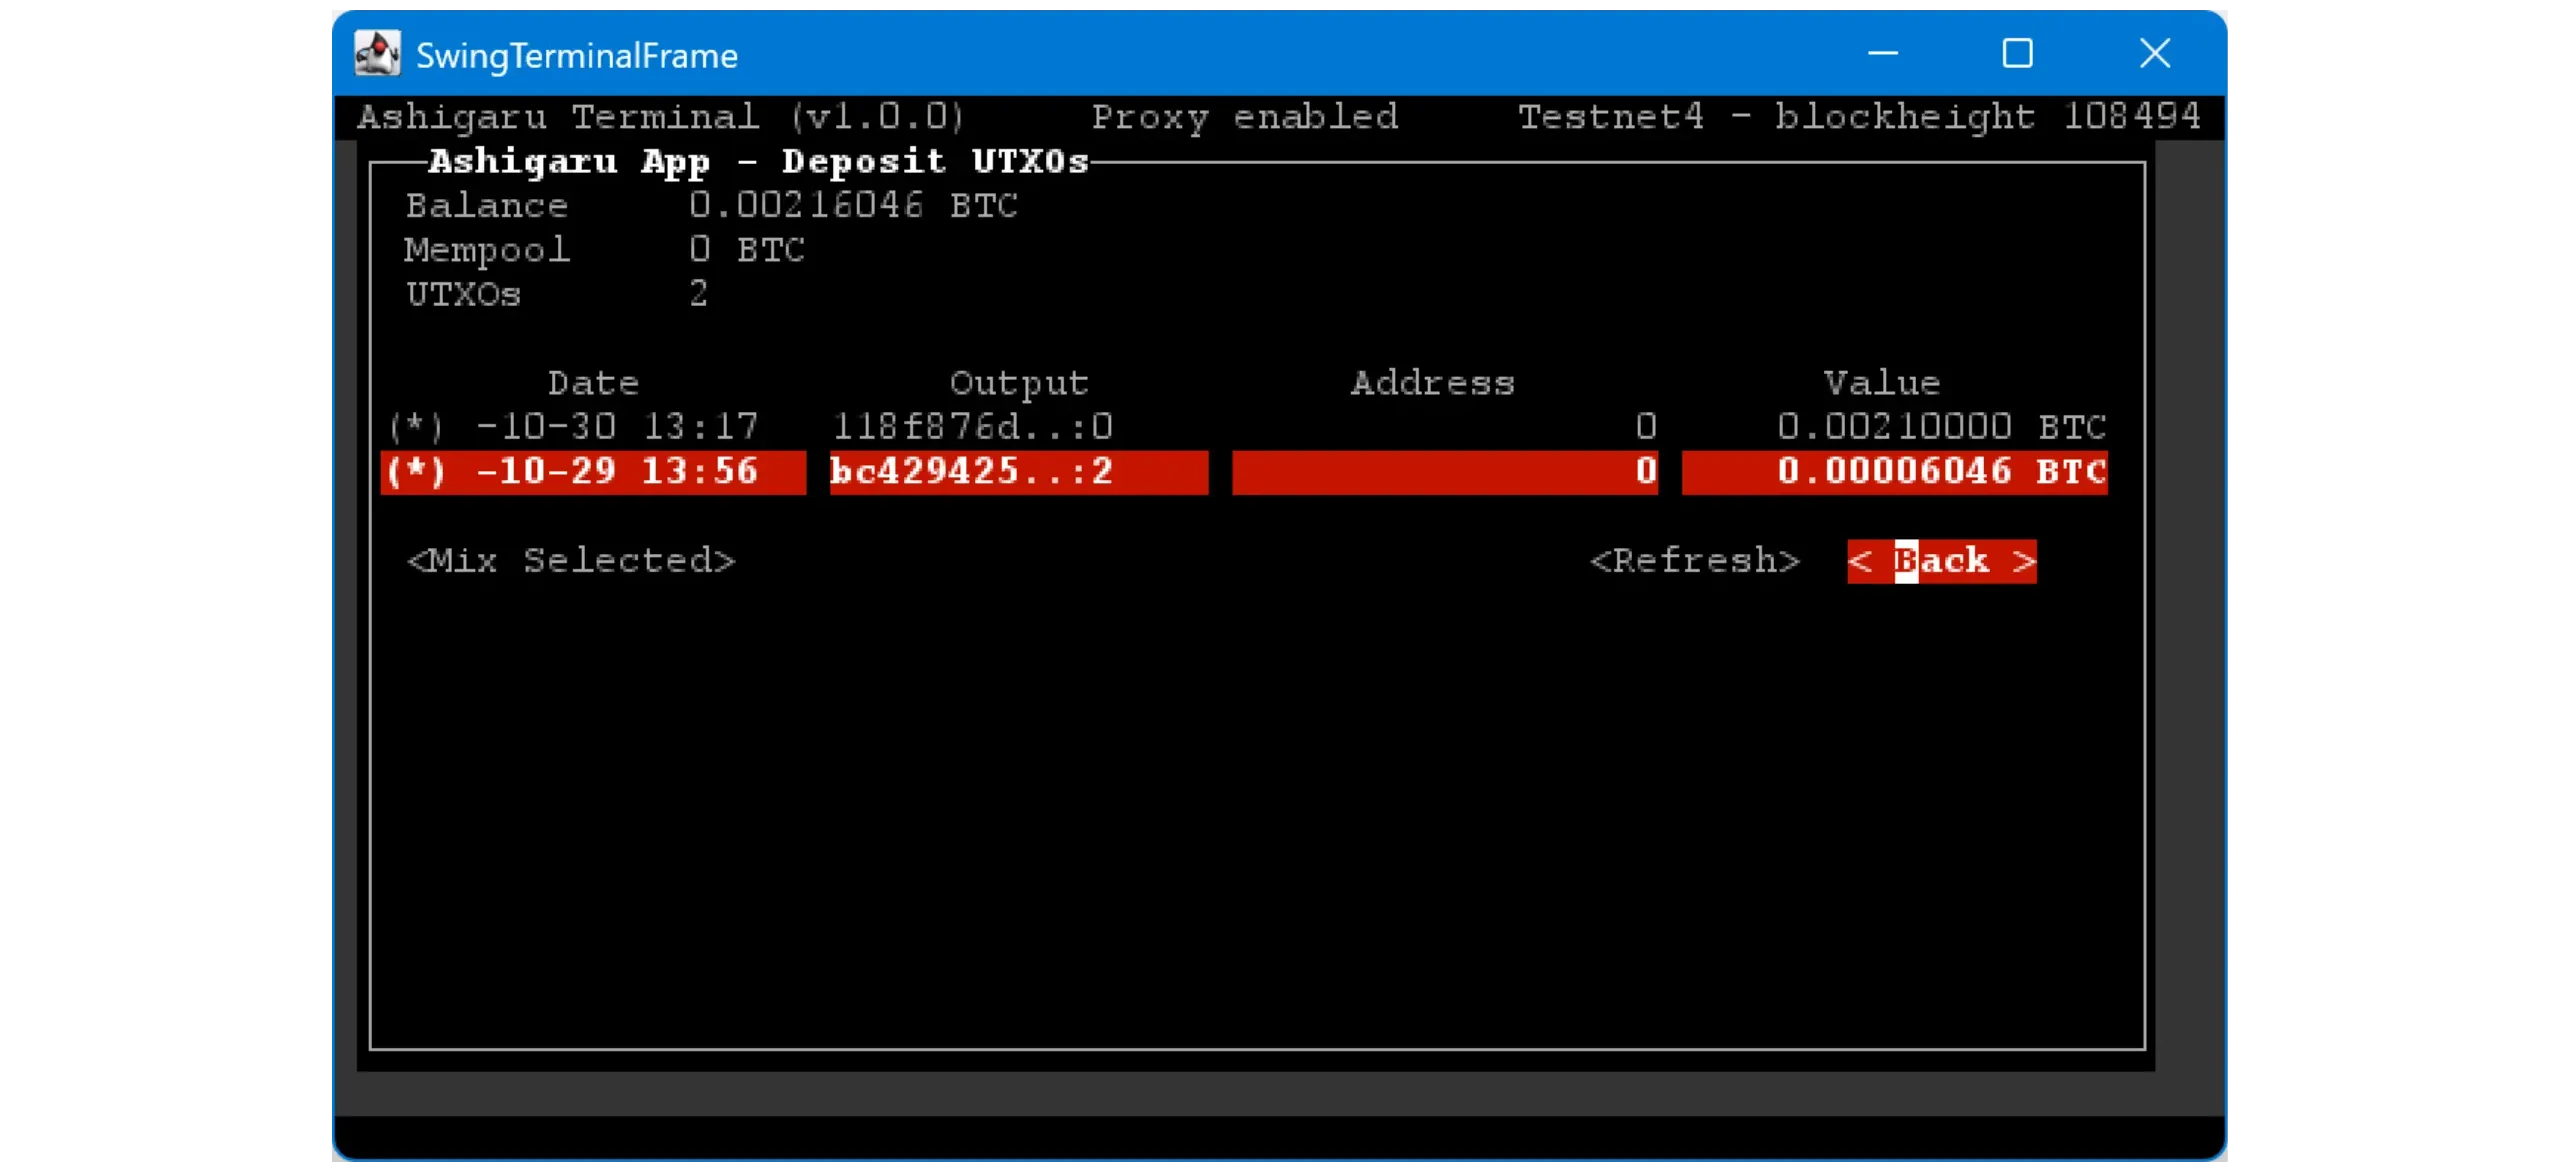
UTXOs: list all available UTXOs.
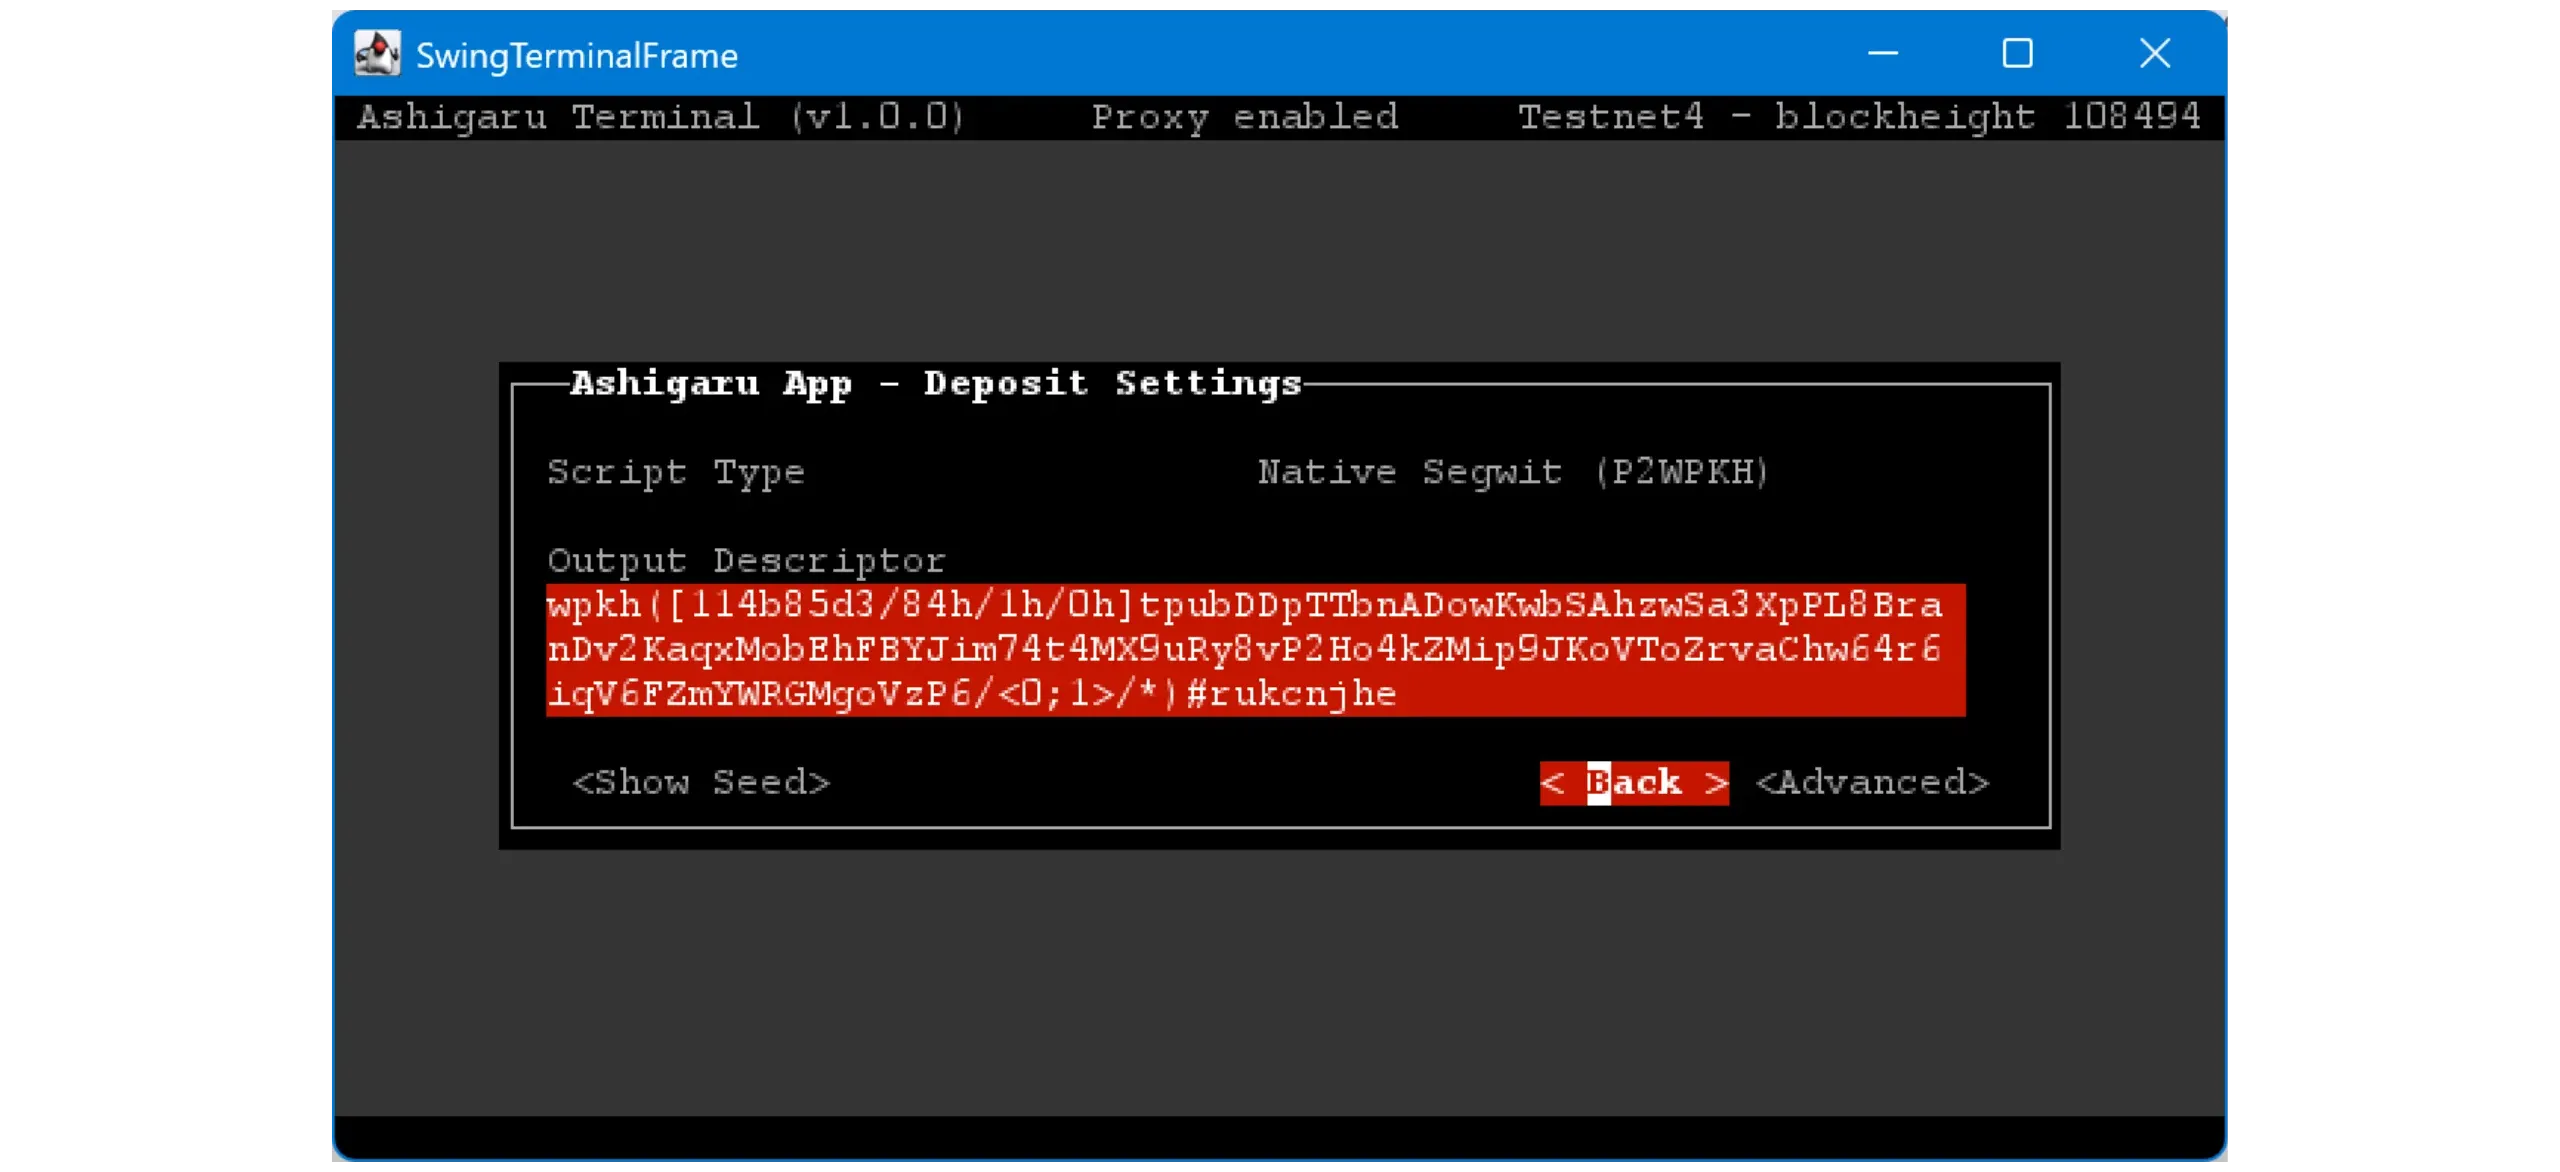
Settings: view the wallet descriptor, check the seed, adjust Gap Limit, or change the wallet birthday/start date.
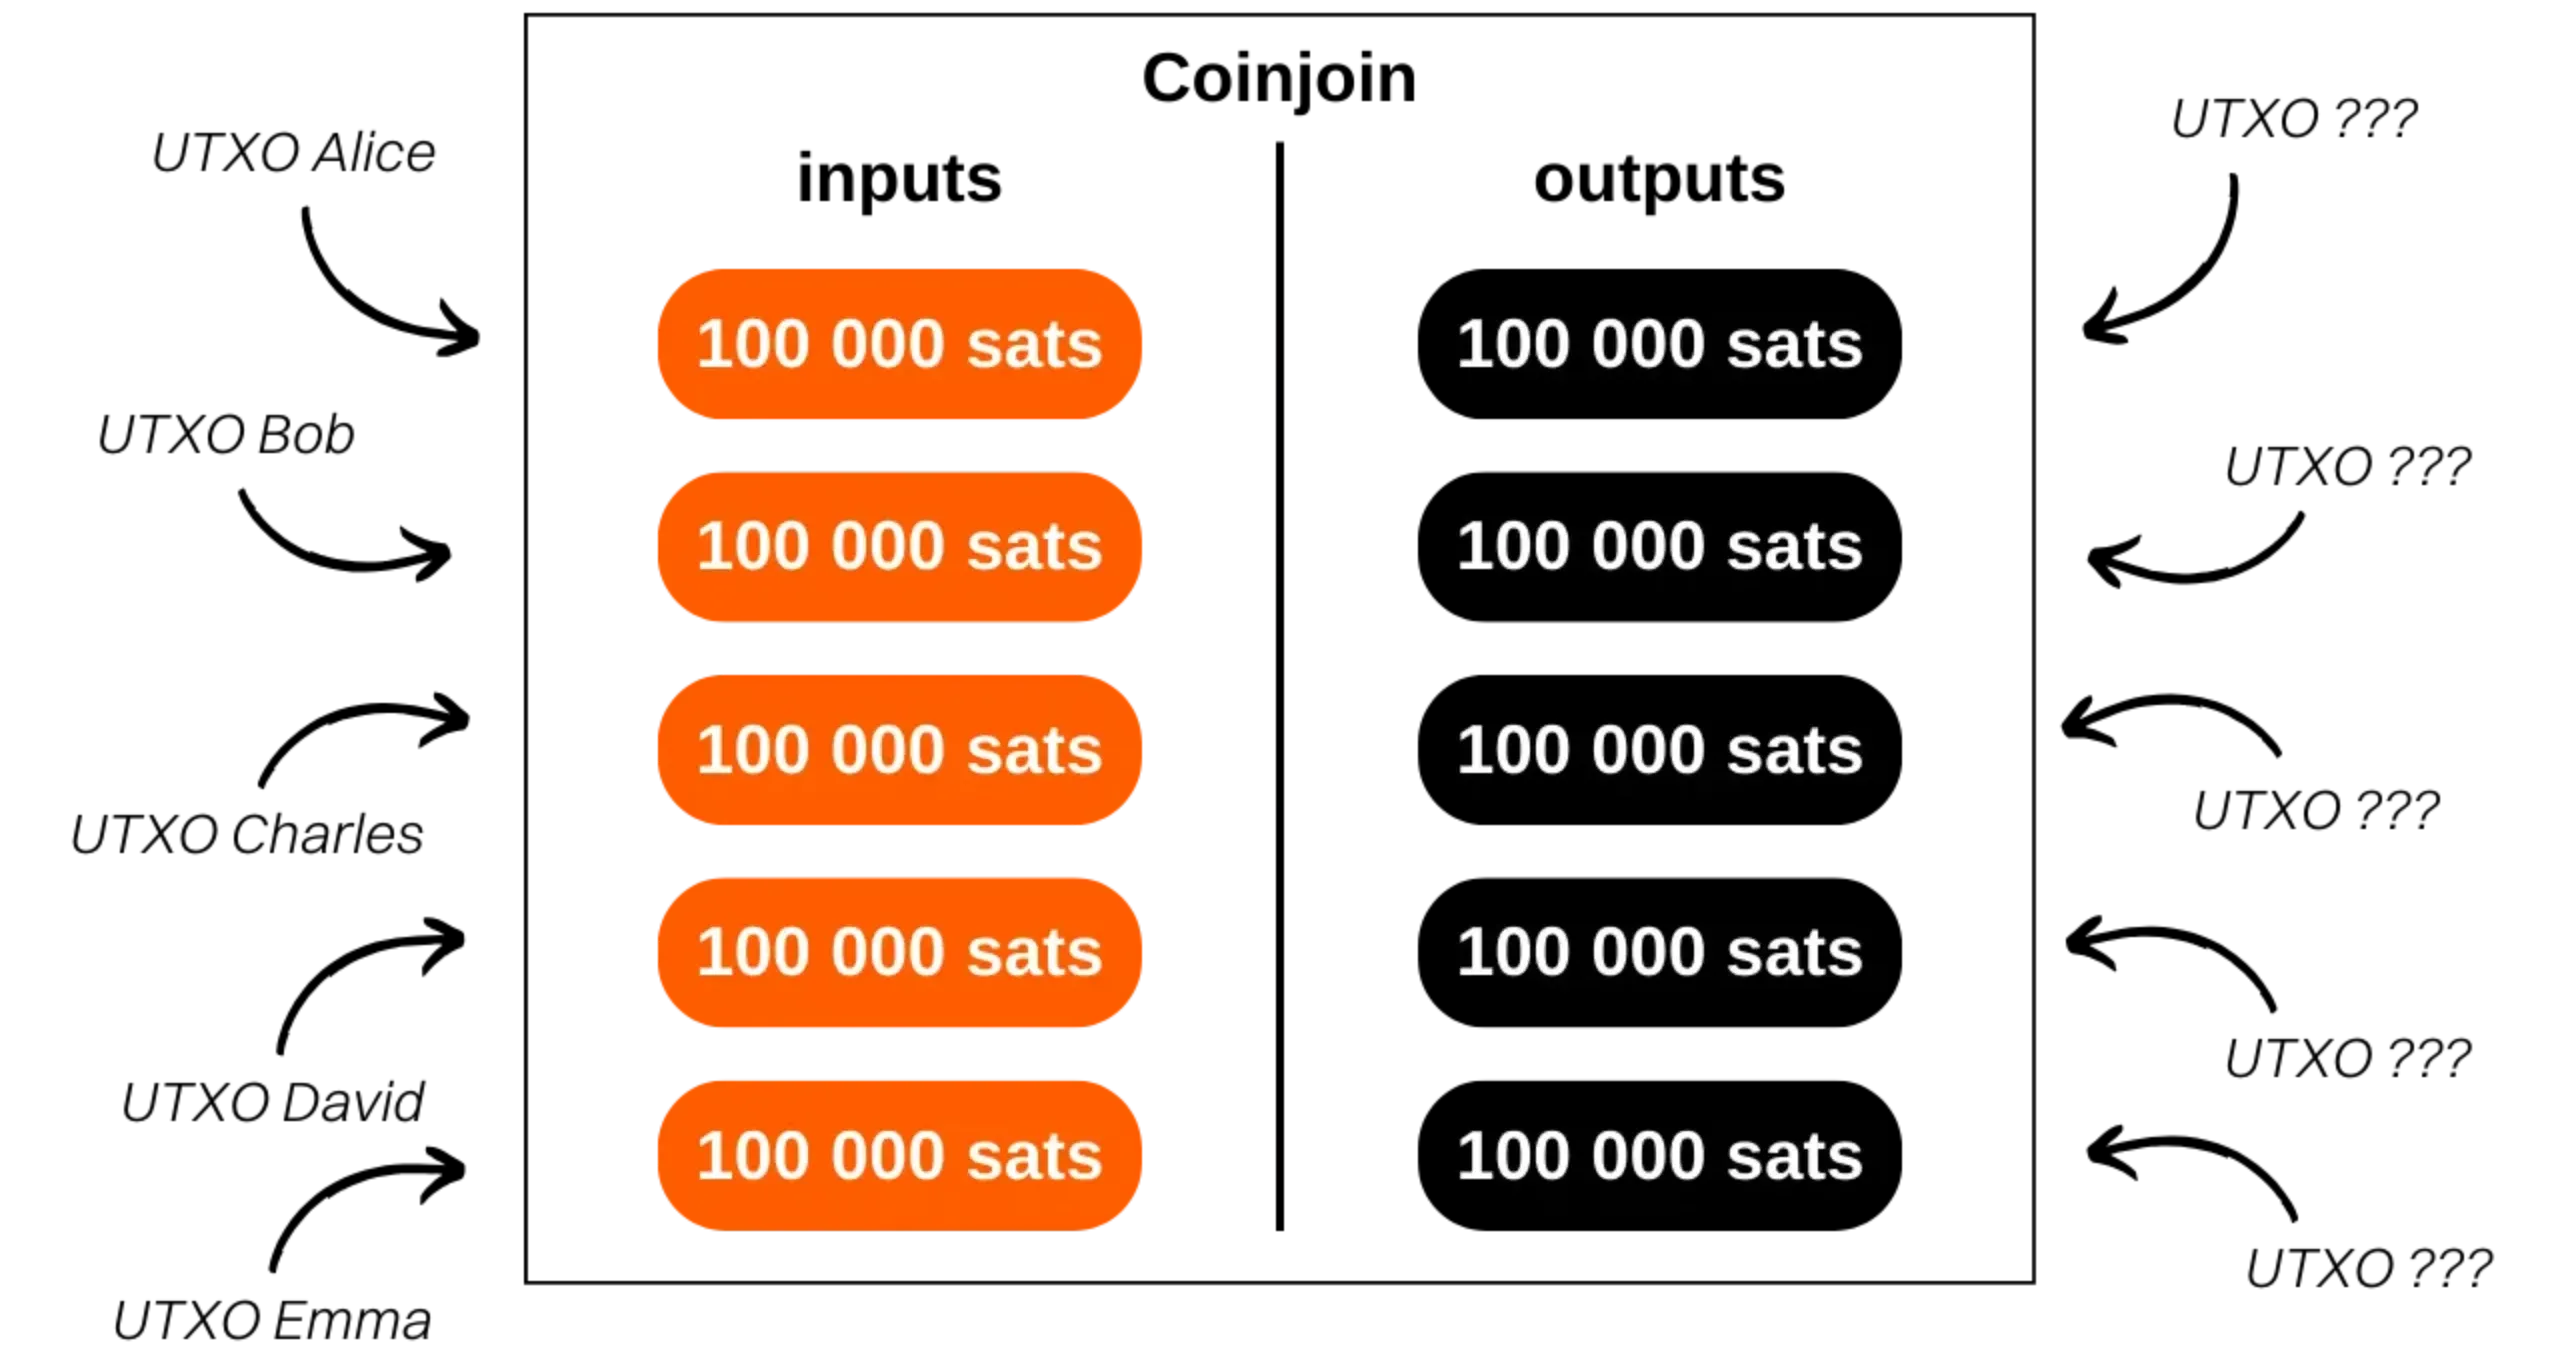
15. How Whirlpool coinjoins work
“a bitcoin wallet for the streets”
In this section, you’ll learn what a coinjoin is in practice and how to perform one using the Ashigaru ecosystem and Whirlpool — a coinjoin protocol inherited from Samourai Wallet — via Ashigaru Terminal.
As always DO YOUR OWN RESEARCH!
This guide does not explain coinjoin theory, why it’s useful, or the formal design of Whirlpool, as these topics will be covered in detail in a future post.
Here are a few quick points that help in practice.
Wallets compatible with Whirlpool use 4 distinct accounts to support the coinjoin process:
- Deposit account, index
0' - Bad Bank (aka doxxic change), index
2 147 483 644' - Premix, index
2 147 483 645' - Postmix, index
2 147 483 646'
As of November 2025 on Ashigaru, two pool denominations are available (this list will likely evolve in the coming months — check values at the time you read this):
0.25 BTC, with an entry fee of0.0125 BTC0.025 BTC, with an entry fee of0.00125 BTC
Each mixing cycle usually includes 5 UTXOs as inputs and outputs.
Pool sizes and entry fees can change. Be sure to check current values before starting.
Required software
To perform coinjoins with Whirlpool, you need three separate tools:
- Ashigaru Terminal — manage your coinjoins directly from your computer
- Ashigaru Mobile — the mobile app you’ll use to spend your postmix bitcoin anywhere
- Dojo — a Bitcoin node implementation to ensure a sovereign connection without relying on third‑party servers, it can be run on:
- Start9 by downloading dojo from the community marketplace (I would link to this but start9’s marketplace website is poor to say the least)
- Umbrel by installing the “Samourai Server” app
- Vanilla dojo on Ubuntu or Debian by following this guide.
- You may also use a public dojo run by a community member but know that this is not ideal for privacy and you should strive to run your own dojo. You may want to use a public dojo if you are just testing with testnet coins for example. Learn more here: dojobay.pw
Install each tool following its dedicated tutorial. Then you can start doing your first coinjoins.
Receive bitcoin for mixing
After creating your wallet, you start with a single account — index 0' — called Deposit. Send bitcoin you intend to coinjoin to this Deposit account. You can receive via the Ashigaru mobile app in the receiving section earlier in this guide or via Ashigaru Terminal in the wallet section above.
Once your Deposit account holds at least the amount required to join the smallest pool, plus service fees and a minimum to cover mining fees, you’re ready to initiate your first coinjoins.
Create the Tx0
When funds have arrived in your Deposit account and the transaction is confirmed, you can start the coinjoin process. In Ashigaru Terminal, open the Wallets menu, then choose your wallet. If it’s locked, you’ll be asked for your password and passphrase.
Select the Deposit account.
Go to the UTXOs menu.
You’ll see all UTXOs in your Deposit account. Select the UTXOs you want to enter into coinjoin cycles.
For better privacy — and to avoid the Common Input Ownership Heuristic (CIOH) — it’s recommended to use UTXOs from the same sources in each Tx0. You do not want to accidentally associate your KYC and non-KYC coins, for example.
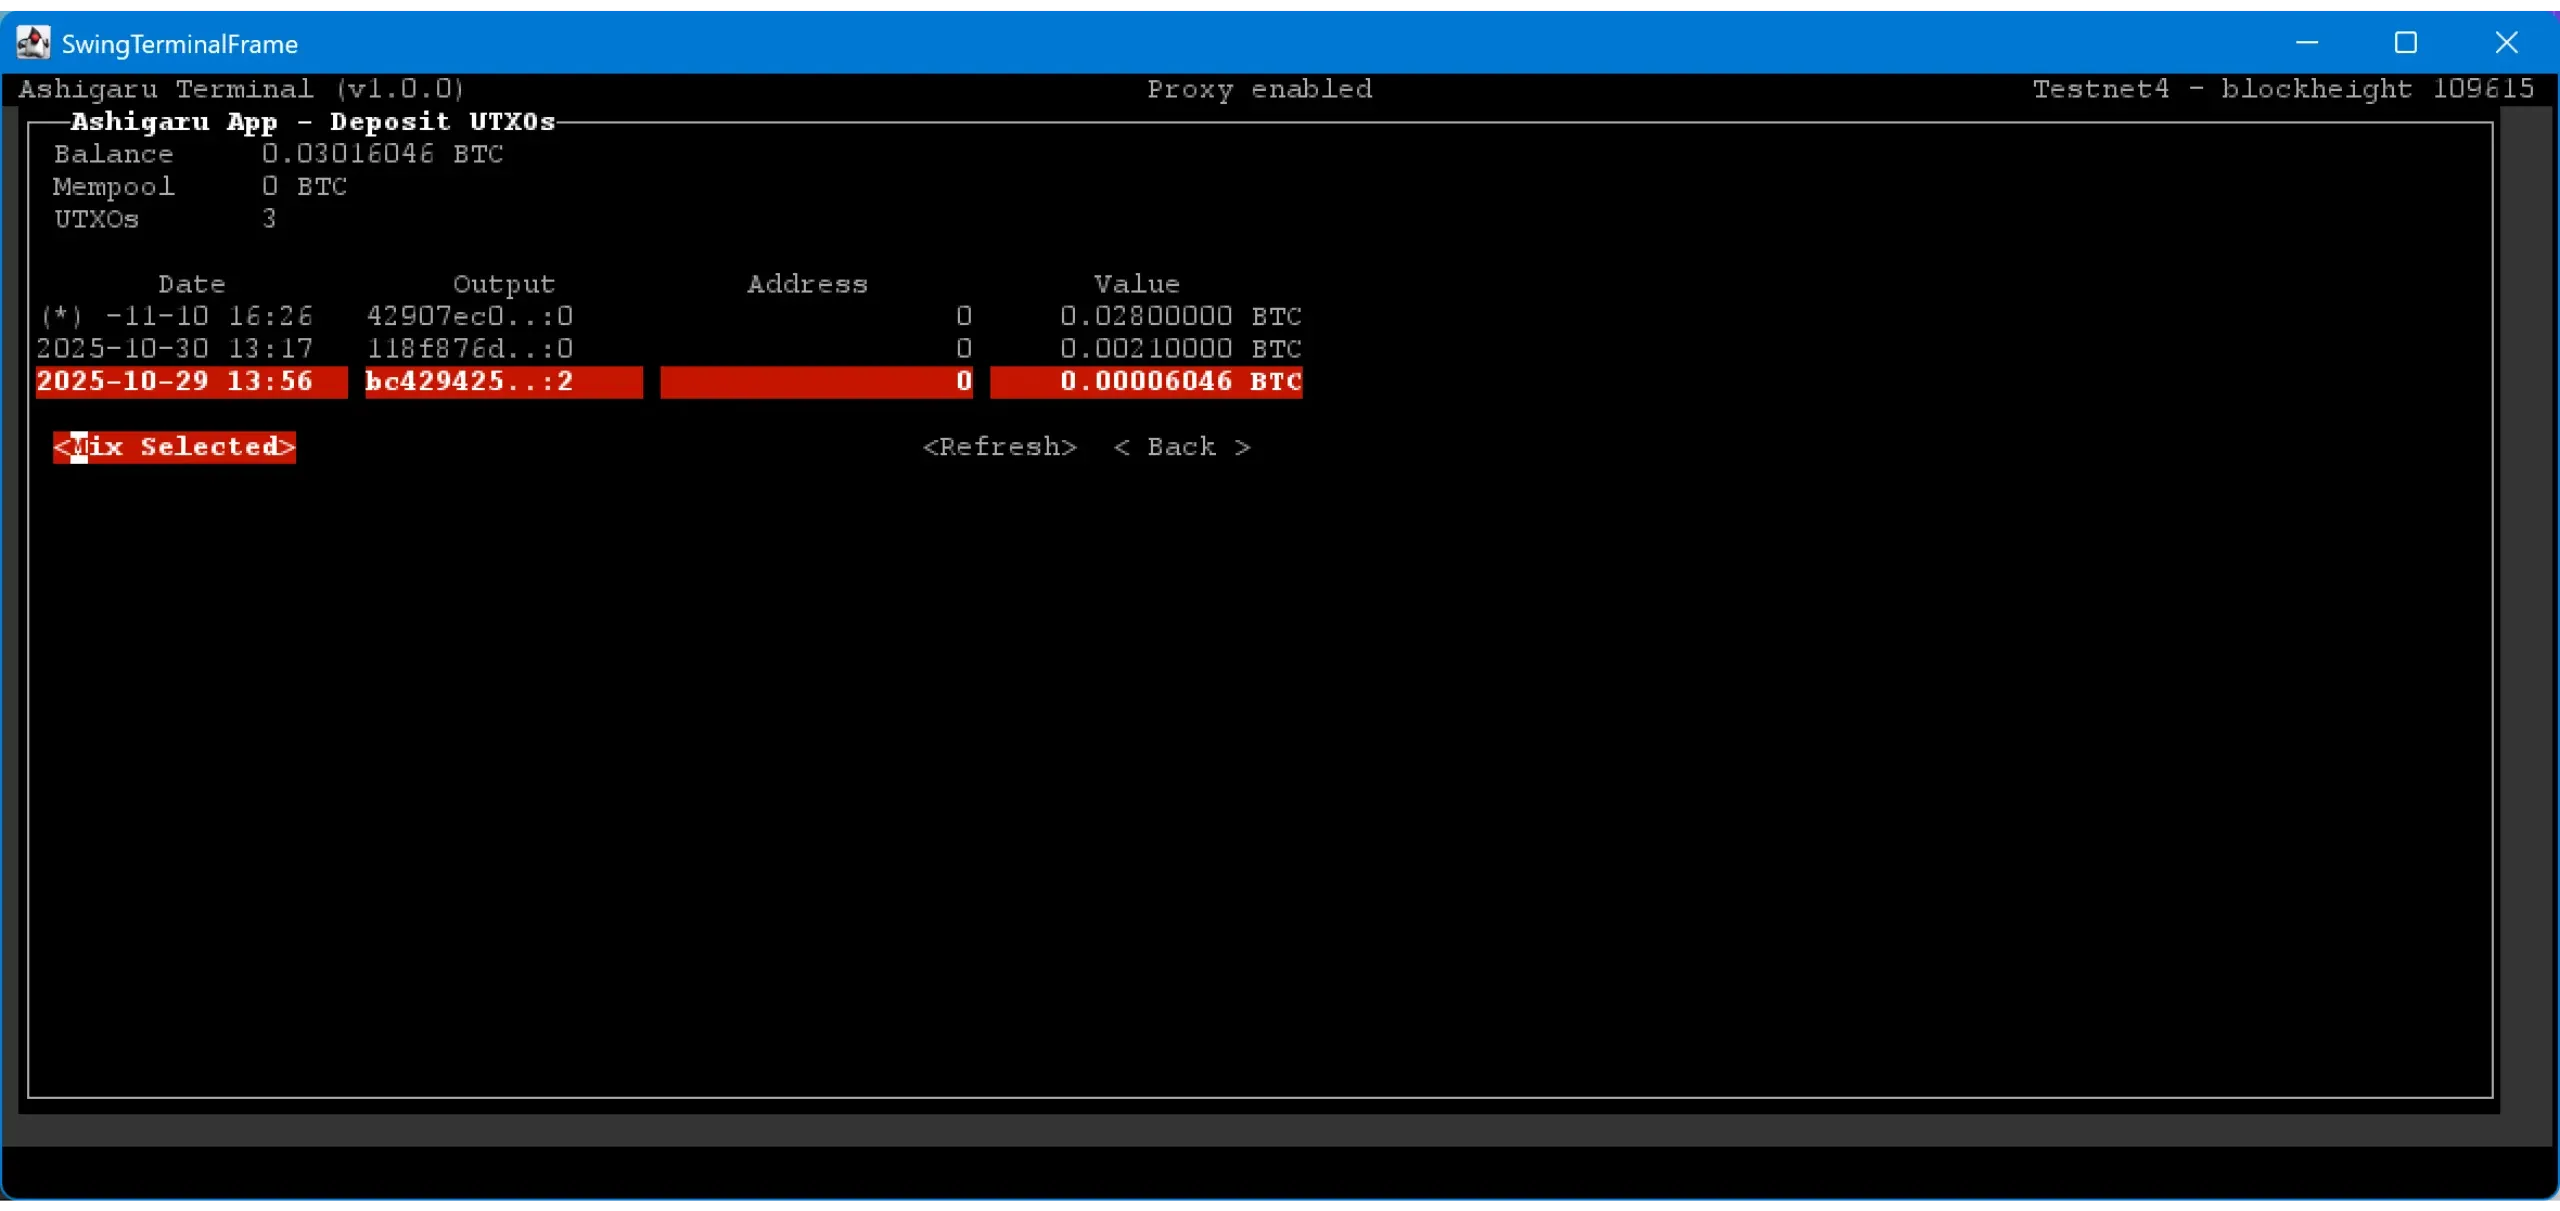
Press ENTER to select a UTXO: an asterisk (*) will appear next to it.
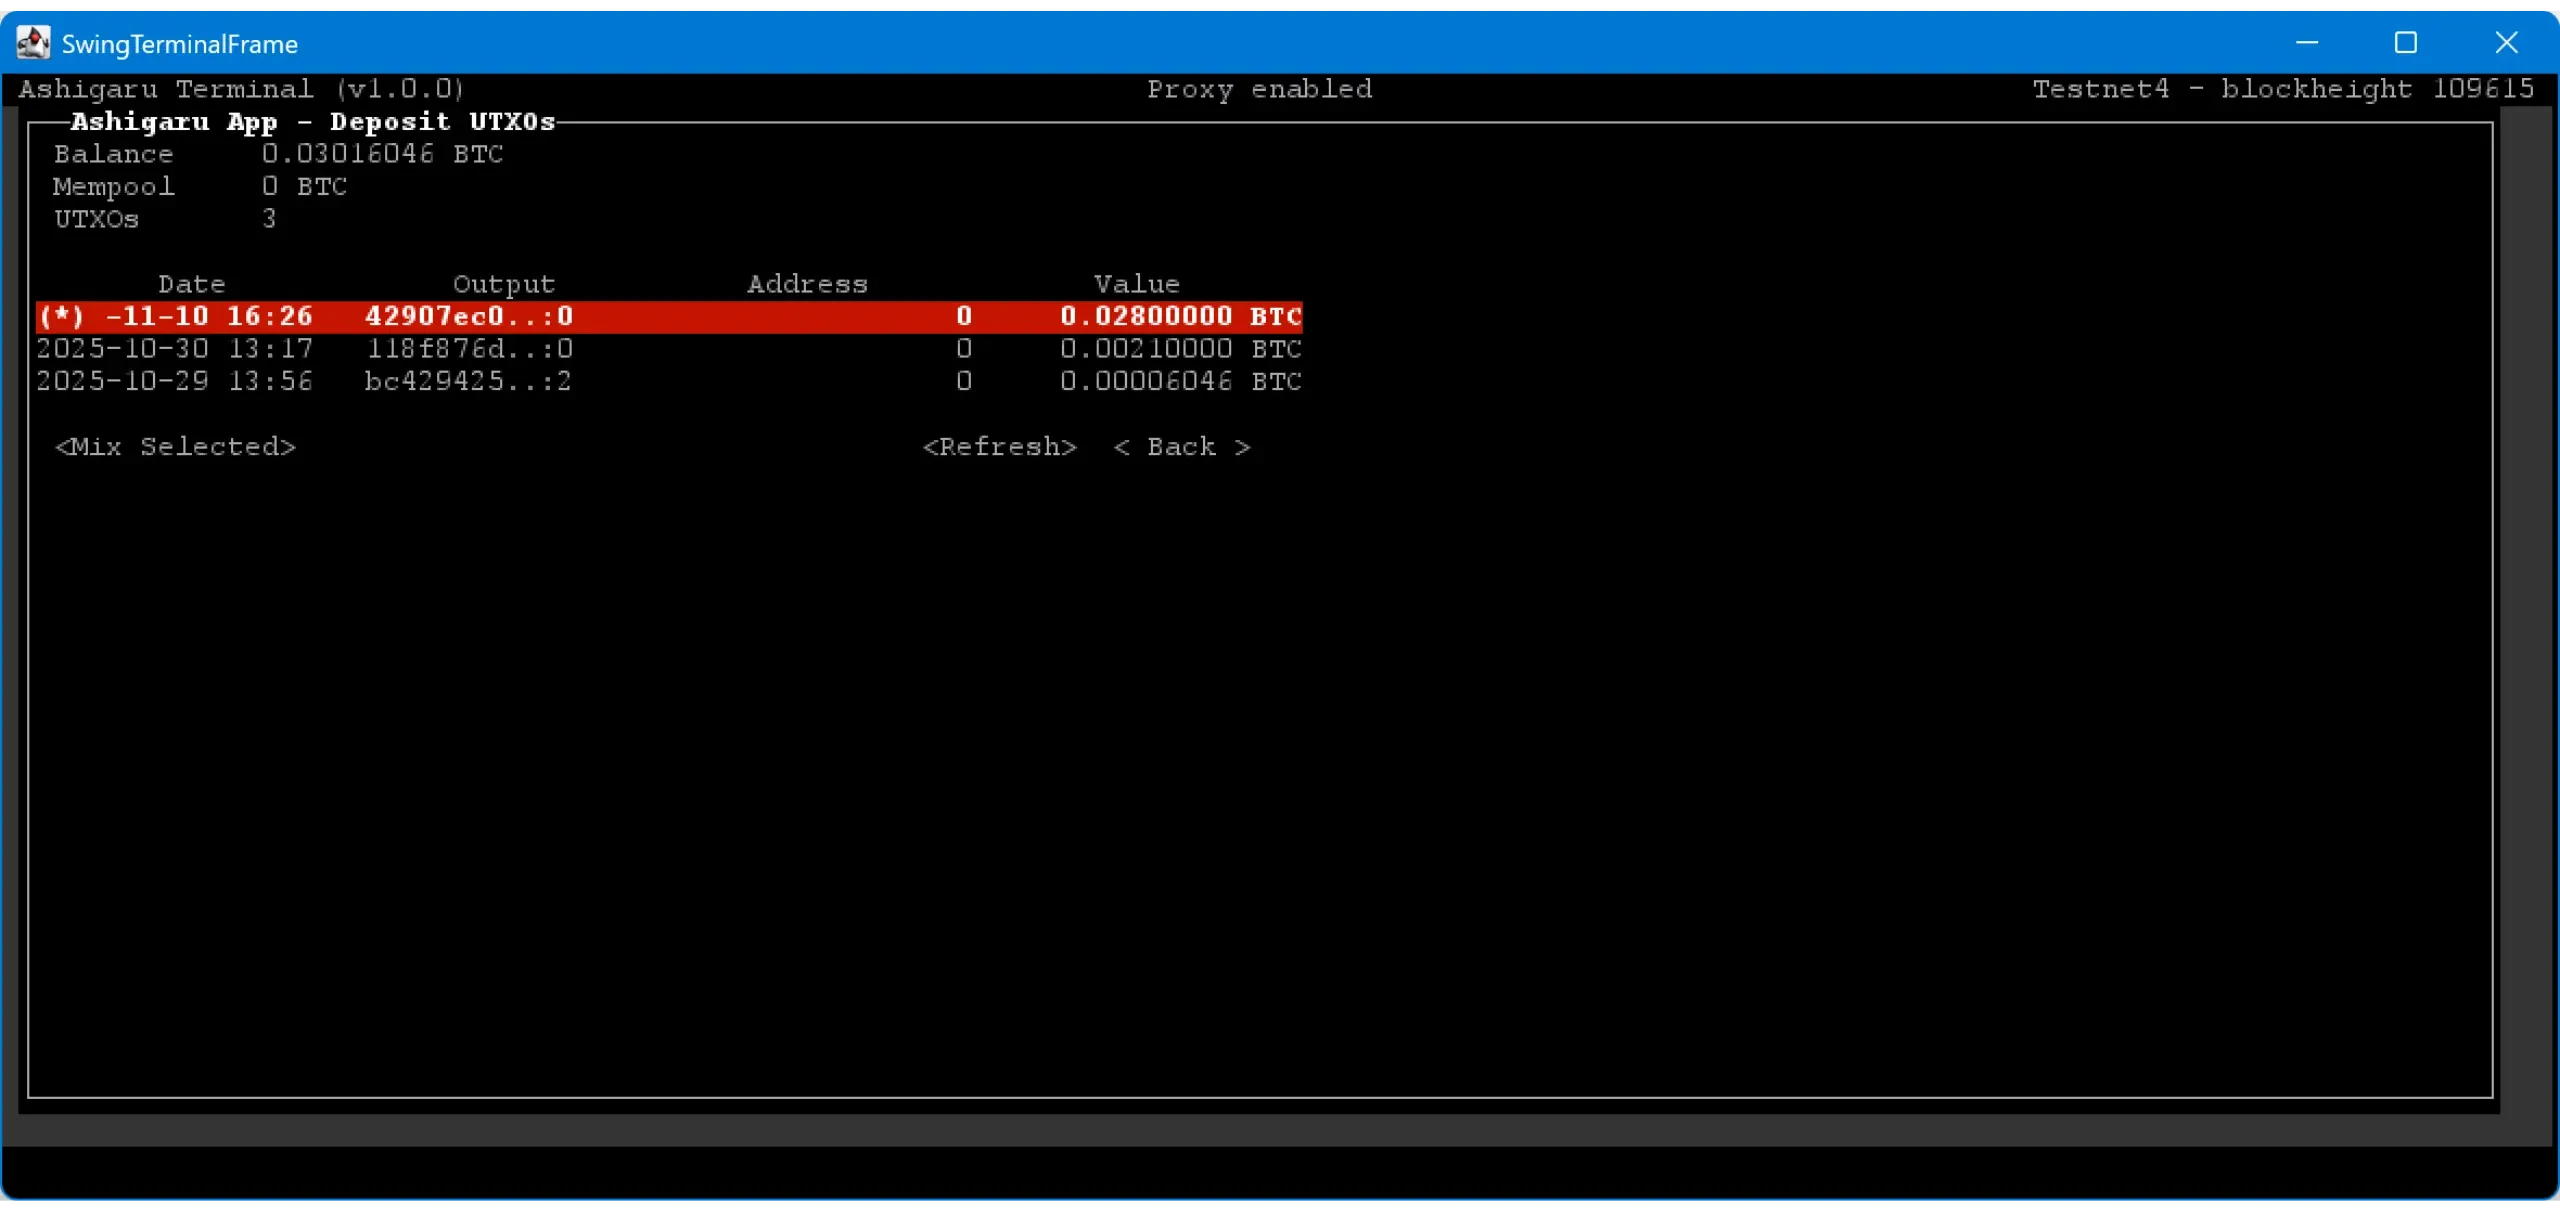
Click Mix Selected.
If you have a UTXO large enough to enter one of the available pools, choose the pool using the arrow keys. On this page, you’ll see your Tx0 details:
- Number of UTXOs entering the pool
- Fees applied (service fees and mining fees)
- Amount of doxxic change
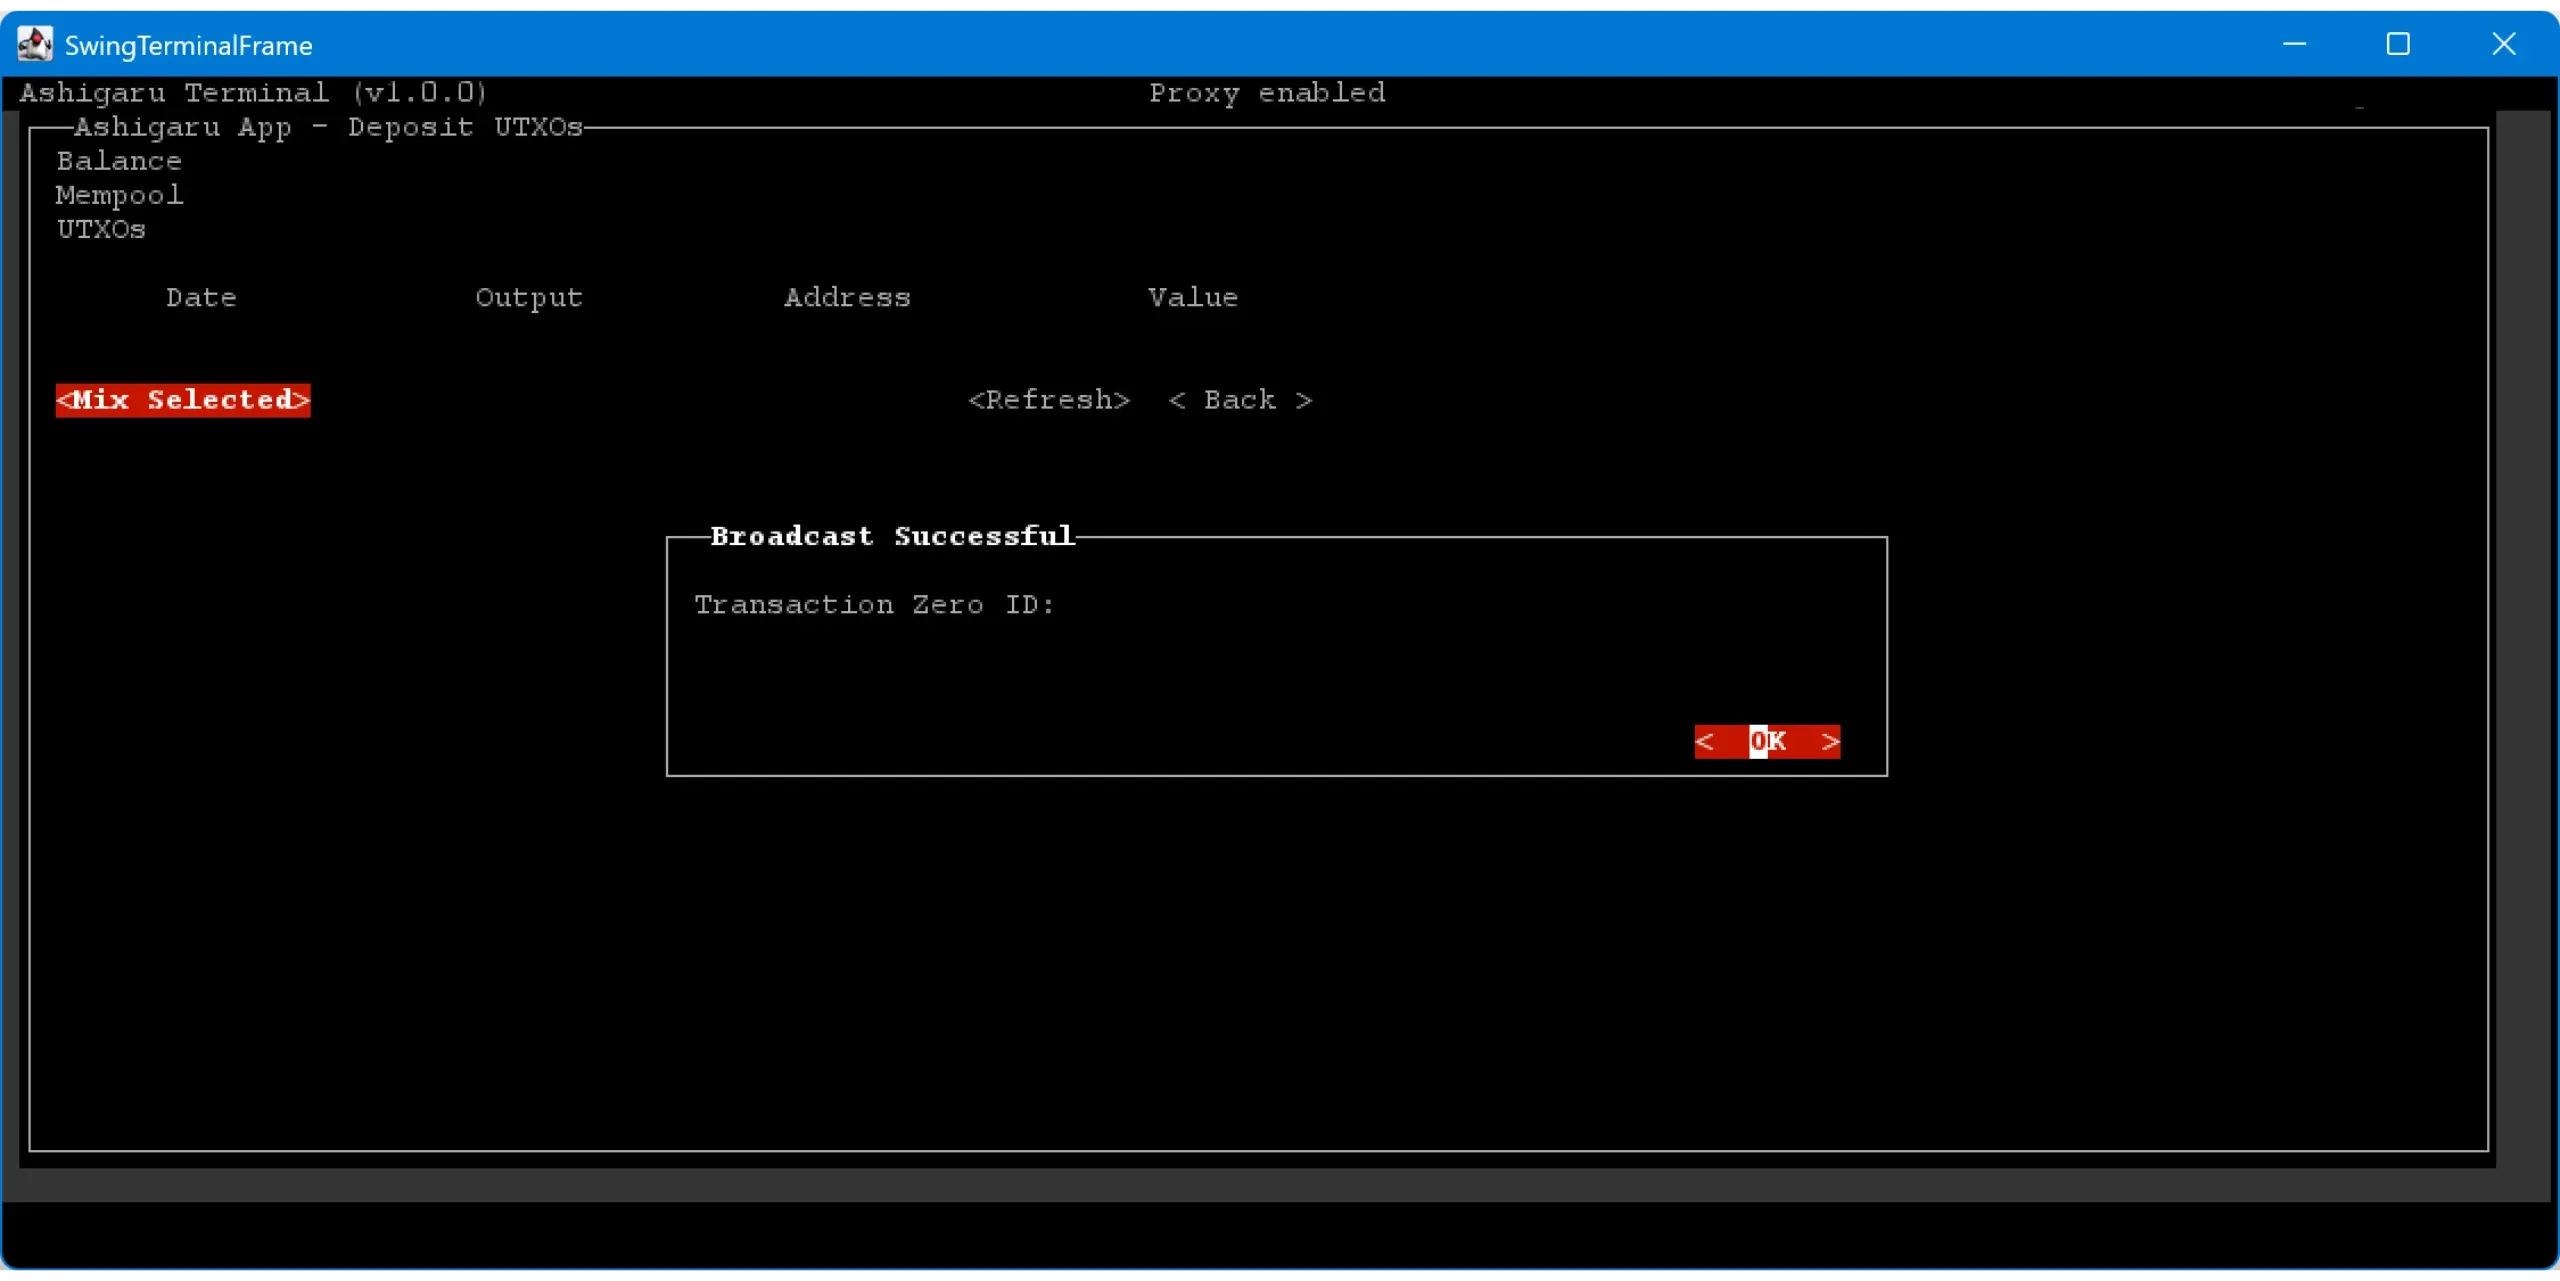
Review the information carefully, then click Broadcast to send the Tx0.
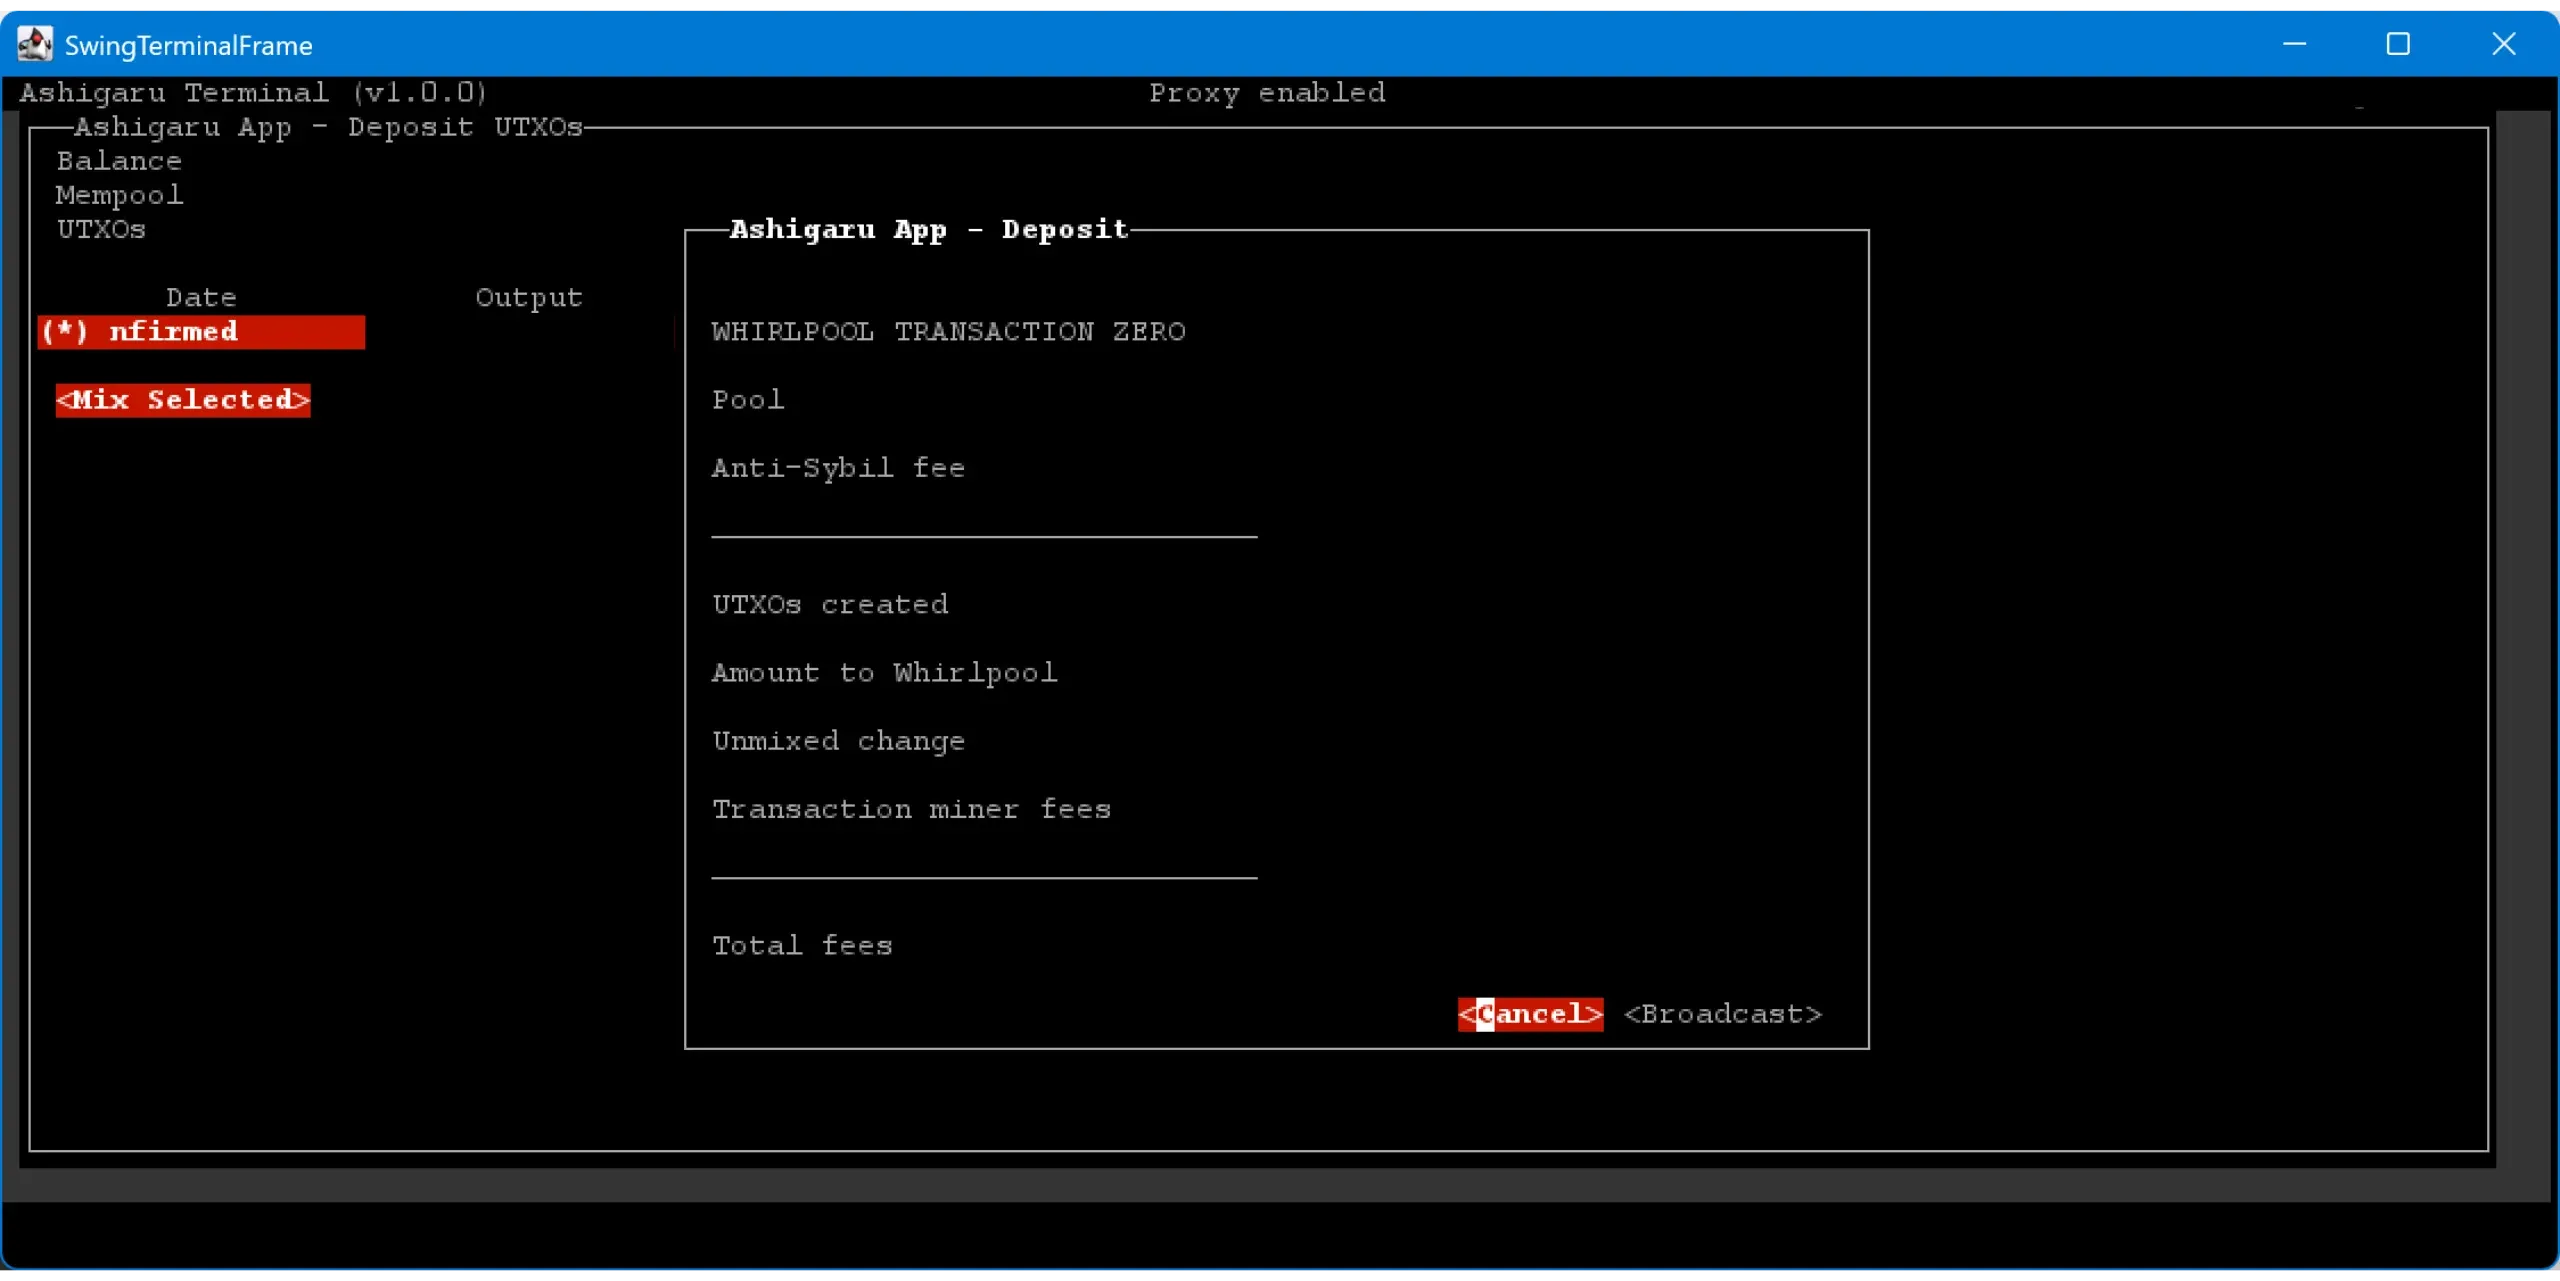
Ashigaru will then show the TXID of your Tx0, confirming the transaction was broadcast to the network.
Use UTXOs from similar sources when possible — combining multiple UTXOs can expose your ownership of said UTXOs via the CIOH.
Run the coinjoins
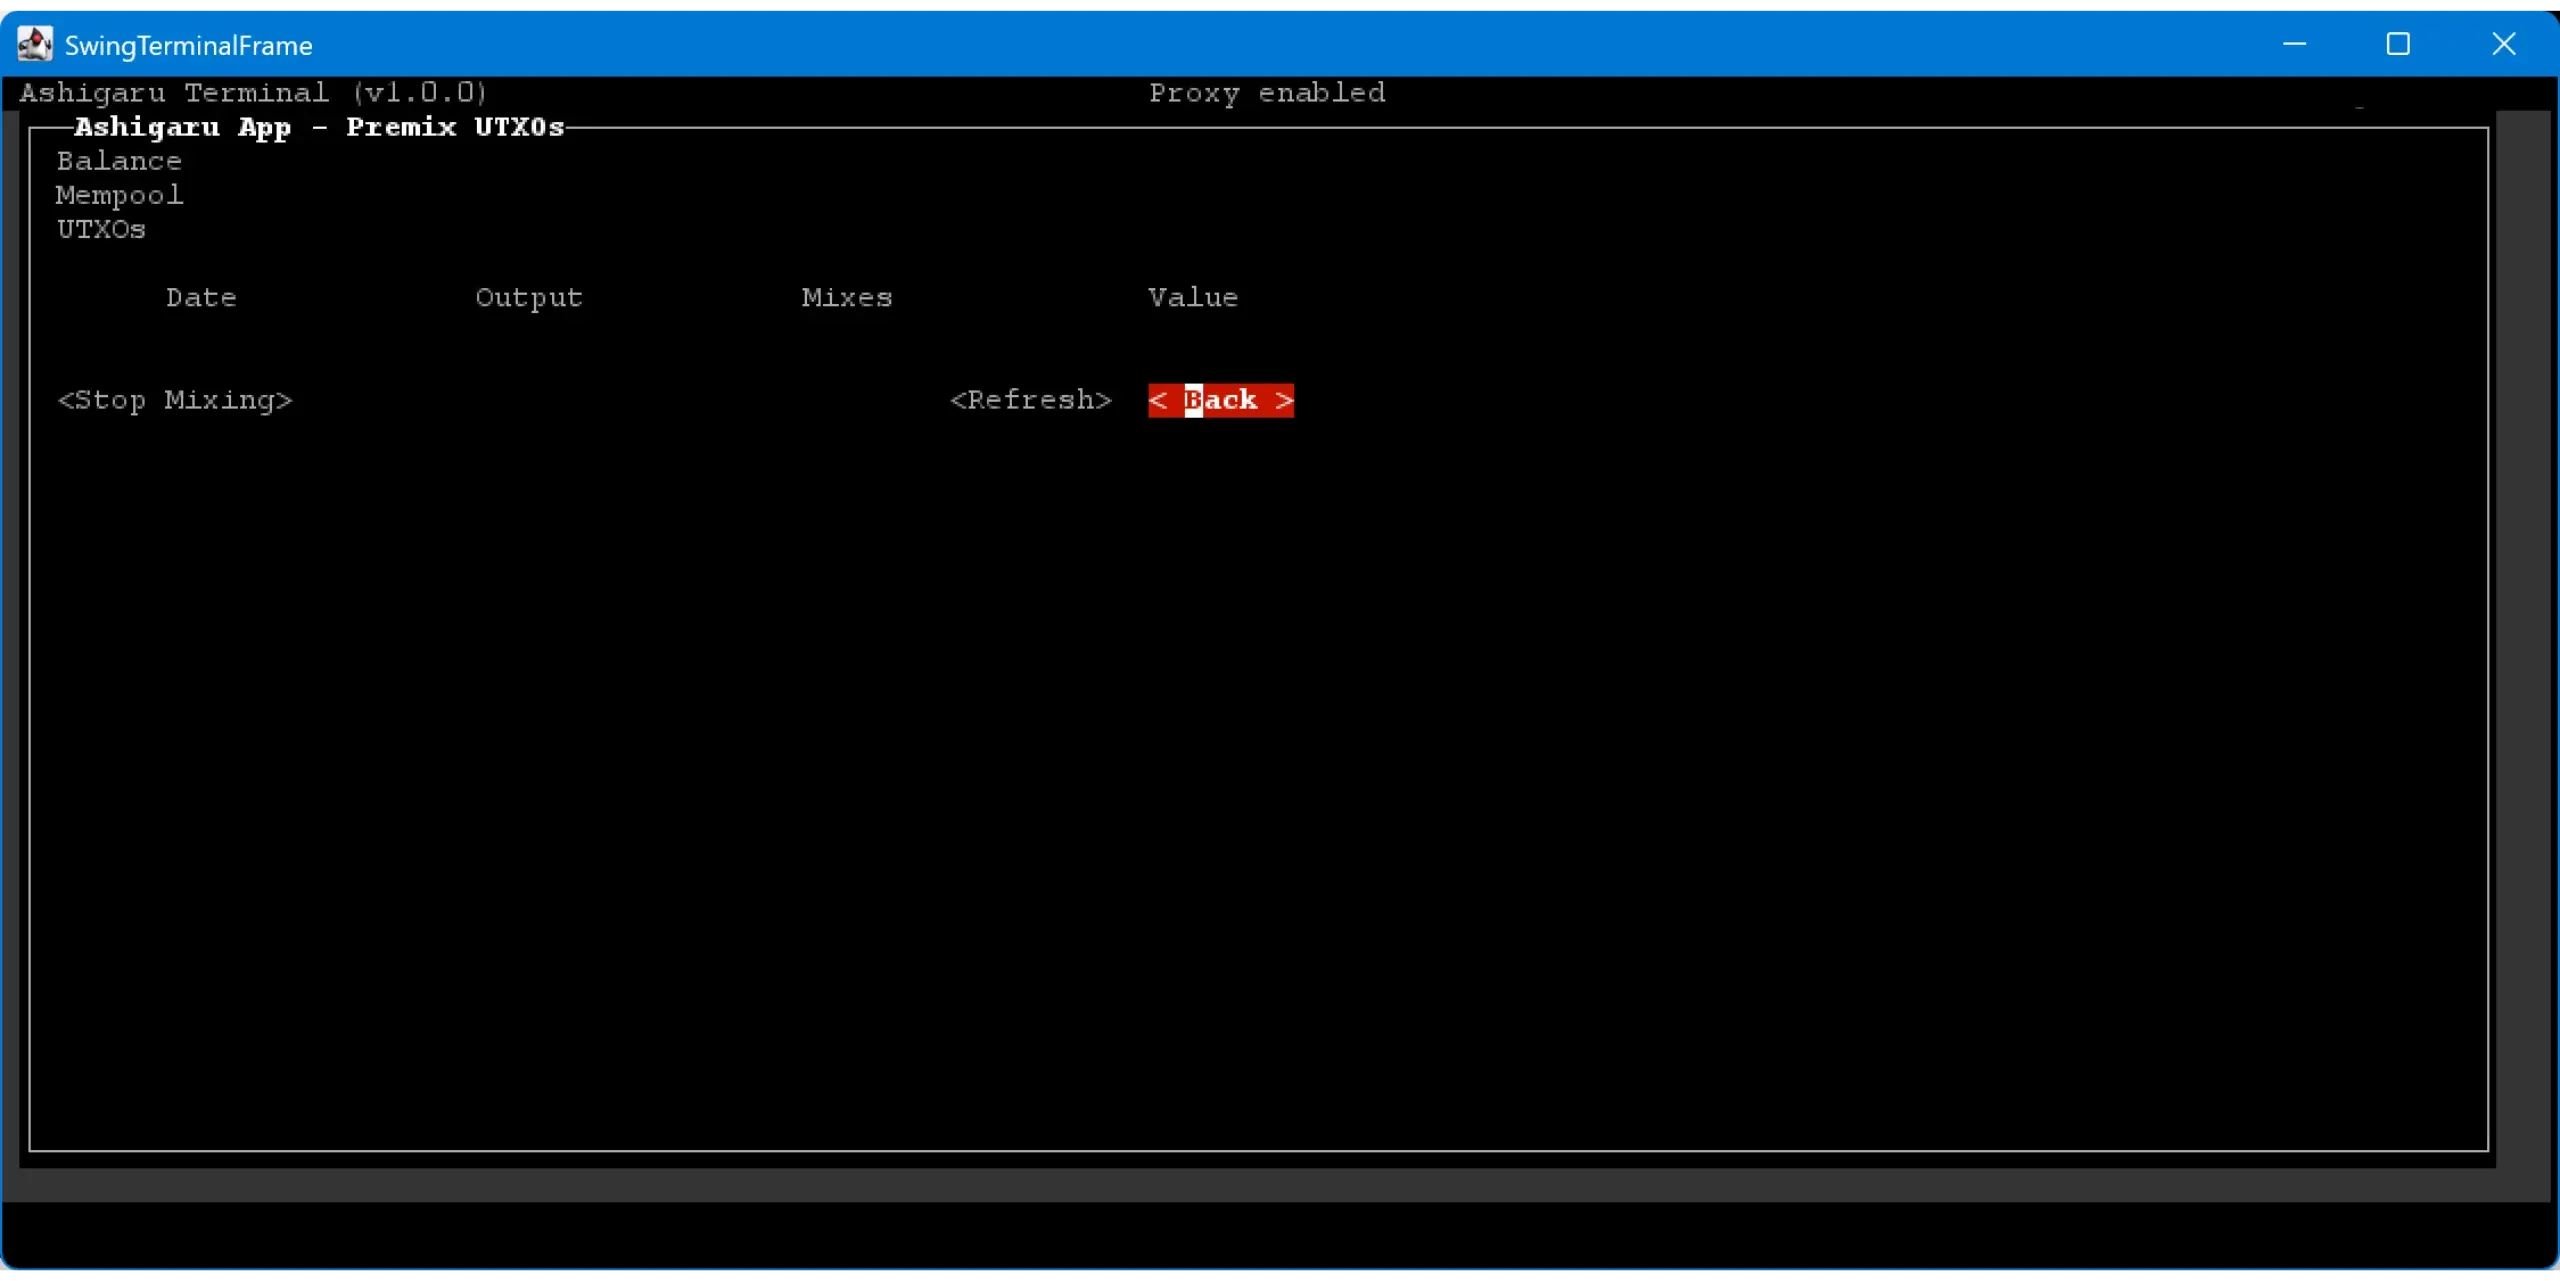
After broadcasting the Tx0, return to your Deposit account’s home page, click Accounts, and select the Premix account.

In the UTXOs menu, you’ll see the equalized pieces ready to enter coinjoin cycles. As soon as the Tx0 confirms, Ashigaru Terminal can automatically start the first mixing cycle.
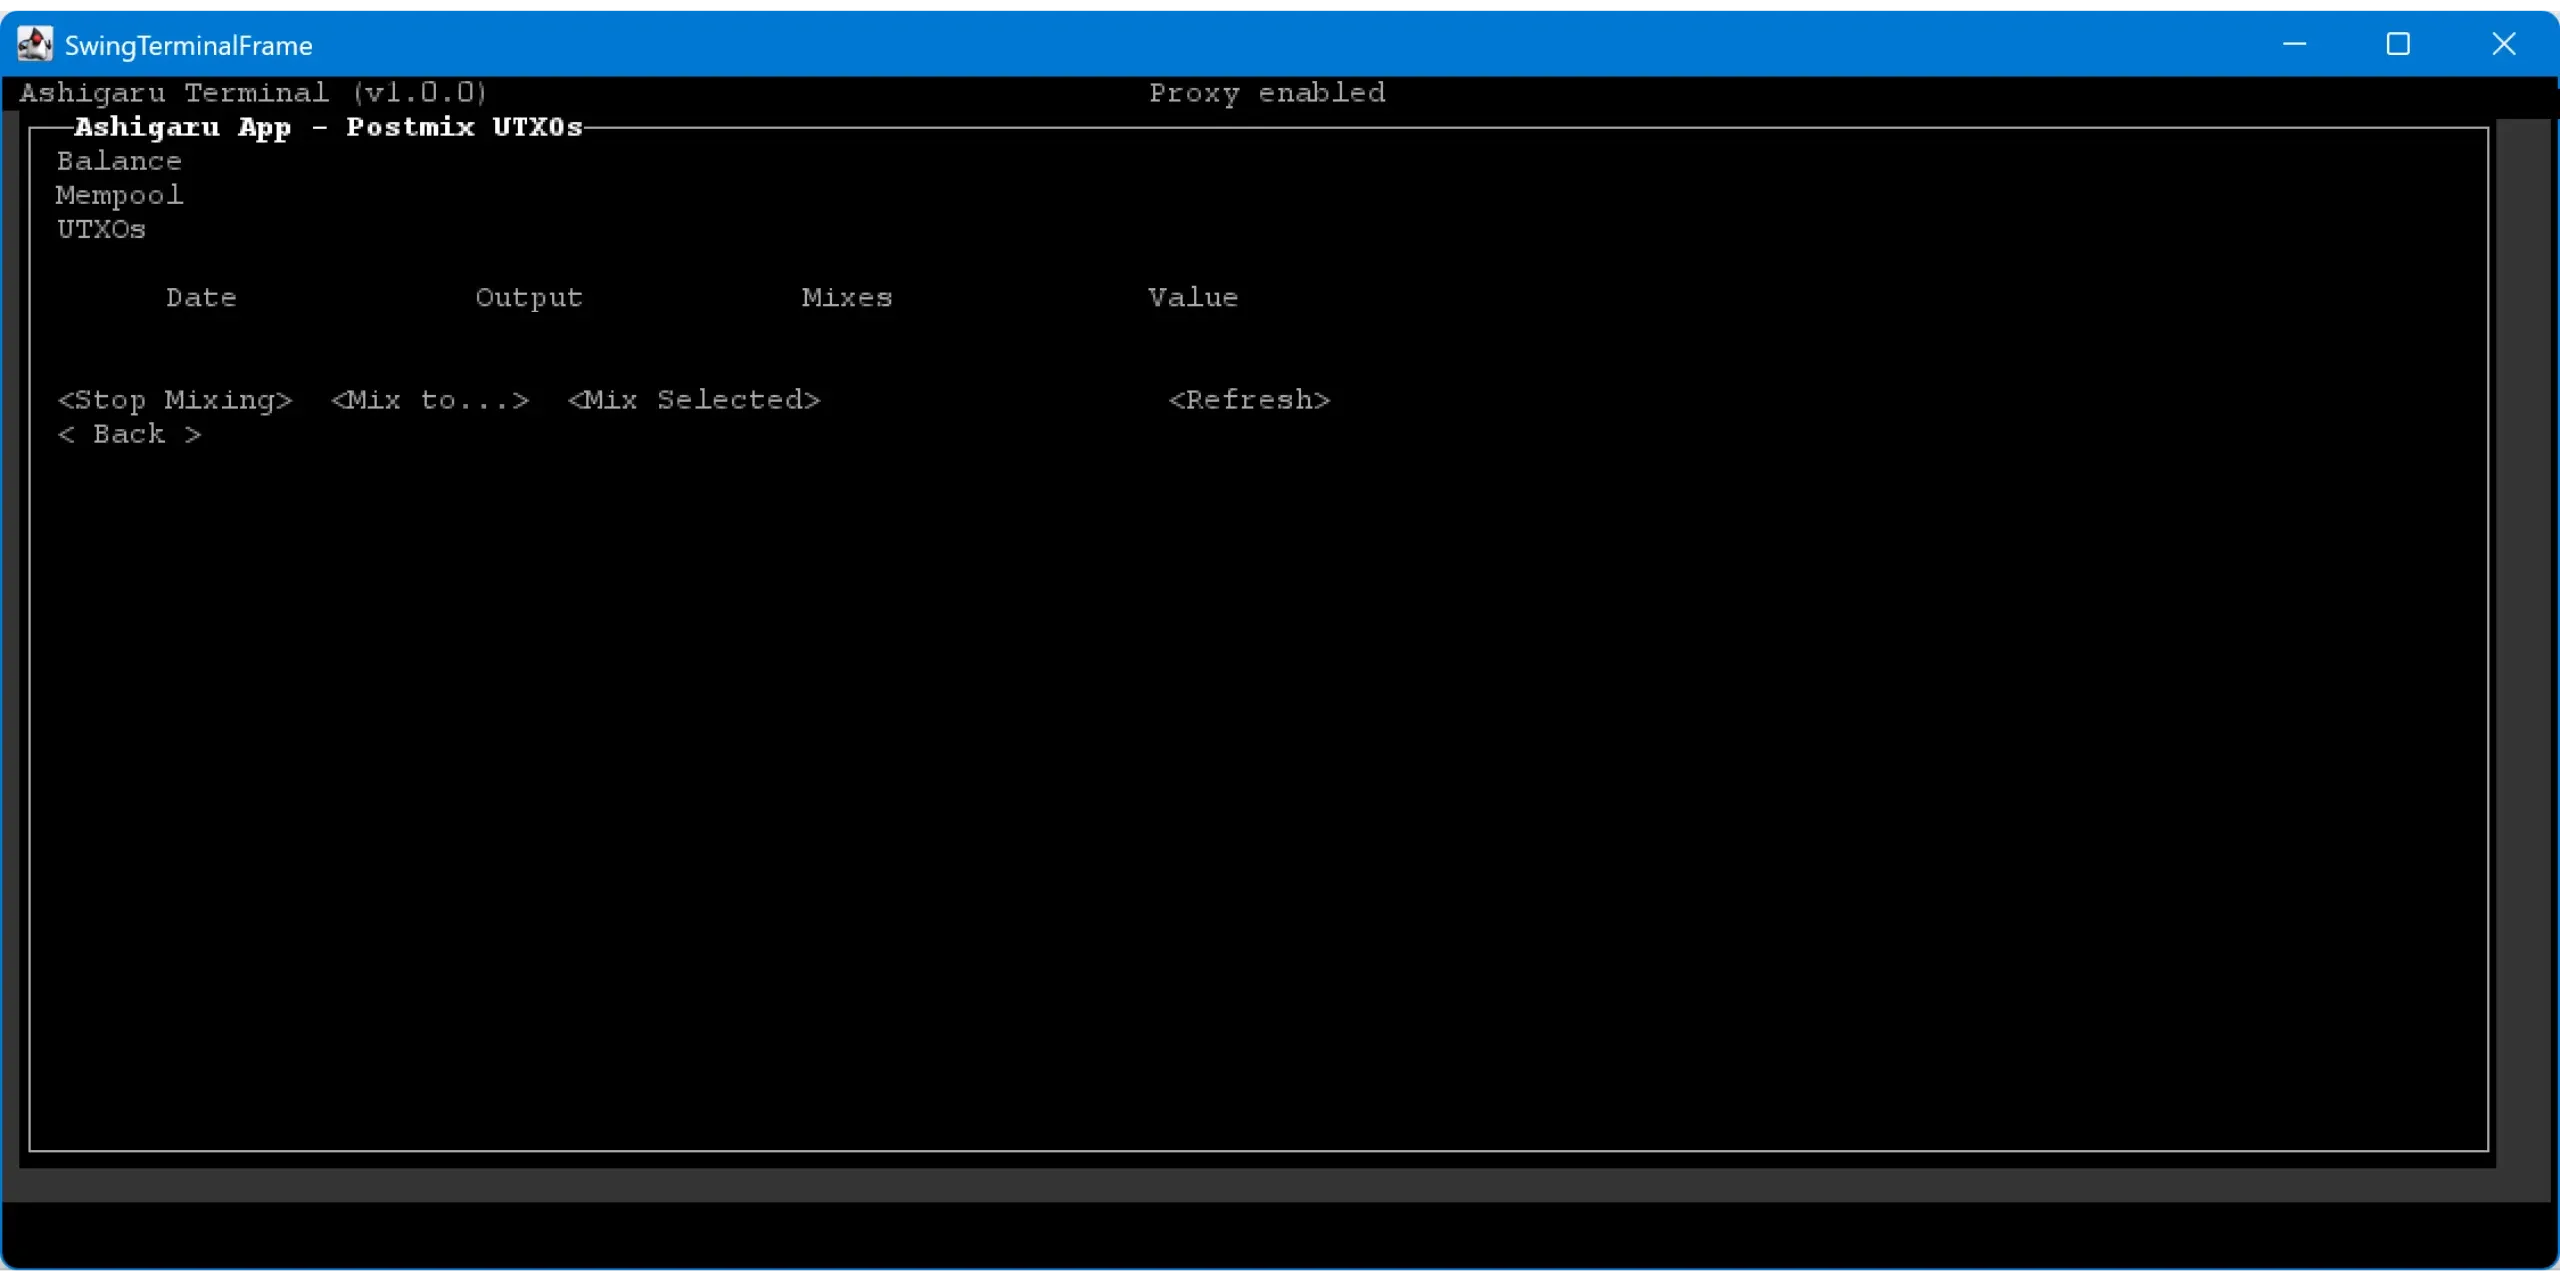
Once the Tx0 is confirmed, the first coinjoin transaction will be created and broadcast automatically by Ashigaru Terminal. In Accounts > Postmix > UTXOs, you can view your equalized UTXOs waiting for their first cycle’s confirmation.
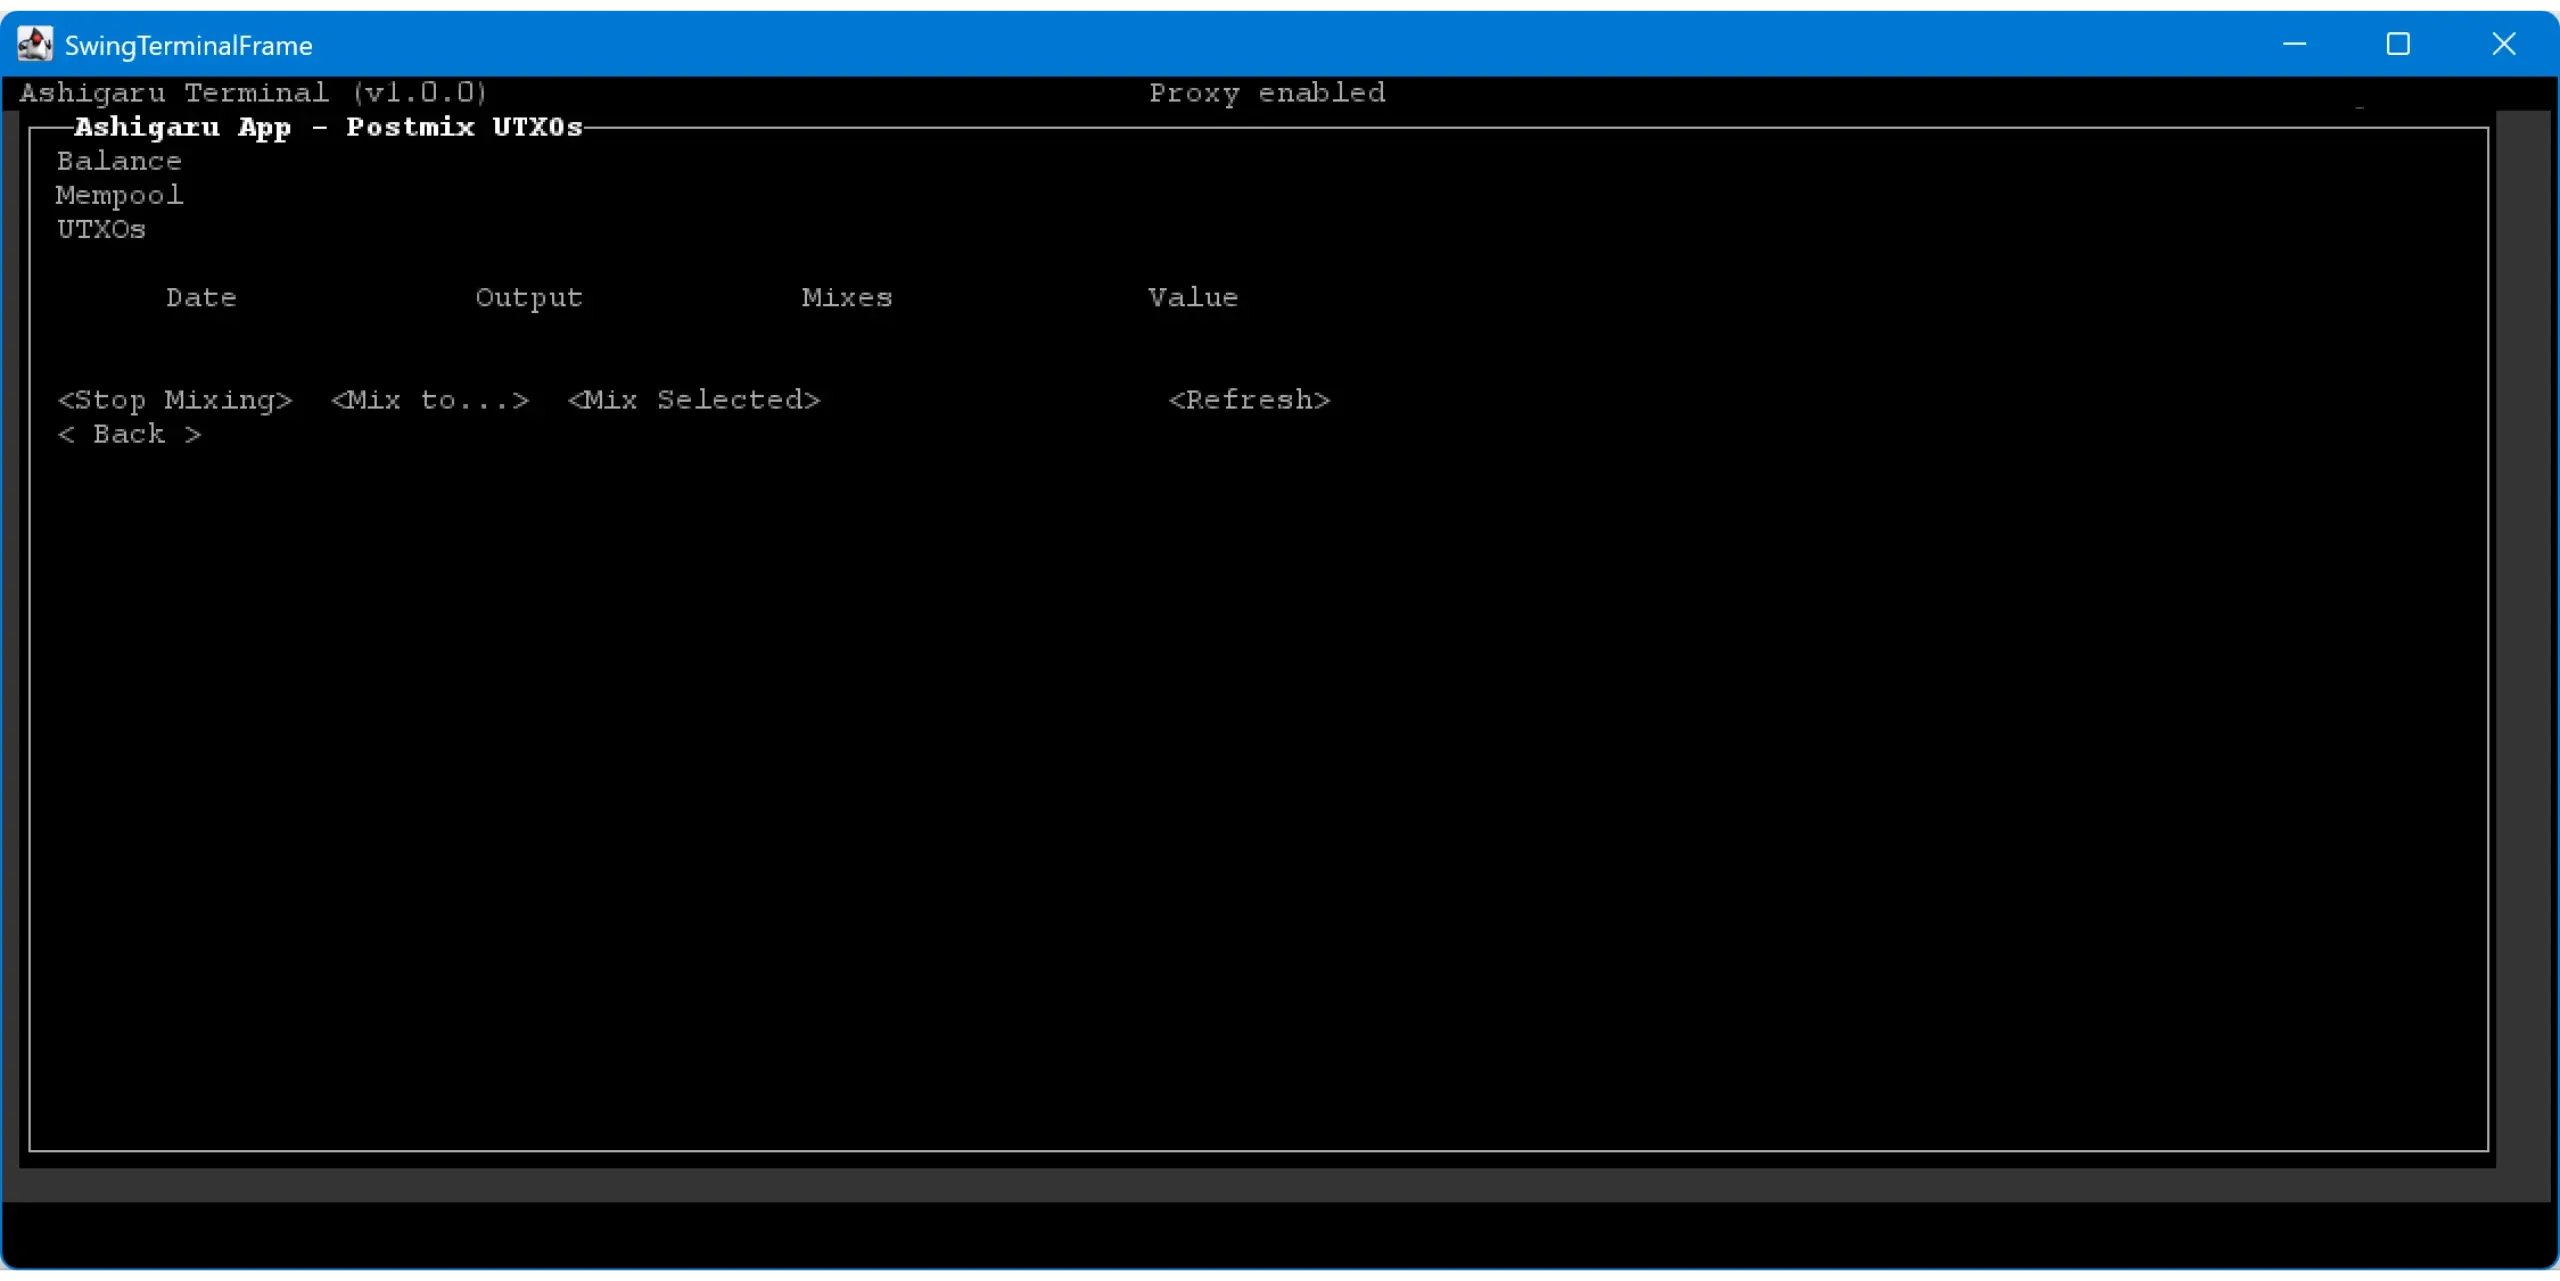
You can now leave Ashigaru Terminal running in the background. It will continue mixing and remixing your coins automatically.
Remixes continue automatically and cost nothing extra in Whirlpool (no additional service or mining fees for remixes).
Finishing the coinjoins
You can let your coins keep remixing automatically. In Whirlpool, remixes accrue no extra fees — neither service nor mining — so more cycles can only improve your privacy.
To better understand this mechanism and how many cycles are worthwhile, I will post a detailed article in the future, stay tuned!
To see how many remixes each coin has completed, open the UTXOs menu of the Postmix account.
To spend your mixed coins, use the Ashigaru mobile app, which shares the same wallet as Ashigaru Terminal. The default view is the Deposit account. To access the Postmix account where mixed UTXOs live, tap the Whirlpool icon at the top right.
In this account, you’ll see all your coins in the mixing process. To spend, tap the + symbol at the bottom right, then select Send.
Enter your transaction details: the recipient address, the amount, and — if you wish — select a specific transaction type for even stronger privacy.
Carefully check the transaction information, then slide the arrow at the bottom of the screen to confirm sending.
Your transaction has been signed and broadcast to the Bitcoin network.
Spending the doxxic change
Remember: Whirlpool’s model equalizes coins in the Tx0 before entering pools, which makes tracking harder. This is the most effective coinjoin model, but it has a drawback: a change output that does not go through the coinjoin process, we call this doxxic change.
This change output is created for each Tx0. It is isolated in a specific account named Doxxic Change or Bad Bank depending on the software to avoid using it with your other UTXOs. This point is critical: these UTXOs have not been mixed — their traceability links remain intact and can compromise your privacy by tying you to your coinjoin activity. Handle them carefully and never use them with other UTXOs, mixed or not. Combining a toxic UTXO with a mixed UTXO destroys all privacy gains from coinjoins.
Currently, Ashigaru does not provide direct access to the Doxxic Change account, at least it wasn’t found at the time of writing. This feature will likely be added in a future update. In the meantime, the only way to retrieve these funds is to import your seed into Sparrow Wallet. Sparrow usually auto-detects a Whirlpool wallet and gives access to all four accounts, including Doxxic Change. You can then spend those UTXOs like regular bitcoin from Sparrow.
Here are several possible strategies to handle coinjoin change UTXOs without compromising your privacy:
- Mix them in smaller pools: If a toxic UTXO is large enough for a smaller pool, this is often the best option. Do not merge multiple toxic UTXOs to reach the threshold — that would link your entries.
- Mark them as unspendable: Another cautious approach is to keep them in their separate account and not touch them to avoid accidental spending. If BTC appreciates, new pools may become available for their size.
- Donate them: You can donate toxic UTXOs to Bitcoin developers, open‑source projects, or nonprofits that accept BTC. This disposes of them usefully while supporting the ecosystem.
- Buy gift cards or prepaid Visa cards: Platforms like Bitrefill allow exchanging bitcoin for gift cards or reloadable Visa cards. This can be a simple, discreet way to spend toxic UTXOs. But be aware that these UTXOs are still linked to their previous history so be careful which ones you spend.
- Swap them for Monero: Samourai Wallet previously offered atomic BTC/XMR swaps, now discontinued. This service exists in Eigen Wallet. You can isolate these UTXOs, convert to XMR, then back to BTC if desired. This method can be costly and depends on available liquidity. Also consider whether you want to potentially risk a UTXO that may be associated with you being given to a third party who can do whatever they want with it.
- Open a lightning channel: Transferring toxic UTXOs to LN to benefit from lower transaction fees can be useful. However, this may leak information depending on your LN usage, so proceed carefully.
Carefully consider what you want to do with your doxxic change, always proceed carefully.
How to assess coinjoin quality
Effective coinjoins exhibit high homogeneity between input and output amounts. This uniformity increases the number of plausible interpretations for an external observer and therefore uncertainty about the transaction. We measure this uncertainty using entropy applied to the transaction. Whirlpool’s model is recognized as one of the strongest in this regard, thanks to excellent homogeneity between participants.
The performance across multiple coinjoin cycles is measured by the size of the sets in which a coin is hidden — called anonsets. There are two types:
- One measures privacy against retrospective analysis (from present to past)
- The other measures resistance against prospective analysis (from past to present)
For a full explanation of these two indicators a follow-up post will be posted.
How to manage postmix
After several coinjoin cycles, the best strategy is to keep UTXOs in the Postmix account, letting them remix indefinitely until you actually need to spend them.
Some users prefer moving mixed BTC to a hardware wallet. This is possible, but it requires discipline to avoid compromising privacy gains from coinjoins.
The most common mistake is merging UTXOs. Never combine mixed UTXOs with unmixed UTXOs in the same transaction, or you risk creating links via the CIOH. This means rigorous UTXO management is key — clear and precise labeling is essential. In general, UTXO merging is risky and often leads to privacy loss when done poorly.
Be careful with consolidation of mixed UTXOs with each other, too. Limited consolidation may be acceptable if UTXOs have large anonsets, but it inevitably reduces your privacy. Avoid large or rushed consolidations before sufficient remixes, as they can create deducible links between your coins before and after mixing. When in doubt, do not consolidate postmix UTXOs. Instead, transfer them one by one to your hardware wallet, generating a fresh receiving address each time. Label every transferred UTXO carefully.
It is strongly discouraged to move postmix UTXOs into wallets using minority scripts. For example, if you participated in Whirlpool from a multisig P2WSH wallet, few users share that script type. Sending postmix UTXOs back to the same script greatly reduces your anonymity set. Beyond script type, other wallet fingerprints can harm your privacy. The safest option is to spend from the Ashigaru app.
Finally, as with any Bitcoin usage, never reuse a receiving address. Each payment should go to a fresh, unused address.
The simplest and safest method remains: keep mixed UTXOs resting in Postmix, let them remix naturally, and spend only when needed from Ashigaru.
Ashigaru and Sparrow include additional protections against common chain‑analysis pitfalls, helping you preserve transaction privacy.
Avoid merging mixed and unmixed UTXOs; prefer spending from Postmix directly; don’t reuse addresses; and be cautious with script types and consolidations.
16. Understanding Stowaway (PayJoin)
Force blockchain spies to rethink everything they think they know.
Payjoin is a specific structure of Bitcoin transaction that enhances user privacy during a payment by collaborating with the payment recipient.
In 2015, LaurentMT first described this method as “steganographic transactions” in a document available here. Samourai Wallet adopted and implemented it as “Stowaway” in 2018. Payjoin concepts are also discussed in BIP79 and BIP78. Common terms you may see:
- Payjoin
- Stowaway
- P2EP (Pay‑to‑End‑Point)
- Steganographic transaction
What makes Payjoin unique is that it produces a transaction that looks ordinary at first glance but is actually a mini coinjoin between two parties. To achieve this, the recipient participates in the inputs alongside the sender. The recipient also includes a self‑payment in the transaction, allowing them to be paid.
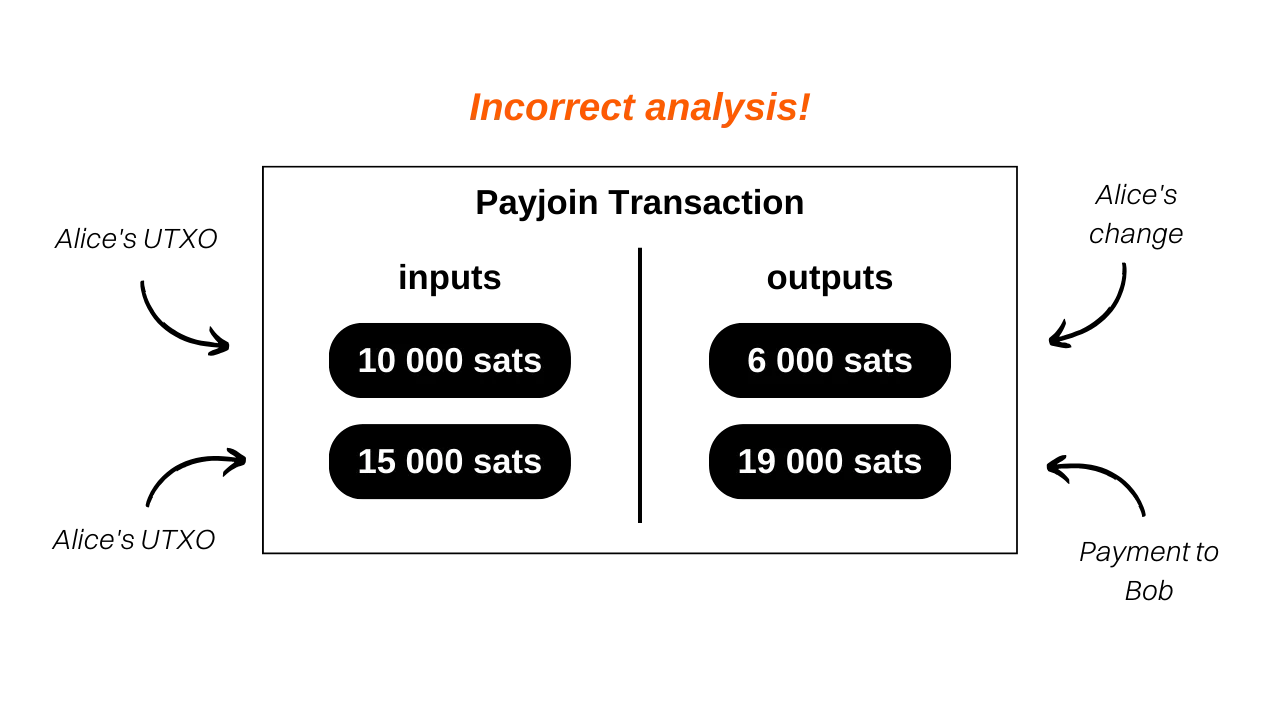
Example: if you buy a baguette for 4,000 sats using a 10,000‑sat UTXO and opt for a Payjoin, the baker adds a 15,000‑sat UTXO that belongs to them as an input. They receive that in full as an output, plus your 4,000‑sat payment:
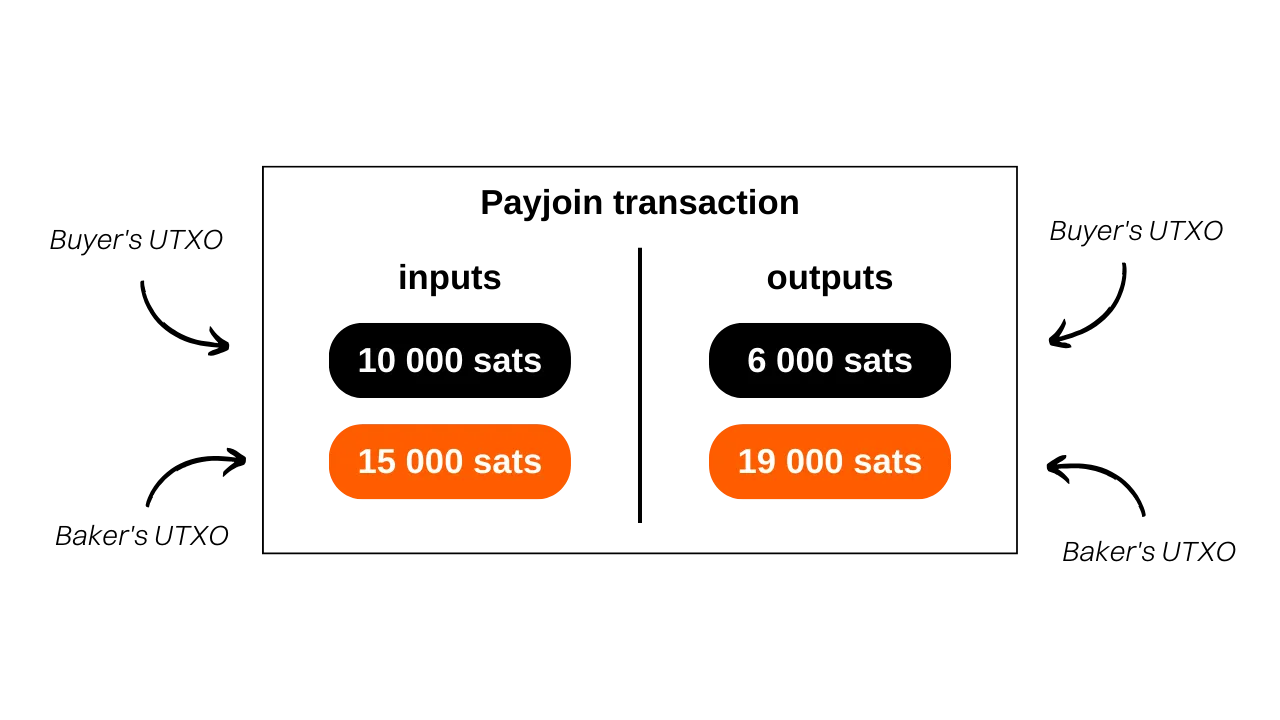
In this example, the baker introduces 15,000 sats as input and receives 19,000 sats as output — a difference of exactly 4,000 sats, the price of the baguette. You input 10,000 sats and end with 6,000 sats in change — a −4,000‑sat balance, i.e., the payment amount.
For clarity, mining fees are omitted here. In practice, they are included and paid by the parties.
What is the purpose of a Payjoin transaction?
Payjoin achieves two privacy goals.
A Payjoin transaction serves two objectives that allow users to enhance the privacy of their payment. First of all, Payjoin aims to mislead an external observer by creating a decoy in chain analysis. This is made possible through the Common Input Ownership Heuristic (CIOH). Usually, when a transaction on the blockchain has multiple inputs, it is assumed that all these inputs likely belong to the same entity or user. Thus, when an analyst examines a Payjoin transaction, they are led to believe that all the inputs come from the same person. However, this perception is incorrect because the payment recipient also contributes inputs alongside the actual payer. Therefore, chain analysis is diverted towards an interpretation that turns out to be false.
Furthermore, Payjoin also allows for deceiving an external observer about the actual amount of the payment that has been made. By examining the transaction structure, the analyst might believe that the payment is equivalent to the amount of one of the outputs. However, in reality, the payment amount does not correspond to any of the outputs. It is actually the difference between the recipient’s output UTXO and the recipient’s input UTXO. In this sense, the Payjoin transaction falls into the domain of steganography. It allows for hiding the actual amount of a transaction within a fake transaction that acts as a decoy.
Definition — Steganography:
Steganography is a technique of concealing information within other data or objects in such a way that the presence of the hidden information is not perceptible. For example, a secret message can be hidden inside a dot in a text that has nothing to do with it, making it undetectable to the naked eye (this is the technique of micropoint). Unlike encryption, which makes information incomprehensible without the decryption key, steganography does not modify the information. It remains displayed in plain sight. Its objective is rather to hide the existence of the secret message, whereas encryption clearly reveals the presence of hidden information, although inaccessible without the key.
Returning to our baguette example:
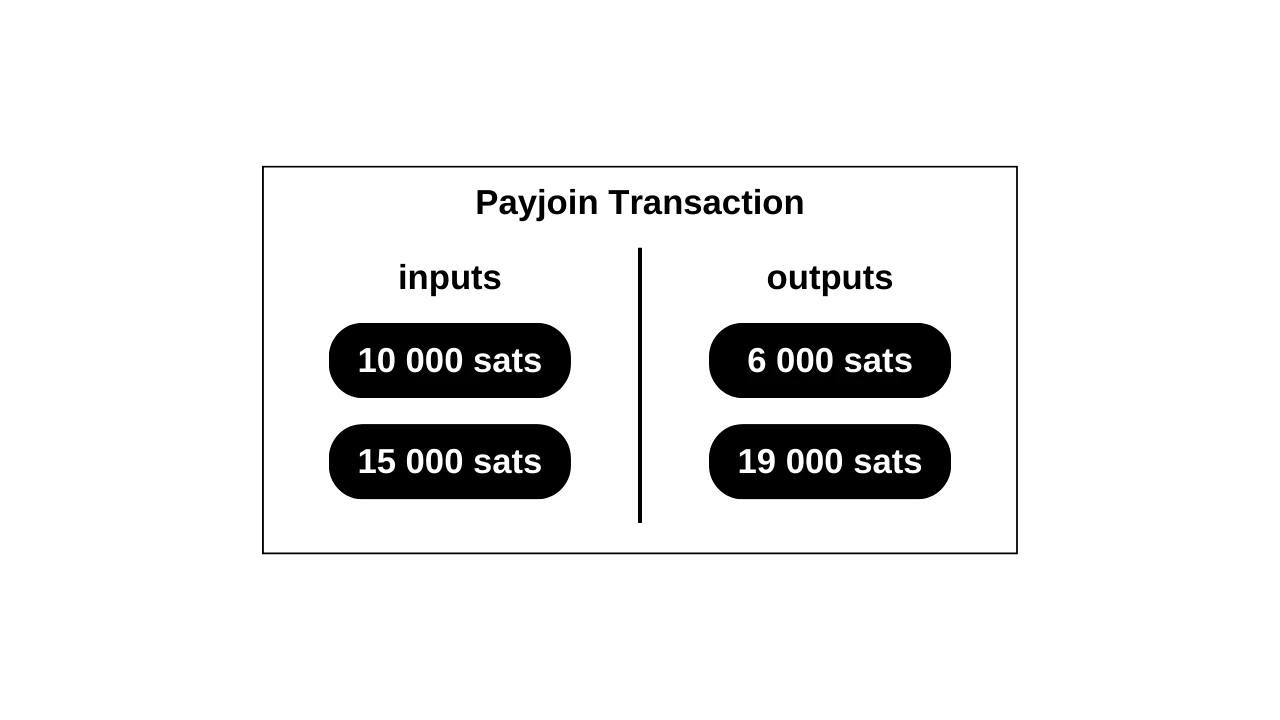
A typical heuristic might conclude: “Alice merged 2 UTXOs to pay 19,000 sats to Bob.”
That’s wrong. The two input UTXOs do not belong to one person, and the actual payment value is 4,000 sats — the difference between Bob’s output and Bob’s input. The observer’s analysis is led to an erroneous conclusion, protecting participants’ privacy.
If you want to analyze a real Payjoin, here’s one performed on testnet: 8dba6657ab9bb44824b3317c8cc3f333c2f465d3668c678691a091cdd6e5984c
External resources:
- LaurentMT steganography gist
- BIP78: Payjoin
- payjoin.org
- BTC 204 — Privacy on Bitcoin: Part 5 https://planb.academy/courses/65c138b0-4161-4958-bbe3-c12916bc959c
Payjoin is implemented in Ashigaru as “Stowaway.” Below is how Stowaway works and how to use it step by step.
How Stowaway works
Ashigaru includes a Payjoin tool called Stowaway, available in the Ashigaru Android app. To complete a Payjoin, the recipient who also acts as the collaborator must use software compatible with Stowaway — currently, Ashigaru only.
Stowaway belongs to Samourai’s “Cahoots” category — collaborative transactions that exchange information off‑chain. Ashigaru currently offers two Cahoots tools: Stowaway (Payjoins) and Stonewall X2.
Cahoots require exchanging PSBTs (partially signed transactions) between users. Manually, this involves five successive QR scans between participants, suitable when you’re together in person. At a distance, manual exchange is cumbersome; Soroban, an encrypted Tor‑based protocol, automates the PSBT exchange in the background.
Soroban requires an authenticated channel between participants. It uses users’ PayNyms for identification and encrypted communications.
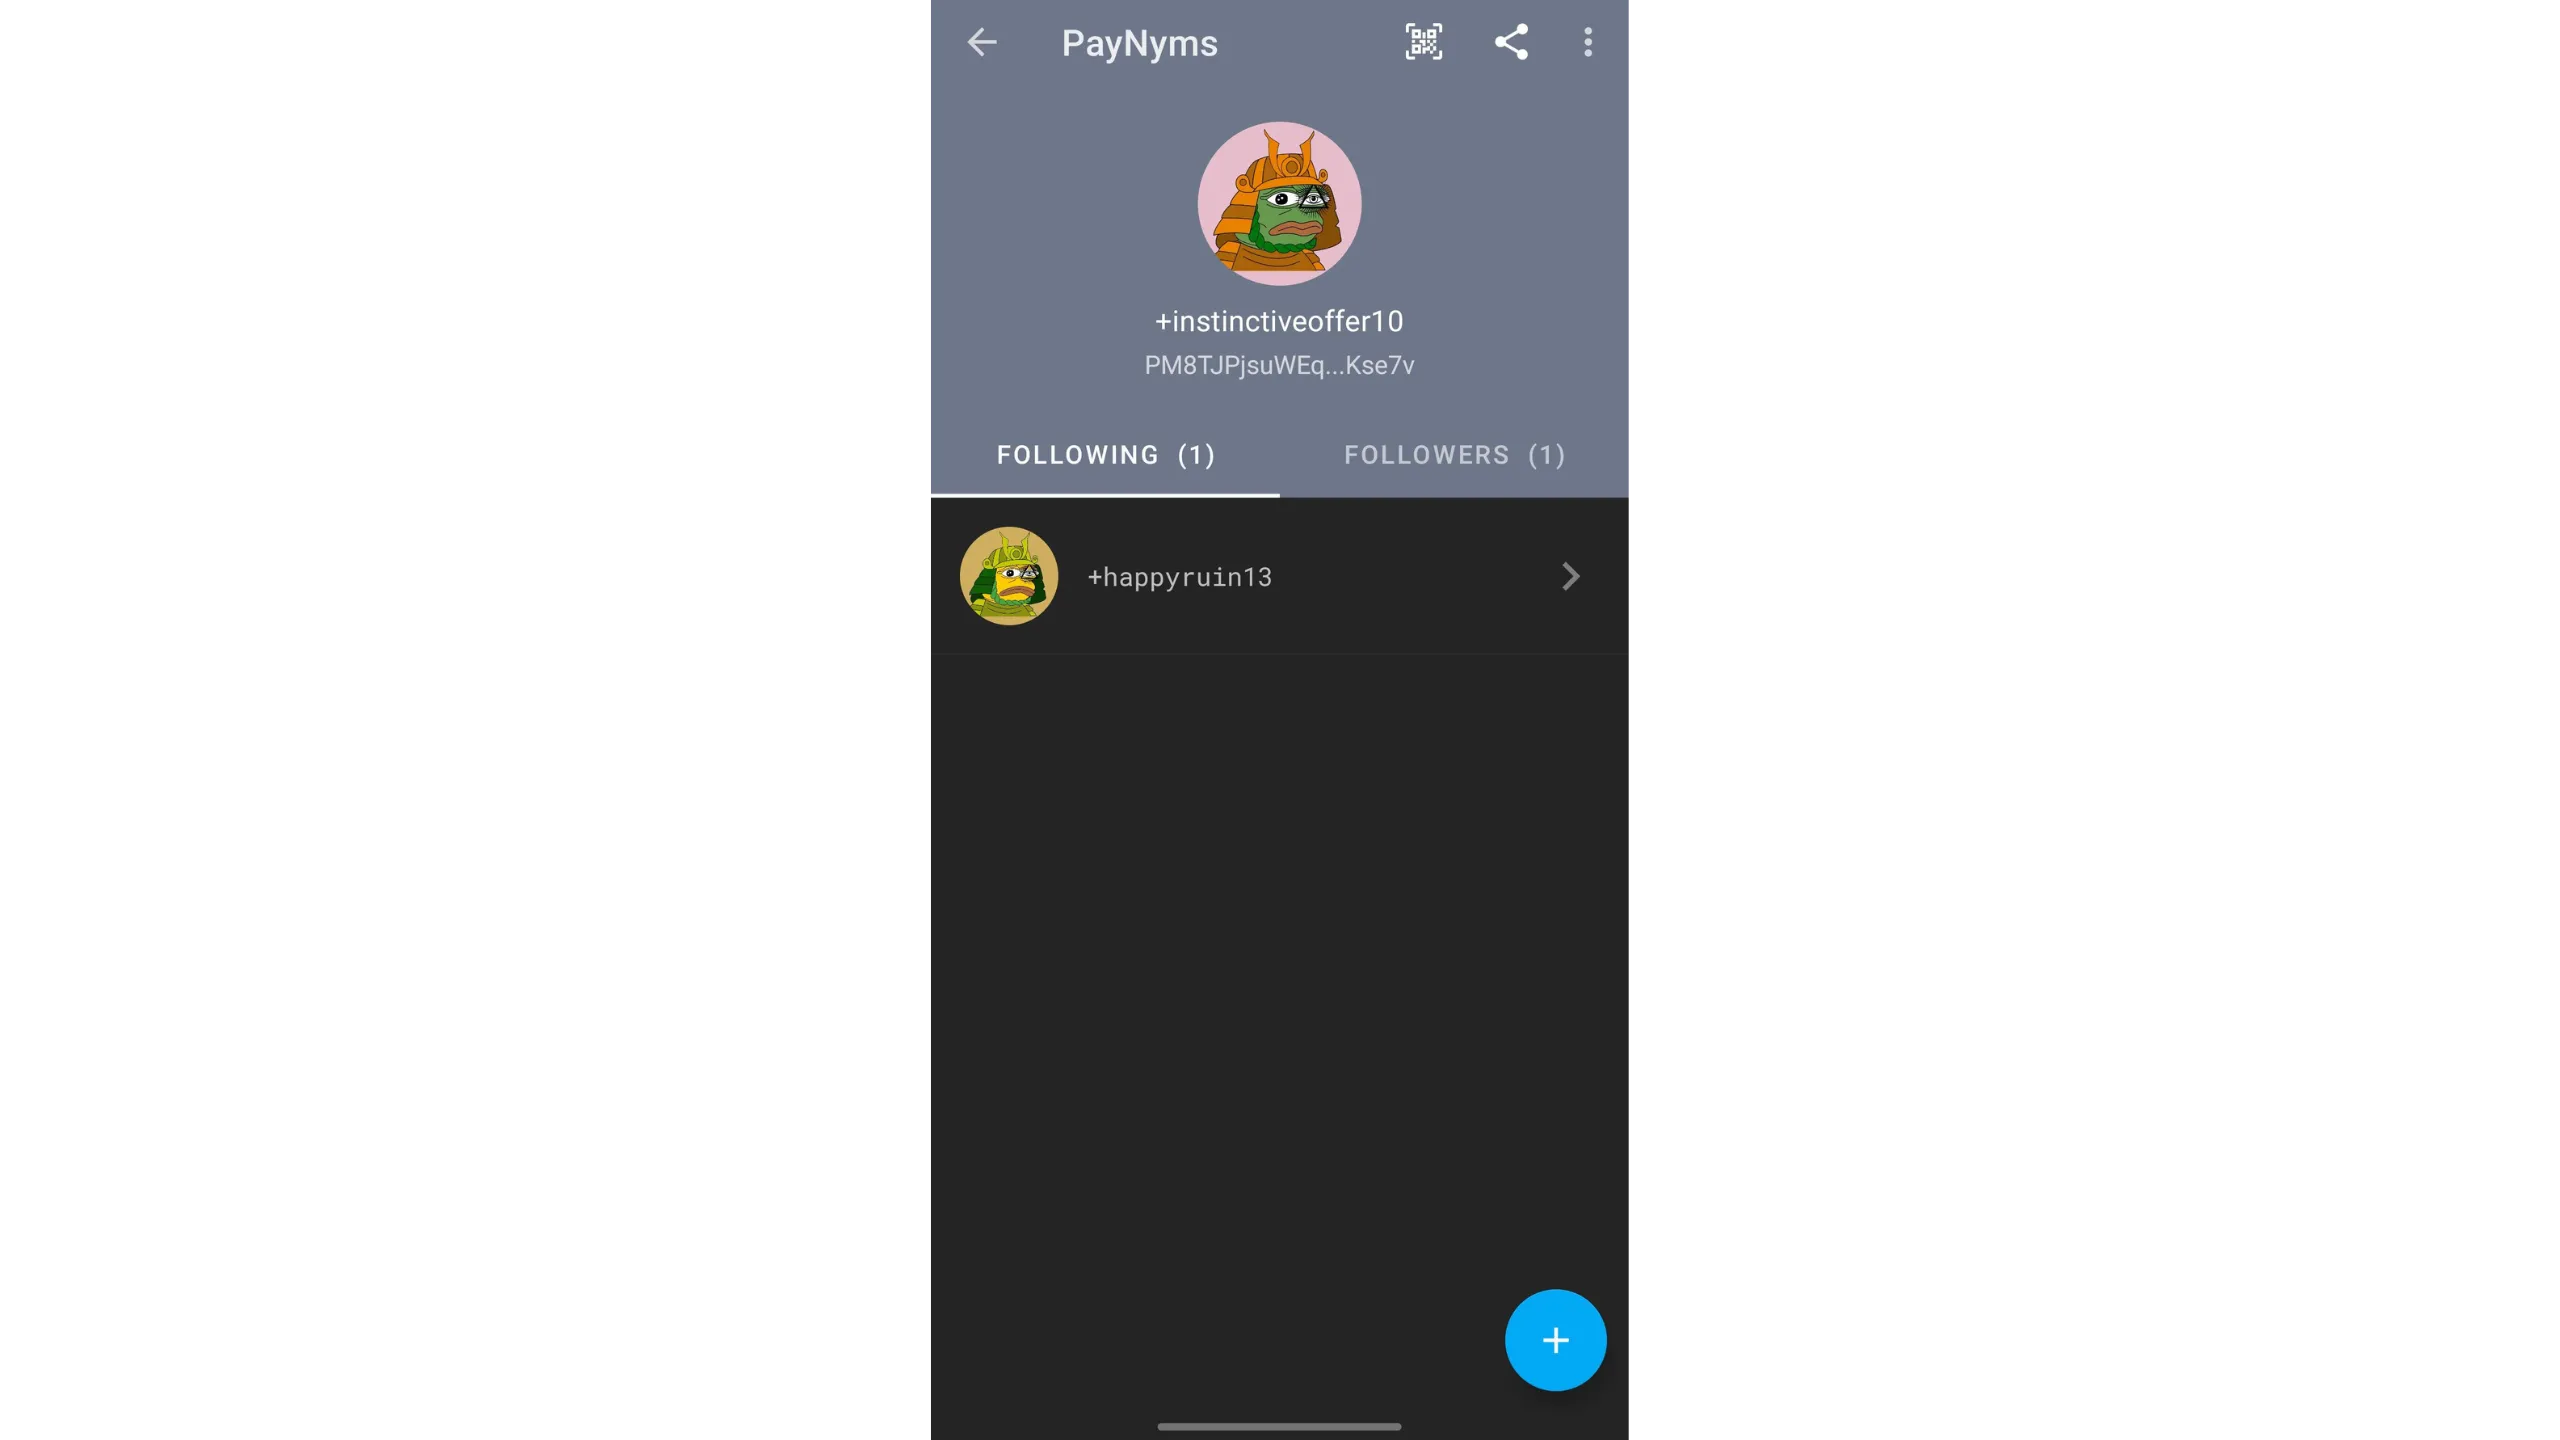
A PayNym is a unique wallet identifier that activates features like encrypted exchanges. It appears as an ID with an illustration, example on testnet:
Summary:
- Payjoin = specific collaborative transaction structure
- Stowaway = Ashigaru’s Payjoin implementation
- Cahoots = Samourai’s name for collaborative transaction types (Stowaway, Stonewall X2), now in Ashigaru
- Soroban = Tor‑based encrypted communications for Cahoots
- PayNym = unique wallet identifier used to establish Soroban communications for Cahoots
Soroban automates PSBT exchange over Tor; PayNyms provide the authenticated channel used by Soroban.
How to establish a connection between PayNyms
First, install Ashigaru and create a wallet using the setup instructions earlier in this guide.
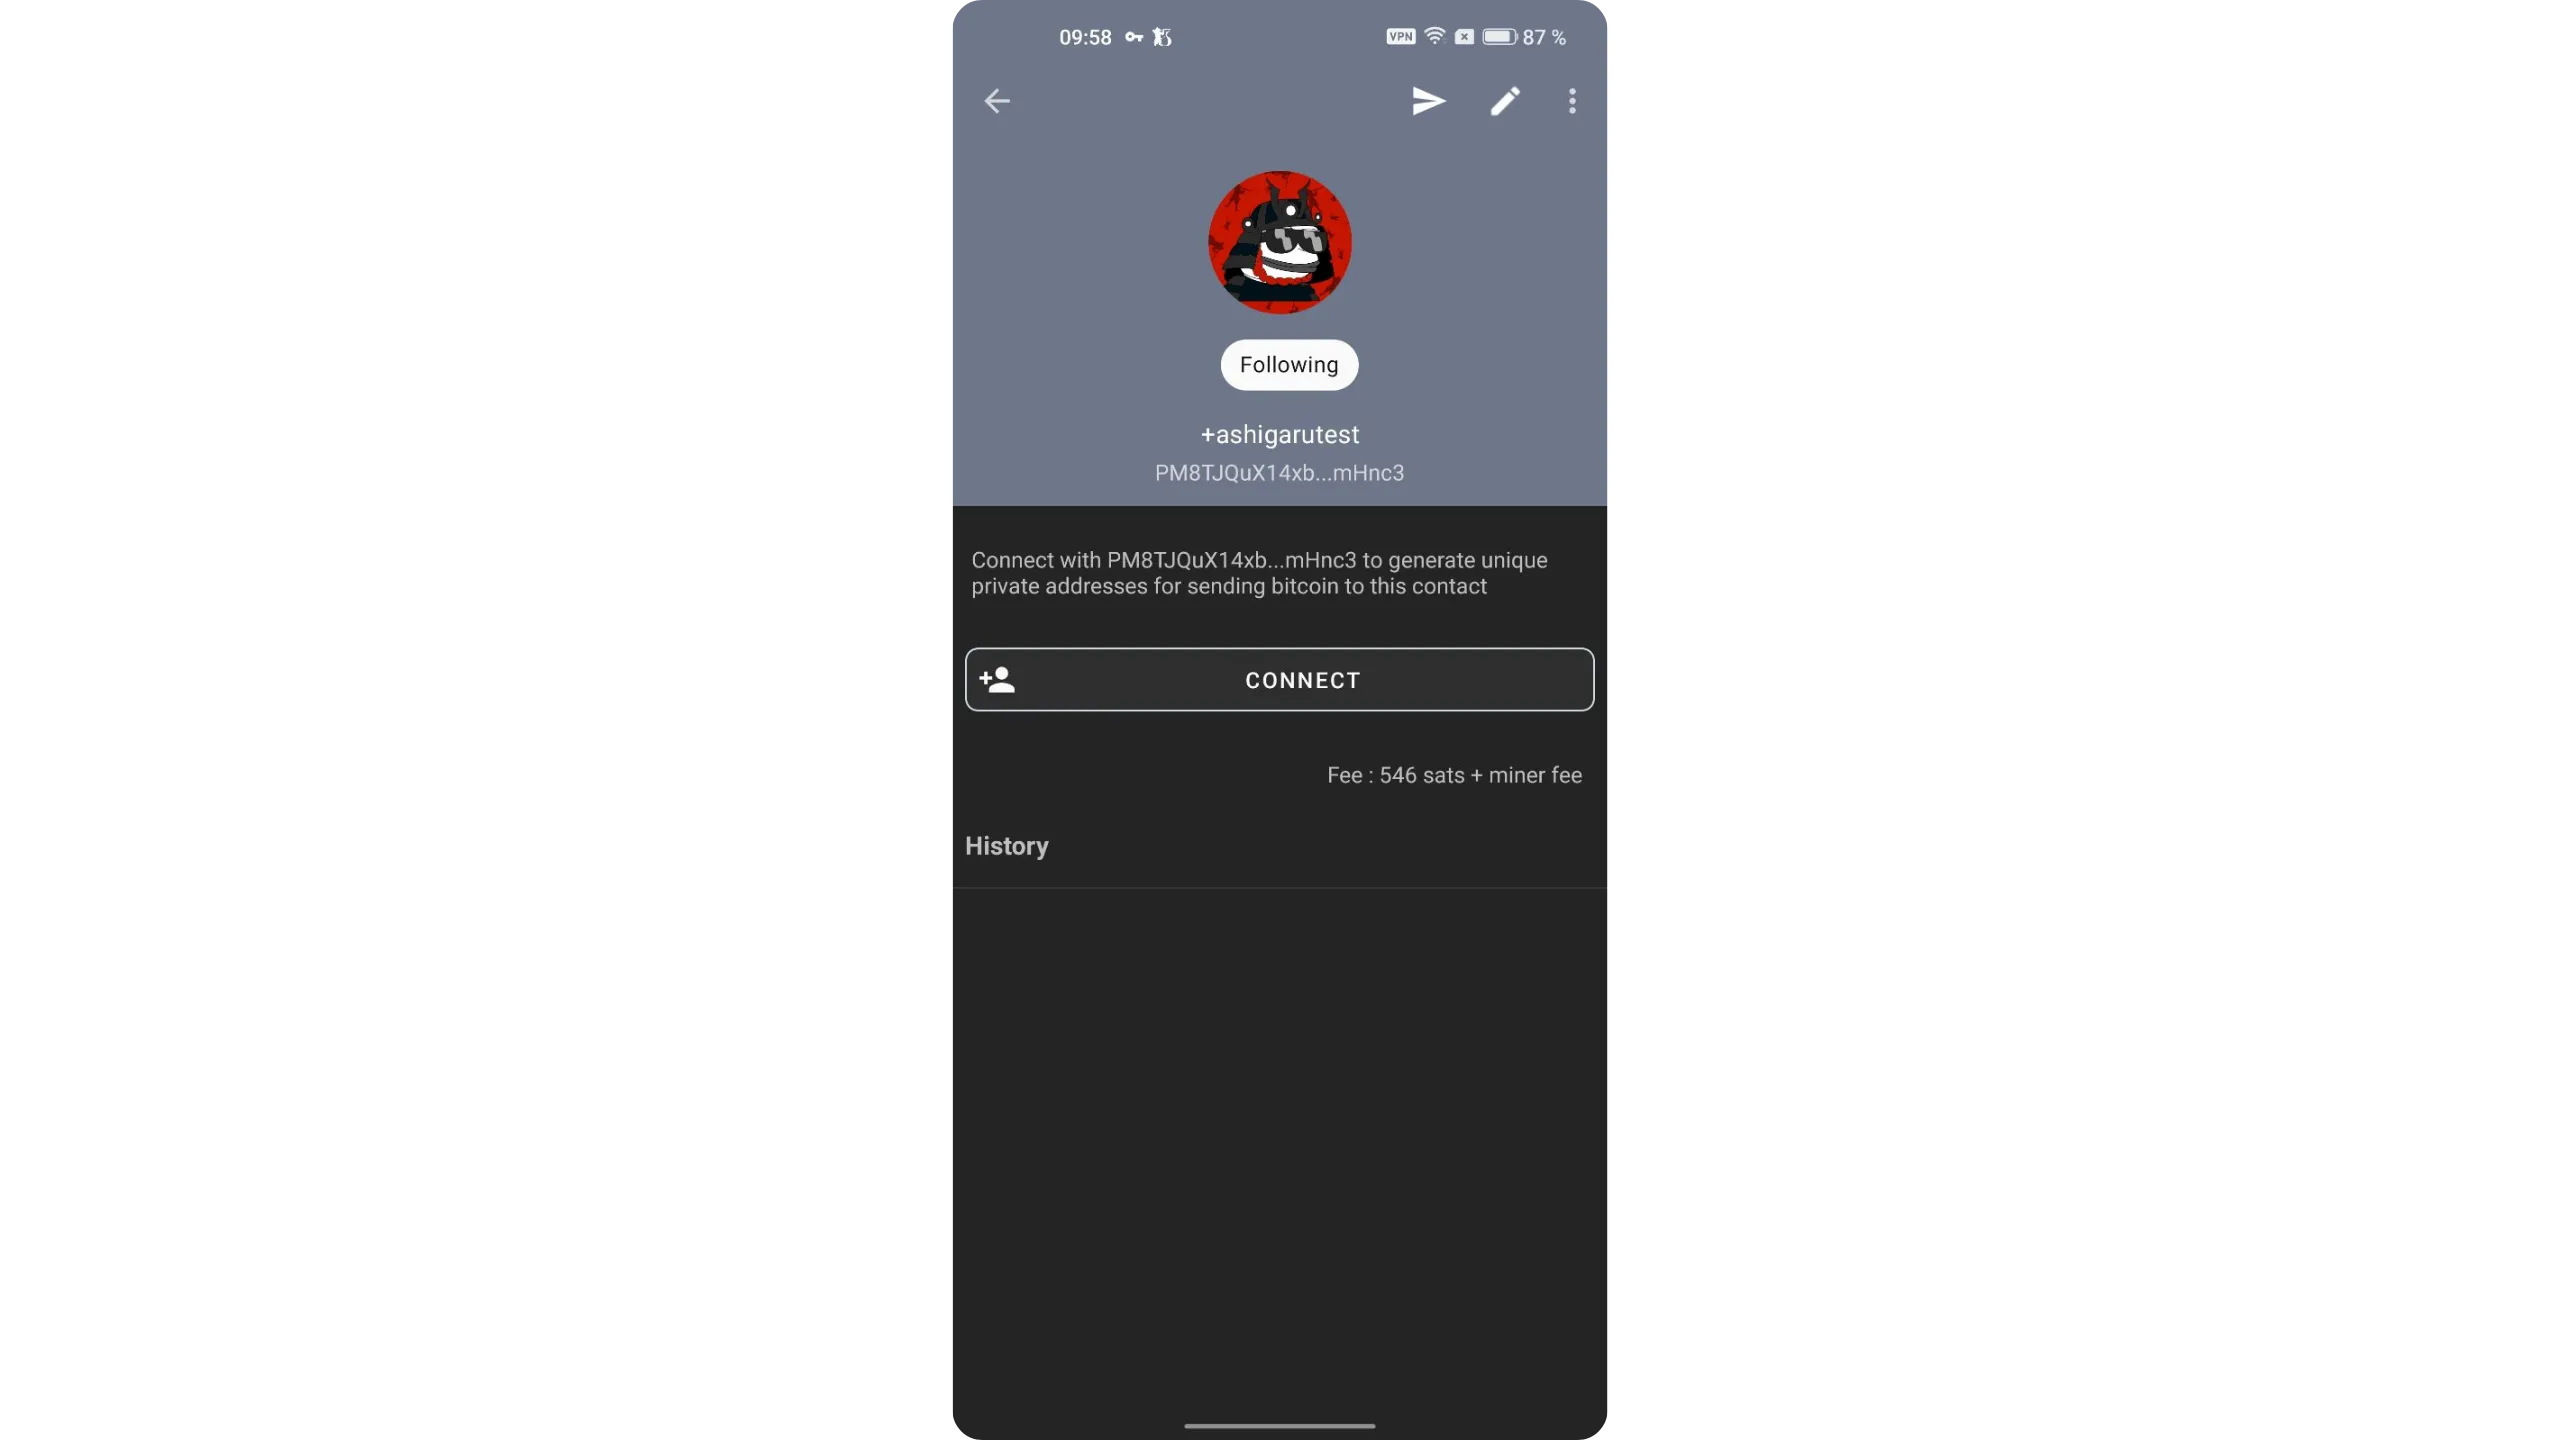
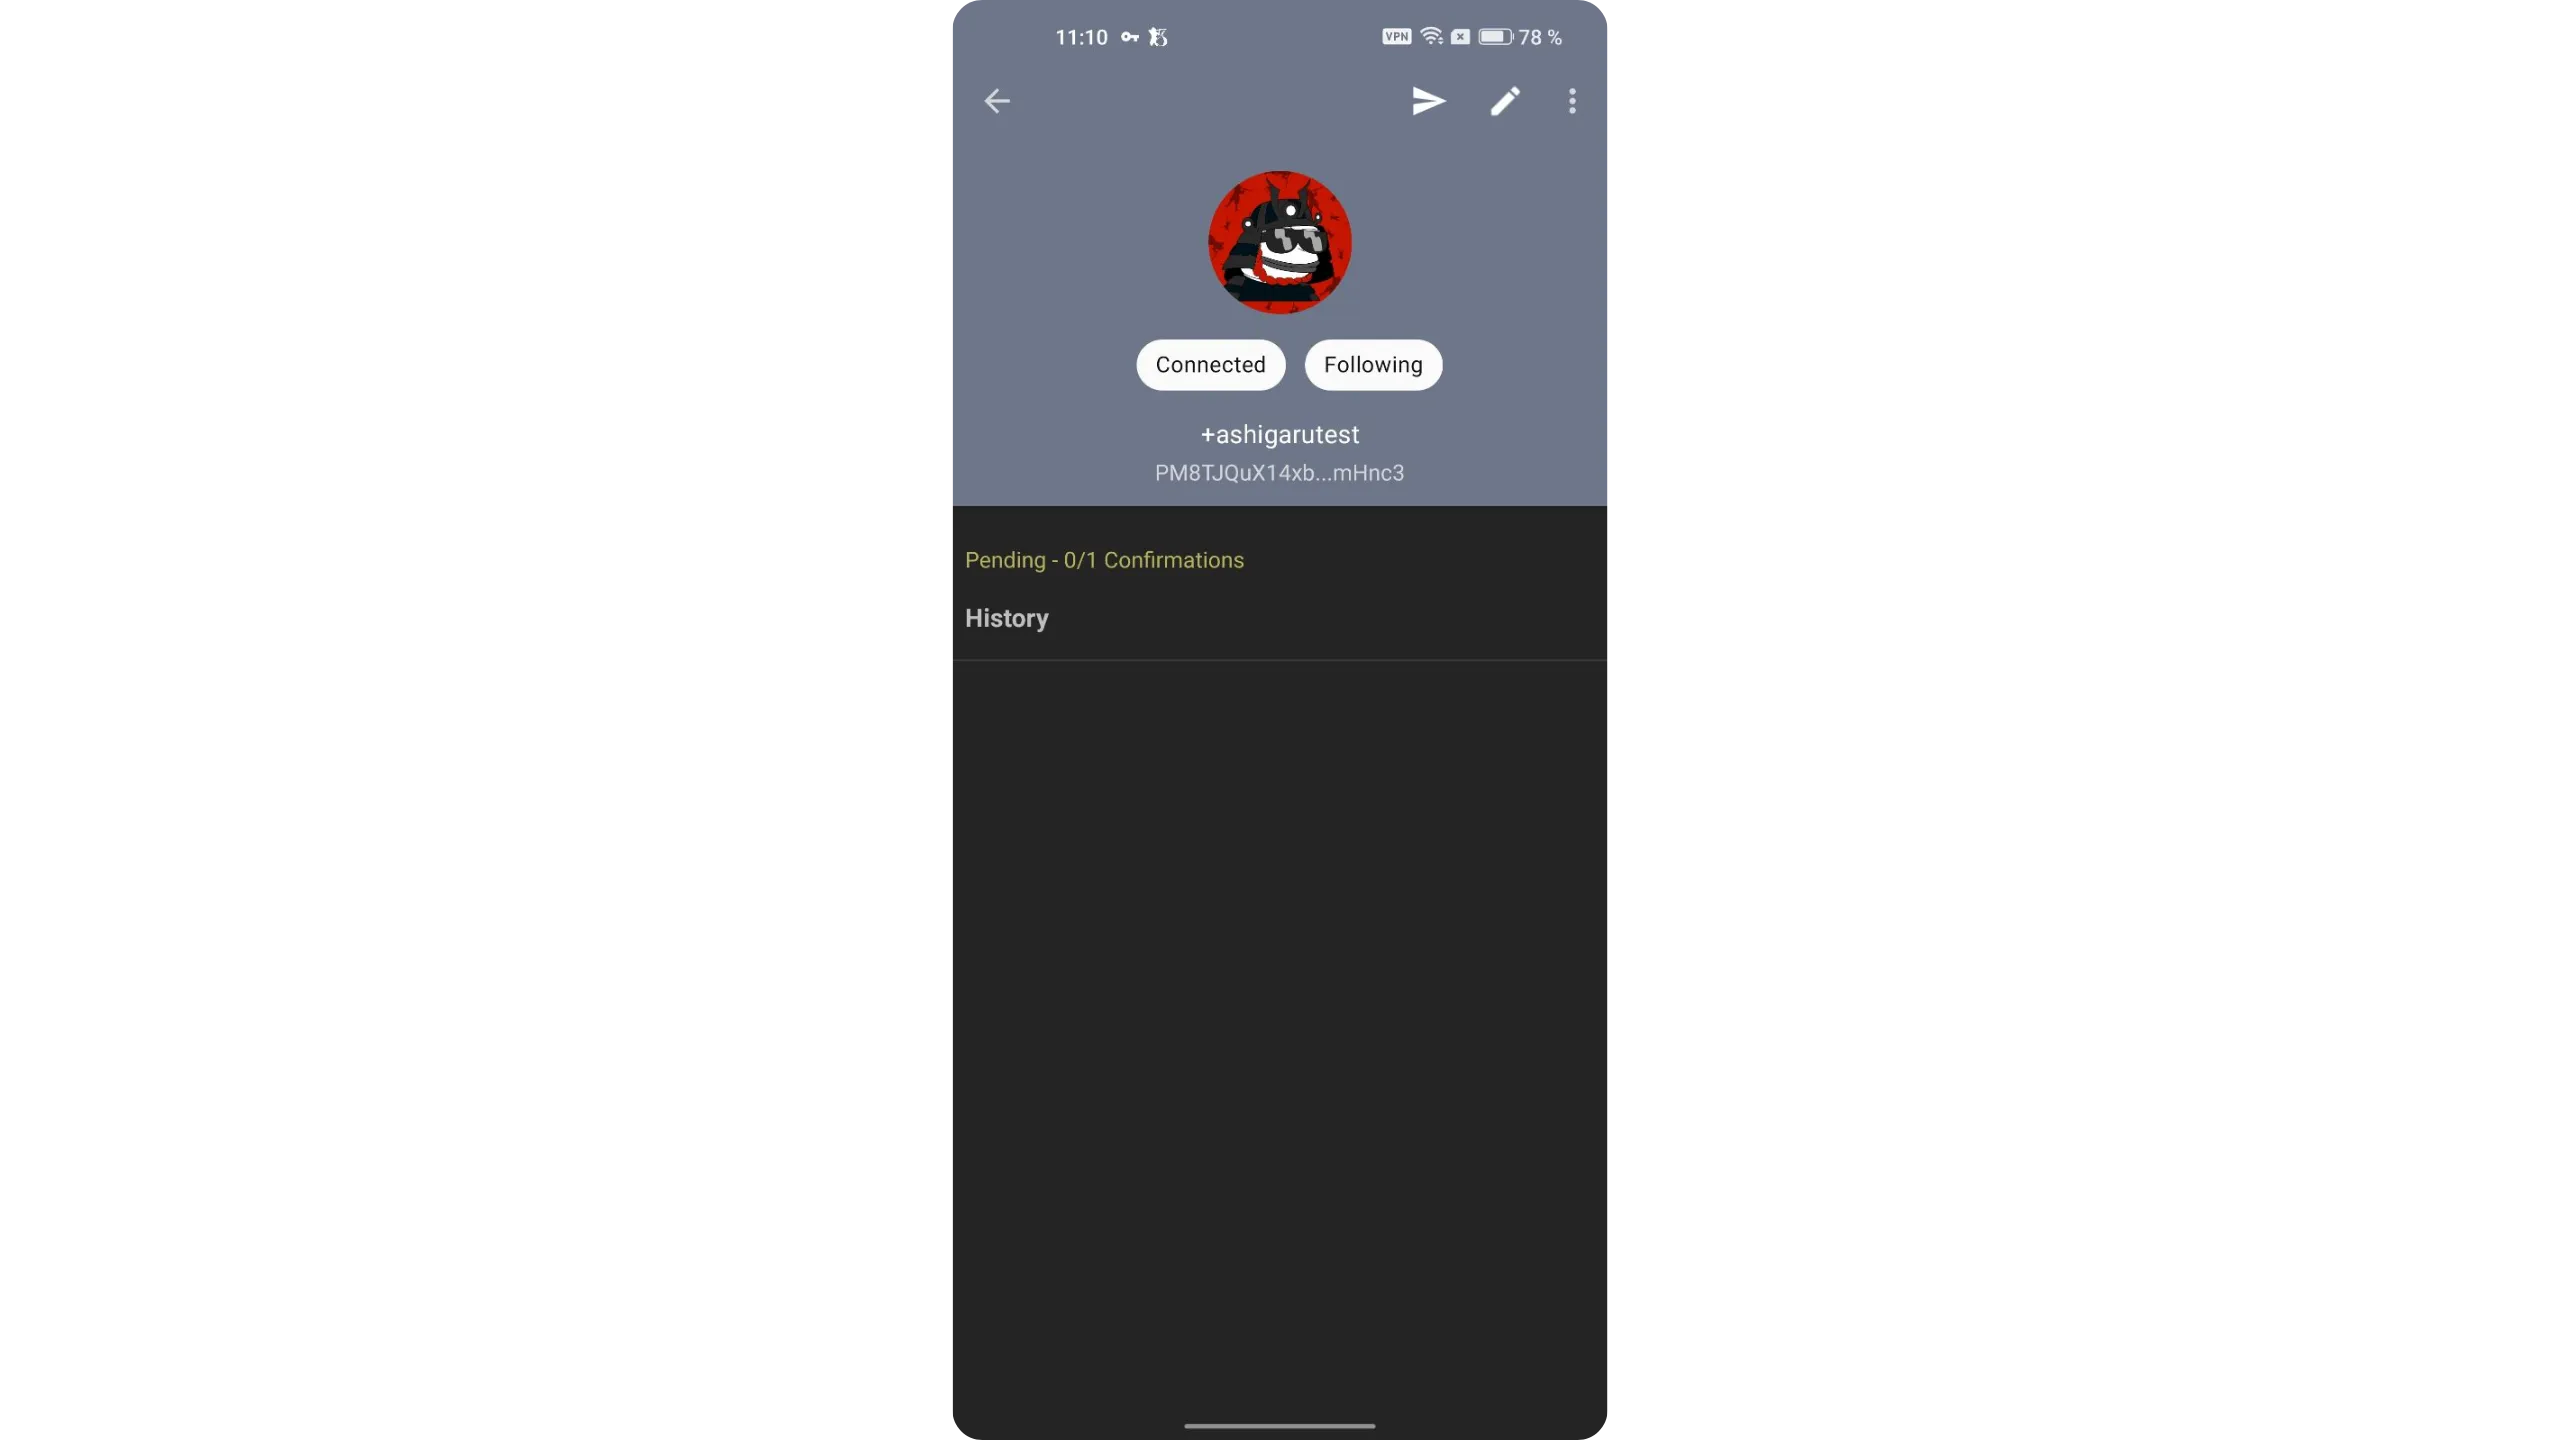
To do a remote Cahoots Payjoin/Stowaway, you must “follow” the user you’ll collaborate with, using their PayNym — in Stowaway, this means following the person you intend to pay.
Before initiating Stowaway, ensure both PayNyms follow each other — it’s required to establish the encrypted Soroban channel.
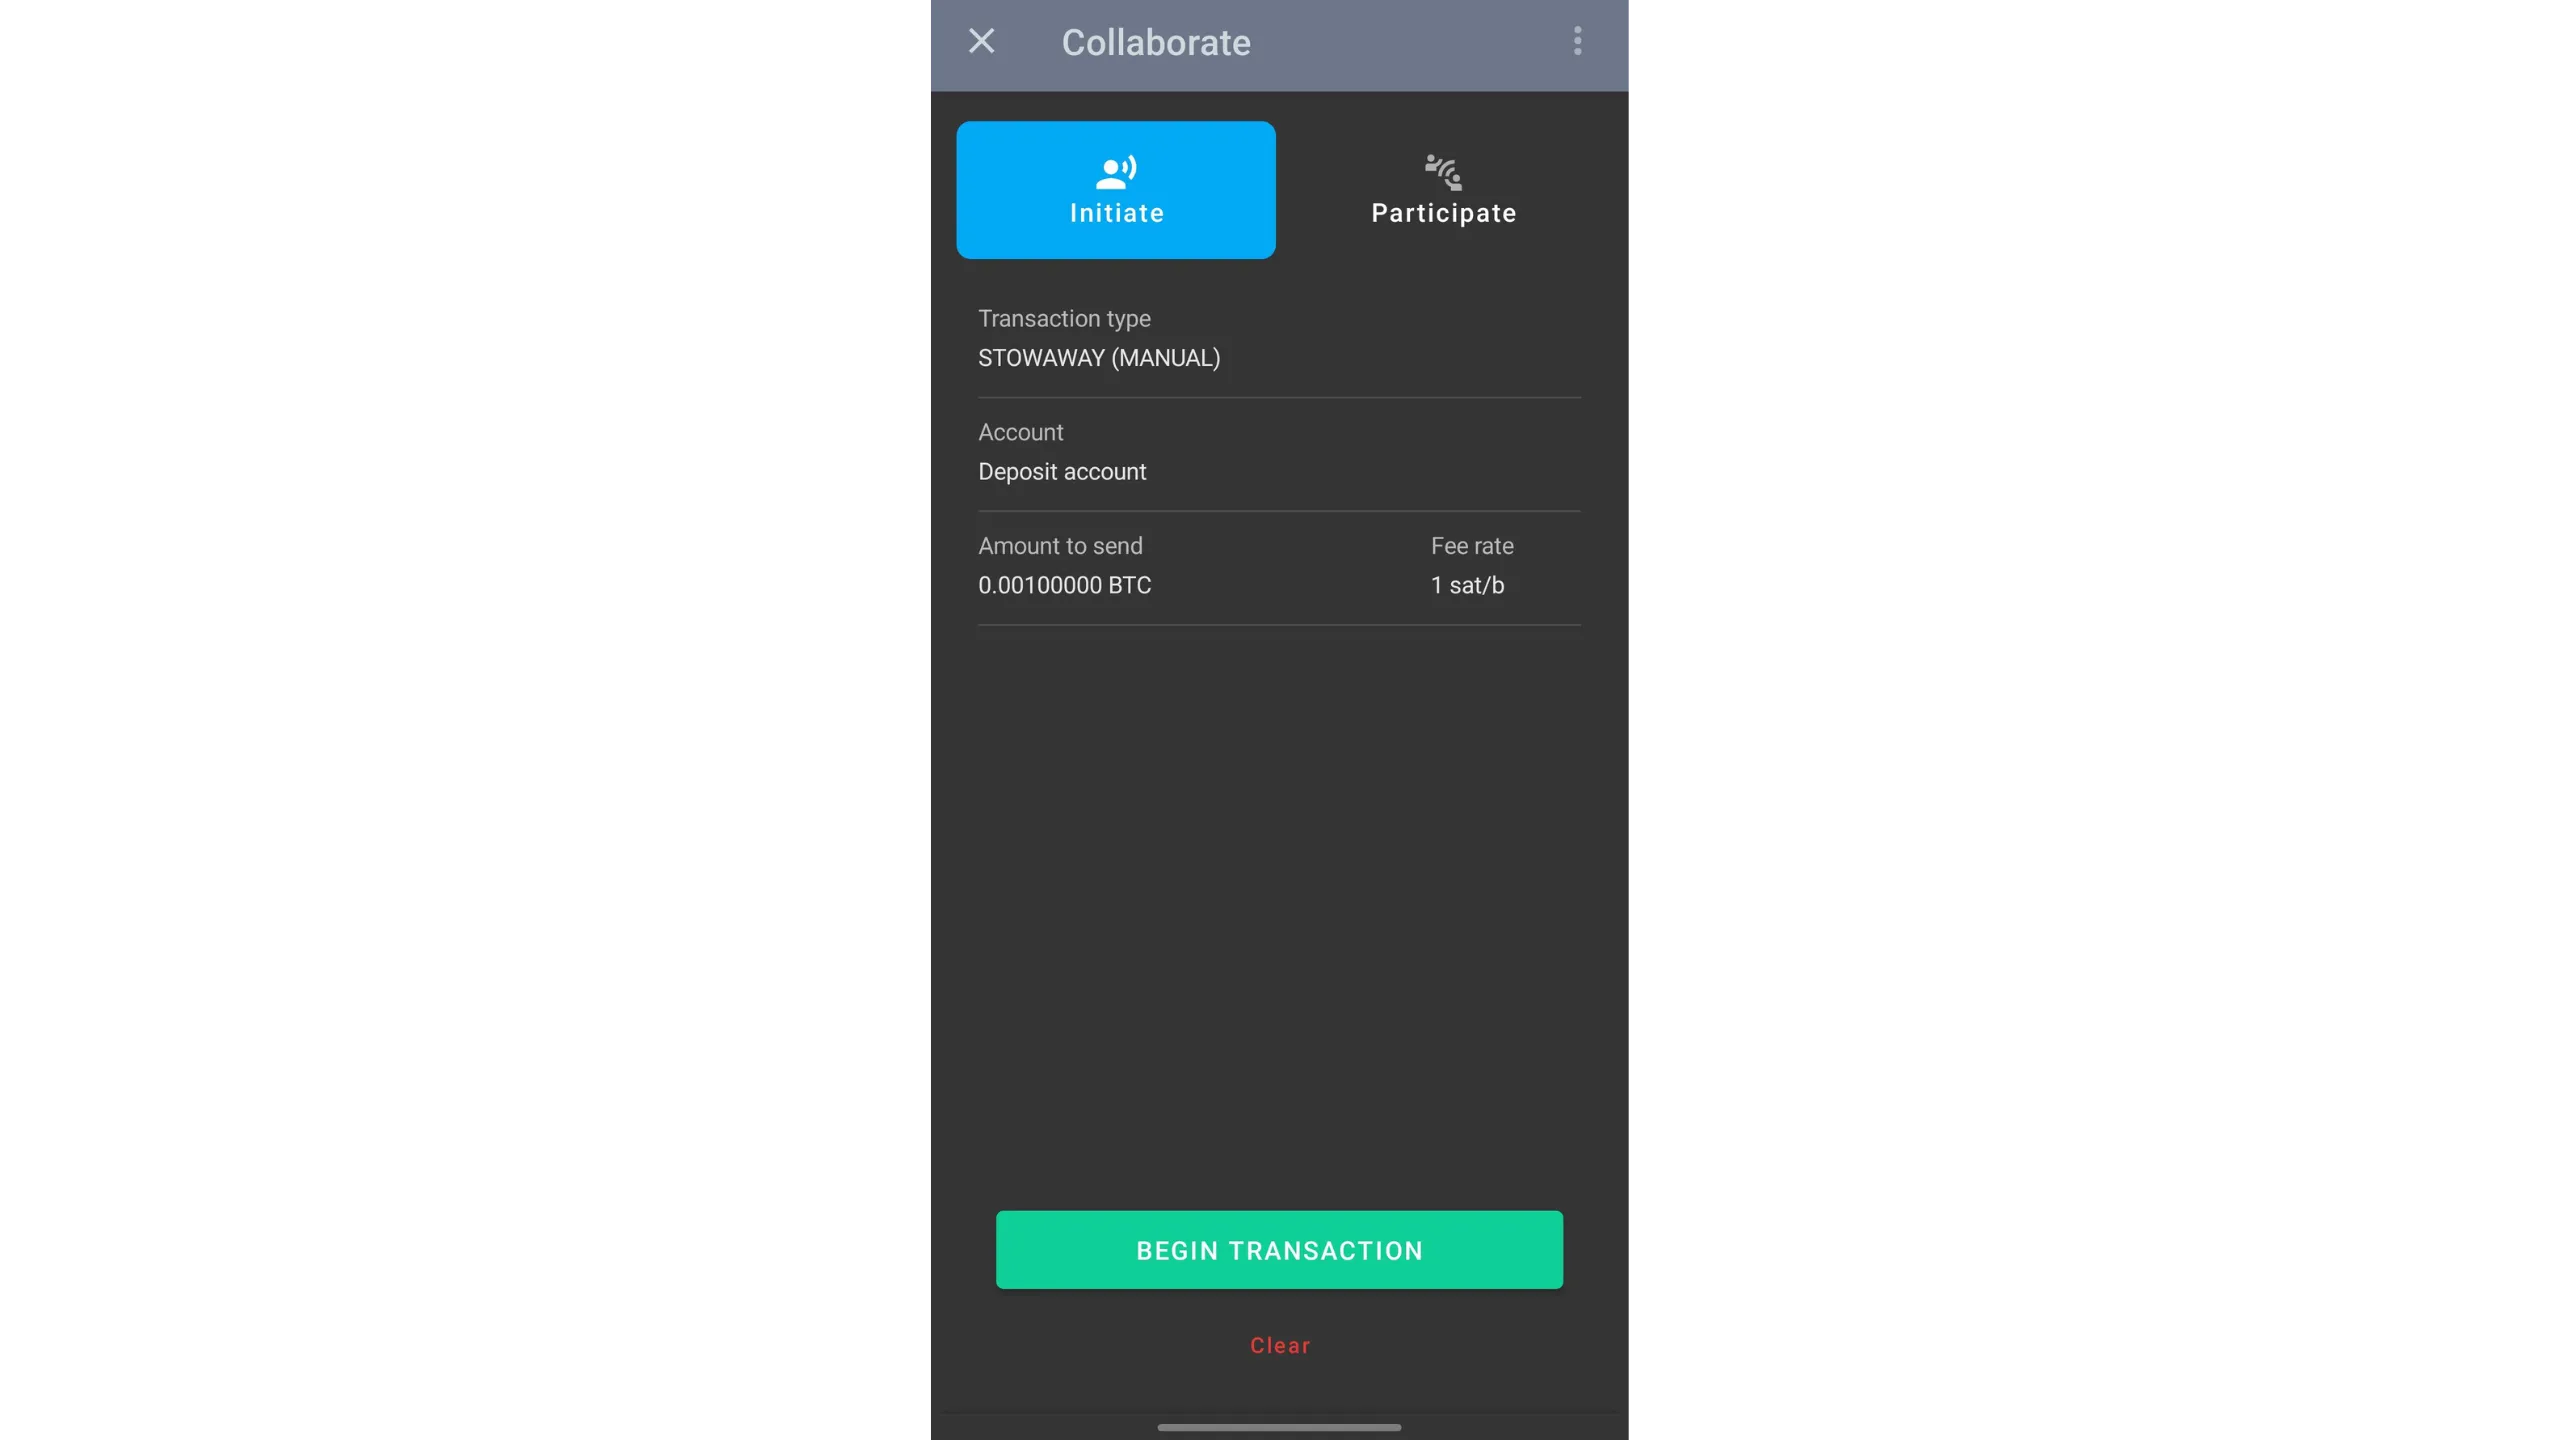
How to do a Payjoin in Ashigaru
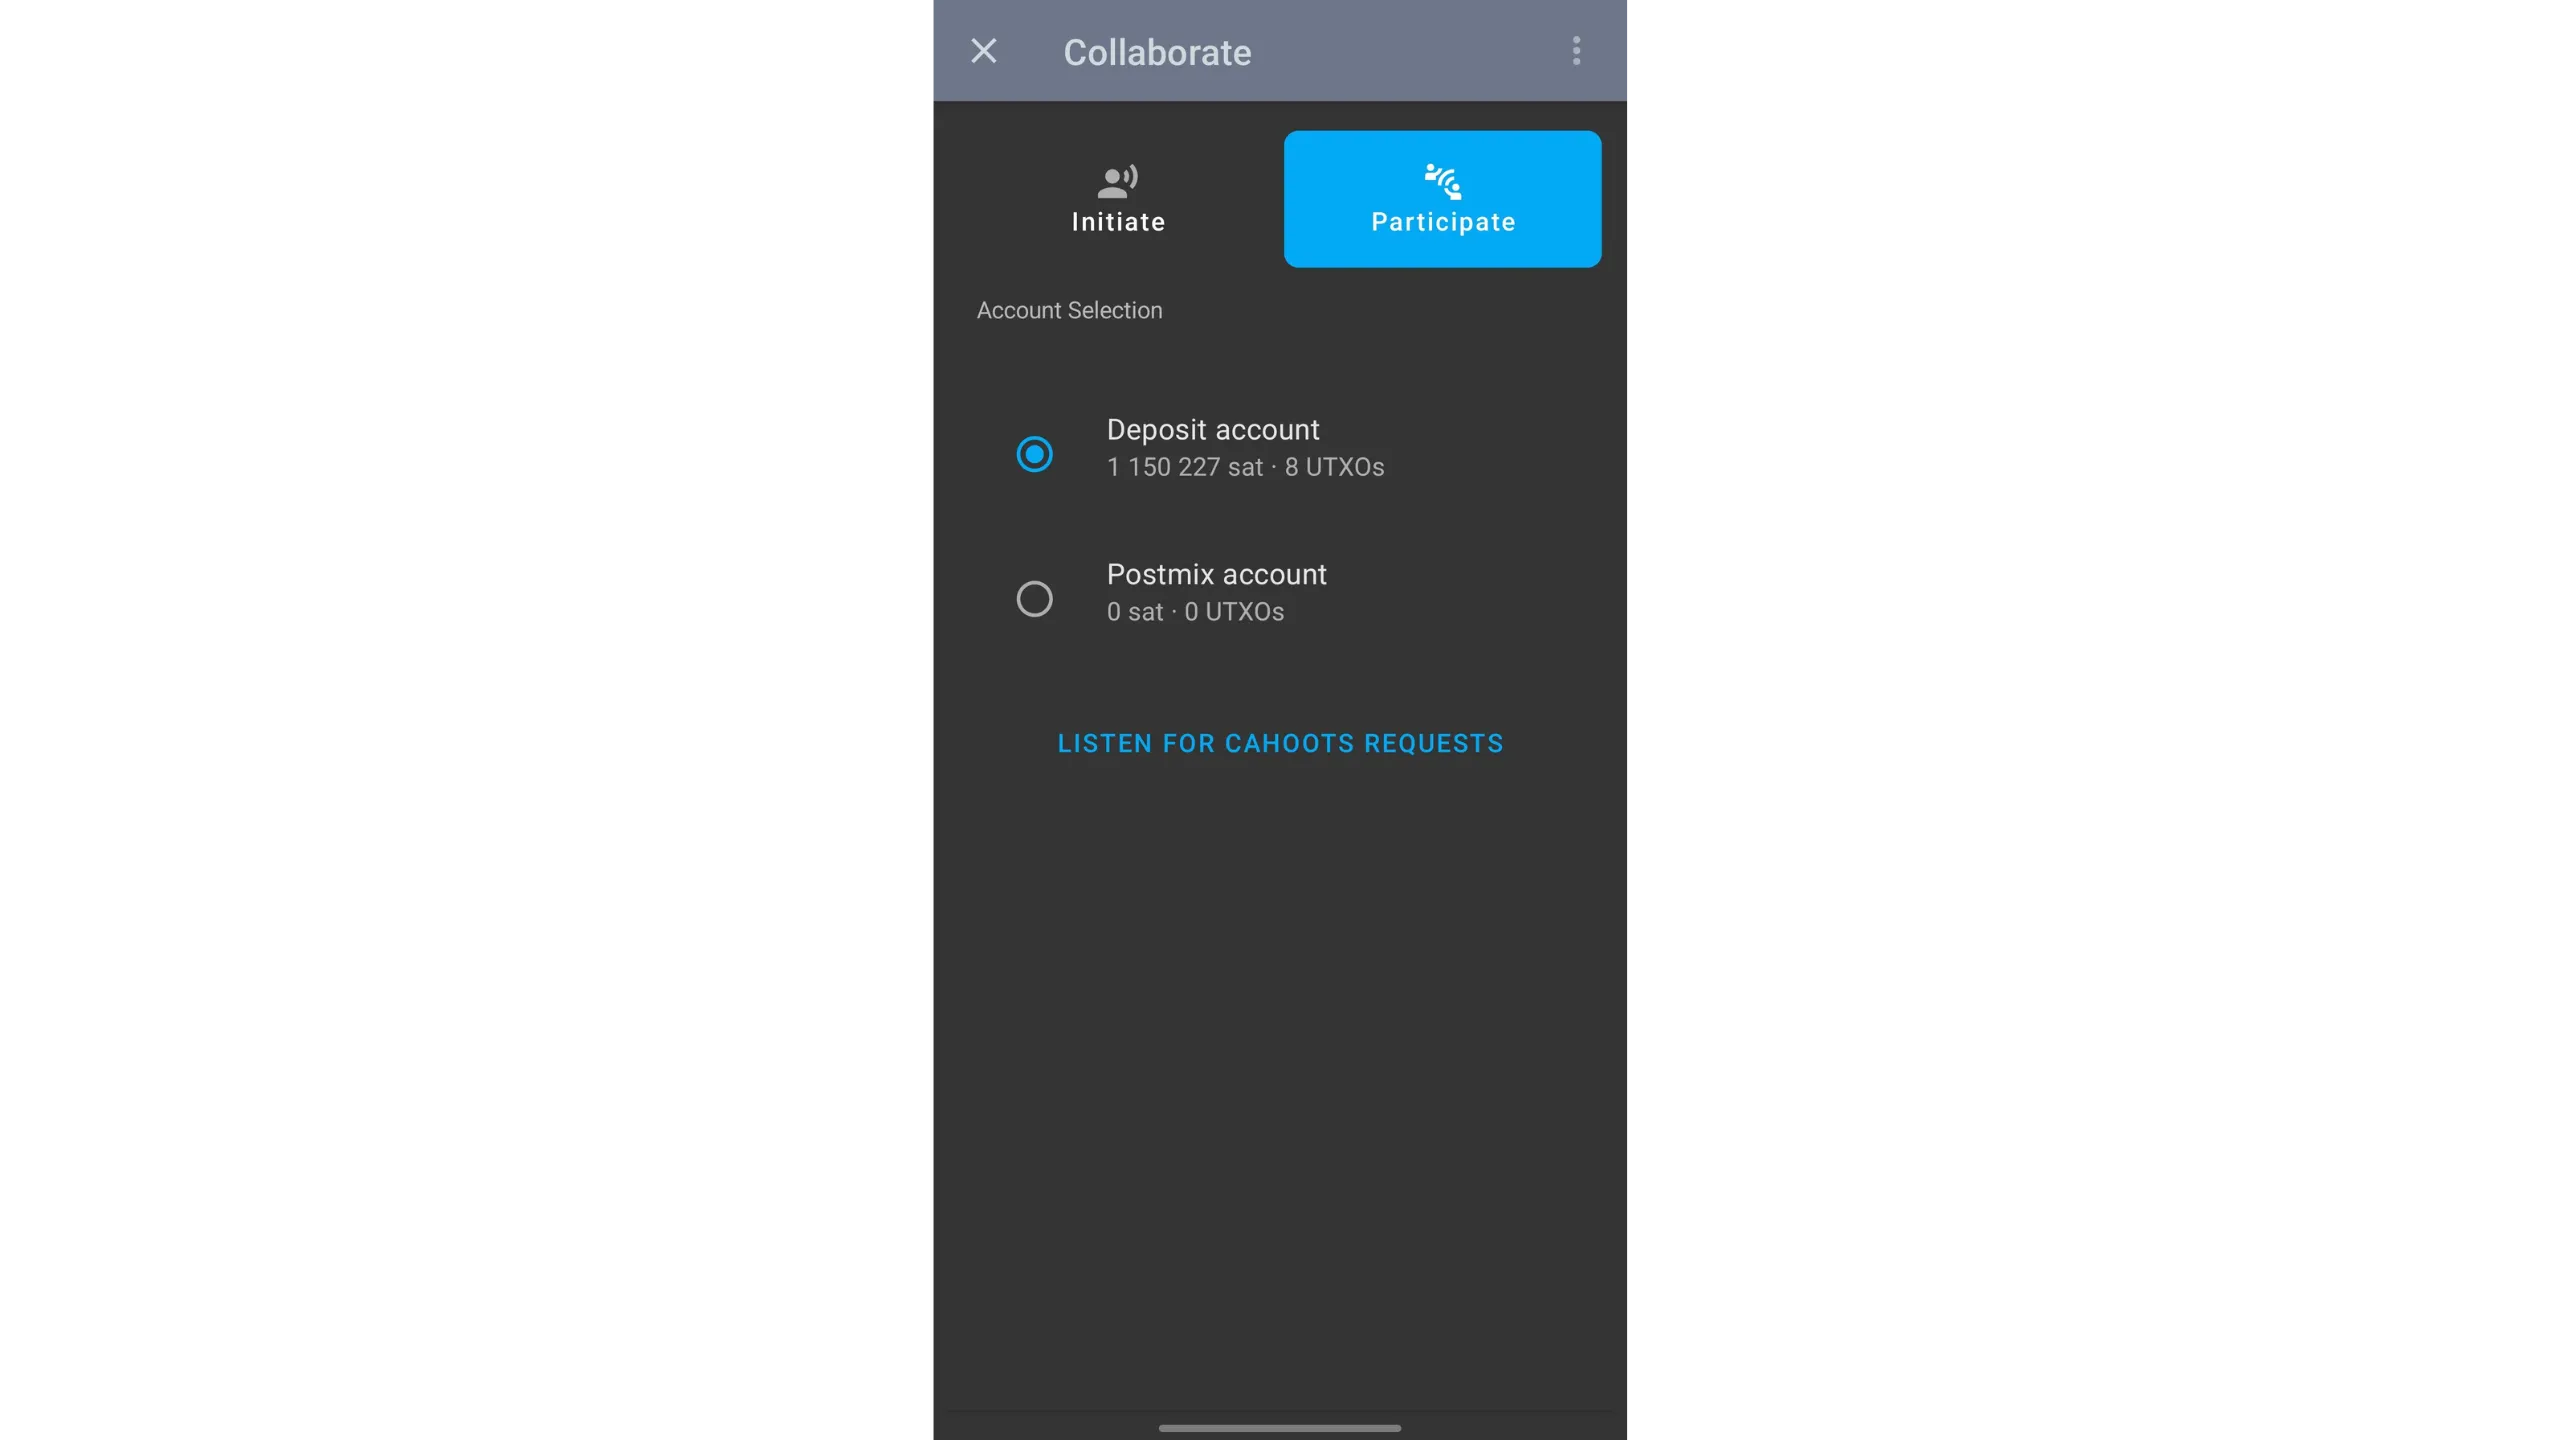
Tap your PayNym image top-left, then open Collaborate. The person participating must do the same — unless you’re exchanging QR codes in person.
Choose:
Initiateif you are the payer senderParticipateif you are the recipient collaborator

If you’re the recipient/collaborator, remote via Soroban:
- Tap
Participate - Choose the account you’ll use
- Tap
LISTEN FOR CAHOOTS REQUESTSand wait for the payer’s request

For in‑person collaboration:
- Go to wallet home
- Tap the QR icon at the top
- Scan the payer’s QR code
If you’re the payer initiator:
- Go to
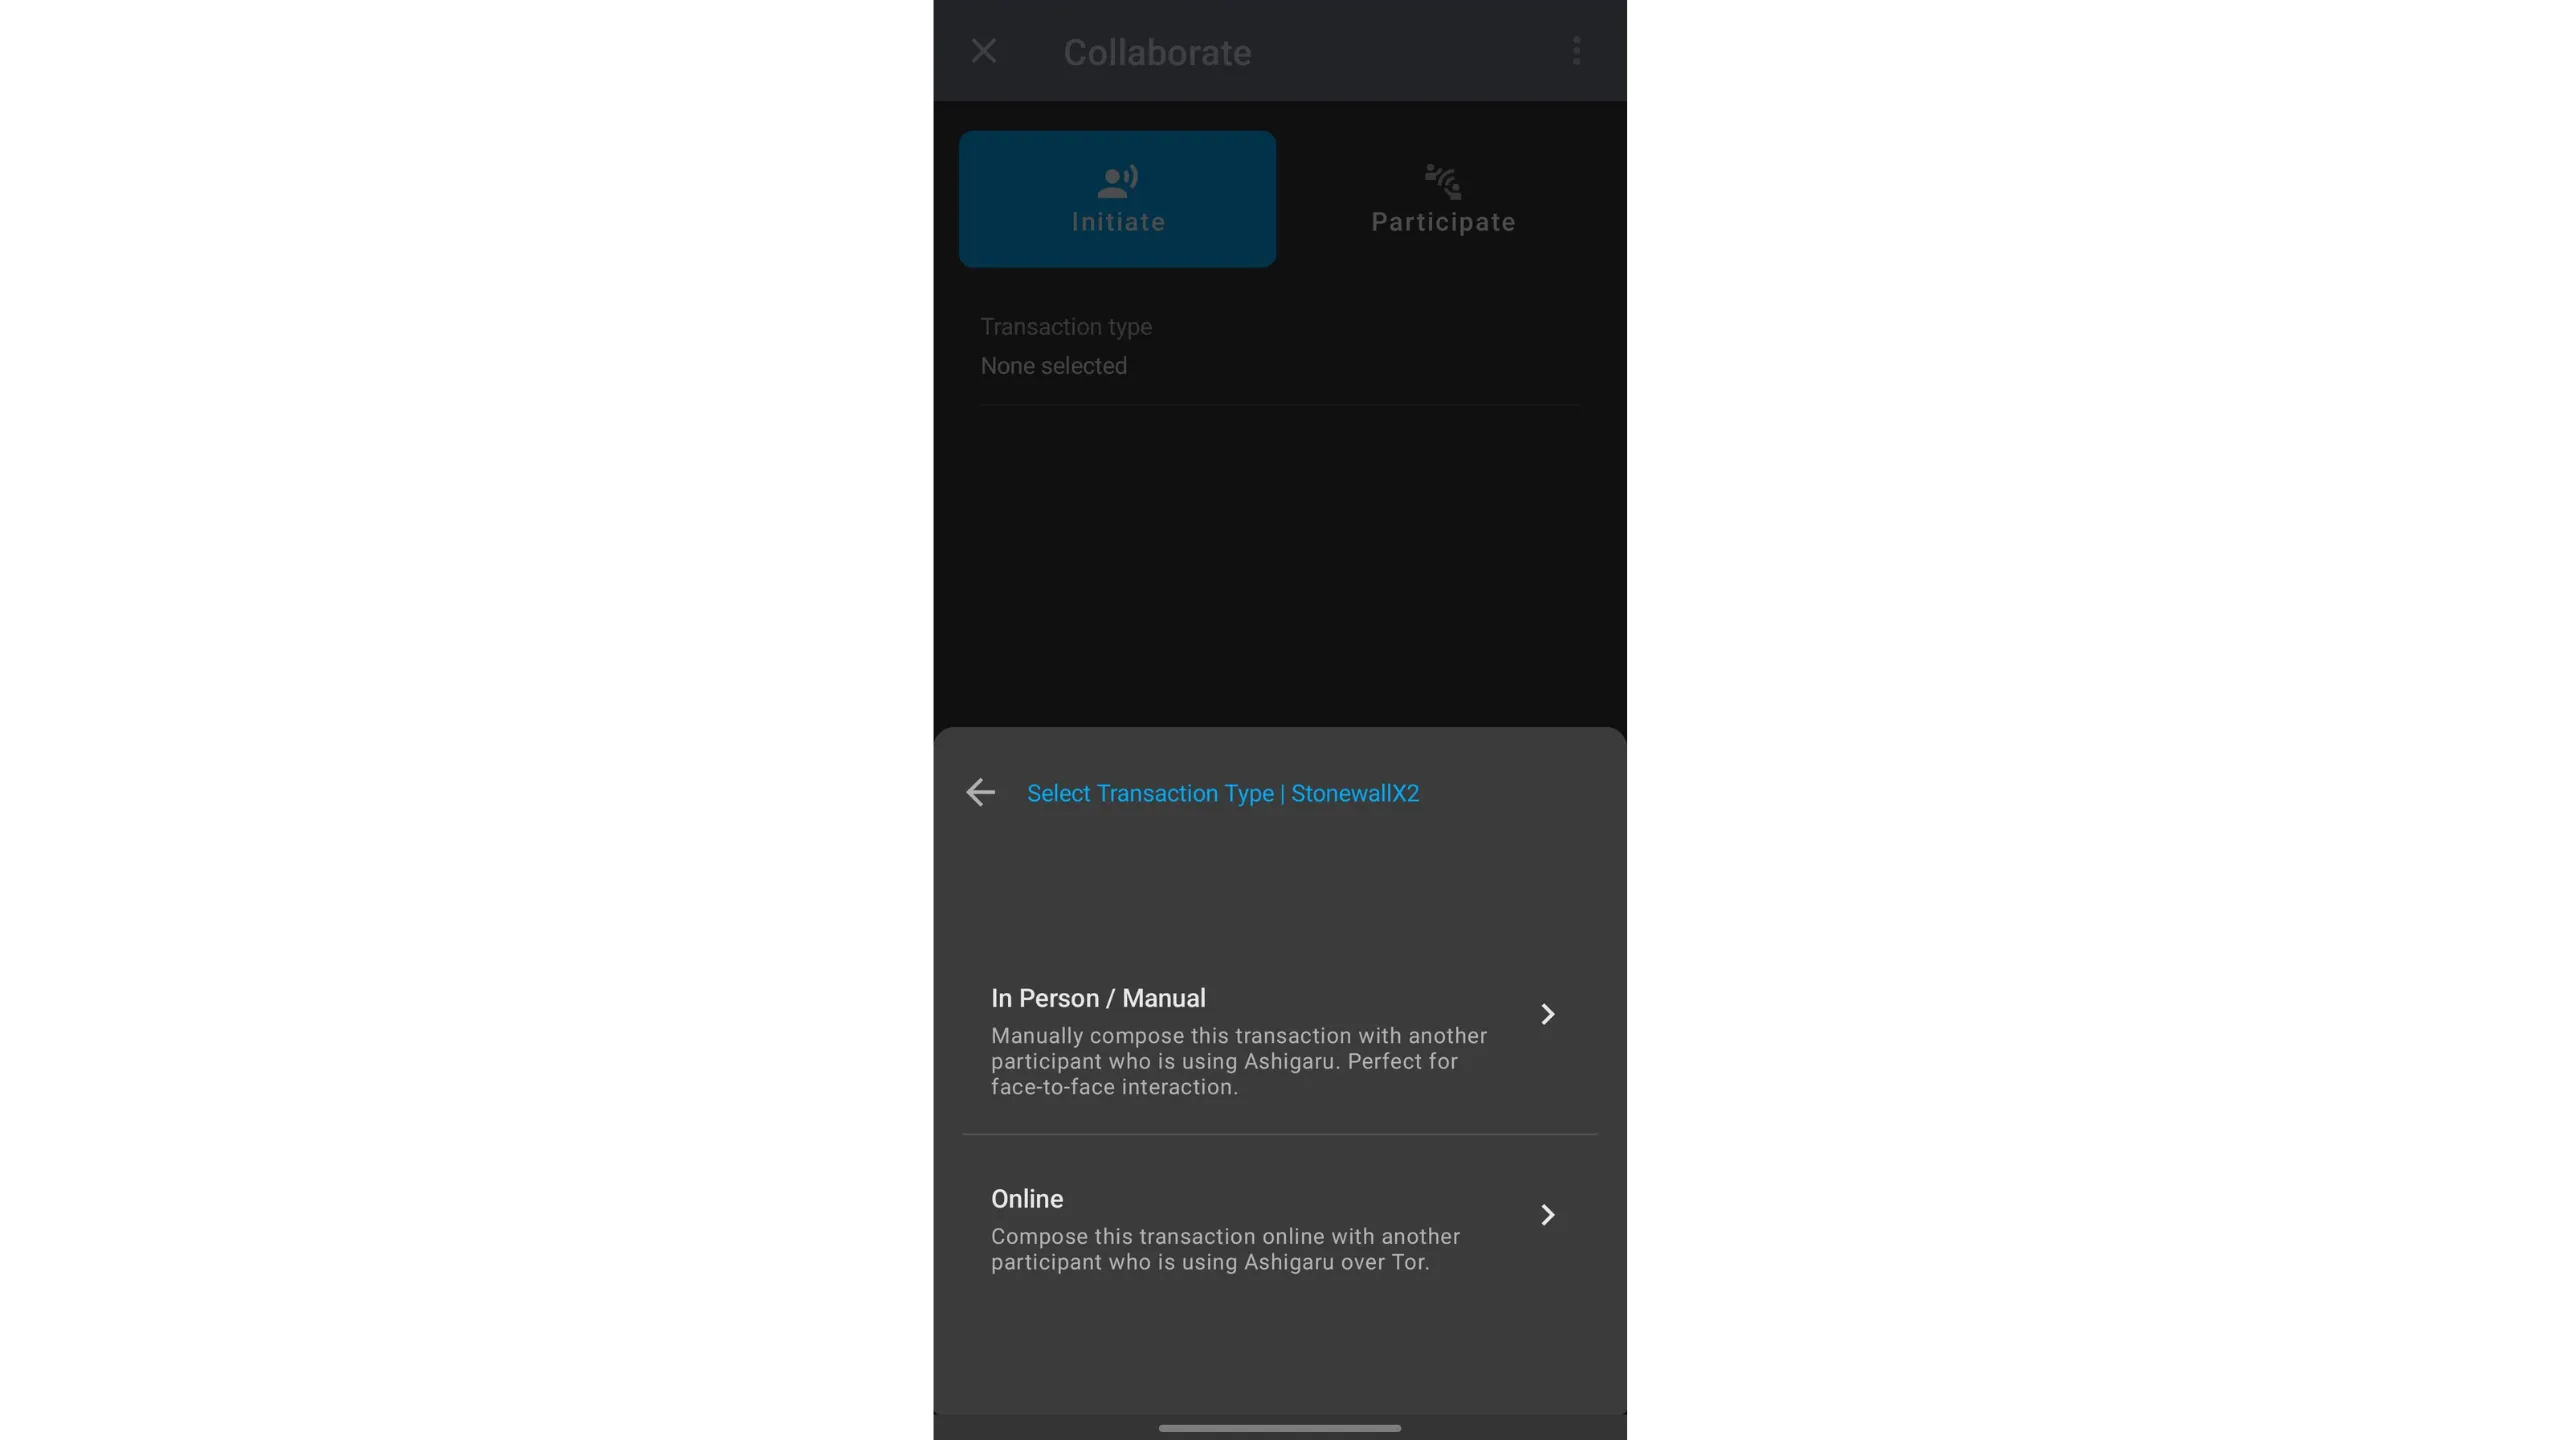
Collaborate→Initiate
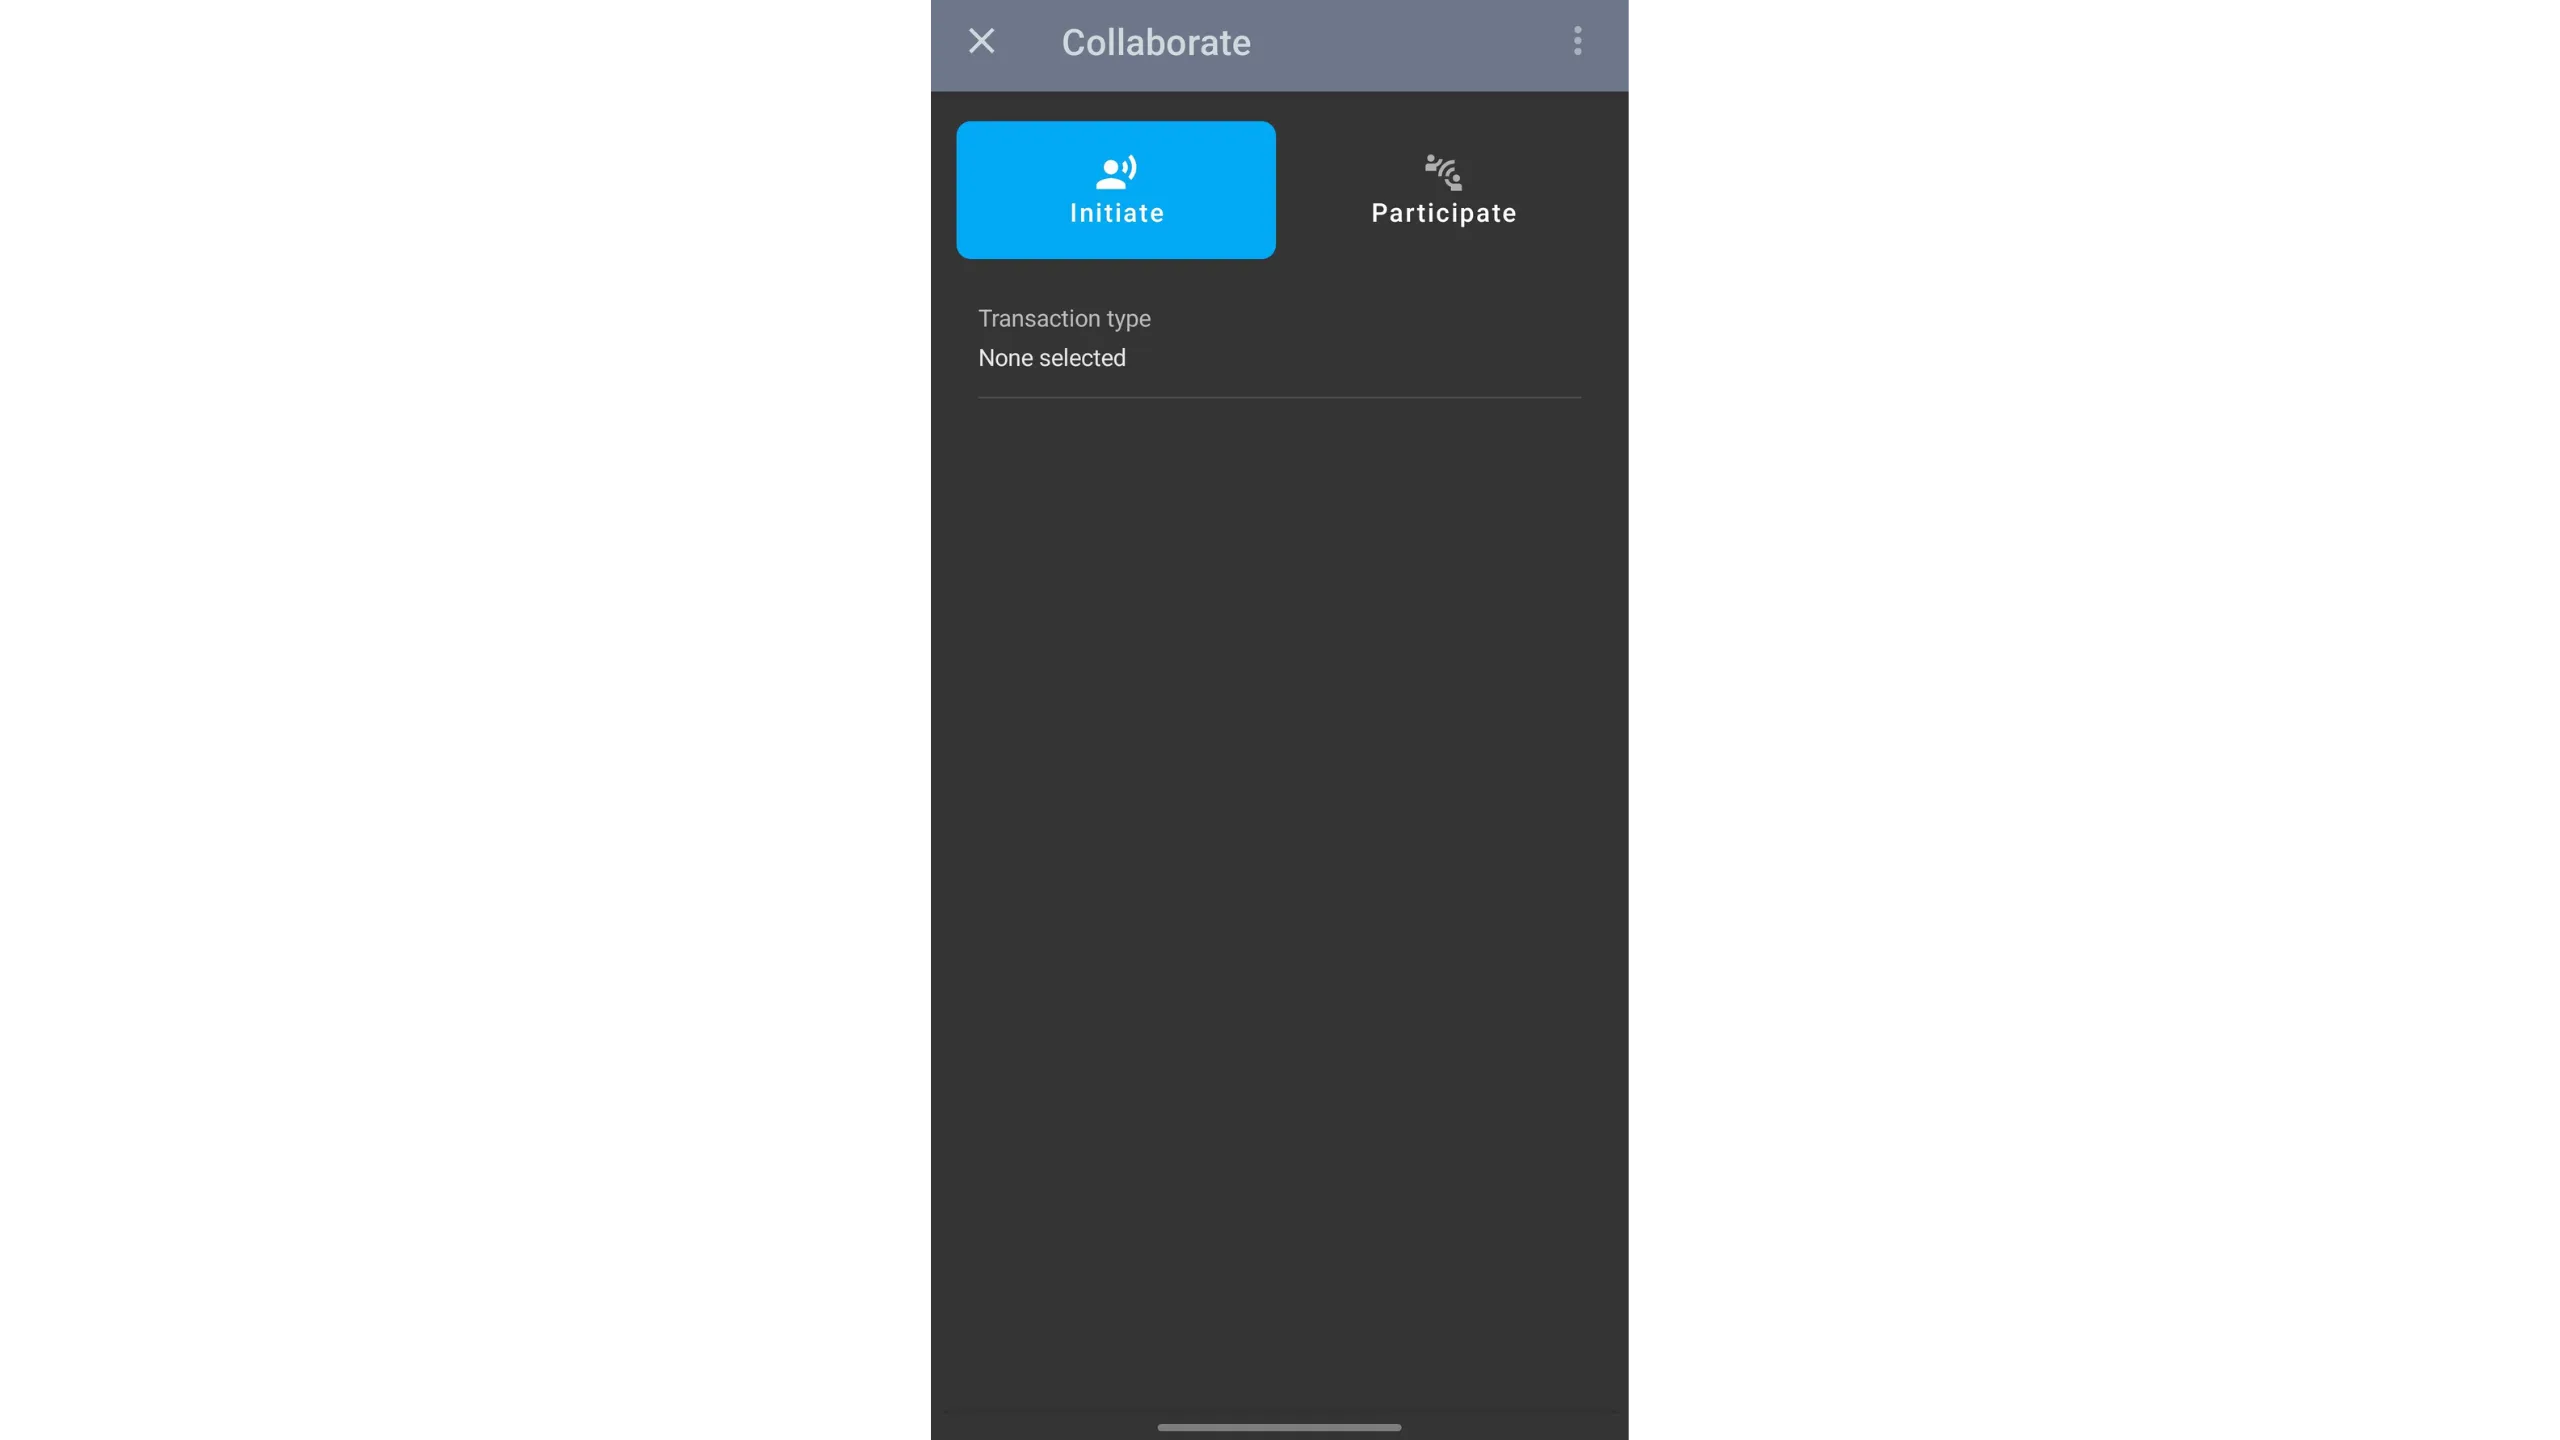
- Choose the transaction type
StowawayPayjoin

- Choose collaboration mode:
OnlineCahoots via SorobanIn Person / ManualQR exchanges

Online Cahoots (Soroban)
Select the recipient from the PayNyms you follow.

Tap Set up transaction, then choose the spending account.

Enter:
- Amount to send
- Fee rate
No receiving address is needed — the recipient supplies it during the PSBT exchange. Tap Review transaction setup.

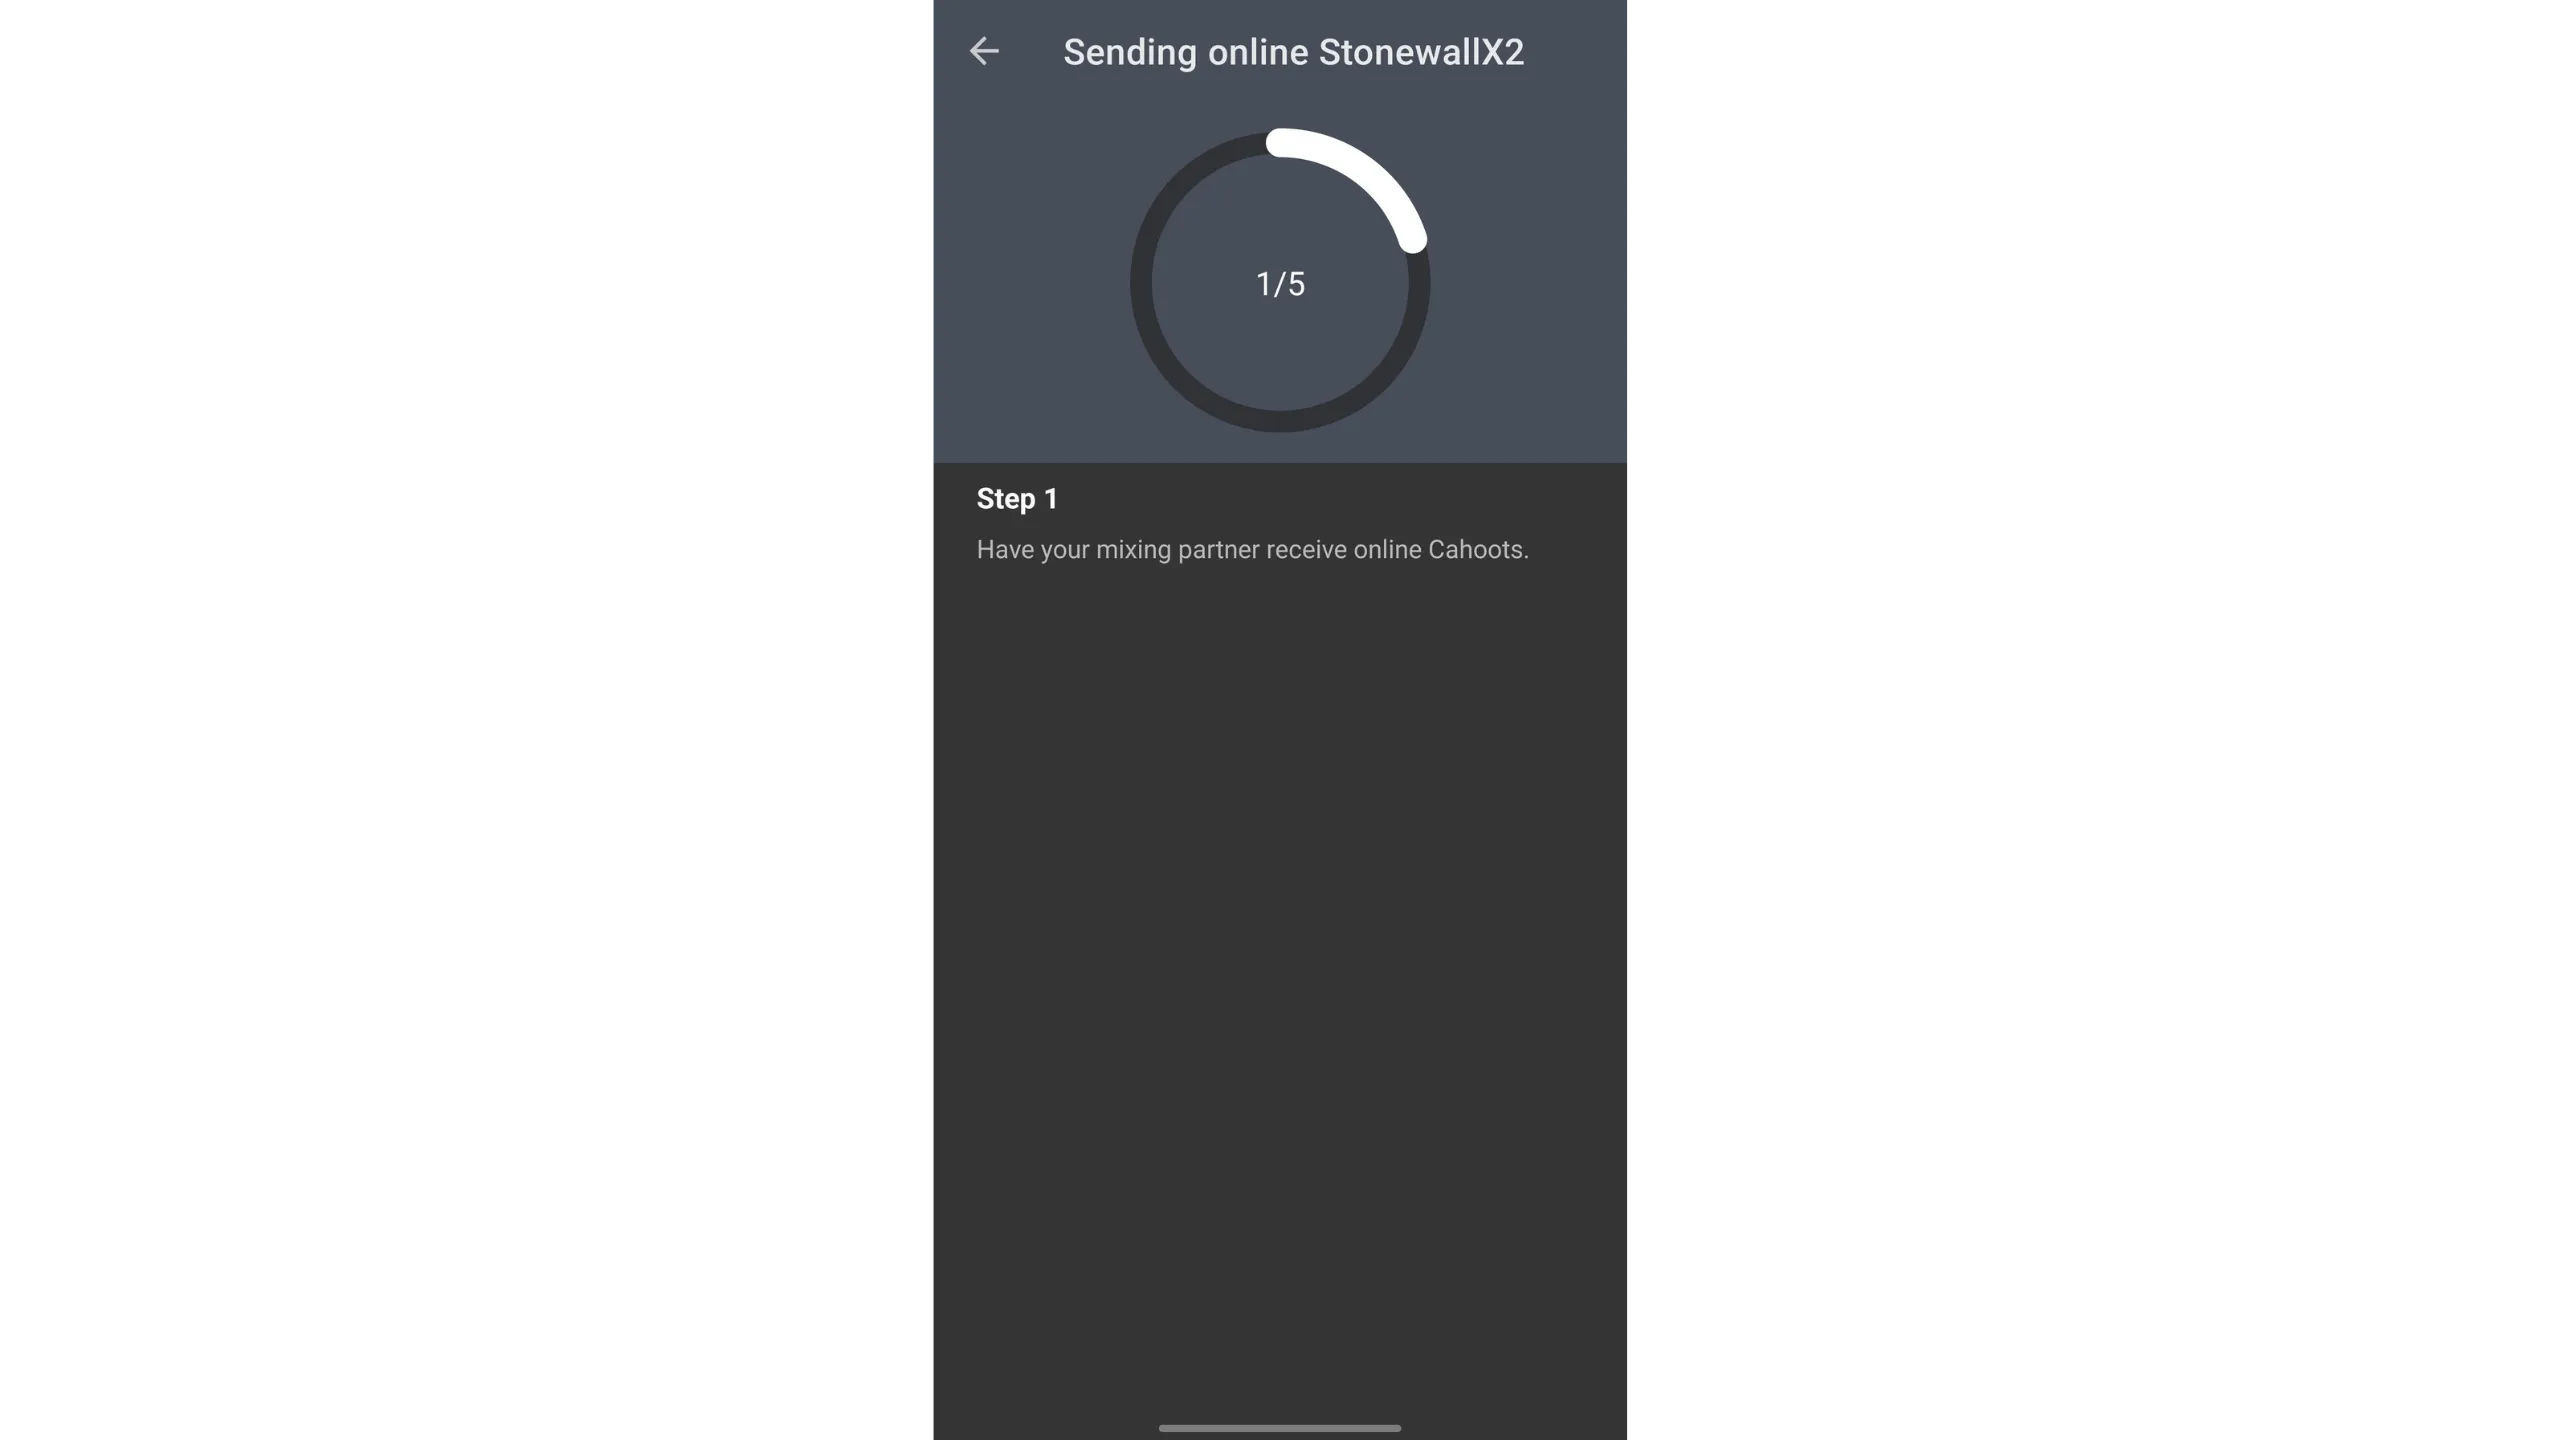
Check details carefully. Ensure your collaborator is listening for Cahoots requests, then tap the green BEGIN TRANSACTION to start the Soroban PSBT exchange.

Wait until both participants finish signing, then broadcast to the Bitcoin network.

Keep both devices online and inside the app during Soroban — interruptions pause the PSBT exchange.
In‑person exchanges (QR)
If you prefer a face‑to‑face exchange, select the transaction type Stowaway, then choose In Person / Manual.

Tap Set up transaction, then choose the spending account.

Enter:
- Amount to send
- Fee rate
No receiving address is needed — the recipient provides it during the PSBT exchange. Tap Review transaction setup.

Tap the green BEGIN TRANSACTION to start the QR‑based PSBT exchange.
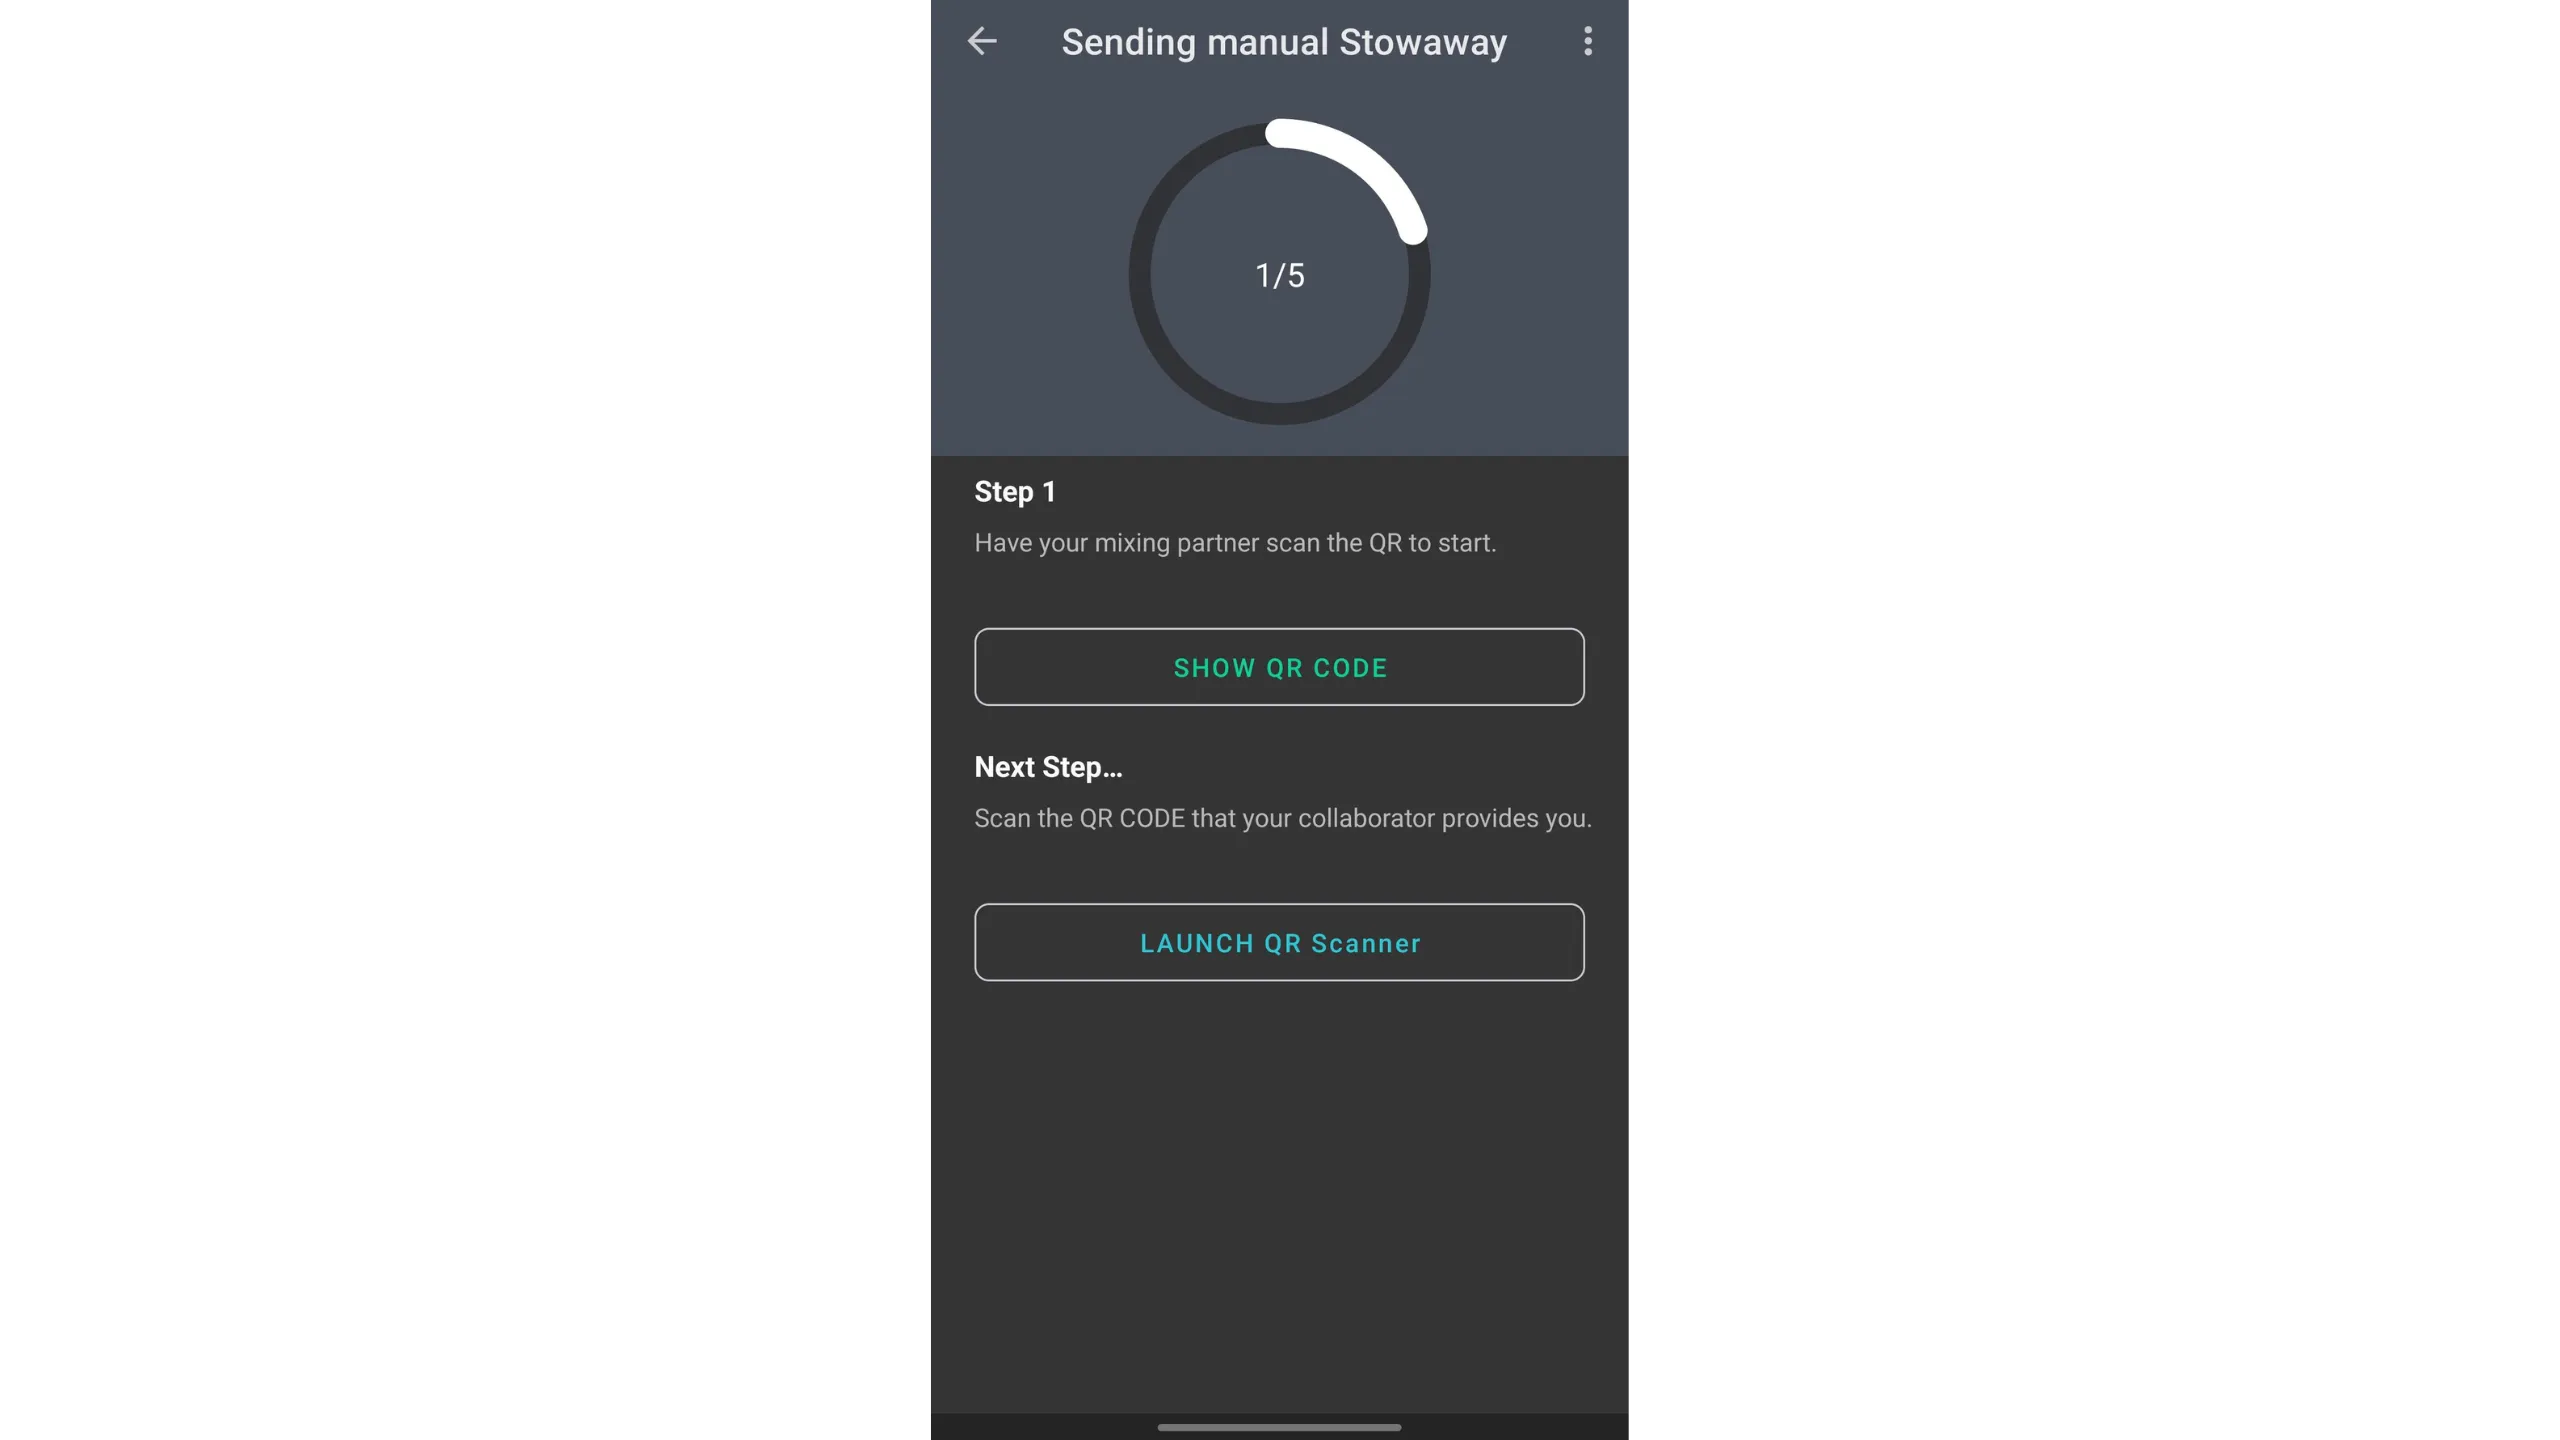
Alternate scanning:
- Tap
SHOW QR CODEso your collaborator can scan it - They tap
SHOW QR CODEfor you to scan - You tap
LAUNCH QR Scannerto scan theirs - Repeat until all five steps complete
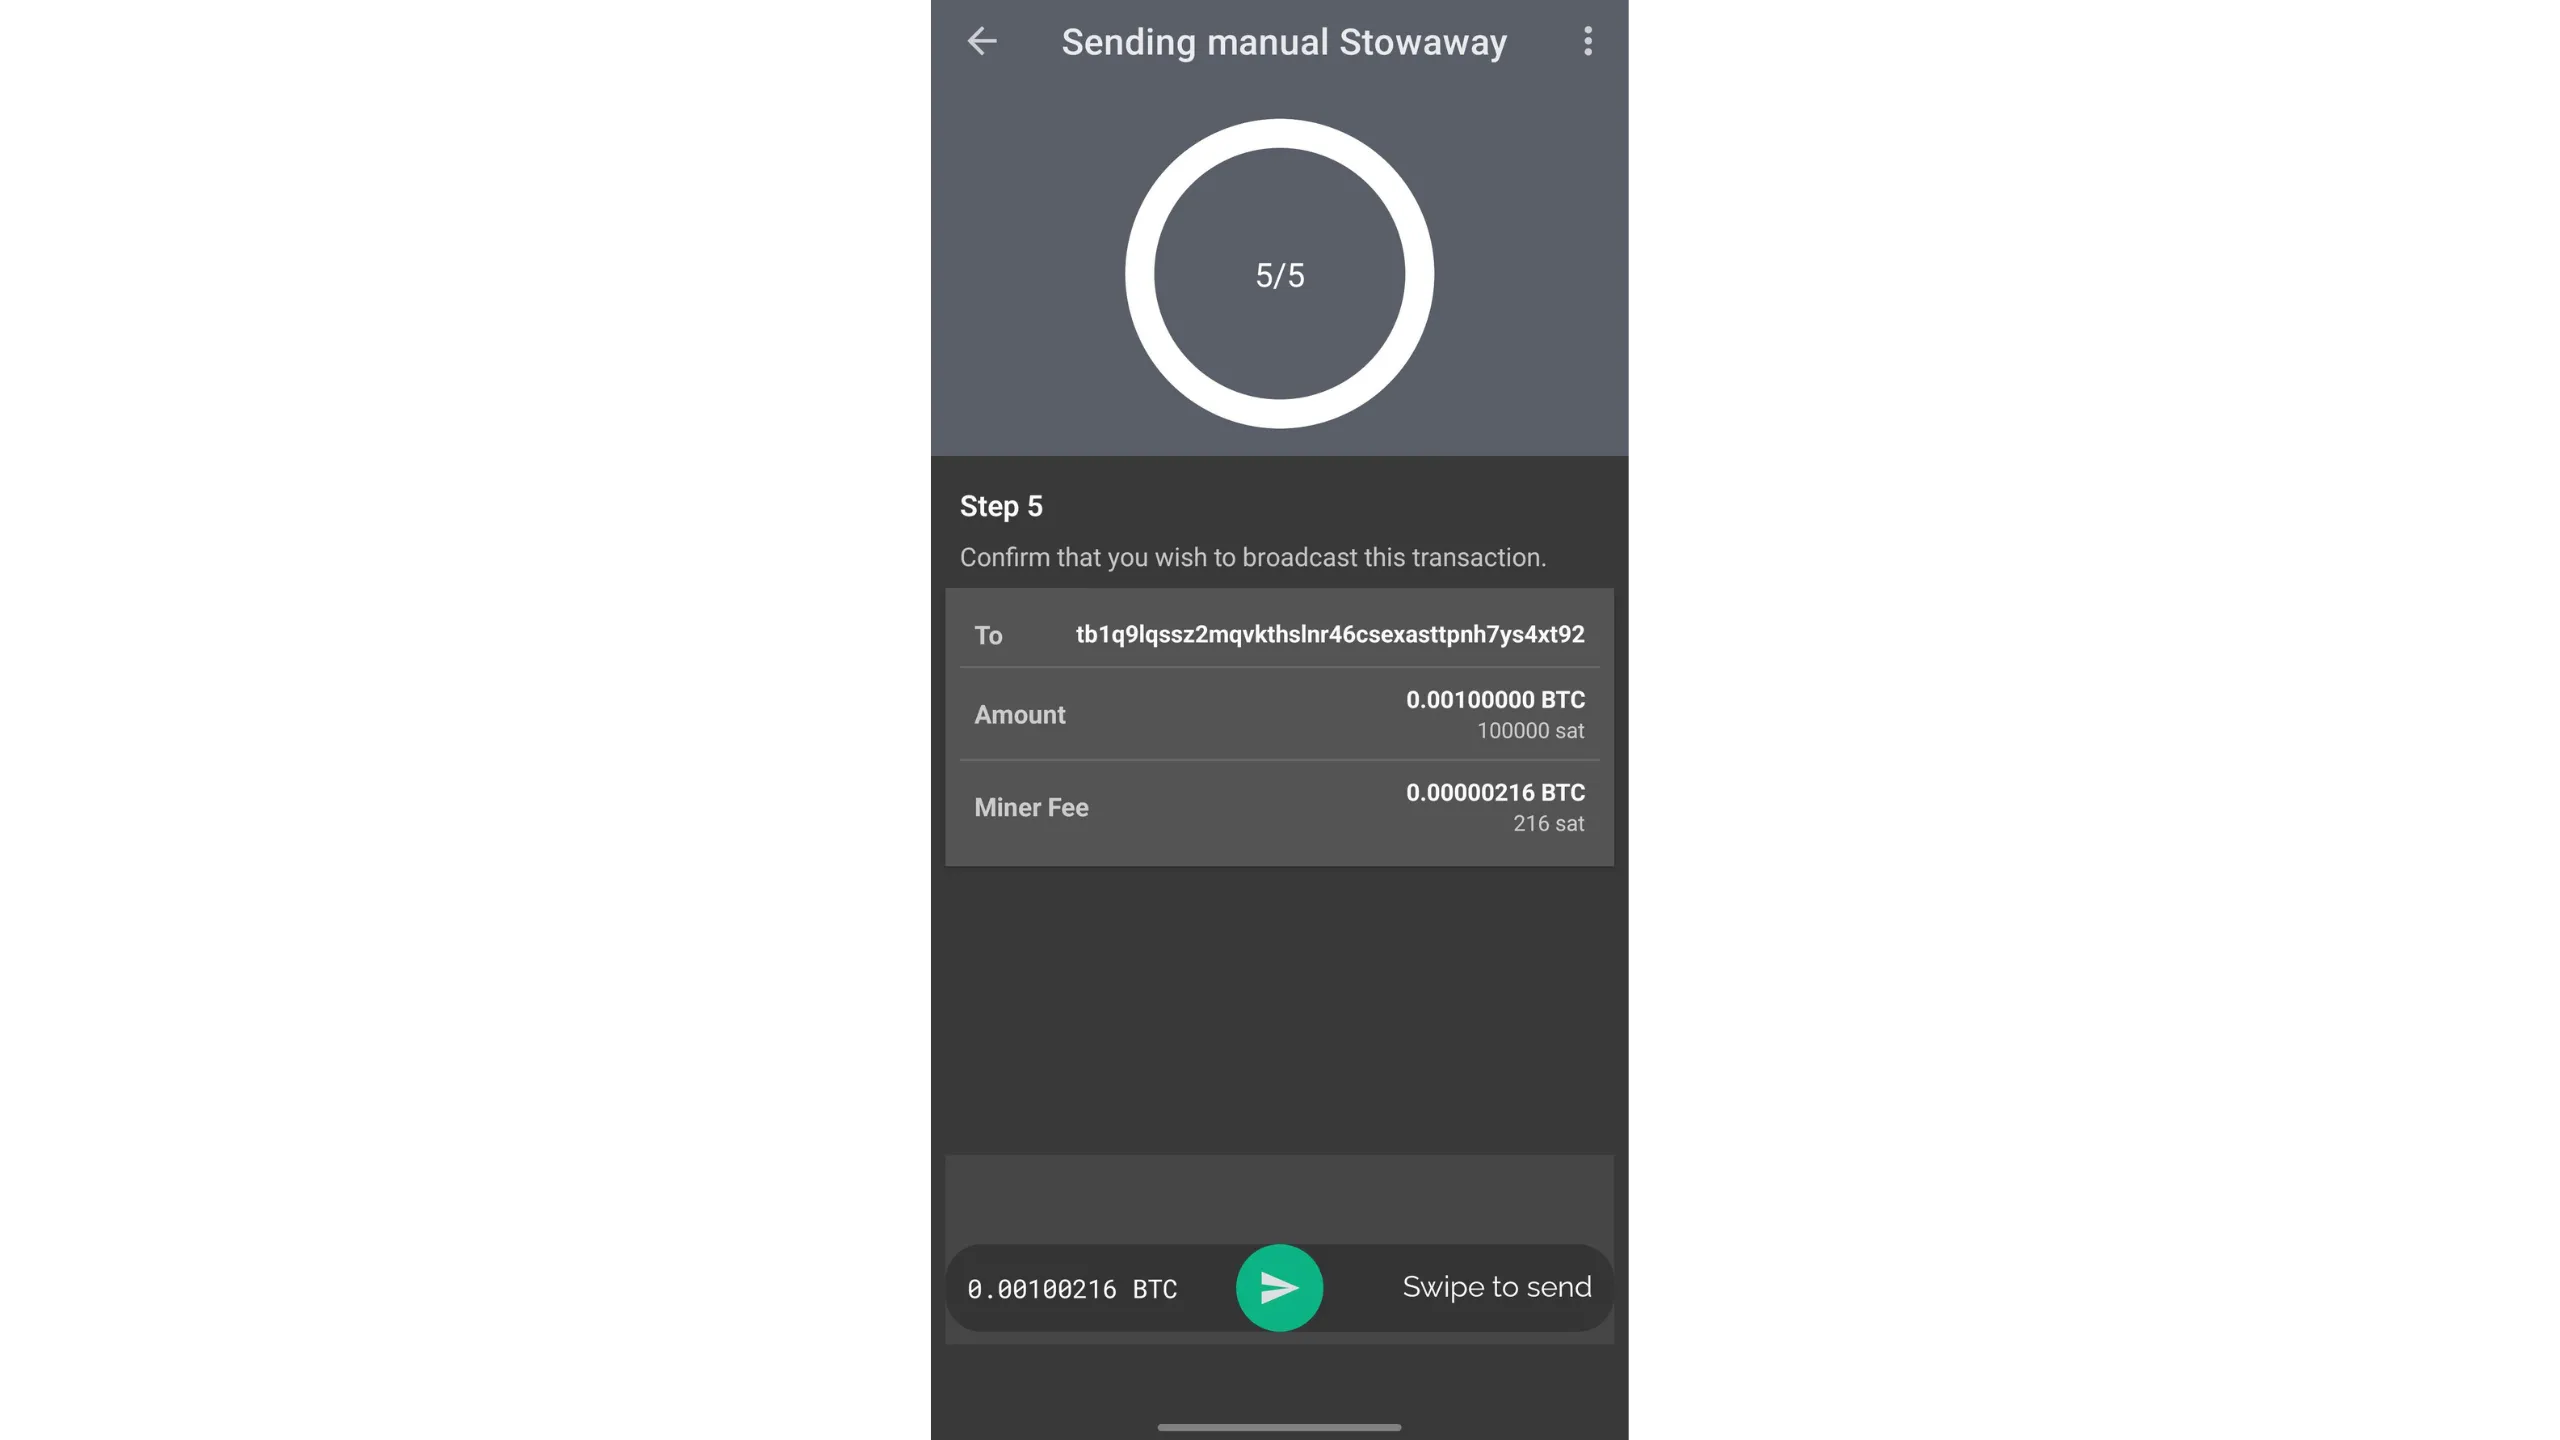
After all exchanges, verify the transaction details, then slide the green arrow to broadcast.
Broadcasted transaction (testnet)
Its structure looks like this:
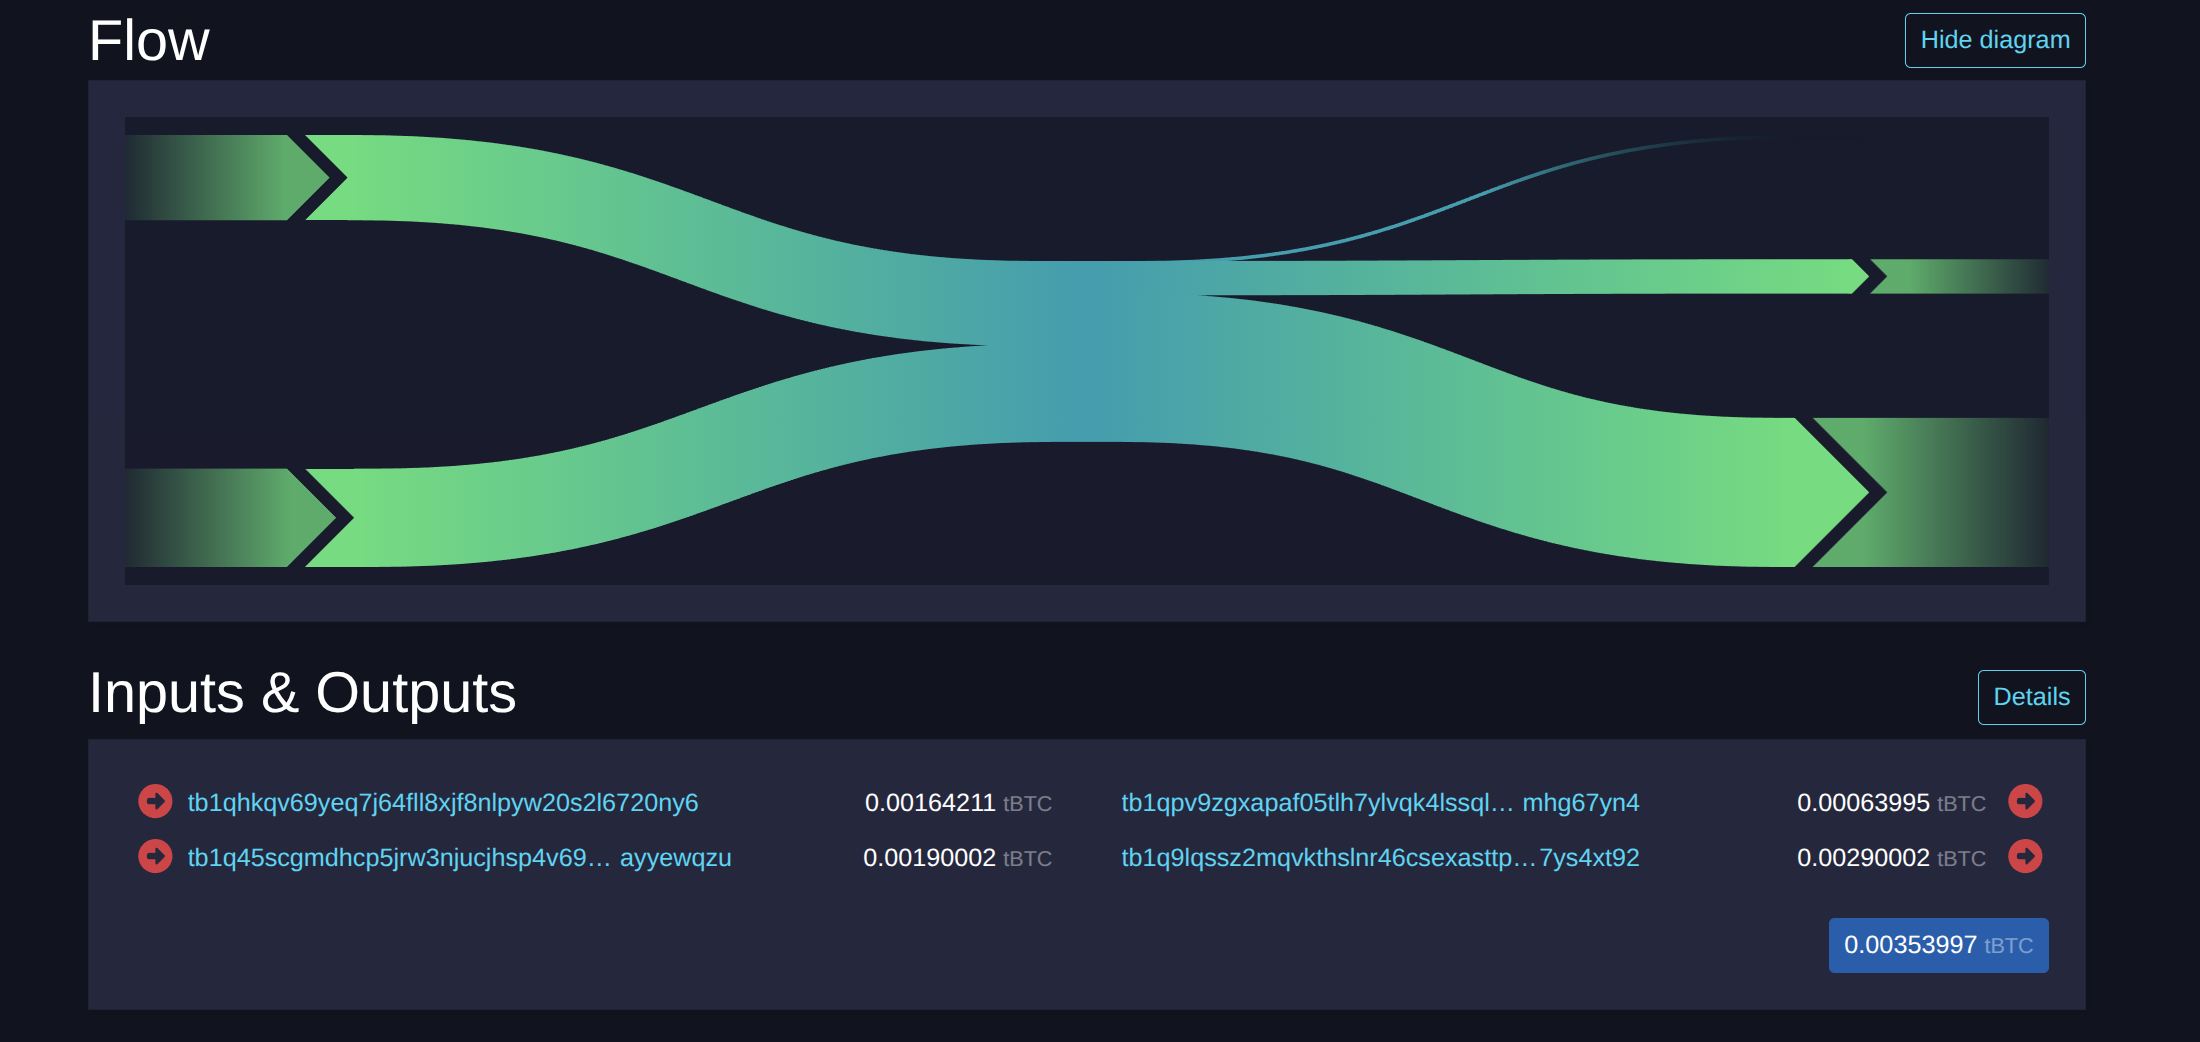
Credit: mempool.space
Analysis:
- Inputs: my UTXO (164,211 sats) + recipient’s UTXO (190,002 sats)
- Outputs: my change (63,995 sats) + recipient’s output (290,002 sats)
Comparing inputs and outputs:
- Recipient gains 100,000 sats, the payment amount
- I lose 100,000 sats plus mining fees
I can describe this structure because I built the transaction; but for external observers, it’s generally impossible to determine which UTXOs belong to which participant, inputs or outputs.
Stowaway blurs input ownership and destination; observers cannot reliably assign roles, which strengthens privacy.
17. Understanding Stonewall x2
Make every spend a coinjoin.
Stonewall x2 is a specific form of Bitcoin transaction that increases user privacy by collaborating with a third party who is not involved in the actual payment. This method simulates a mini‑coinjoin between two participants while making a payment to a third party. Stonewall x2 transactions are available in the Ashigaru Mobile app, a fork of Samourai Wallet, the team that originally created this transaction type.
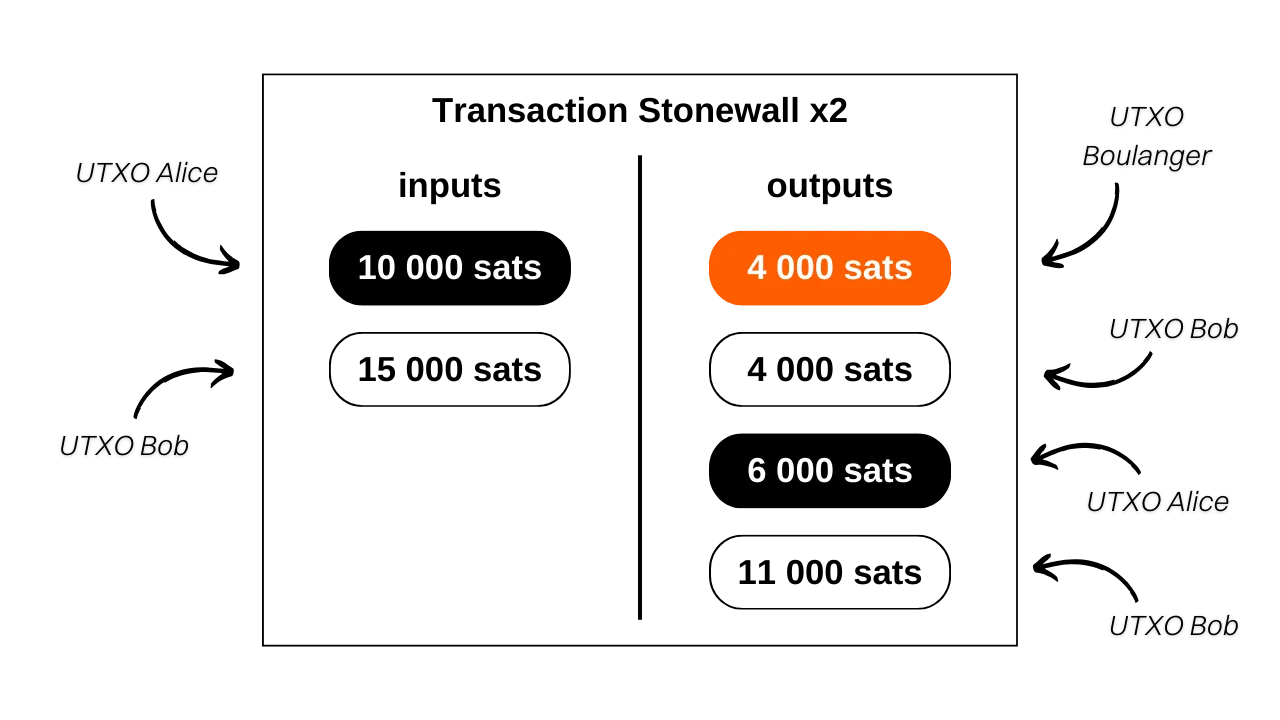
Mechanics:
- You use one of your own UTXOs to fund the payment.
- A collaborator contributes one of their own UTXOs.
- The transaction has four outputs:
- Two equal‑amount outputs: one goes to the payment recipient; the other returns to the collaborator.
- A third output returns the rest of the collaborator’s input so their net is neutral, minus mining fees.
- A fourth output is your change.
Roles in Stonewall x2:
- The sender payer, who makes the actual payment
- The collaborator, who contributes bitcoin to improve the transaction’s anonymity set and receives all their funds back net‑neutral, minus mining fees
- The recipient, who can ignore the transaction’s structure and simply receives a payment
Example: Alice buys a loaf for 4,000 sats and wants privacy. She collaborates with her friend Bob.
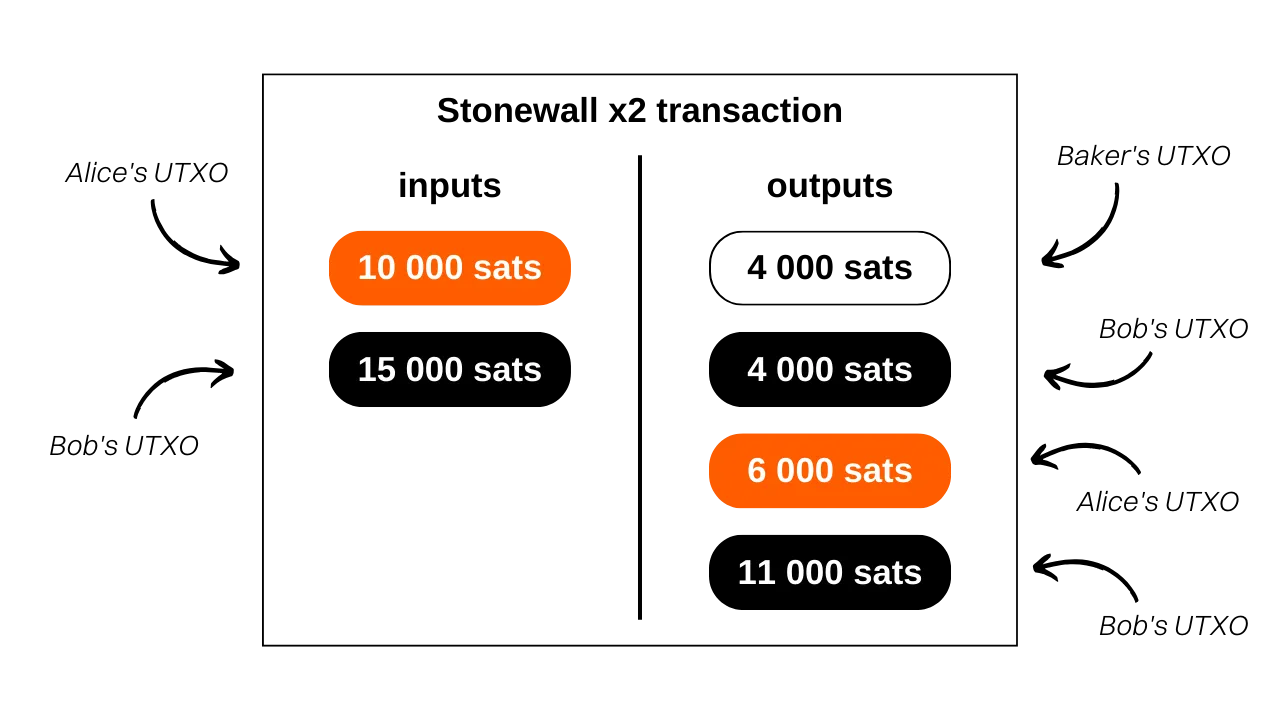
Analyzing the transaction:
- The baker receives 4,000 sats
- Alice inputs 10,000 sats and receives 6,000 sats as change, net −4,000 sats
- Bob inputs 15,000 sats and receives two outputs: 4,000 sats and 11,000 sats, net 0
For clarity, mining fees are omitted in the example. In practice, transaction fees are split equally between the sender and the collaborator.
What’s the difference between Stonewall and Stonewall x2?
A Stonewall x2 works exactly like a Stonewall in pattern, except that x2 is collaborative while Stonewall is not. Stonewall x2 involves a third party outside the payment who contributes bitcoin to boost privacy. In a regular Stonewall, the collaborator’s role is played by the sender alone.
Continuing the bakery example: if Alice didn’t find a collaborator like Bob, she could do a Stonewall by herself — both inputs would be hers, and she would receive three change outputs.
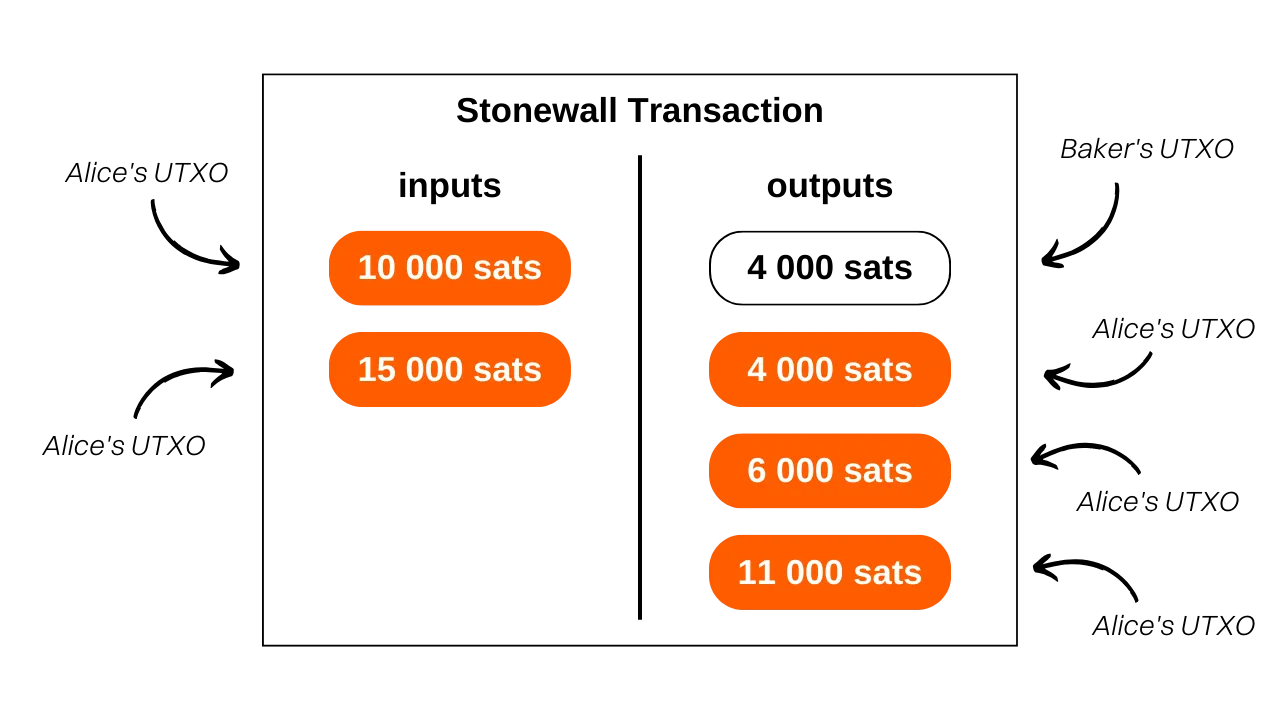
From the outside, the pattern would look the same:

Practical logic for Ashigaru spending tools:
- If the merchant does not support Payjoin/Stowaway, you can perform a collaborative spend Stonewall x2 with an external participant.
- If you don’t find a collaborator, you can do a solo Stonewall that mimics the Stonewall x2 pattern.
Both transactions share the same structure on‑chain. The difference collaborative vs non‑collaborative is invisible to observers, which increases doubt — and privacy.
Why use a Stonewall x2 transaction?
Stonewall x2 adds significant entropy to the transaction and confuses chain‑analysis heuristics. From the outside, it can be misinterpreted as a small two‑party coinjoin. In reality, it’s a payment with a collaborator who remains net‑neutral.
Returning to Alice, Bob, and the Baker, the blockchain view might look like:
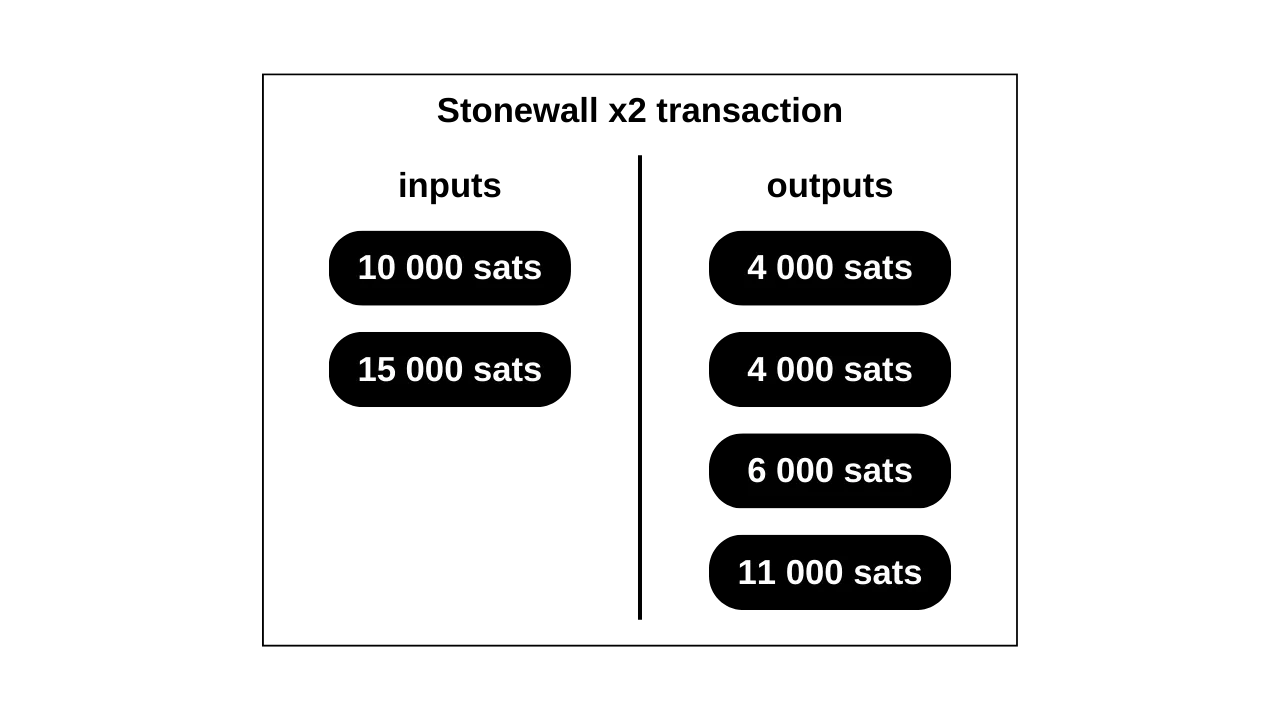
A typical heuristic‑driven conclusion could be:
“Alice and Bob did a small coinjoin, one input each, two outputs each.”
But the actual situation is different: one output is the baker’s payment, Alice has one change output, and Bob has two outputs returning his contribution.
Even if the observer identifies the Stonewall x2 pattern, they cannot know:
- Which of the two equal‑amount outputs is the payment
- Whether Alice or Bob made the payment
- Whether the two inputs came from two different people or one person combining UTXOs
Because Stonewall solo and Stonewall x2 collaborative share the same pattern, distinguishing them without extra context is impossible, adding more doubt to the spend.
The ambiguity about who paid and who contributed which inputs/outputs is the privacy benefit.
How to establish a connection between PayNyms
Like other collaborative Ashigaru transactions, Cahoots, Stonewall x2 requires exchanging partially signed transactions between the sender and the collaborator. This can be done:
- Manually, when you’re physically together, QR code exchange
- Automatically, via the Soroban communication protocol
For Soroban online collaboration, you must establish a PayNym connection first: your PayNym must follow your collaborator’s PayNym, and vice versa.
Soroban uses BIP47 channels between PayNyms to exchange PSBTs securely. Verify you’re following each other before initiating.
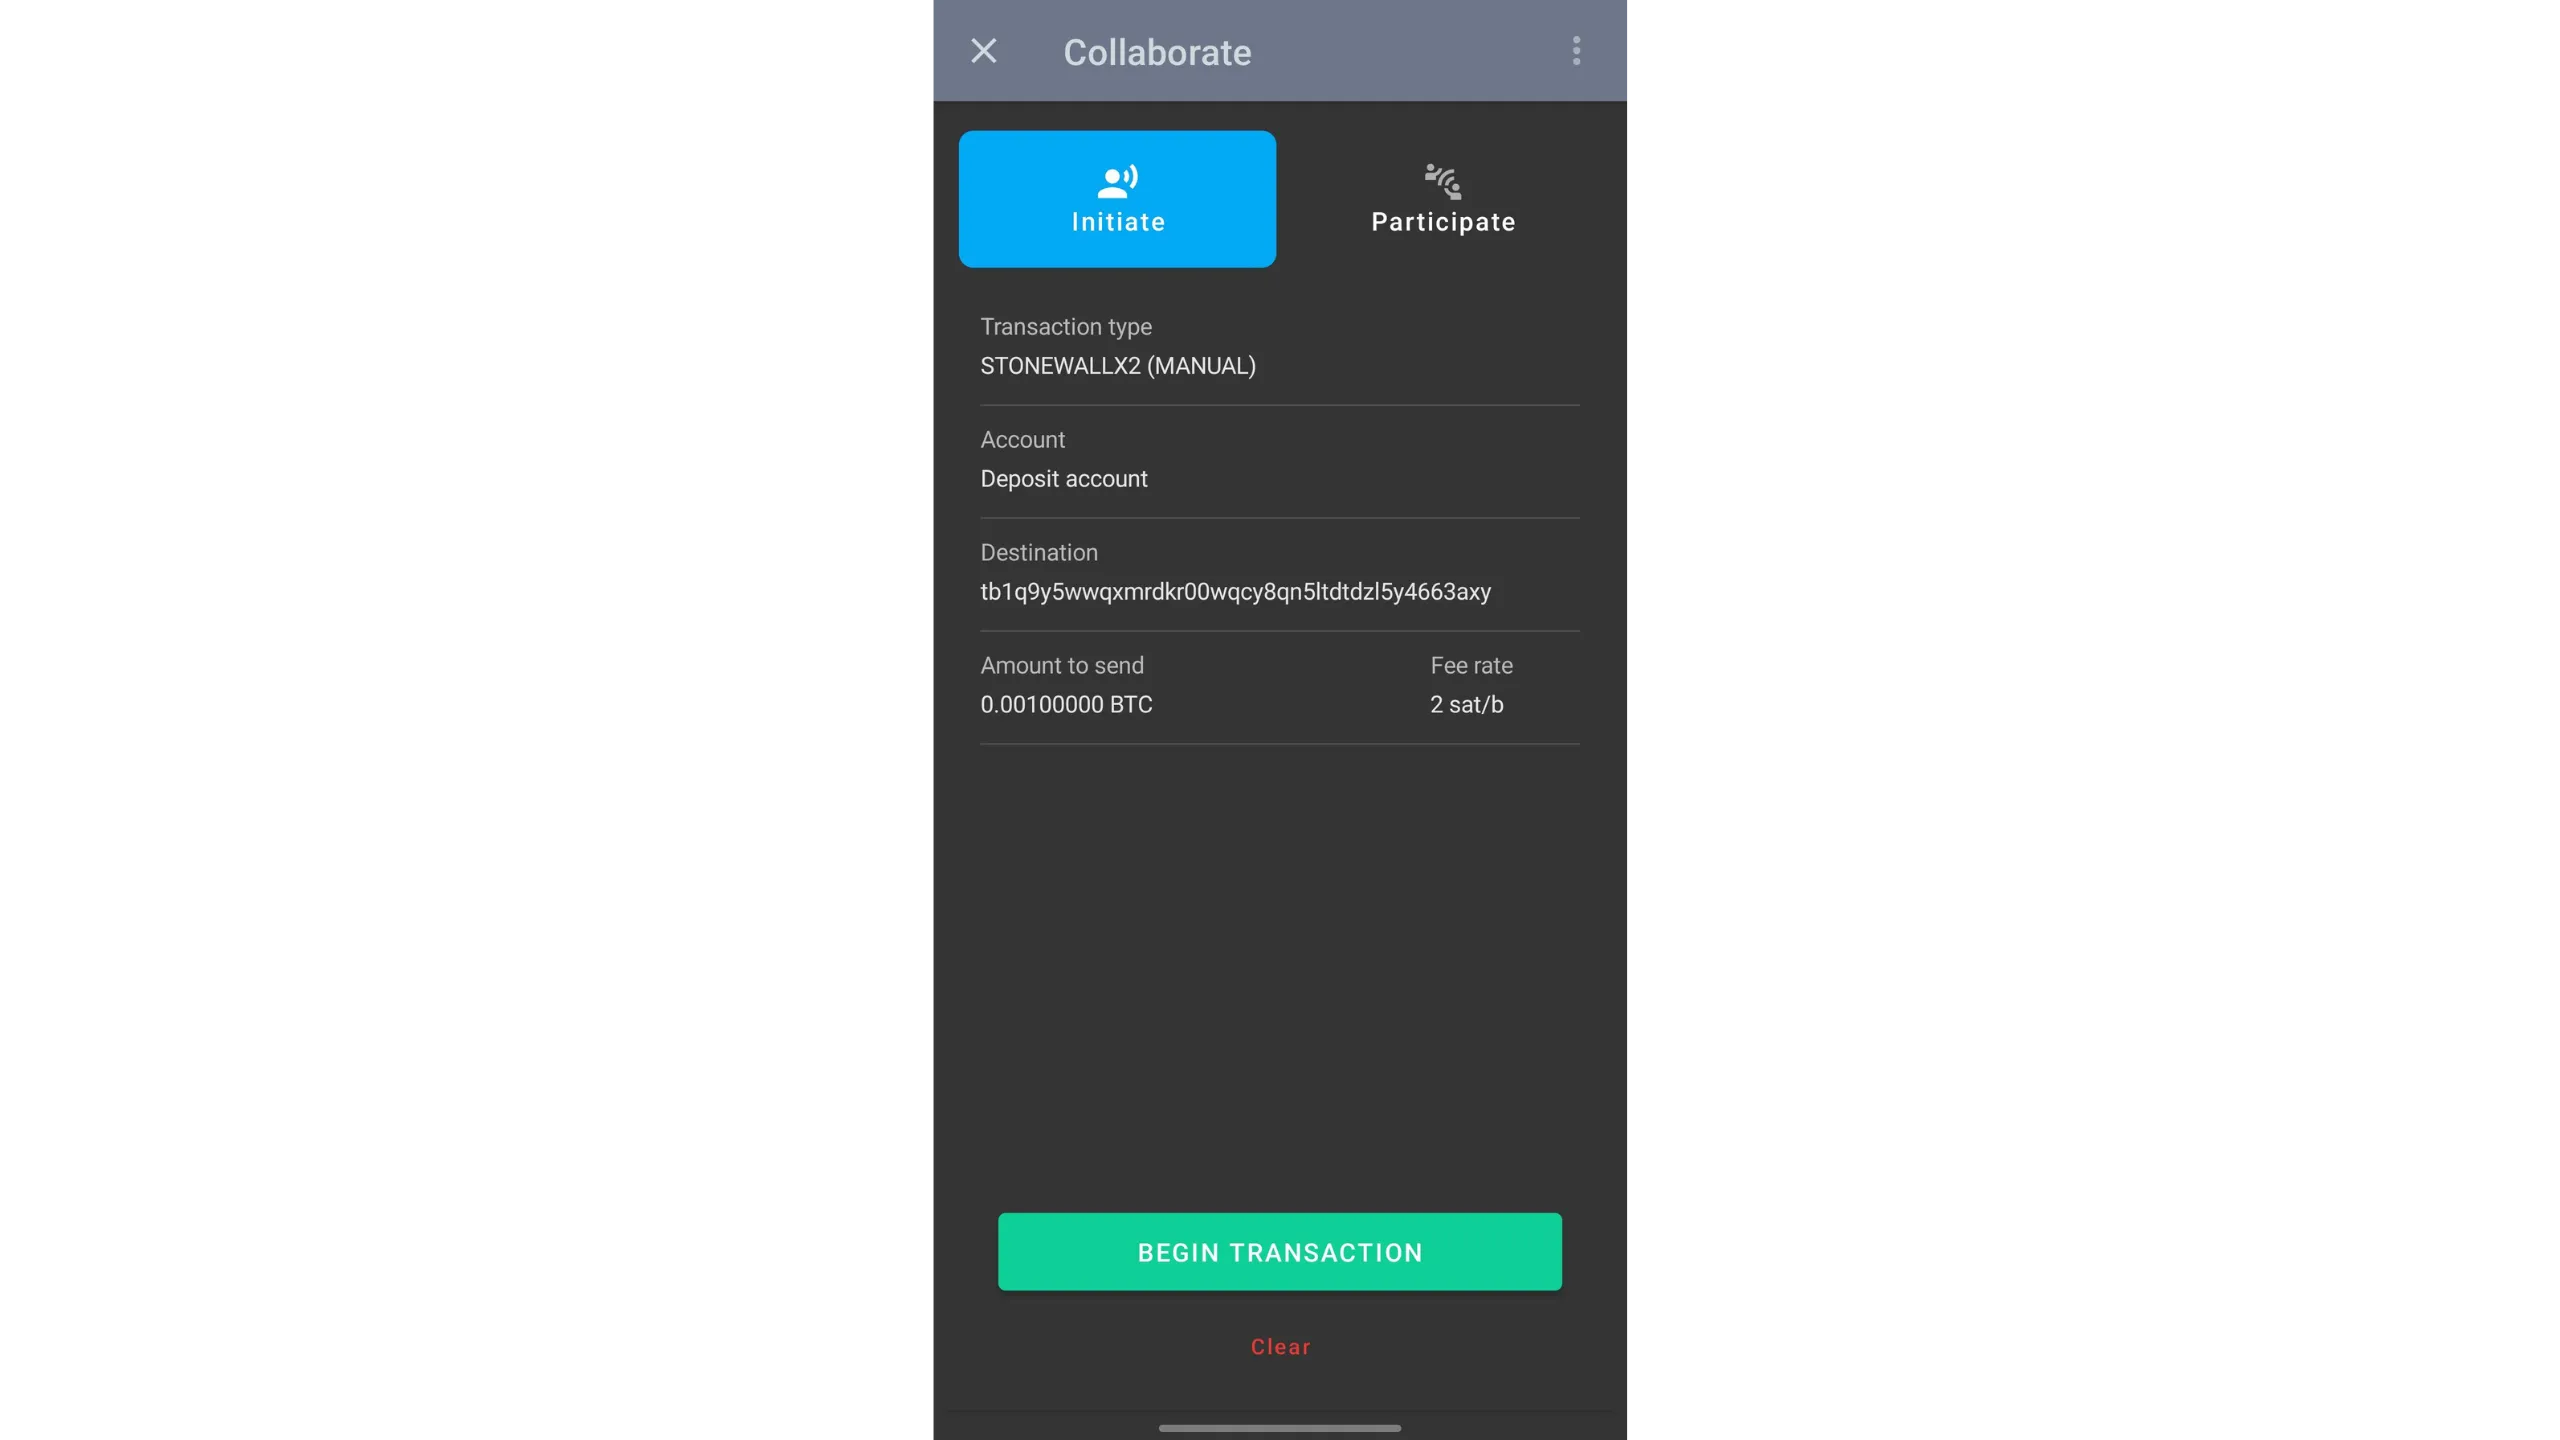
How to do a Stonewall x2 in Ashigaru
Tap your PayNym image top-left, then open the Collaborate menu. Your collaborator must do the same — unless you’re exchanging QR codes in person.
Choose:
Initiateif you are the payerParticipateif you are the collaborator, not the payer or recipient

If you’re the collaborator, remote via Soroban:
- Tap
Participate - Choose the account to use
- Tap
LISTEN FOR CAHOOTS REQUESTSand wait for the payer’s request
For in‑person collaboration:
- On your wallet home, tap the QR icon at the top
- Scan the QR provided by the payer who initiated the transaction
If you’re the payer initiating:
- Go to
Collaborateand selectInitiate - Choose the transaction type:
STONEWALL X2


Choose collaboration mode:
OnlineCahoots via SorobanIn Person / ManualQR exchange

Online Cahoots (Soroban)
Select your collaborator from the PayNyms you follow.
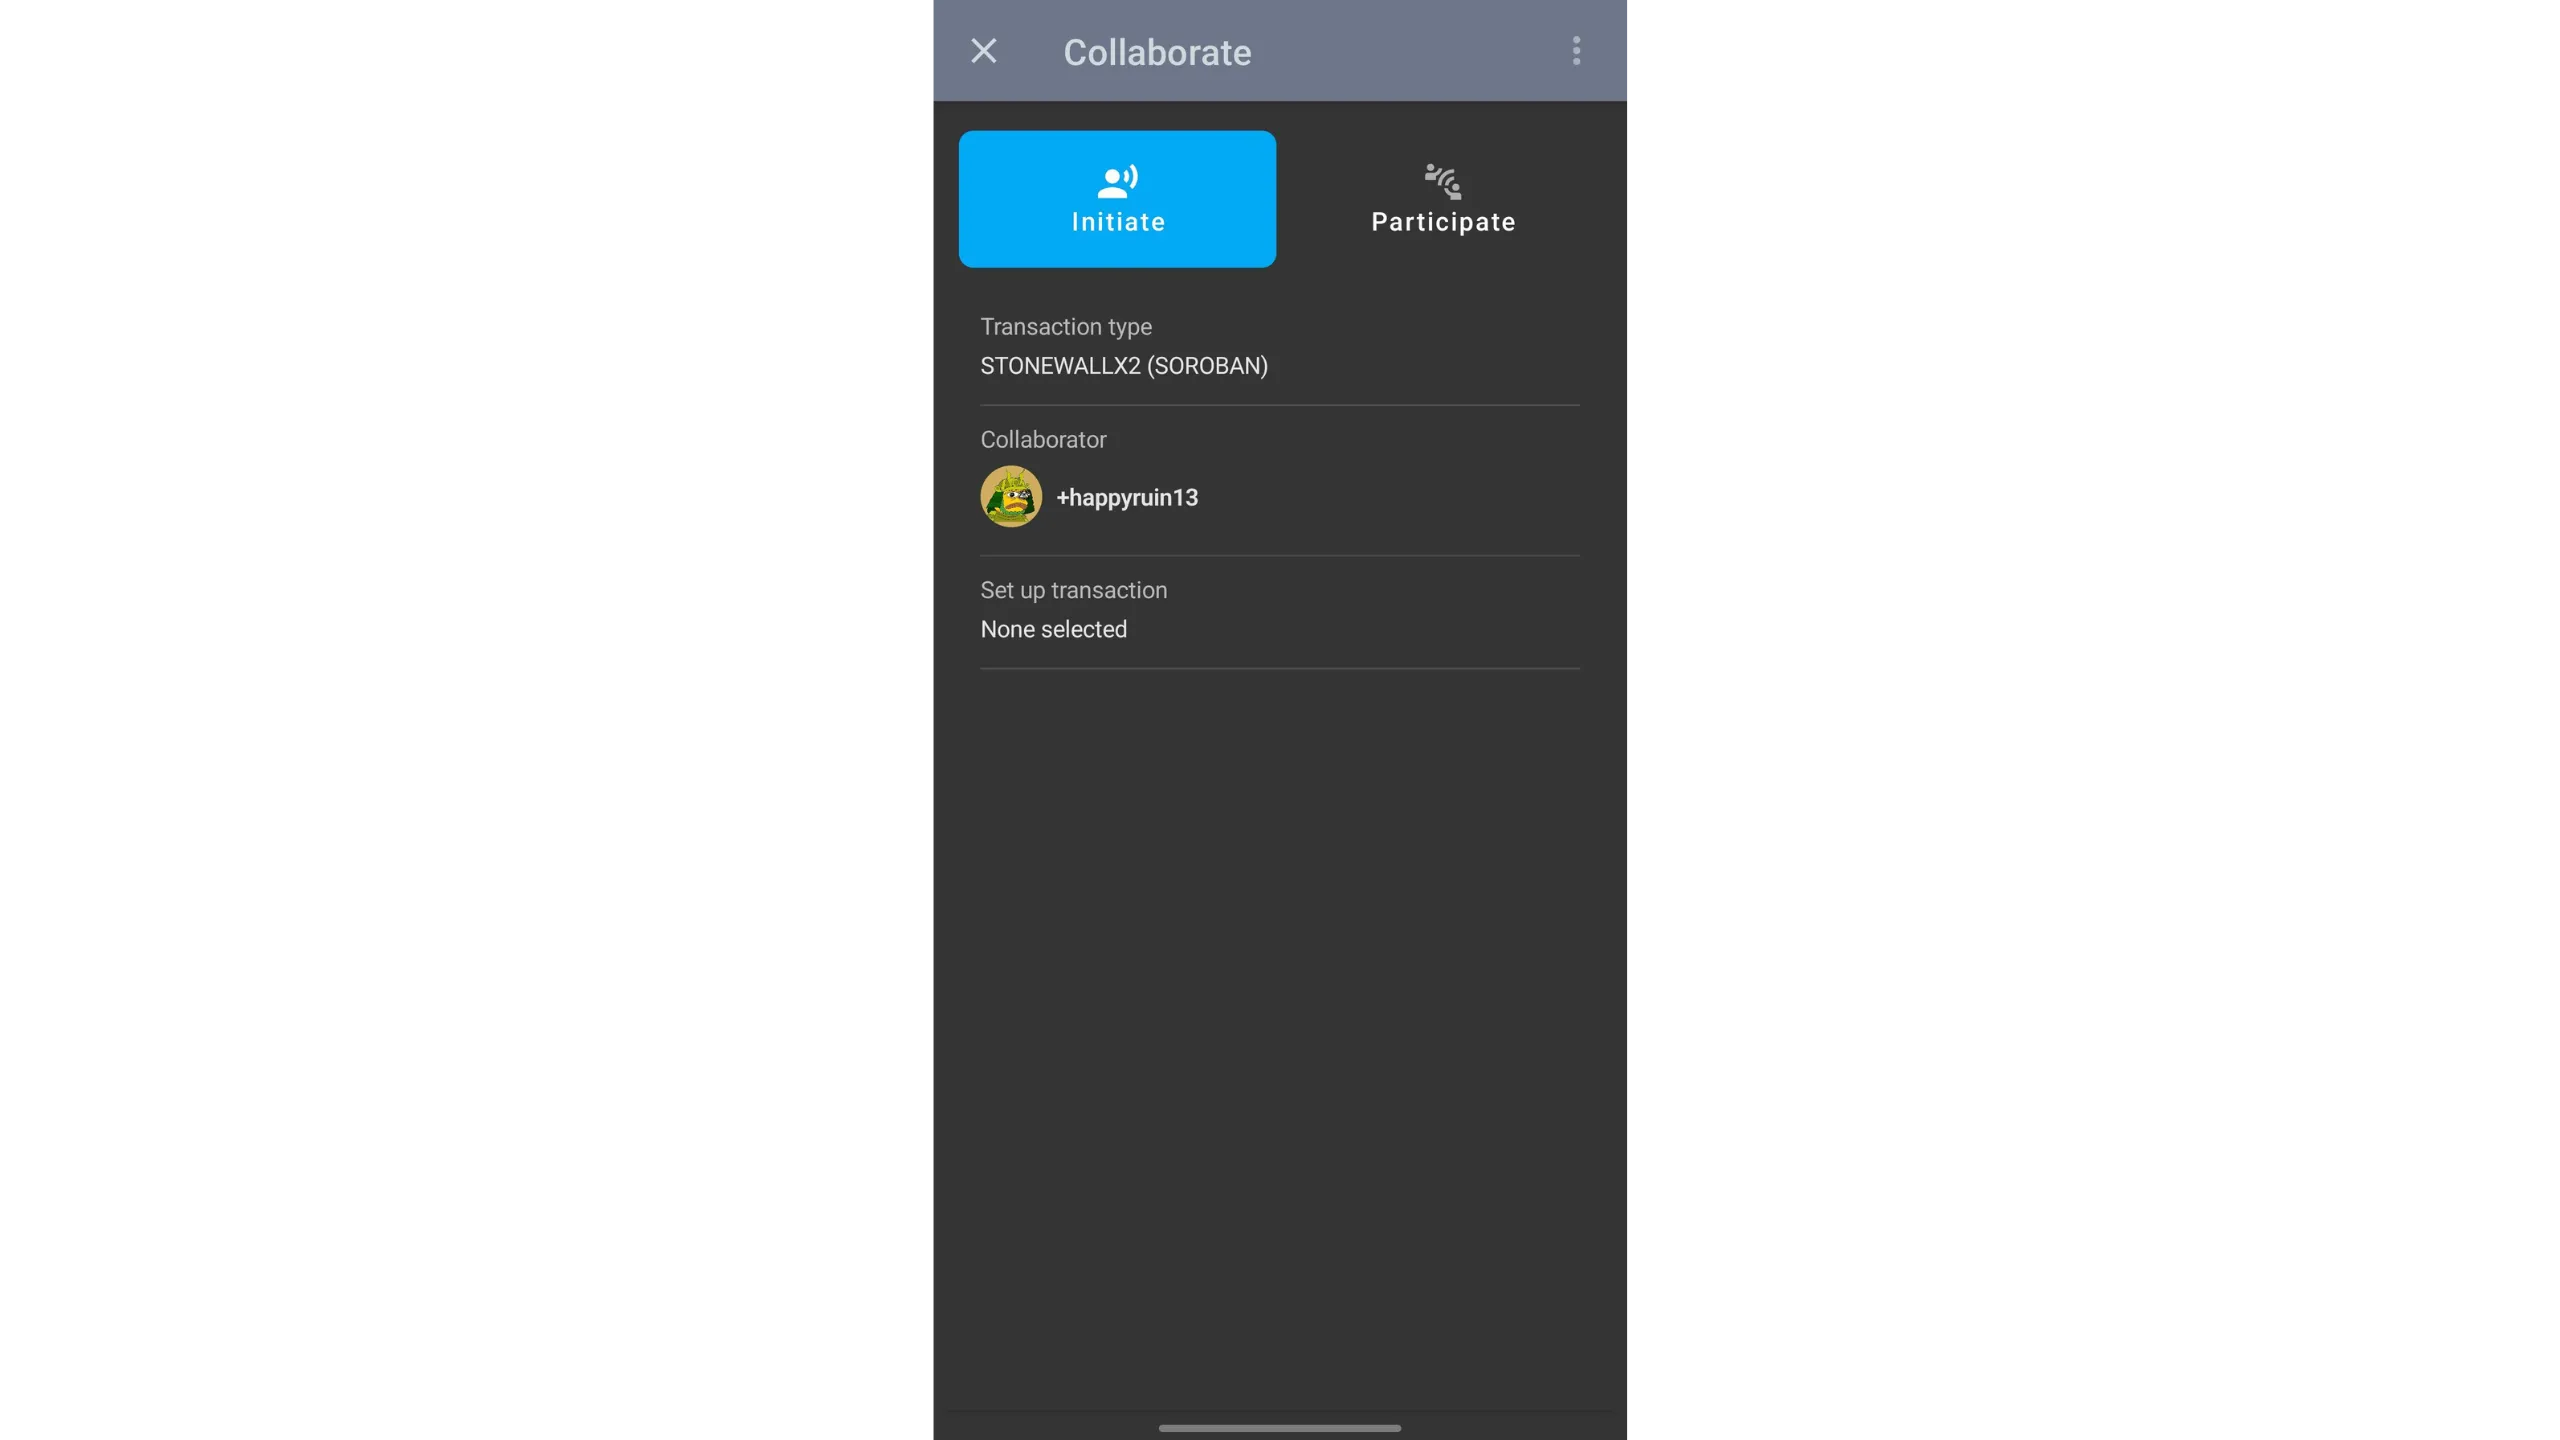
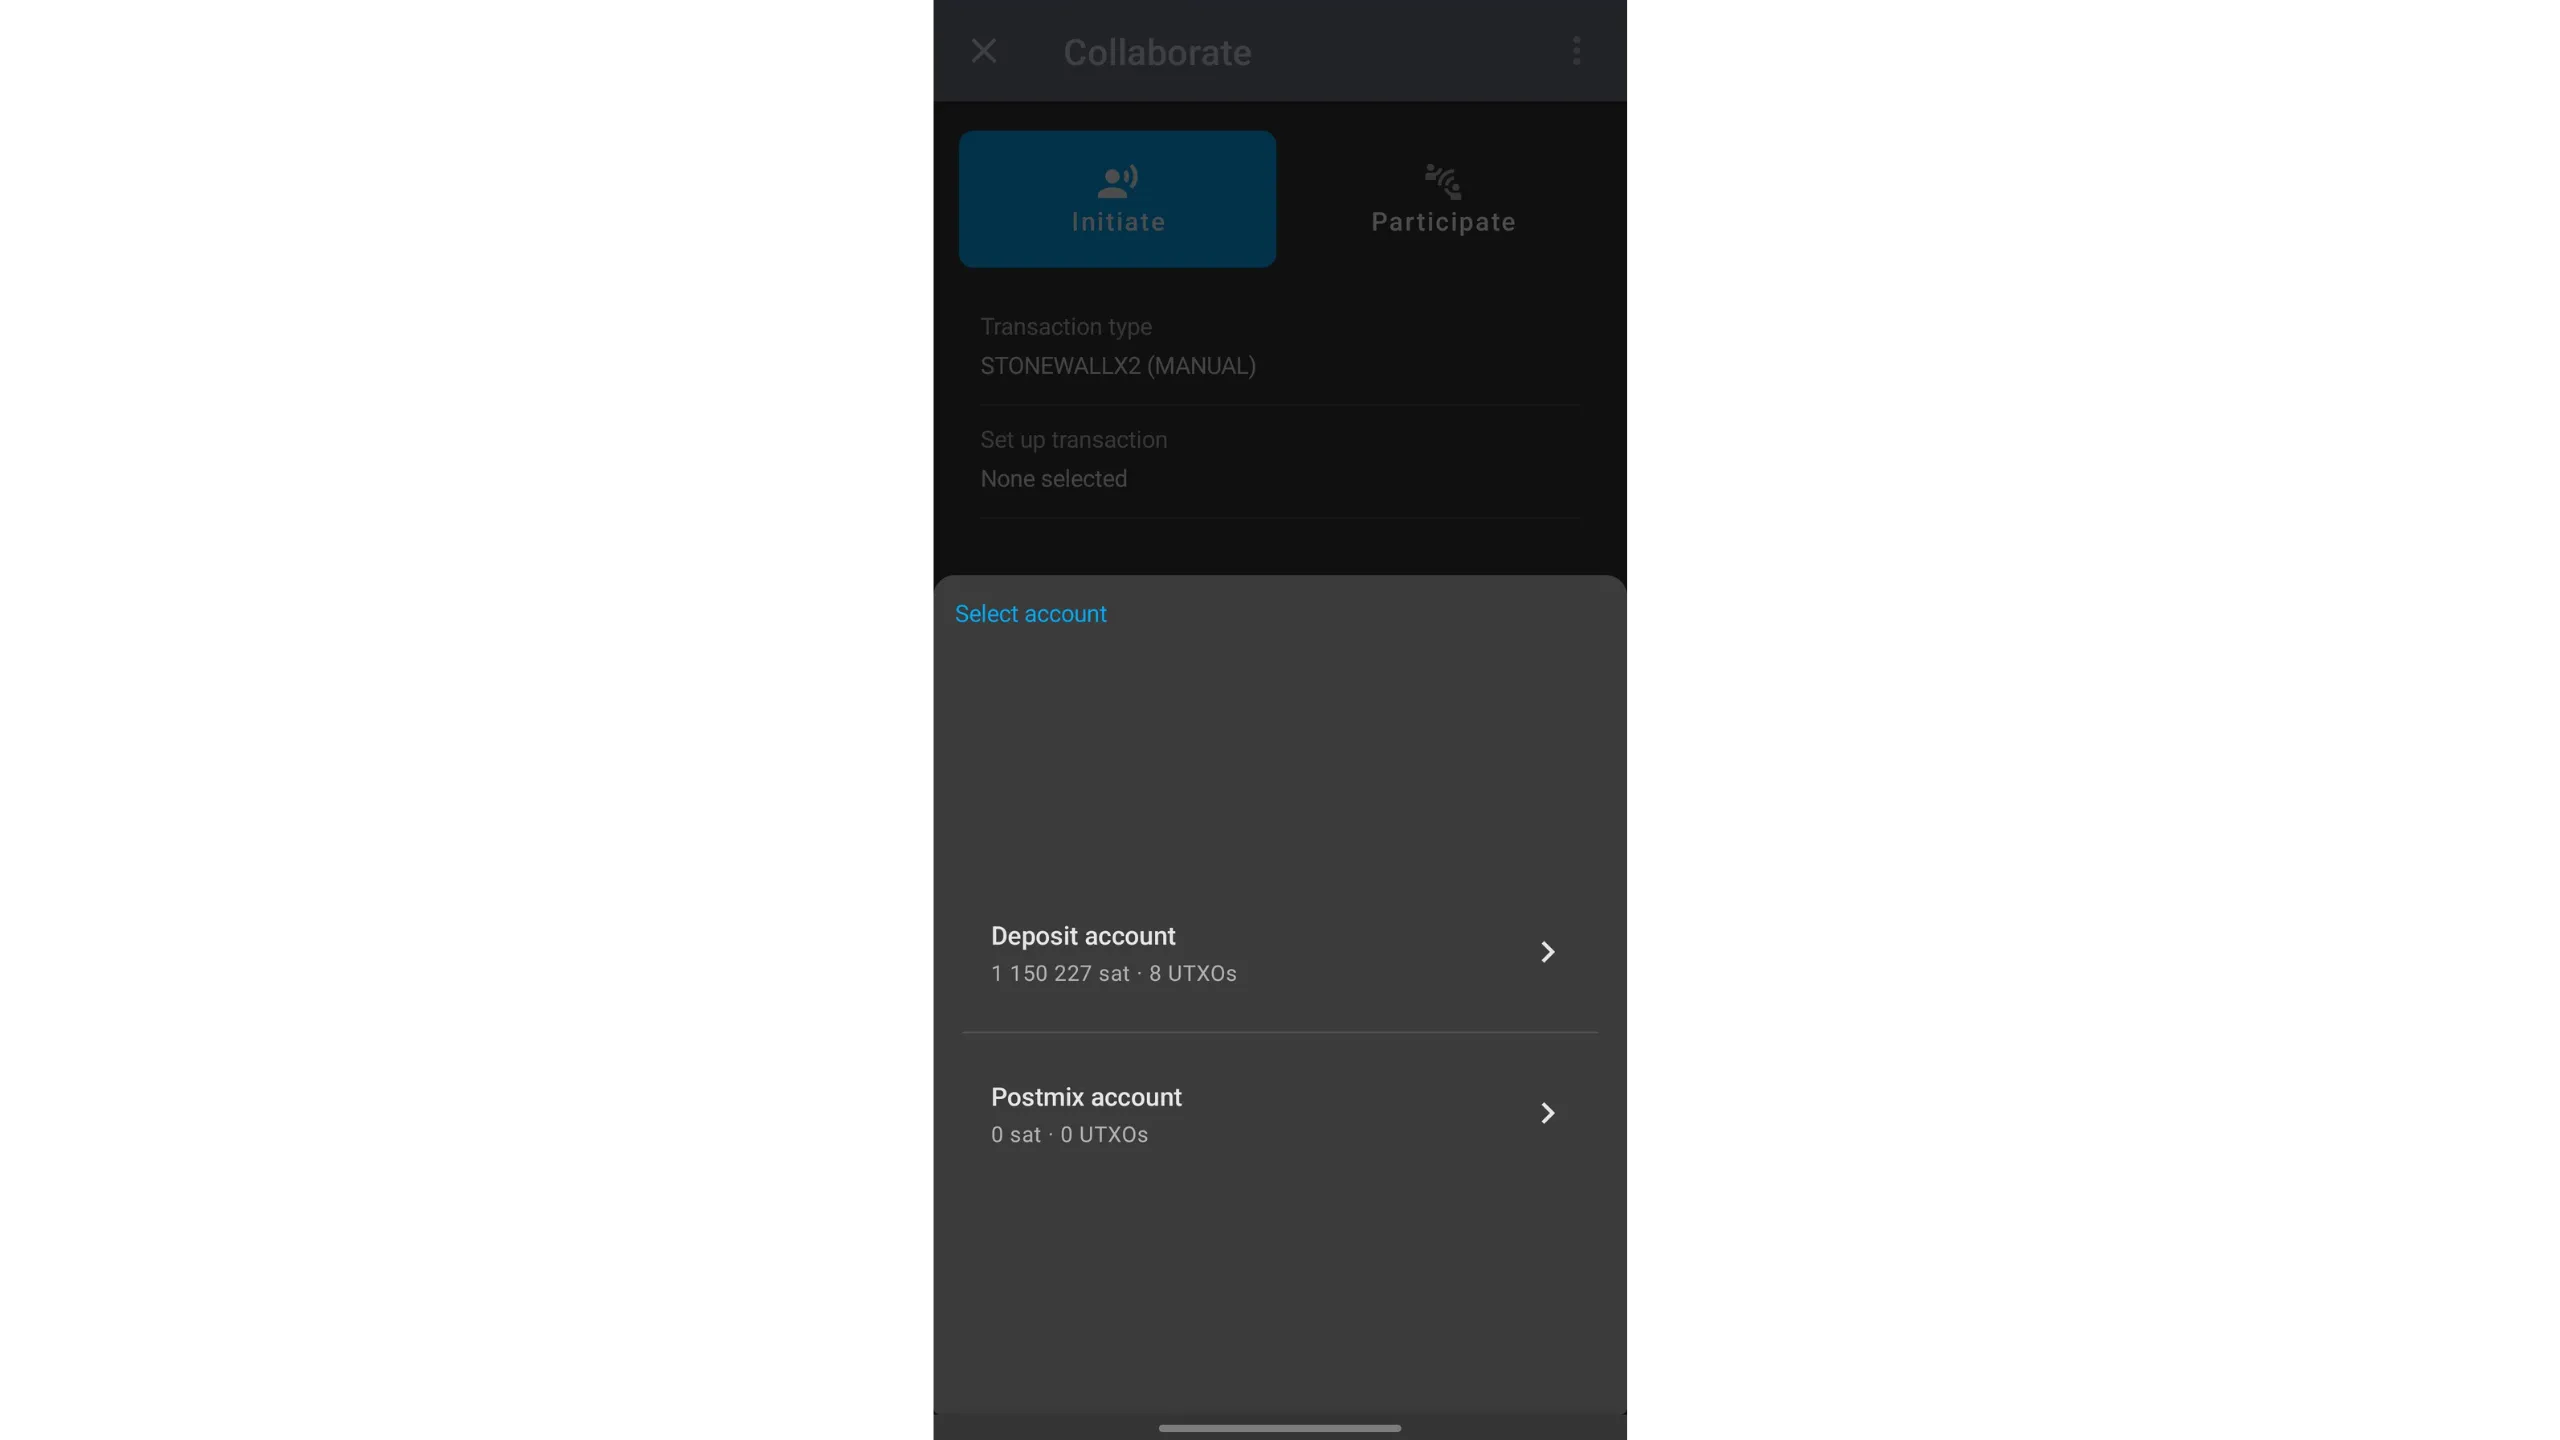
Tap Set up transaction, then choose the account to spend from.

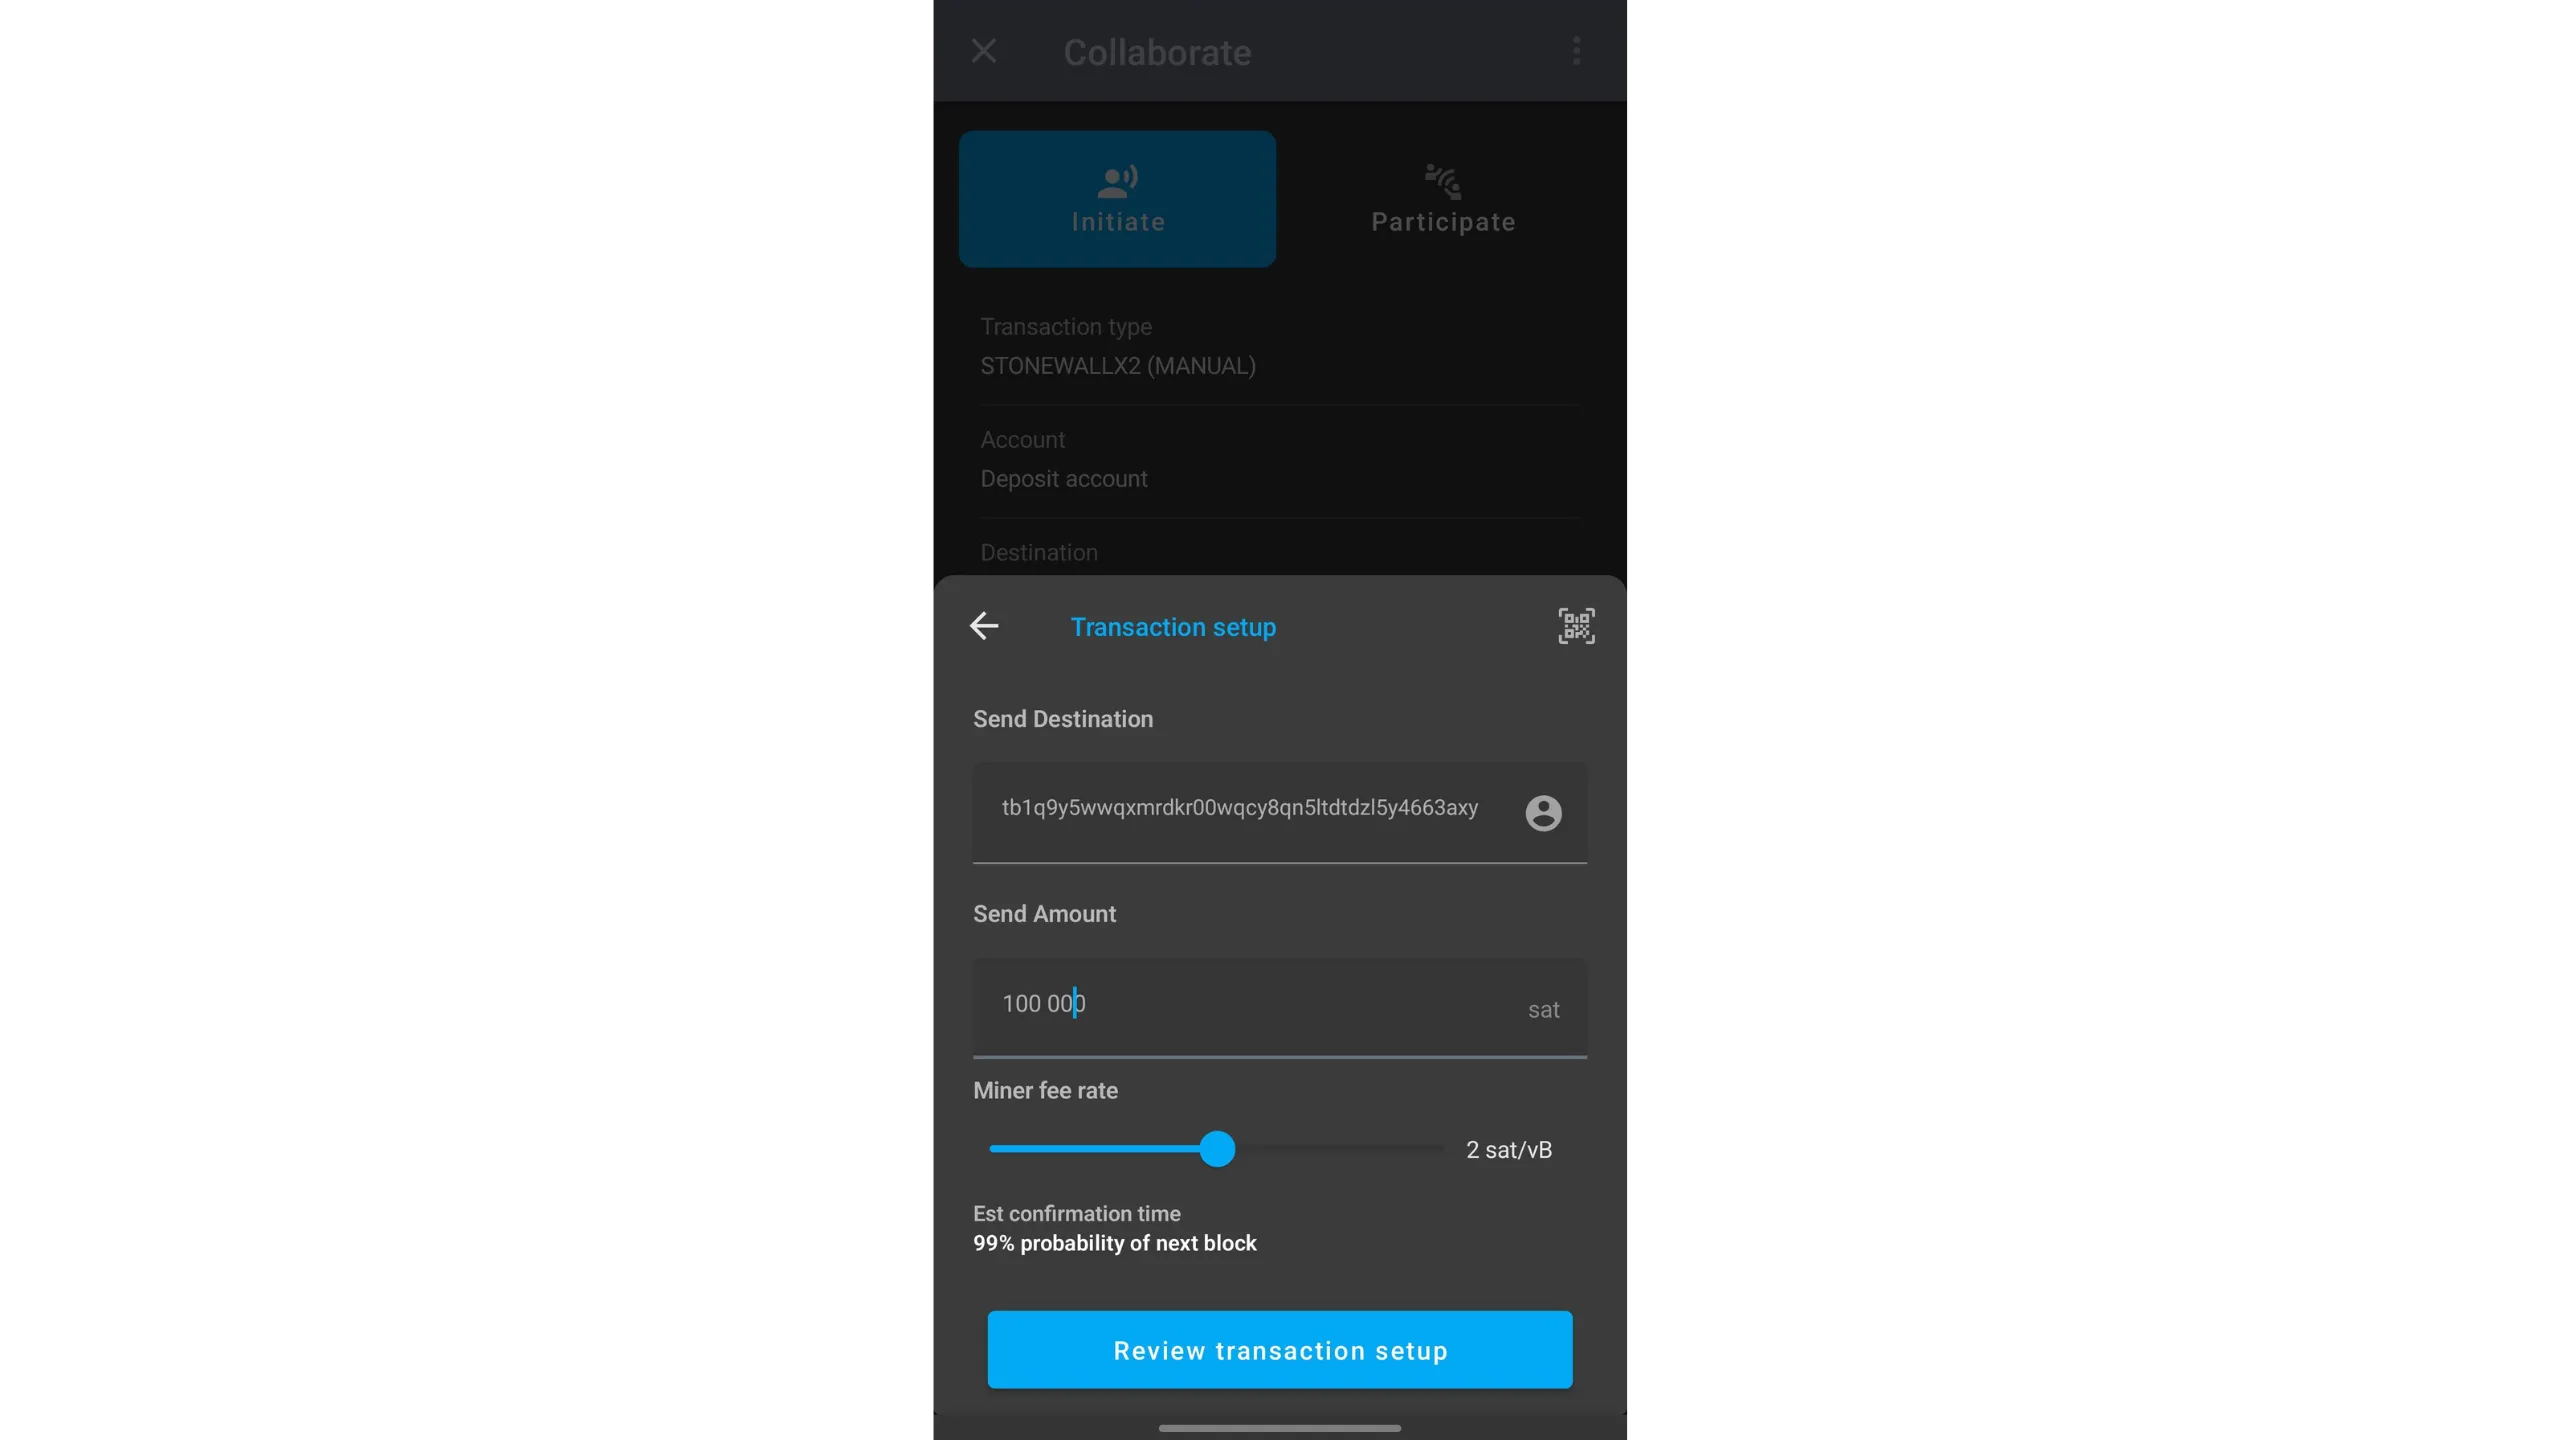
On the next page, enter:
- The real recipient’s address
- The amount to send
- The fee rate
Tap Review transaction setup.

Review carefully. Ensure your collaborator is listening for Cahoots requests, then tap the green BEGIN TRANSACTION button to initiate the Soroban PSBT exchange.

Wait until both participants finish signing. Then broadcast to the Bitcoin network.
Keep the app open and online during the Soroban flow; interruptions will pause the PSBT exchange.
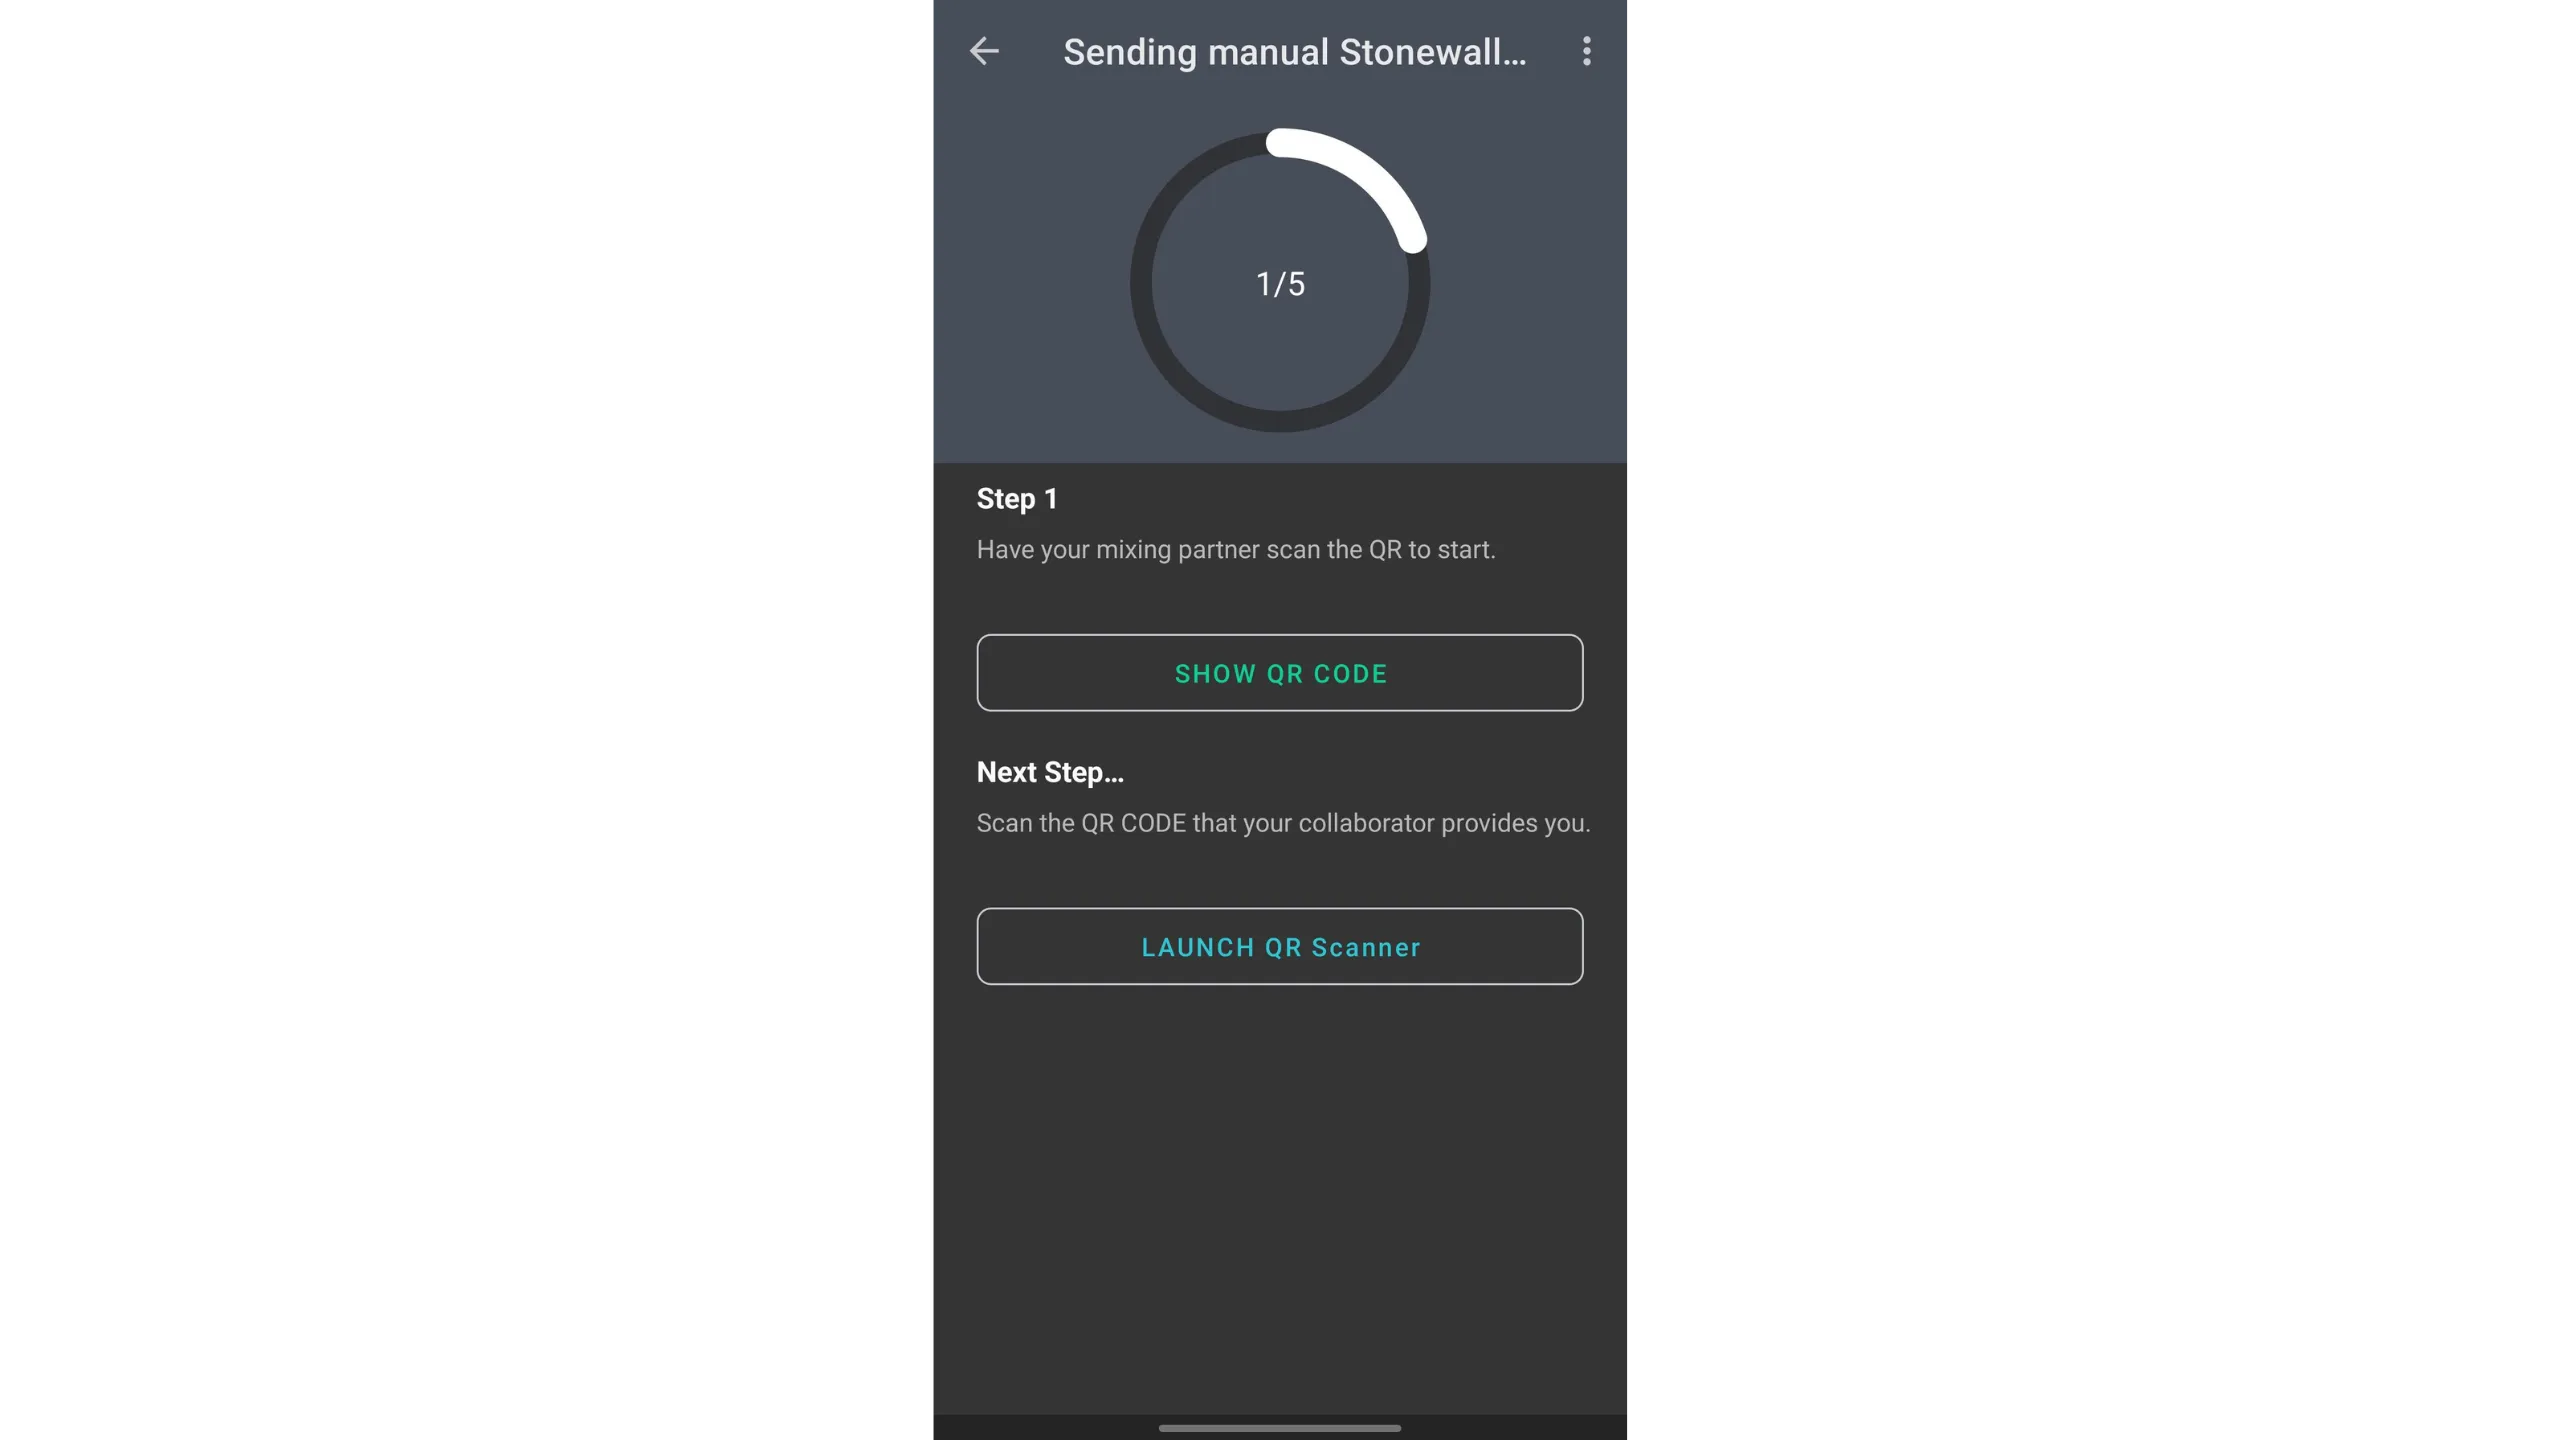
In‑person exchange (QR)
Select the transaction type STONEWALL X2, then choose In Person / Manual.
Tap Set up transaction, then choose the account to spend from.
Enter:
- The real recipient’s address
- The amount
- The fee rate
Tap Review transaction setup.
Review, then tap the green BEGIN TRANSACTION to start the PSBT exchange via QR scanning.
Alternate scanning with the collaborator:
- Tap
SHOW QR CODEso your collaborator can scan it - Then the collaborator taps
SHOW QR CODEfor you to scan - You tap
LAUNCH QR Scannerto scan theirs - Repeat until all five exchange steps are complete
After all exchanges, verify the transaction details, then slide the green arrow at the bottom to broadcast.
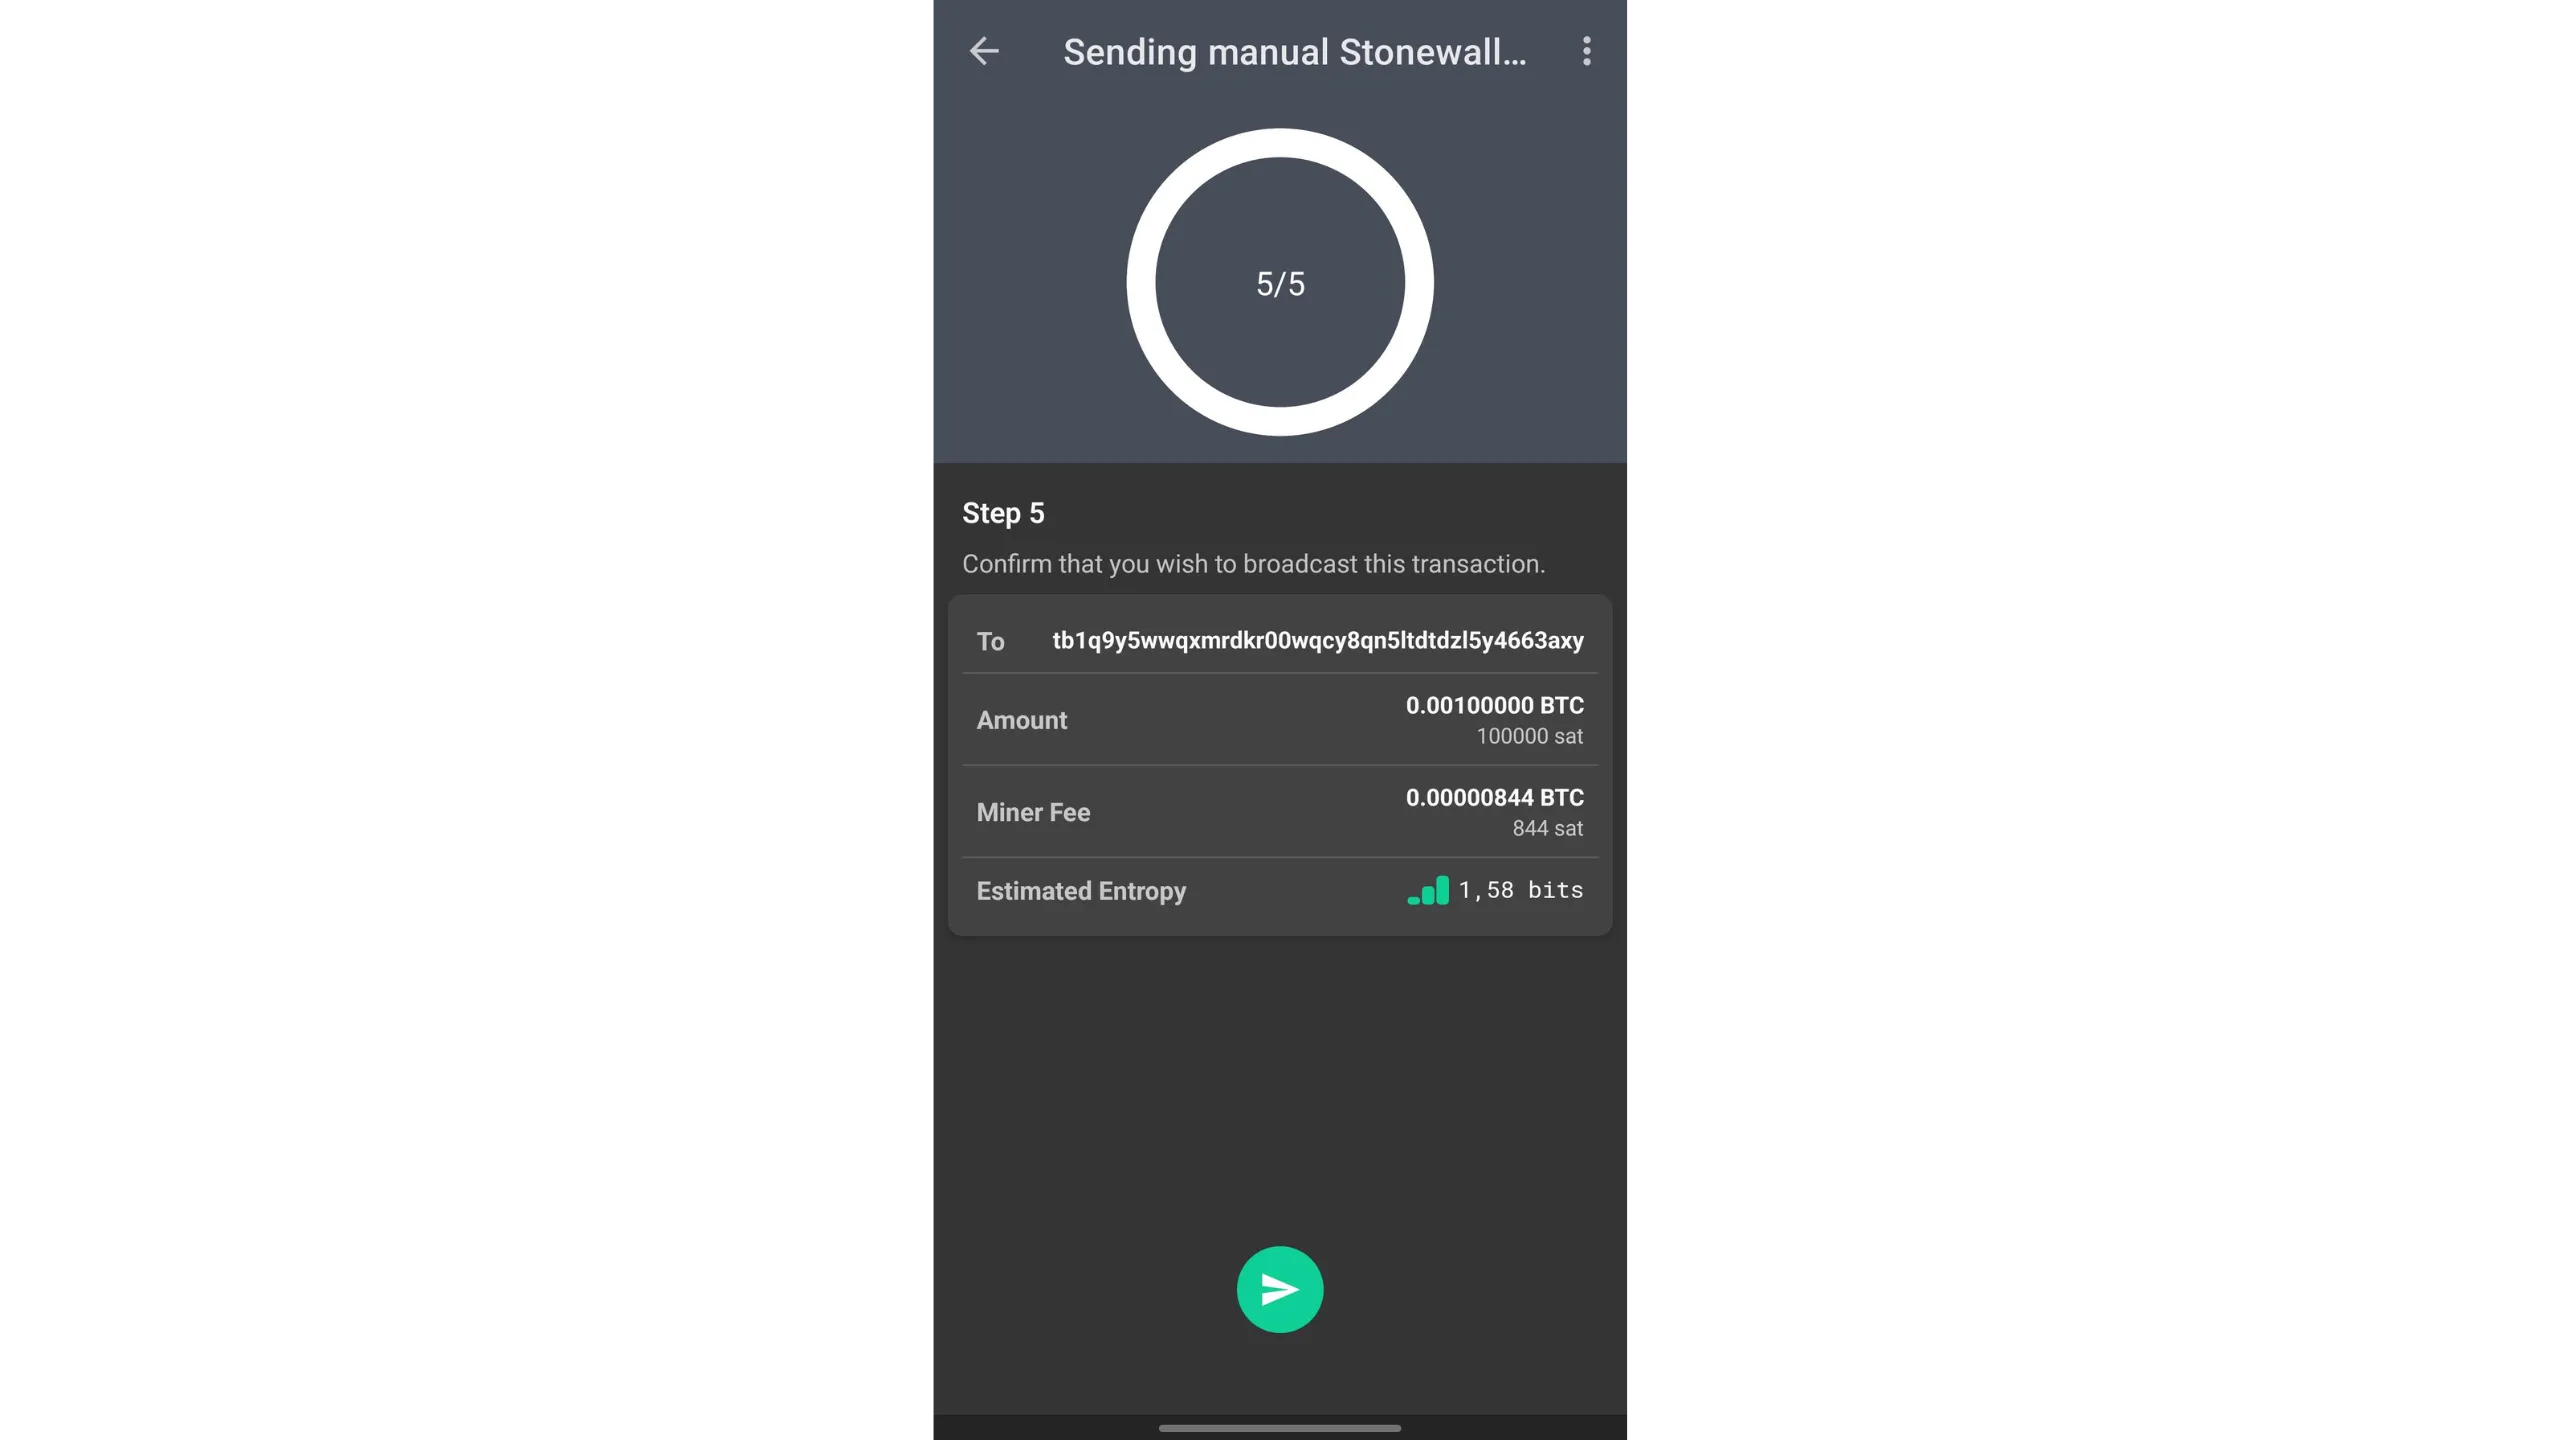
The transaction has been broadcast. Its structure looks like this:

Credit: mempool.space
Observations:
- Two inputs are mine: 91,869 sats and 64,823 sats
- Two inputs are from the collaborator’s wallet
- Outputs:
- 100,000 sats goes to the real recipient
- 100,000 sats and 159,578 sats return to the collaborator, net‑neutral minus mining fees
- 56,270 sats is my change, the difference between my total inputs and the 100,000 sats payment
I can describe this structure since I built the transaction; but for an external observer, it’s generally impossible to determine which UTXOs belong to which participant — either on inputs or outputs.
Stonewall x2 blurs input ownership and destination heuristics. Observers cannot reliably ascribe roles, adding doubt and protecting privacy.
18. Understanding Stonewall
Break the assumptions of blockchain analysis with mathematically provable doubt between the sender and the recipient of your transactions.
Stonewall is a specific form of Bitcoin transaction that boosts user privacy by imitating a two‑party coinjoin — without actually being one. The transaction is not collaborative. A single user can construct it alone, using only their own UTXOs as inputs. You can create a Stonewall transaction anytime, without needing to coordinate with another user.
Mechanics:
- Inputs: the sender uses 2 of their own UTXOs
- Outputs: the transaction produces 4 outputs, including 2 outputs that are exactly the same amount; the other 2 are change
- Among the 2 equal‑amount outputs, only one goes to the actual payment recipient
There are only two roles in a Stonewall transaction:
- The sender, who makes the actual payment
- The recipient, who can ignore the specific nature of the transaction and simply expects a payment
Let’s use a simple example. Alice buys a loaf of bread for 4,000 sats and wants to pay in bitcoin while keeping her payment private. She decides to build a Stonewall transaction.

Analyzing this transaction, the baker receives 4,000 sats for the bread. Alice used two inputs: 10,000 sats and 15,000 sats. The outputs on Alice’s side are 4,000 sats, 6,000 sats, and 11,000 sats. Alice’s net balance change is −4,000 sats, which matches the price.
For clarity, the example omits mining fees. In reality, the sender pays all transaction fees.
What’s the difference between Stonewall and Stonewall x2?
Stonewall and Stonewall x2 share the same external pattern. The difference is collaboration:
- Stonewall is non‑collaborative — the sender creates it alone
- Stonewall x2 is collaborative — a second participant collaborator contributes an input and receives their entire contribution back in the outputs, minus fees
Continuing the bakery example: if Alice wanted Stonewall x2, she would collaborate with Bob. Each would contribute one input. Bob would receive back all his input on the outputs. The baker would receive the 4,000 sats payment as before, and Alice would end up with her initial balance minus the bread cost.
From the outside, the transaction pattern appears identical.

In short: Stonewall and Stonewall x2 share the same structure. Stonewall is built alone; Stonewall x2 involves cooperation between two users.
Observers cannot distinguish Stonewall from Stonewall x2 with on‑chain data alone. This ambiguity is the point — more doubt, more privacy.
Why use a Stonewall transaction?
The Stonewall structure adds meaningful entropy and confuses common chain‑analysis heuristics. From the outside, it can look like a small two‑party coinjoin. But in reality, like Stonewall x2, it’s just a payment. This duality introduces uncertainty and can lead watchers down false trails.
Returning to Alice’s bakery purchase, the blockchain view might look like this:

A typical heuristic‑driven conclusion could be: “Two people performed a small coinjoin, each with one input and two outputs.”

But you know the truth: one output went to the baker, both inputs belong to Alice, and she received three outputs of change.
Even if an observer recognizes the Stonewall pattern, they still cannot know:
- Which of the two equal‑amount outputs is the payment
- Whether the two inputs belong to two different people or to one person combining them
The second point exists because Stonewall x2 collaborative and Stonewall non‑collaborative share the same pattern. Without additional context, differentiating them is impossible, which adds yet more doubt to the spend.
Stonewall introduces uncertainty about input ownership and payment destination. This uncertainty is privacy.
How to do a Stonewall transaction in Ashigaru
Stonewall was originally developed by the Samourai Wallet team and is now implemented in Ashigaru, the fork created after the Samourai developers’ arrest. Install Ashigaru and create a wallet using the setup steps earlier in this guide.
Unlike Stowaway or Stonewall x2, Cahoots, Stonewall does not require PayNyms. It can be executed directly, without preparation or collaboration.
In practice, you don’t need a guide just to make Stonewall — Ashigaru generates Stonewall automatically for each spend when your wallet has sufficient UTXOs.
Tap the + in the bottom‑right, then select Send.
Choose the account to spend from.
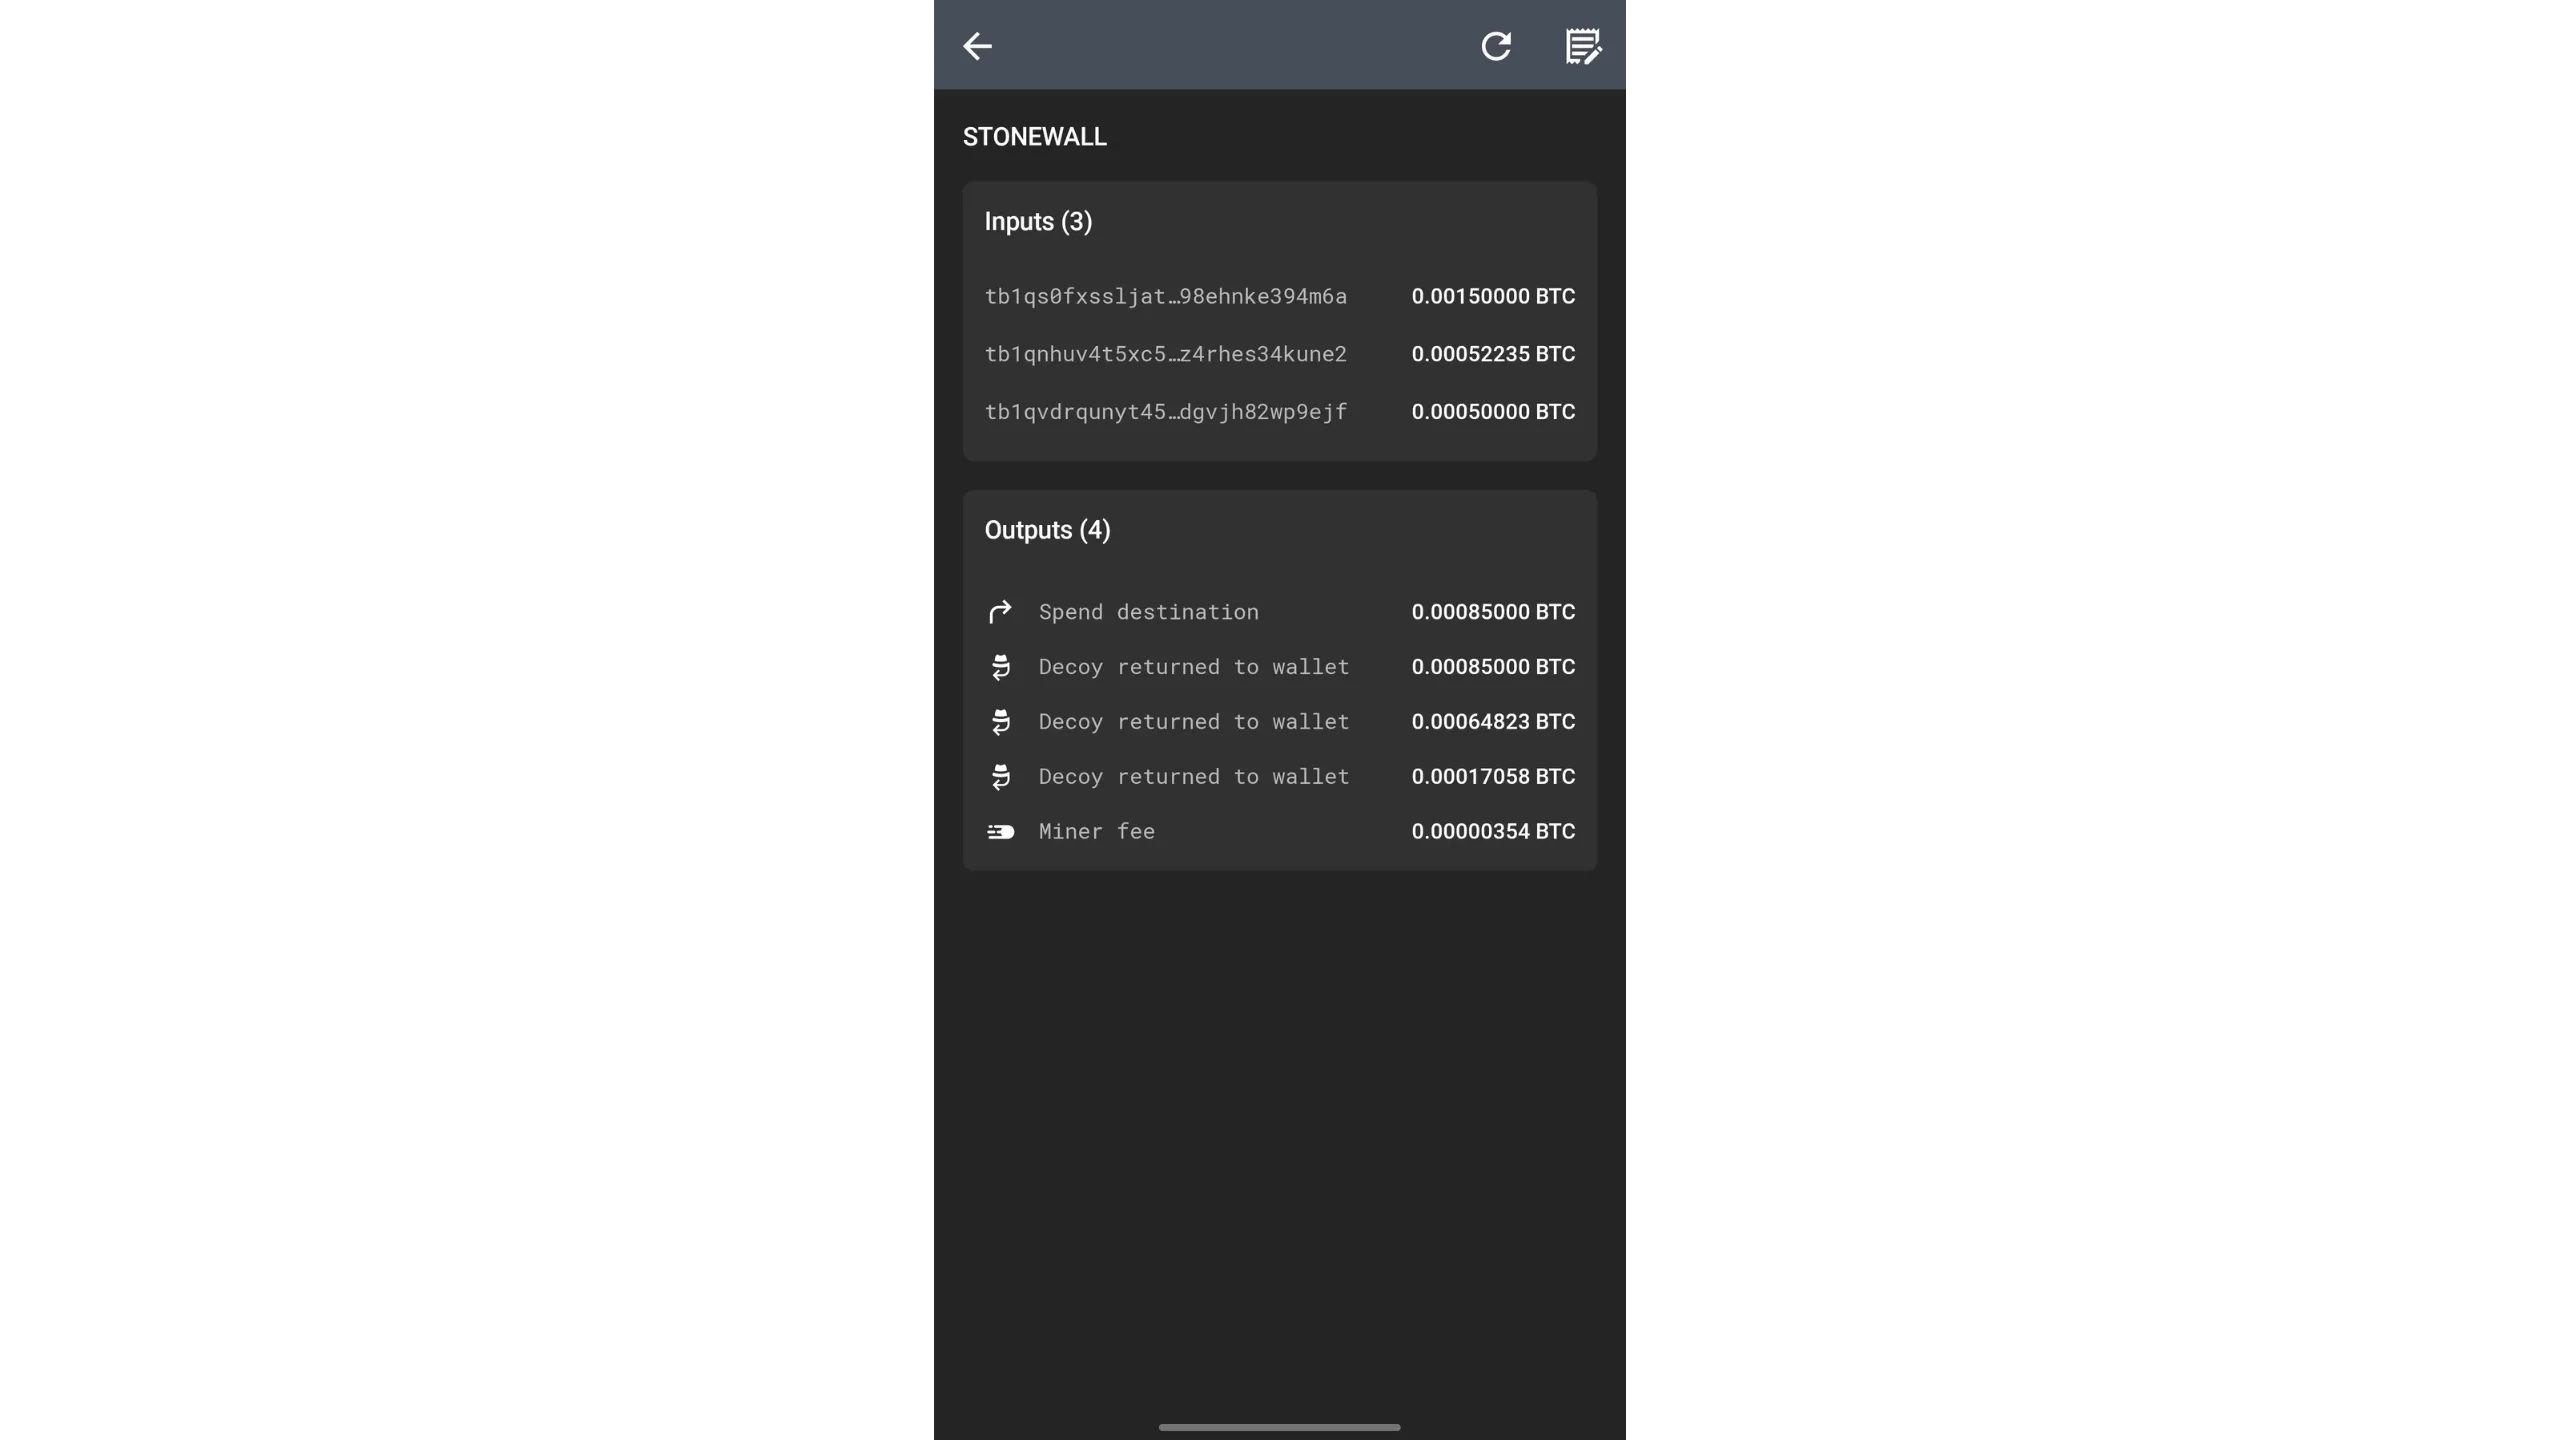
Enter the transaction details: recipient address and amount to send, then press the arrow to confirm.
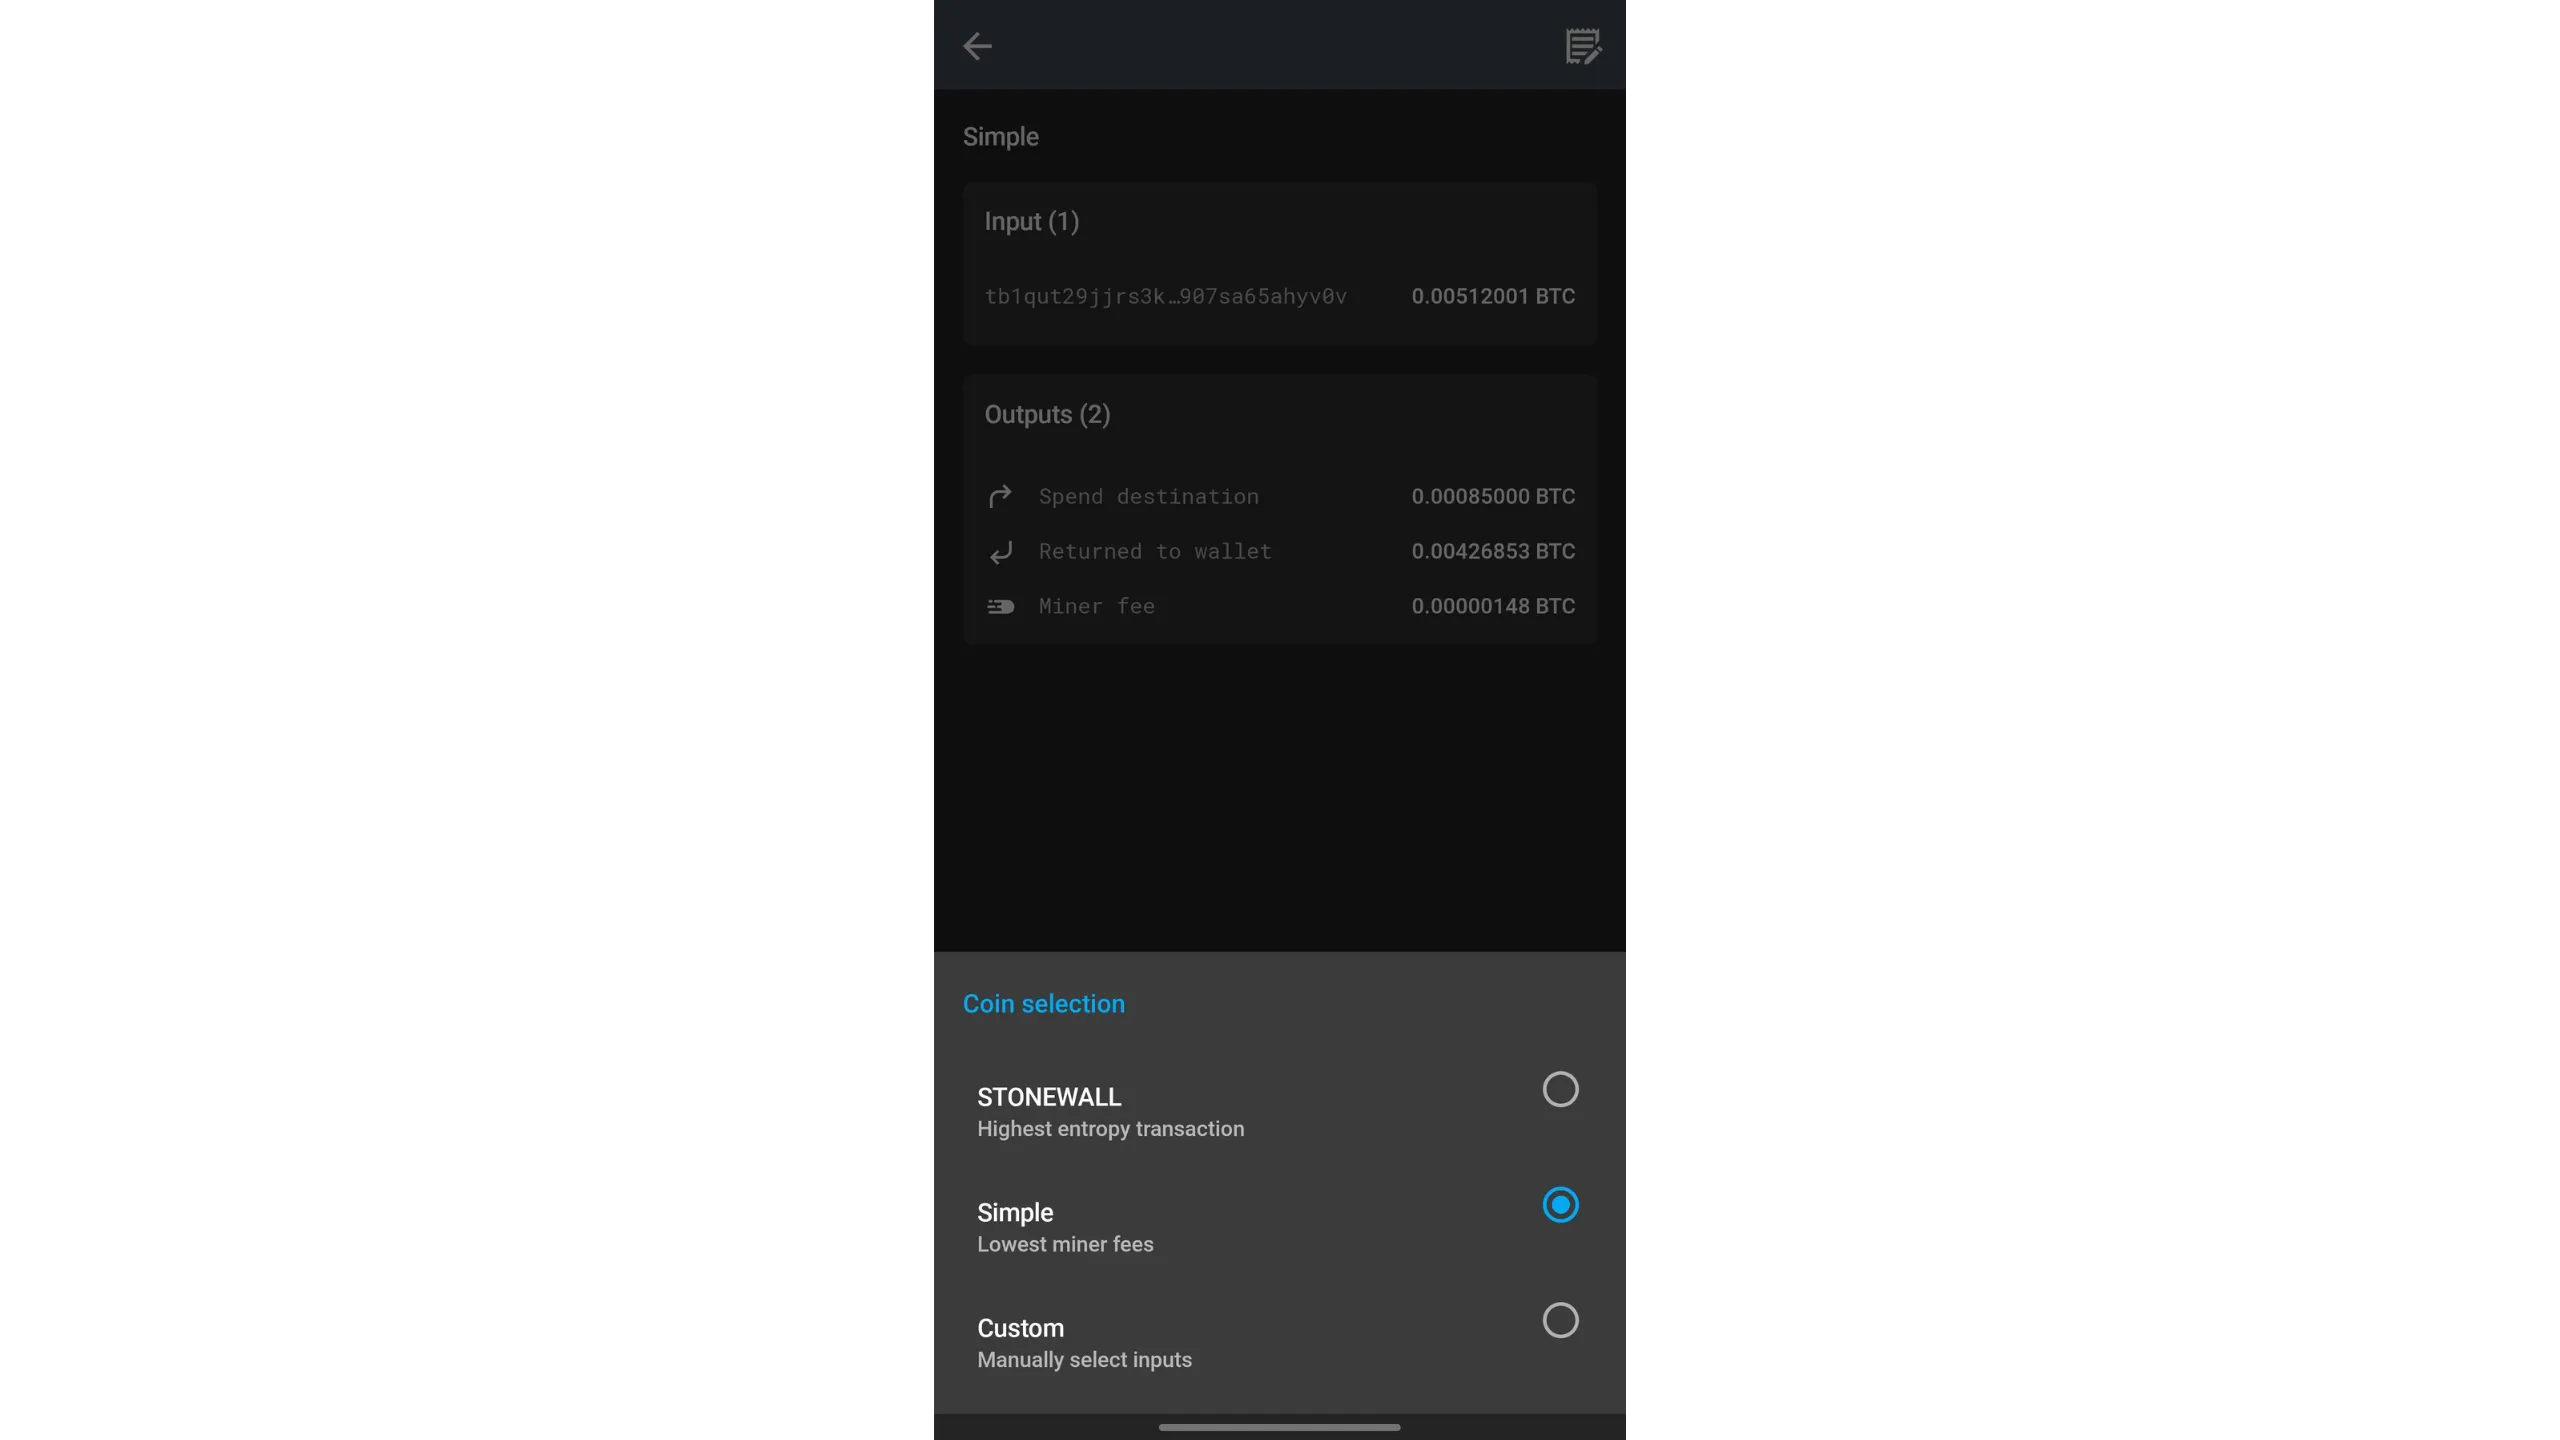
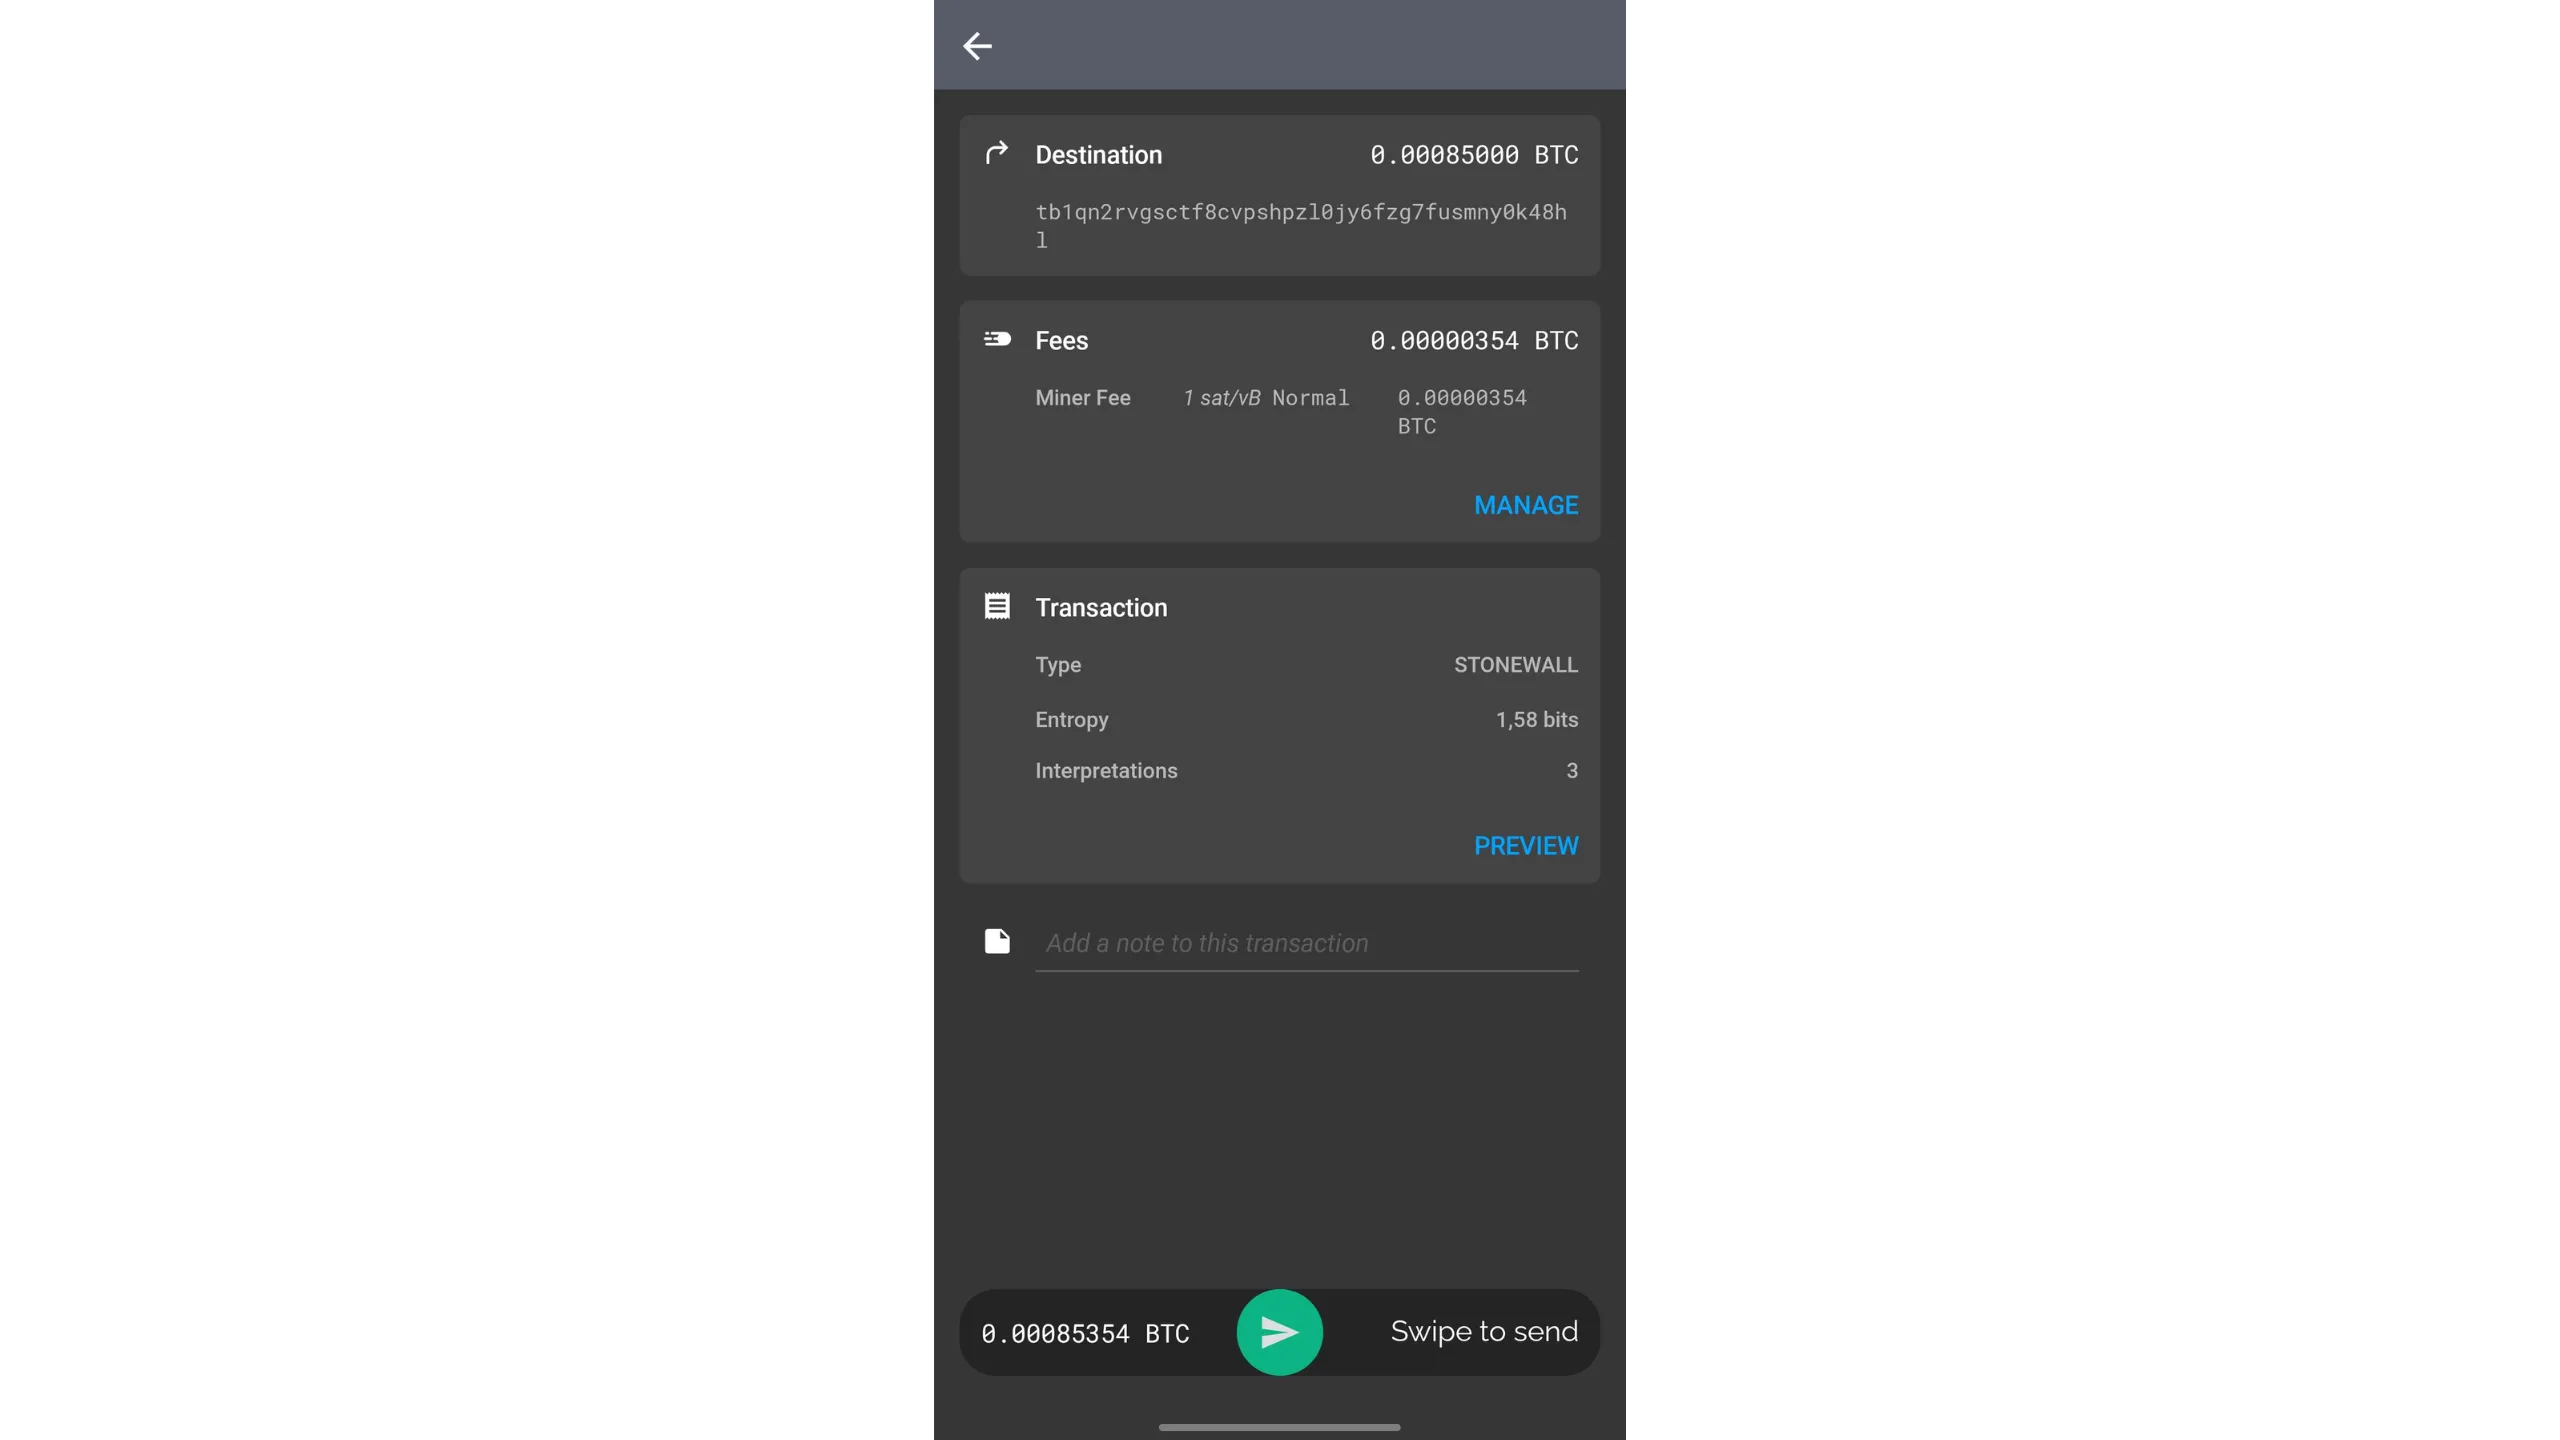
You can adjust default fees for current network conditions. The most interesting element here is the transaction type: Ashigaru automatically selected STONEWALL. Tap PREVIEW for more details.
You’ll see the Stonewall pattern: 2 inputs of equal amount, 2 outputs of equal amount, plus change outputs, and in this example an additional input to reach the payment sum.
If you prefer a simple payment, tap the pencil icon top-right, then switch STONEWALL to Simple.
After checking all details, slide the green arrow at the bottom to sign and broadcast.
19. Understanding Ricochet
A premium tool that adds extra hops of history to your transaction. Stump blacklists and help guard against unjust third‑party account closures.
Ricochet is a technique where you create several self‑payments to your own fresh addresses to simulate a change of ownership of your bitcoin before the final spend. Unlike Ashigaru’s other spending tools inherited from Samourai Wallet, Ricochet does not aim for prospective anonymity; instead, it provides a form of retrospective anonymity. In practice, Ricochet blurs properties that could compromise the fungibility of a Bitcoin UTXO.
For example, if you perform a coinjoin, your postmix coin will be identifiable as having passed through a coinjoin. Chain‑analysis tools can detect coinjoin patterns and tag coins that exit them. Coinjoins break historical links, but their presence is still detectable — like encrypted text: you can’t read it, but it’s easy to see that encryption was applied.
That coinjoin‑tagged coin label can affect fungibility. Regulated entities, for example exchanges, may refuse coinjoin‑sourced UTXOs, ask for explanations, or even freeze accounts or funds. In some cases, an exchange may report activity to state authorities.
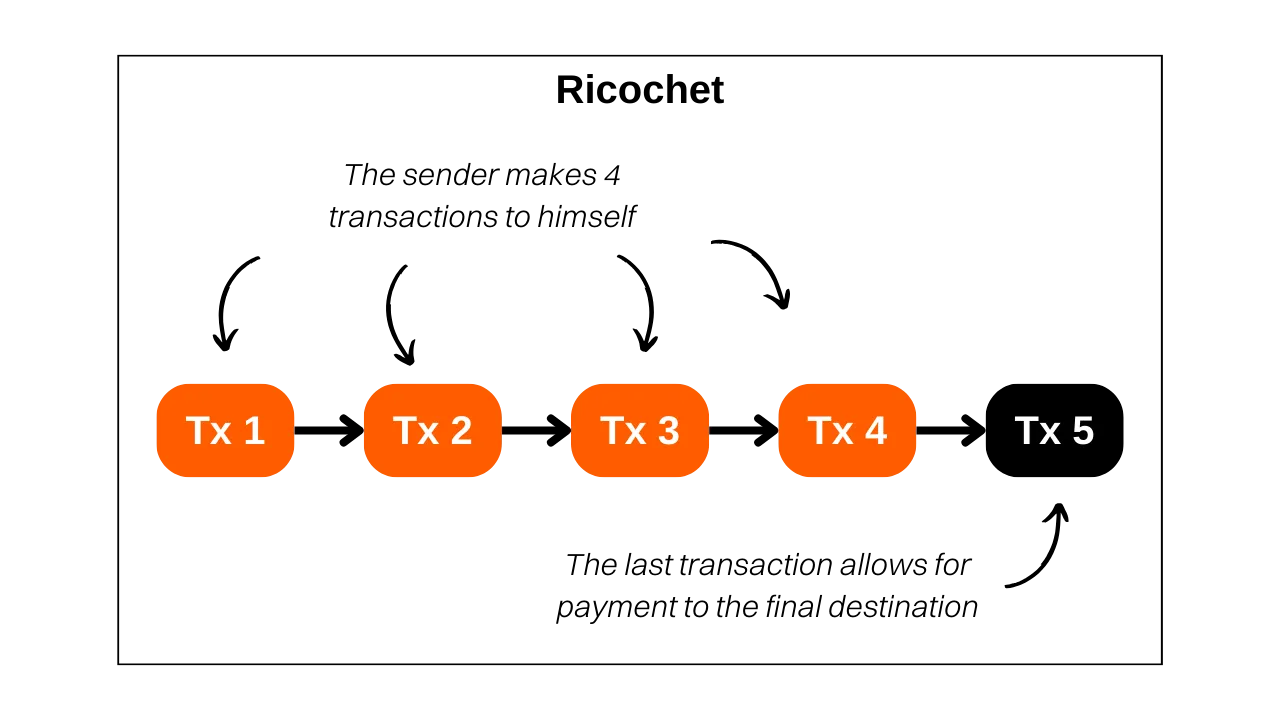
Ricochet addresses this by inserting four successive self‑transactions, each to a new address you control, then sending to the final destination, for example an exchange. The goal is to create distance between the original coinjoin and the final spend. This makes chain‑analysis tools more likely to consider a change of ownership has occurred post‑coinjoin, discouraging them from taking action against the sender.
You might ask why chain‑analysis tools don’t simply look beyond four hops. In practice, these companies face an optimization dilemma: they must choose a threshold for number of hops after which they assume a change of ownership likely occurred and ignore older links. Raising that threshold increases false positives exponentially — wrongly flagging people as coinjoin participants when someone else did the coinjoin earlier in the chain. Too many false positives push users to competitors and threaten long‑term viability. As a result, raising the threshold is challenging; four hops is often enough to defeat their heuristics in many cases.
Ideally, do not send coinjoin‑sourced coins to regulated entities. If you must, for example urgent fiat liquidation, Ricochet can help reduce misclassification risks.
Ricochet is a pragmatic, retrospective privacy tool. It does not guarantee acceptance by any third party, but it commonly reduces friction with blacklist heuristics.
How Ricochet works in Ashigaru
Ricochet is simply sending bitcoin to yourself; you can simulate it manually without any specialized tool. Ashigaru, a fork of Samourai Wallet, offers a streamlined, automated Ricochet that produces clean results.
- Service cost: Ricochet on Ashigaru charges 100,000 sats for service fees, plus mining fees.
- Practical use: Best suited for larger transfers where the fee overhead is proportionally reasonable.
Because Ricochet costs 100,000 sats plus mining fees, it’s recommended for significant amounts rather than small spends.
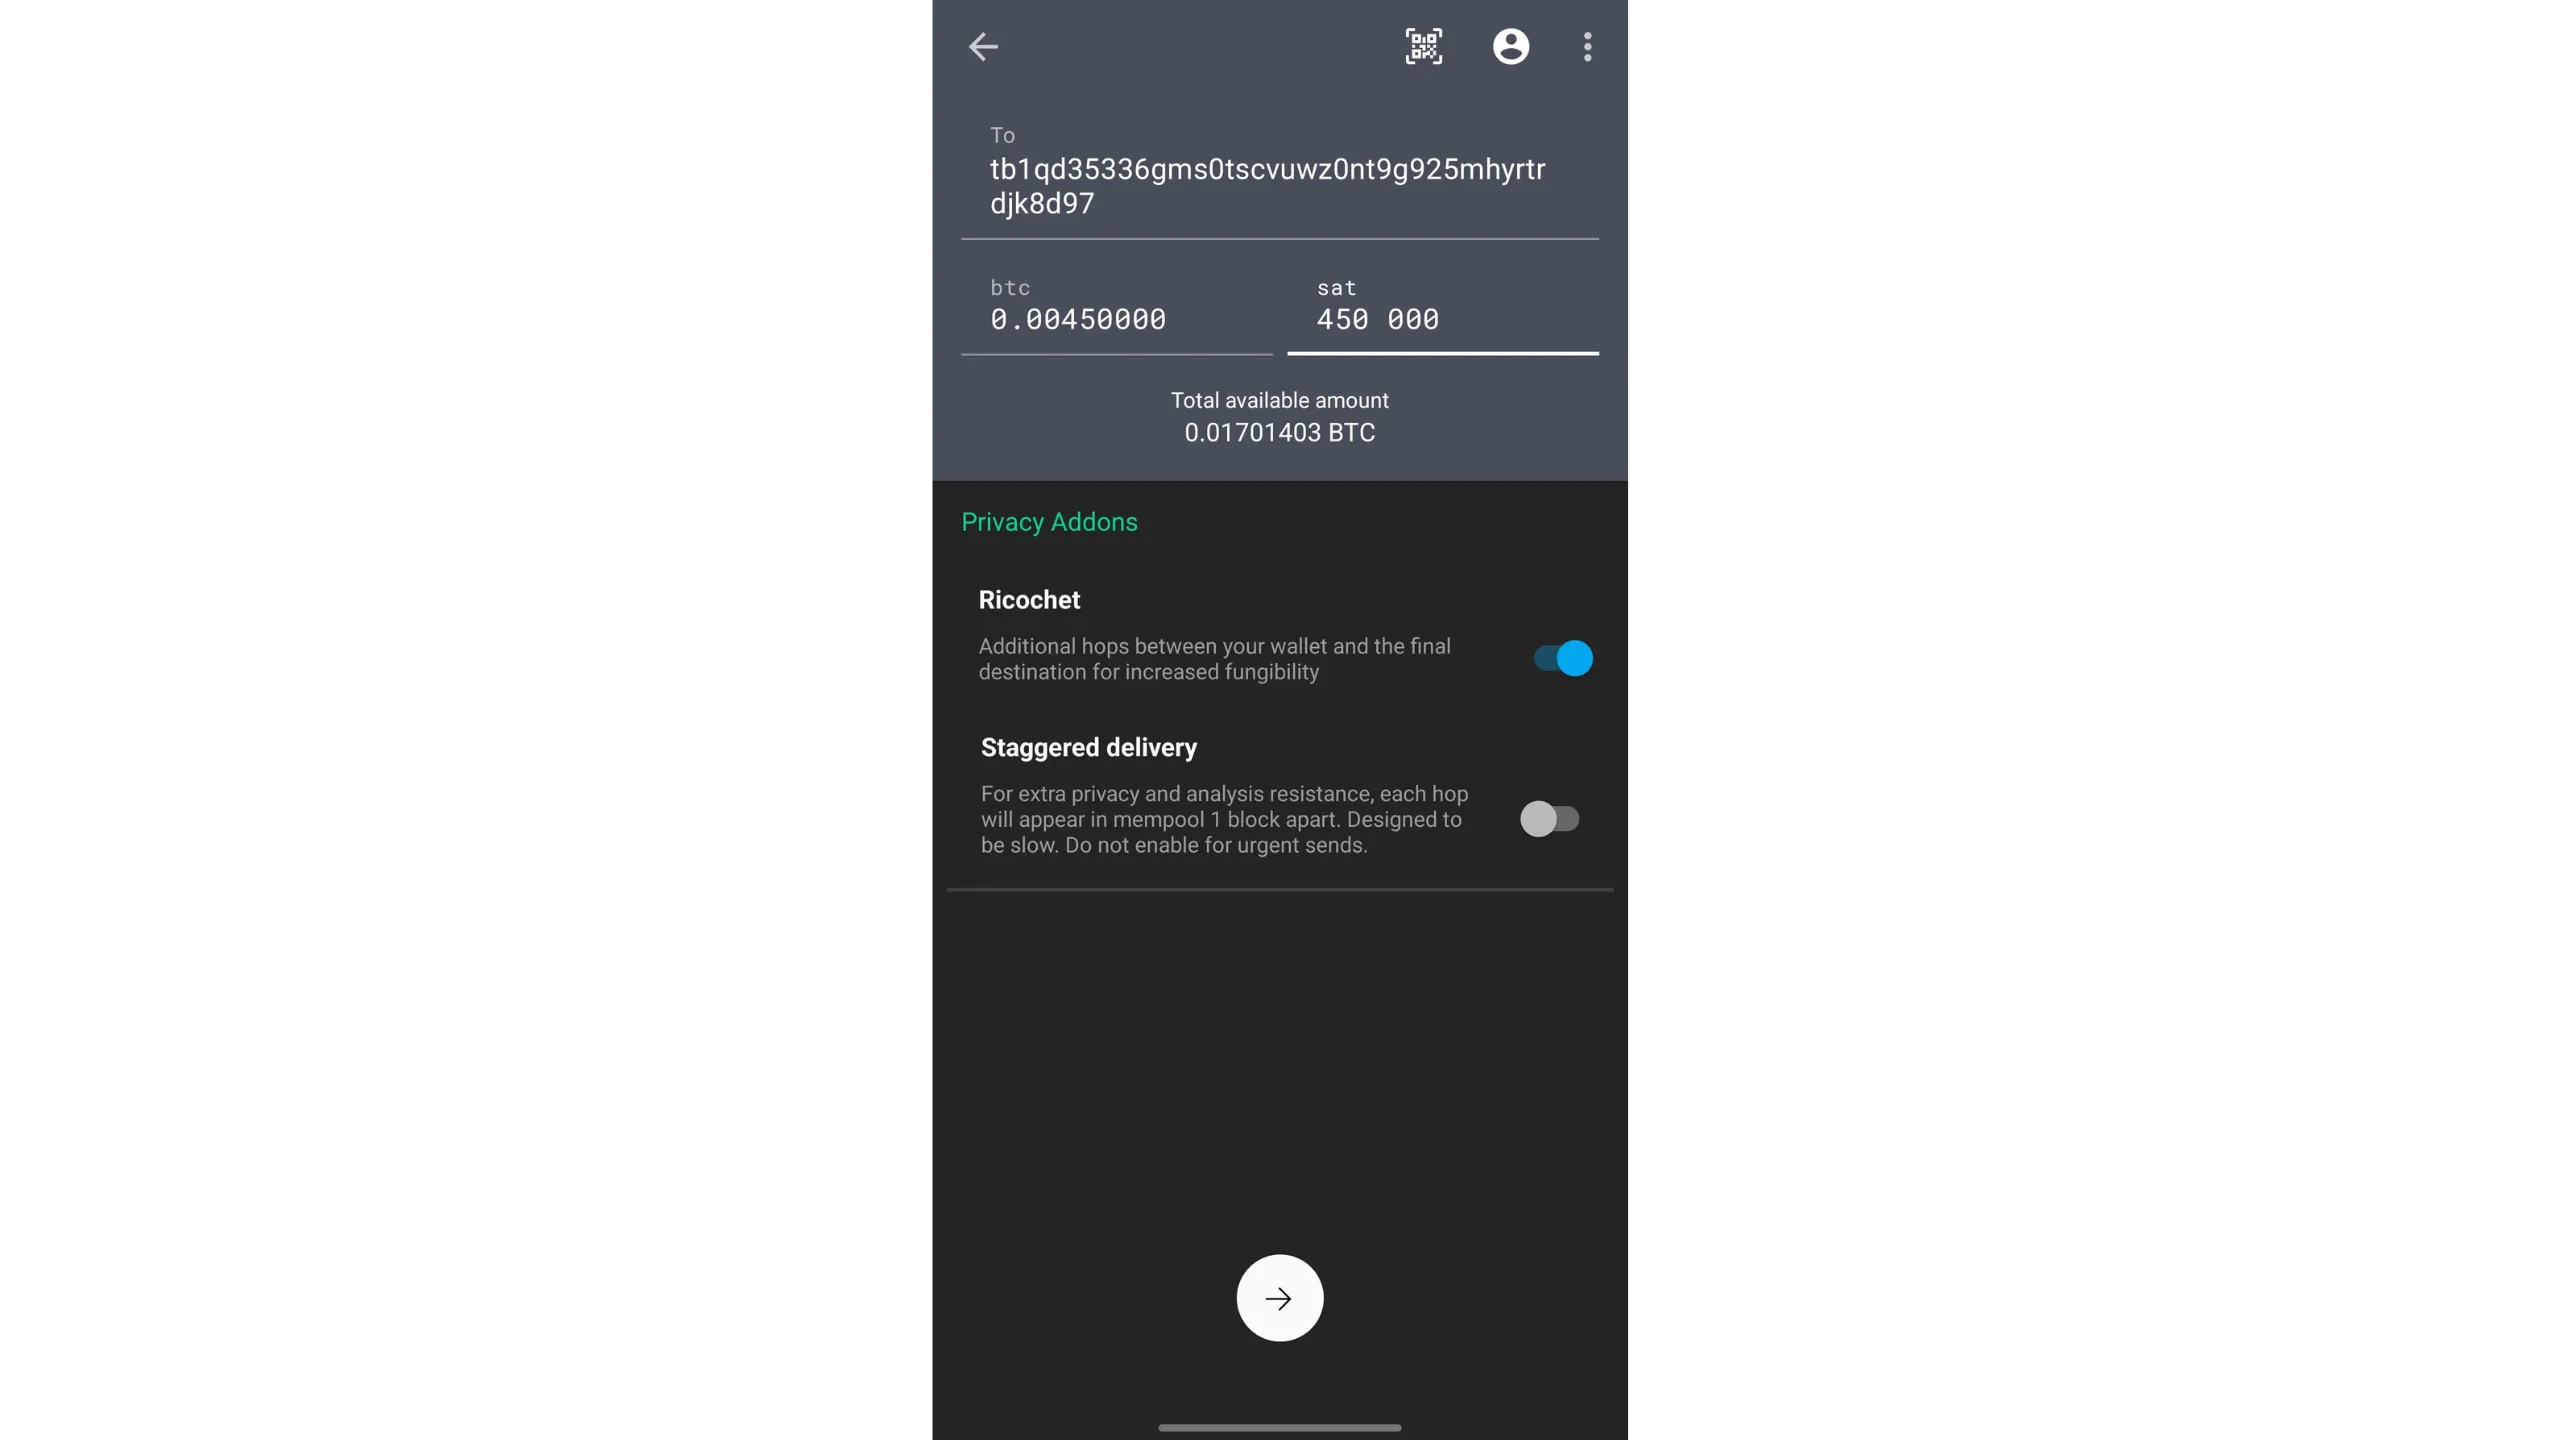
Ashigaru offers two Ricochet variants:
- Staggered delivery, reinforced Ricochet
- Distributes the 100,000‑sat service fee across the five successive transactions
- Ensures each transaction is broadcast at a distinct time and confirms in a different block
- Maximizes the appearance of ownership change for better resistance to chain analysis
- Slower, but preferred when you’re not in a hurry
- Classic Ricochet
- Executes quickly, broadcasting transactions within a short interval
- Offers less privacy and resistance to analysis than staggered delivery
- Use for urgent sends only
Choose “staggered delivery” for best privacy; choose “Classic” only if you need speed.
How to do a Ricochet in Ashigaru
1) Start a send
- Tap
+→Send - Select the account to spend from
2) Fill transaction details
- Enter the amount to send
- Enter the final destination address, the address after the hops
- Check the
Ricochetoption
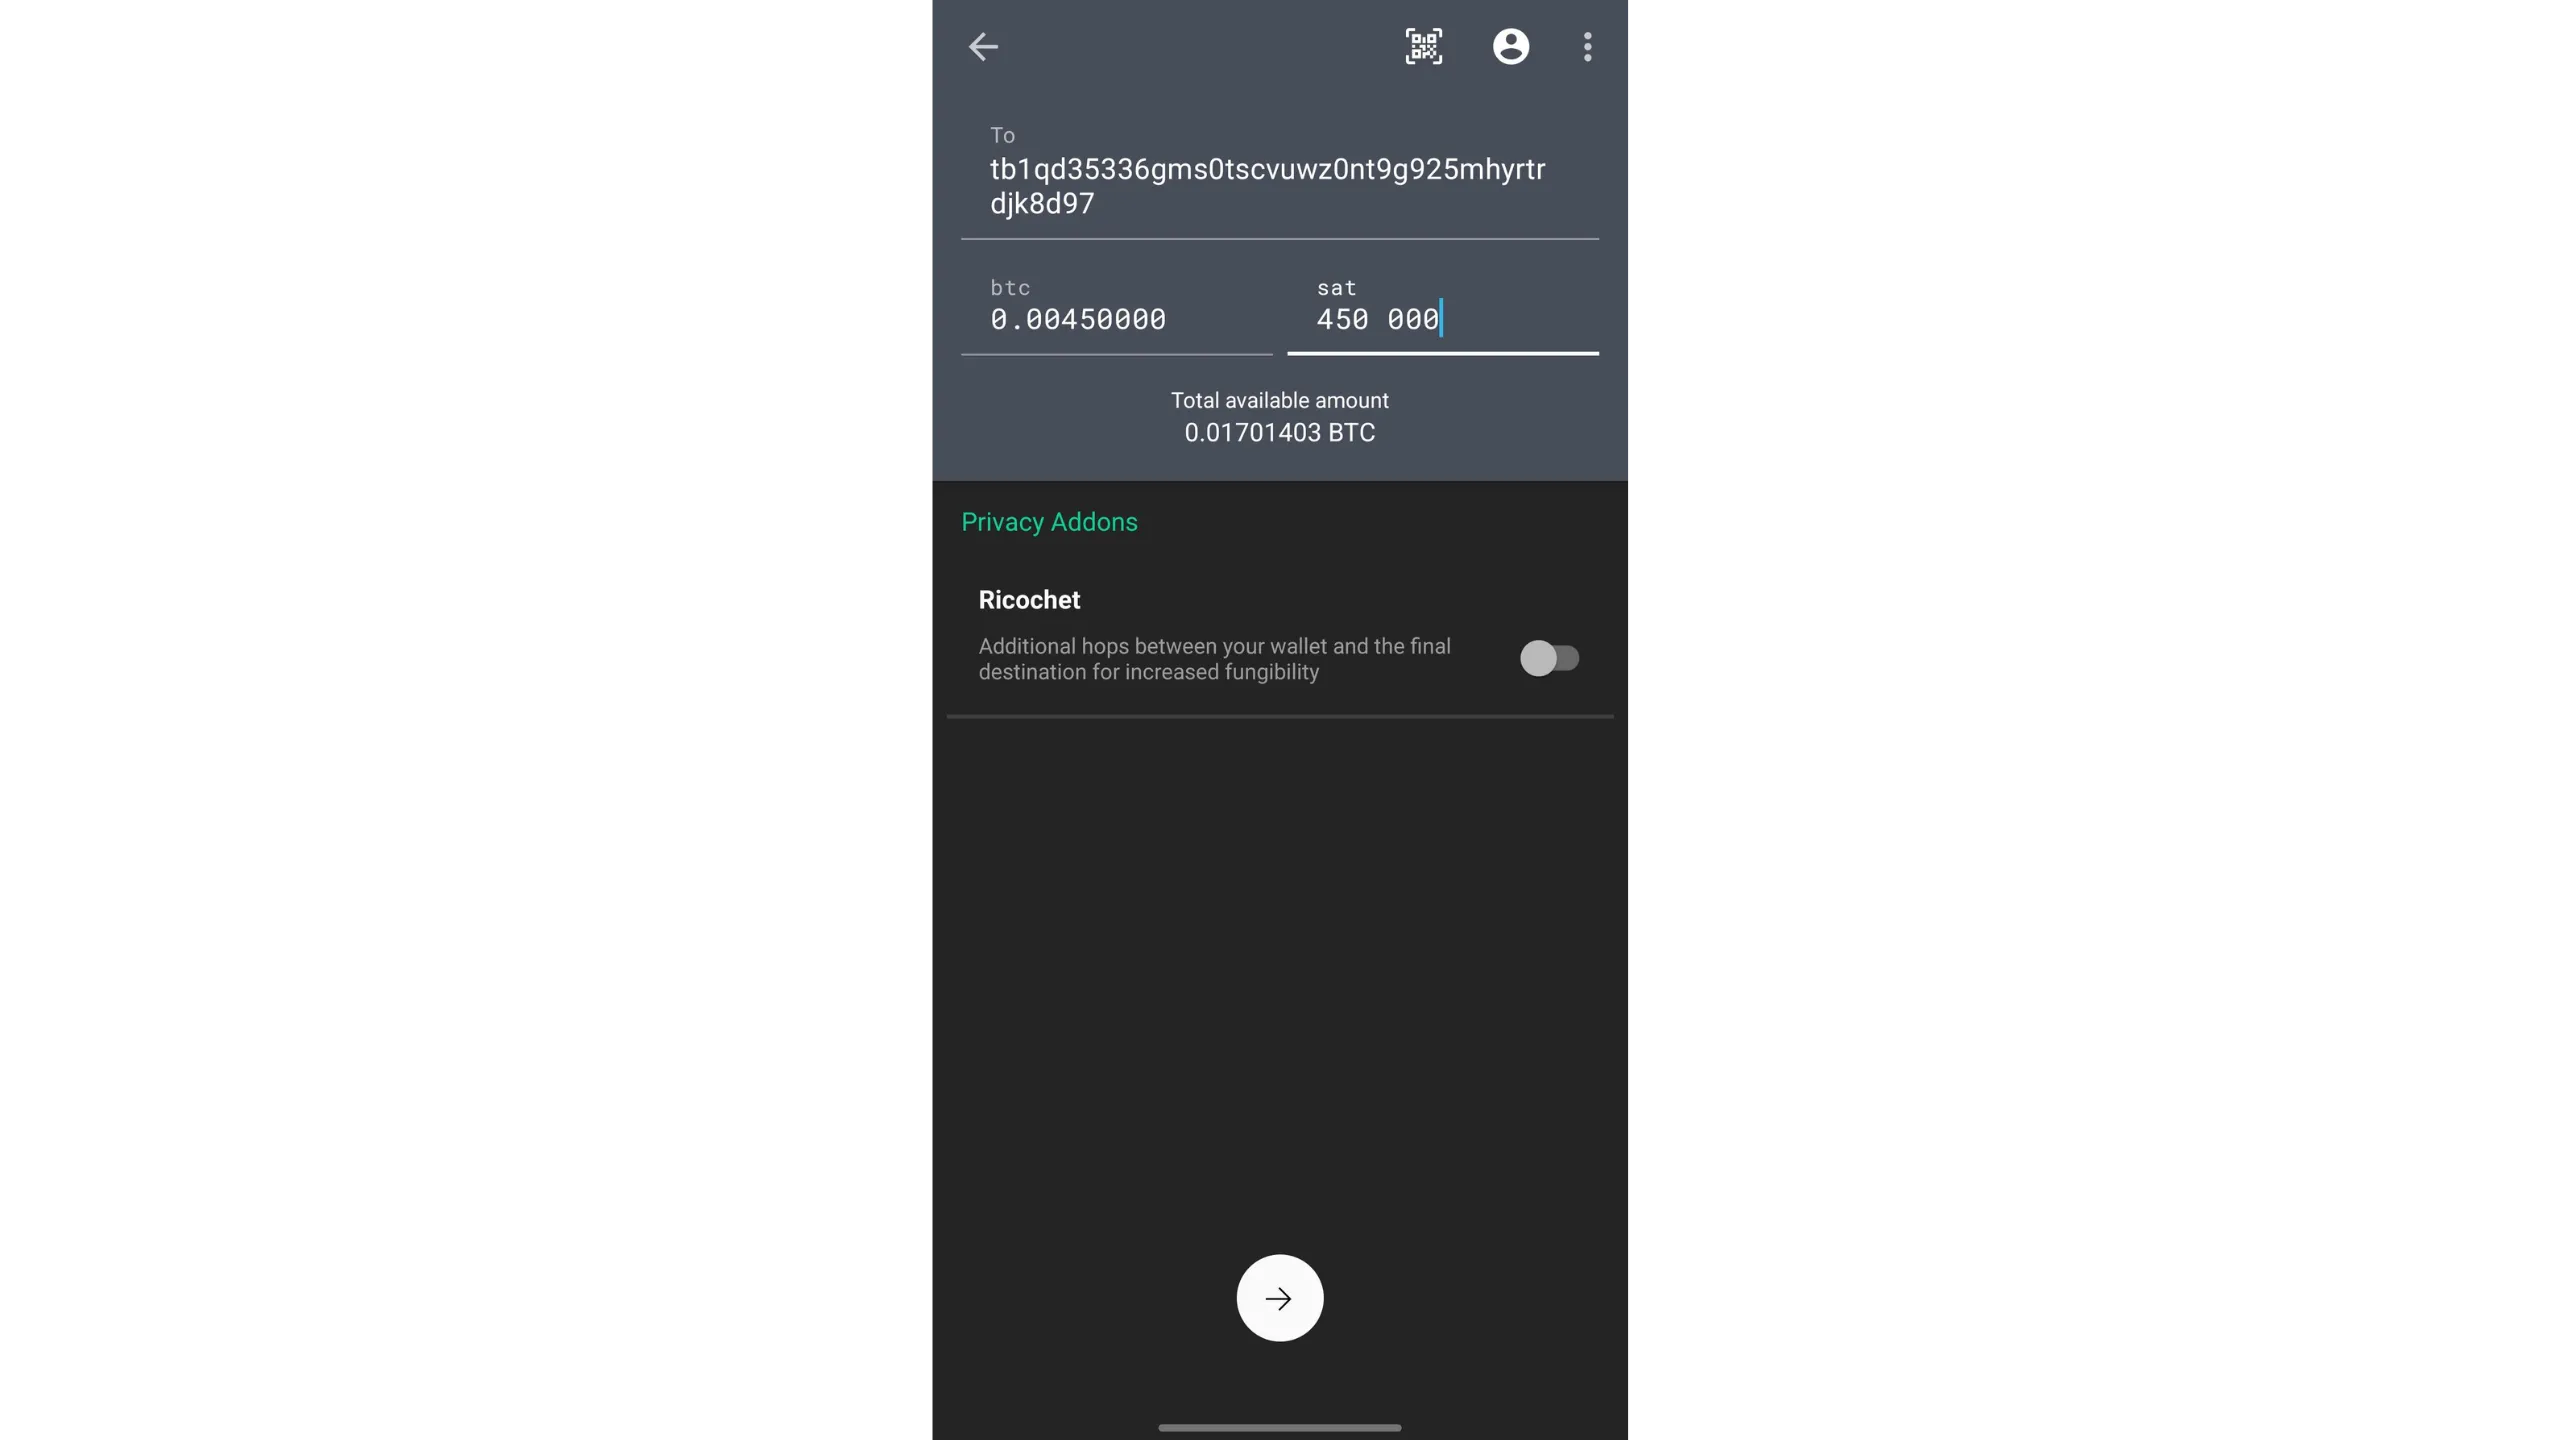
3) Choose Ricochet mode
- Select
Classic, faster and lower privacy, orstaggered delivery, slower and higher privacy - Tap the arrow at the bottom to confirm
4) Review and fee management
- On the summary screen, review all details
- Adjust miner fees according to current market conditions
- Slide the green arrow to sign and broadcast the Ricochet sequence
5) Wait for the automatic hops to complete
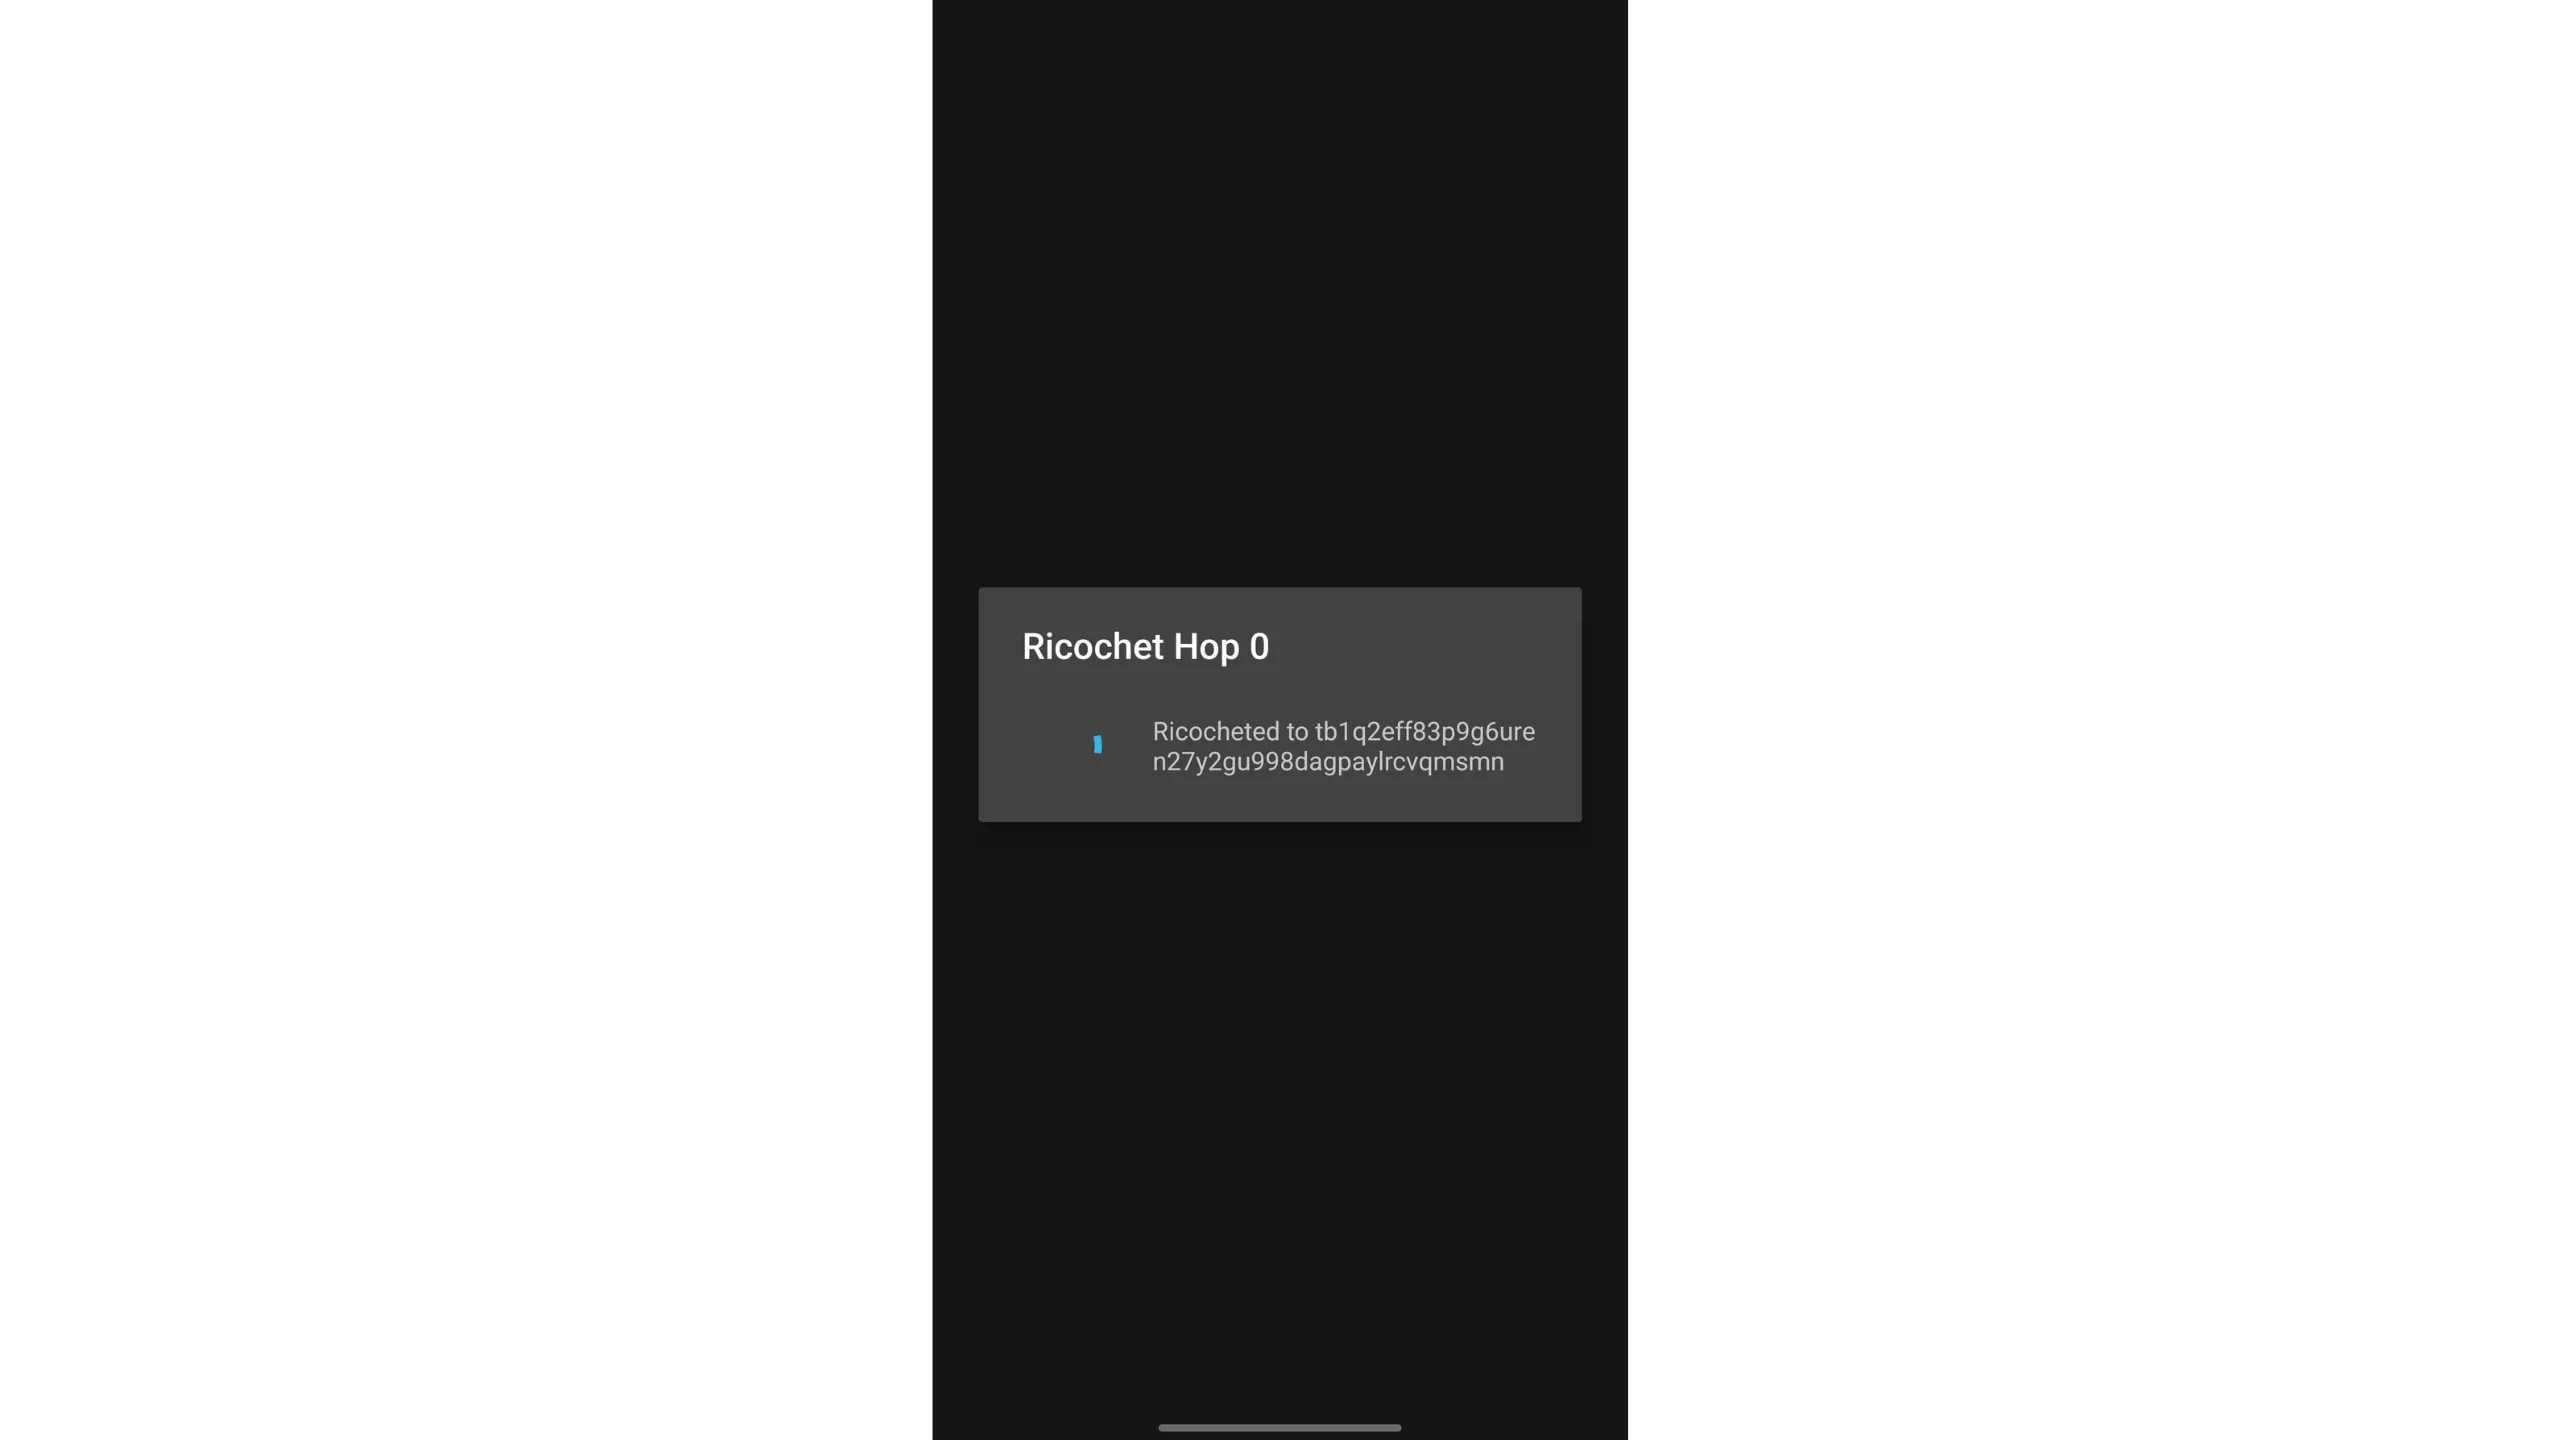
6) Confirm success and final delivery

Ricochet will automatically manage the sequence of hops. If you chose staggered delivery, allow time for each hop to confirm in a separate block.
20. Final notes on Ashigaru spending tools
At this point, you have one complete reference for:
- Ashigaru mobile setup and wallet management
- Ashigaru Terminal installation and operation
- Whirlpool coinjoins and postmix handling
- Stowaway PayJoin
- Stonewall x2
- Stonewall
- Ricochet
These tools serve different goals:
- Whirlpool improves privacy through repeated collaborative coinjoins and remixing.
- Stowaway hides payment structure by involving the recipient.
- Stonewall x2 creates collaborative ambiguity with a neutral third party.
- Stonewall creates the same on-chain pattern without collaboration.
- Ricochet is designed to add retrospective separation before a final spend.
Each tool improves privacy differently, and each also demands discipline. Good privacy still depends on UTXO hygiene, avoiding address reuse, not merging toxic and mixed coins, understanding counterparties, and verifying every download and transaction carefully.
Ashigaru and Sparrow include additional protections against common chain-analysis pitfalls, helping you preserve transaction privacy.